


Threadripper Introduction
Hello and welcome to the Extreme Rigs Threadripper CPU Water Block Performance Review. Wow what a mouthful. We’re excited about this one, because after many years of CPU waterblocks essentially stagnating in design with only minor incremental improvements, things are finally different. AMD’s threadripper is a monster CPU not only in terms of size, but also the number of dies, cores and consequently power. This is a review where there will be definite winners and losers and where your choices matter more than just bragging rights.
So let’s talk about Threadripper really quickly. We did our testing on the highest core count part of the first generation Threadripper. This is the 1950x part which has 16 cores. Under Threadripper’s large heatspreader (about the size of a credit card) are 4 discrete pieces of silicon called dies. This is in contrast to most CPUs which only typically use one piece of silicon. Depending on the threadripper part either 2 or all 4 of the dies are activated. Up to 16 cores will use 2 active dies and 2 dummy cores. With the new 2nd generation Threadripper launching there will be 24 and 32 core parts that will have all 4 dies activated.

So this is unusual – unlike a “normal” CPU the heat will no longer be concentrated in a single lump of silicon centered under the heatspreader. Instead there will be 2 or 4 dominant heat sources all of which are off center. So this is quite a major change and we will see how much the size of the water block cooling engine and the amount of block bow affect the cooling.
 Threadripper is very very sensitive to temperature. AMD have tried to protect users from this sensitivity by offsetting the actual die temperature by 27 degrees celsius. Threadripper therefore reports Tctrl which stands for T control. Ostensibly this is for easier system integration as a lot of motherboards will control fan speed based on CPU temperature and AMD need to keep the temperature down. The reason for this is often explained that for longevity it’s best to keep a CPU cool. While that’s always true, there is not some magic weakness that makes AMD processors blow up at 75C Tdie, instead the more reasonable answer is that Threadripper becomes quite unstable with heat, most notably around 95C on Tctl (aka 68C on Tdie). Coincidentally that 95C is regarded as the maximum temperature suitable for Threadripper and thermal throttling is suggested above this. As you’ll see in our tests – your choice of waterblock will keep you above or below that magic number and give you (or rob you) the opportunity of higher overclocks. We struggled with the lesser performing blocks to get accurate thermal numbers because the poor performance led to system crashes.

So we know that thermal performance is important on Threadripper so let’s start off by talking about how we test that.
Bench Setup and Methodology
Bench Setup
The Mk III Bench served a good long run for testing CPU blocks on my 5820K. However I had to move into a city apartment which meant I no longer had a spacious garage to do my testing in. Luckily this coincided with switching to testing Threadripper instead of X99 and so I could rebuild the bench to be more compact and to fit under a desk without needing to retest everything on X99.
Here’s the new MK IV bench:
 Bench – Bastardized Spotswood Custom Testbench
Motherboard – Asrock X399M Taichi MATX (I’m a sucker for matx form factor)
CPU – AMD Threadripper 1950X (all the cores possible at least until the 2990WX releases)
RAM – Corsair Vengeance 4x4GB 2800
GPU – Galaxy GTX460 with EK Thermosphere (leftovers)
SSD – Crucial C300 128GB (more leftovers)
OS – Windows 10 Pro x64
Main PSU – EVGA NEX 1500 (the beast and more reliable than my many Corsair supplies)
Aux PSU (Loop bleeding duty) – Corsair AX850
PSU Switch – Master Chicken’s Aux PSU Switch
Loop Control and Monitor – AquaComputer Aquaero 6 and MPS400
Thermal Logging – Crystalfontz CF633 USB with Dallas One Wire Digital Temp Sensors
Flow Meter – King Instruments 2 GPM 10″ Rotameter (nice to have a quick visual)
Pumps – Swiftech MCP35x2 with heatsinks, PWM controlled
Reservoir – EK X3 400
Radiators – 2x Alphacool UT60 White
Fans – Gentle Typhoon AP-15 x 12 (Not shown 800rpm Noiseblockers for VRM cooling)
Tube – EK ZMT 3×8 x 5/8
Quick Disconnects – Koolance QD4, QD3, VL3N with adapters as necessary
Fittings and Rotary Adapters – Bitspower – mainly brass barbs but some nickel plated
Clamps – Worm clamps, partly because I’m often stretching 3/8″ ID tube over 1/2″ barbs, partly because I don’t trust tube not to loosen over time.
Stop fittings – mainly Monsoon, but some Bitspower, Koolance and EK
 For CPU testing it’s paramount to have the CPU block easy to get to. Low profile RAM and making sure to place the GPU a few slots down really helps.
 As this would go under a desk, all of the monitor and switches needed to be easily accessed and viewed from the front. The Aquaero got mounted between the reservoirs. The PSU switches are on the side, but at least near the front. The PSU Switcher is at least central.
 Radiators are at the back, with drain ports located slightly outside the frame for easier draining. MCP35x2 mounted at the base for easier bleeding.
 The unused QDCs and reservoir on the right side are for restriction testing. Previously this was done in my garden by hooking up a flow meter and faucet to an outdoor hose tap. Not having the luxury of a garden anymore means I needed to build that into the system. Now flow is provided by two D5 pumps connected with an EK series top. This should provide enough power to test even restrictive blocks. The flow meter has a tap built into in order to vary flow. To test a block QDCs with pressure taps are attached to the block under test and connected to the QDCS shown below:
 The pressure taps connect to a differential manometer which reads the pressure across the block. The flow meter sets and measures the flow.
 QDCs are used on the CPU block and GPU block so that CPU blocks, GPU blocks and even hardware can be swapped and tested easily.
 The cooling is overkill but thats ok. Previously the 5820K setup had a ~1C delta to ambient under load, however as the testing was done in a garage without AC, the ambient temperature could vary widely. Now the ambient temperature has to be tolerated by me for long periods of time so it should move less (+/-5C) vs (+/-10C). I’m still not sure whether using the Aquaero to keep coolant at a fixed temperature regardless of ambient would improve data or make it worse. I’m also not sure how to prove which is better or worse. For now I’ll keep the fans constant so that the coolant to air delta is constant rather than trying to fix coolant temperature.
 So that’s the bench. That explains the physical side of the test setup. In terms of software I use HwInfo to track CPU temperatures, and Crystalfontz WinTest software to log coolant temperature. While I could use the Aquaero, and love it for normal use, I prefer the crystalfontz data logging and the Dallas digital temperature probes are also superior unless you calibrate the crap out of the 2 pin aquaero resistor type. The first month of testing was spent purely calibrating the bench. I like to do this every time I set up a new bench. Every processor has some error in it’s temperature reading. The temperature circuits are there to be a rough indicator of temperature but are not designed with accuracy in mind. So the first step is to remove the common mode error, i.e. as the room temperature fluctuates, how much error can we remove from the CPU temperature measurements. For example – logging a few mounts for long periods of times show the following data when we compare the CPU Delta under load vs the Coolant Temperature:

In general you can see a trend from bottom left to top right. The CPU temperature under load should be fixed. The load (prime95 in this case) isn’t changing, only the ambient temperature. So we can remove this with some math:

The lines are now flatter over temperature – this is good because testing can take months, and ambient temperatures can vary from hour to hour let alone month to month. Note that there is still quite some variation in offset between runs. For some reason I’ve yet to figure out why some runs are just better or worse than others. This error is repeatable even without changing the block mount and it seems to occur only when the PC is reset. The best theory I’ve come up with is that it’s to do with the PWM control of the pumps at startup hitting slightly different RPMs. I need to monitor the RPMs on enough runs to be sure. However this leads us on to the next segment which is how to make sure our data is accurate and repeatable. One of the biggest errors in measuring CPU block thermal data is the mount – mount pressure can often vary from run to run, but by far the biggest factor is the TIM application. While a “bad” application of TIM is obvious, there are still significant variations in performance between applications that seem visually “good”. In previous tests I’ve mounted the CPU block 5 or 6 times. Each mount was usually run for 1.5 – 2 hours and data logged. However seeing this difference in measurement based on resetting the PC had me startled and so for my preliminary measurements on the first block I measured ten mounts each 6 times for a total of 60 runs. First I looked at how did the number of runs affect the accuracy of a single mount:

This data says that even with everything I’ve tried to do to minimize error, that a data log average over 1.5 hrs is still only accurate to +/-0.5 DegC. For this reason I will no longer publish results based on a single data point. It is simply too inaccurate for the small differences between blocks that we often see. Note that to get to +/-0.1C accuracy I needed to average 4 runs, each run is 2 hours if you factor in the 30 min warm up time. If I wanted to do 6 mounts as I had done on the X99 bench, then I figured each block would require 6 mounts x 4 runs x 2 hours = 48 hours per block. However I knew that averaging many mount results would also help reduce the error, so I created a table compiling the various combinations of number of mounts and number of runs and the resultant errors:
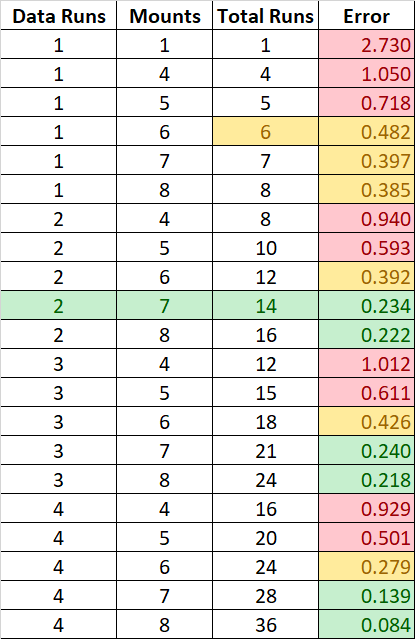
The easiest way to get error under 0.25C seemed to be 2 runs per mount and 7 mounts total for a total of 14 sets of 2 hours, i.e. 28 hours, or about a week per block. So this is what I decided to run with for this entire roundup. Bear in mind this error is total magnitude of max – min, i.e. the error is really +/-0.125C max. So next time you see a thermal review from another website that uses one mount and one data run, remember that the error in that measurement is most likely over +/-1C and that’s if they are even averaging the data over time. We’ve seen review sites measure only the maximum or minimum temperature of a single mount on a single run which is truly terrible.
The reason we go into all of this is to simply equip you the reader with the knowledge of how we do our work in order to be as open and honest as possible. There are many review sites out there, and in our opinion not all of them measure things accurately. Like everything you find on the web, it pays to be cynical and understand the data and to check the methods underneath that data. If a review site doesn’t take the time to go into those details, then it’s probably not worth your time either.
So now that we know what we are doing and why, let’s take a look at the contenders. As always let’s start alphabetically…
Alphacool and Aquacomputer
Alphacool Eisblock XPX with Threadripper Mount
Alphacool had previously sent me the Eisblock XPX in Intel format to review. As there is no specific block for Threadripper, Alphacool have instead released a mounting bracket and new set of thumbscrews to convert the Intel block for Threadripper. 
We were surprised that my inquiry to Alphacool didn’t lead to them offering to send me the part for review. Perhaps they were not interested in participating. As the part was cheap, we bought the mount ourselves. The mount is easy to install because the block does not have to be disassembled. Instead the mount is in two pieces that “click” together around the main body of the block. This is a good thing because you do not want to take the Eisblock XPX apart – there has been a history of the block performing and measuring differently after taking it apart despite best efforts to reassemble correctly. For this reason we never keen to recommend the block on Intel sockets despite it’s awesome performance. We believe CPU blocks should be serviceable by users for cleaning and inspection, for this reason we would still suggest alternatives, but we wanted to test it anyway.
The Threadripper mount is much thicker and stronger than the somewhat soft and almost bendy Intel one. This is a good thing. The resultant look of the silver version of the block with the black mount is far less desirable than the acrylic version in my opinion.

The good thing is that Alphacool offer an array of options to mod the block. This is good because that LED is not RGB, and so when it lights up the Alphacool logo, then the alphacool logo will glow blue. There are different color inserts you can buy, but the obvious solution would for Alphacool to convert to an RGB LED as every other company has now.

Aquacomputer NEXT with Threadripper Mount
We loved the NEXT when we reviewed it previously. It looks sharp and is really high quality. It comes in a ton of options, and performance on Intel was also great. You could even buy one with a built in OLED screen. How good is that? Like most converted Intel blocks we probably aren’t going to achieve great thermal results simply because it’s not designed for Threadripper. The block is far smaller than it needs to be for TR4 and the bow is designed for a centered heat source that is relatively small.

Unlike Alphacool, Aquacomputer were interested in participating and sent me the Threadripper mounting bracket. Changing it over was simple but did involve opening up the block:  Intel mount attached to the block (above and below)
First remove the cold plate, then remove the set screws that are used to secure the mount to the top of the block. Then swap the mount and reassemble:
 All done:
 The block itself is small, and looks tiny on Threadripper:
 In fact you can see the IHS extending past the ends of the block. We do love that low profile mount though:

Bitspower Summit ELX Threadripper
Bitspower Summit ELX Threadripper
It always takes a while to find out about Bitspower’s offerings. Their website is far from user friendly, and if the part isn’t on Performance PC’s then I usually assume it doesn’t actually exist. Luckily Bitspower helped me out with the part number and it arrived promptly:

Simple packaging.
 No instructions were included in the box. However the block was sealed and shrink wrapped.

The accessories include an allen key to open the block and a spare o-ring. Bitspower always seem to include a spare o-ring which is awesome, it’s not uncommen to pinch an o-ring during reassembly after cleaning and render a block worthless.
The allen key was a little bent, but still functional. Opening up the block we see a 4 pin header for the built in RGB LEDs. More and more motherboards now offer a 4 pin RGB terminal which is awesome because it means you can sync the block lighting with the motherboard.
Surprisingly even though the block is quite large we can see that not that much of the block is actually dedicated to the cooling channels. In addition we see that the design is quite simple and basic. There is no jet plate to increase local coolant flowrate, and even the orientation of the channels seems unoptimized.  Bitspower have amazing fittings, but we have yet to be able to recommend their CPU blocks which always seem to be a few generations behind thermally. Hopefully this block is not continuing that trend, but so far things look bleak.

We always like some protection for the mirror finish, and Bitspower’s plating is top notch:
Manufacturing quality is great:
The mount consists of a stand off, a thumb nut which can be tightened as tight as you’d like, a spring and a plastic washer.
 After testing was complete the block was opened for these photos. Not that the 6 screws used to assemble the block thread into the acrylic, which means over torquing is likely to either strip the thread or, more likely, to crack the acrylic top. Luckily the thin allen key makes over-torquing hard to do as it will bend under high torque.
 As there is no o-ring or jetplate to seal the plexi to the cooling channels then there may be some coolant flow that bypasses channels. Restriction data will tell us whether that is likely or not.
The cooling engine is quite small given the size of the block and the channels measure ~41mm long and 27mm wide.

Bitspower are definitely not maximizing the surface area that they could be out of this base.
Mounted on the board, the block does look good though: The mount is also relatively unobtrusive:

Bitspower has made an unusual block here – physically large yet with some obvious mis-steps that should waste cooling potential. Thermal data will tell us whether our assumptions are correct.
EK Supremacy sTR4
EK Supremacy sTR4
 EK were kind enough to send three samples of their latest version of the Supremacy for Threadripper. By our count this is version 3. So let’s have a quick review of the versions.
Version 1 Oct 2017– This took the existing Supremacy EVO design and simply extended the cooling plate to cover the threadripper IHS:
 While the extended cooling plate ensured even mounting pressure and slightly better thermal performance than otherwise, the cooling engine was optimized for a much smaller CPU.
Version 2 Feb 2018 – EK improved the cooling engine on V2, but kept with the same base:

Far more of the metal is now covered in cooling channels, in addition, the orientation of the channels has rotated to provide the dies with as much cold coolant as possible. So let’s take a look at what the latest sTR4 version (aka V3) really consists of. 
The back of the box includes relevant information and is much better suited for a retail store than some of the alternatives.
Opening up the box reveals the instructions plus the block wrapped in sealed plastic. Only the cardboard is used to protect the block. There is no bubble wrap or foam.
None of our samples however showed damage. We like that EK have the block attached to cardboard with the mounting screws pre attached. There is no worrying about the precise order of washers, simply apply TIM and mount the block.
We also like that EK now supply Thermal Grizzly TIM. We’ve heard good things about it, and it is presumably better than the rebranded paste that EK used to include. We prefer to at least know what the TIM is rather having it as an unknown rebrand. Zooming into the top of the plexi block shows an interesting configuration. The jetplate appears to have two input channels vs the usual single. We believe this should increase performance as the coolest water will be injected where the dies are located, rather than in the center of the IHS. Typically we see water temperatures increase about 1C from input to output of a CPU block, so the benefit would probably be less than half of this. Multiple parallel jetplates can also lower restriction and lower the requirements or strain on a pump.

EK protect the back of the block with a very obvious sticker. We prefer this over unmarked clear stickers which can be easy to miss (XSPC). Interestingly EK have opted to to with a dull nickel plated finish for the base. Typically we see manufacturer’s polish the base to a mirror. EK claim this will help thermal performance, however the most important thing is getting a thin layer of TIM between the block and the IHS which is usually combination of mount pressure and bow of the block base.
Here we see the 6 hex head screws that seal the block and also the circlips which keep the mounting screws attached to the mounting plate.
Trying to take a selfie in the reflection of the base shows just how much of a rougher matte finish the block has. The acetal and full metal versions look similar, albeit without the 4 pin RGB LED Header. All versions use a copper base with nickel plating. The full metal also uses a nickel plated copper top and is substantially heavier.
Typically the metal top doesn’t give directly better thermal results as it’s thermally quite decoupled from the CPU itself. However performance is usually different because the base is often more bowed than the equivalent plastic topped block. Whether the CPU prefers more or less bow usually determines if the full metal does better or worse.
Overall the design is simple and clean for the acetal and full metal. The Plexi is busier by necessity of the jetplate design, but we approve of the 4 pin RGB lighting and the block still looks great.
After testing is complete we dissassemble the block to inspect the internals:

The block is easy to take apart, although you must bring your own allen key as EK no longer provides one:
Removing the base reveals the large cooling channel area and the interesting jetplate design that we had seen on the plexi block.
There are no o-rings to fully seal the jetplate to the top of the block. This potentially risks “blow by” fluid that skips the cooling channels, but it does lower cost. With such a complicated jetplate it would be almost impossible to put additional o-rings in anyway.

Inspecting the jeplate and channels shows how little channel area is actually under the jetplate. It seems like at least 50% of the cooling channels are really input and outputs. It’s possible that narrower jetplate channels would increase performance at the cost of increased restriction.

The cooling channels are not super wide or narrow and shouldn’t be too restrictive. The width of the entire cooling engine area is as large as any block we looked at. However the channel length is not as big as it could have been:
We like the look of the block on the board:

The mount also tries to blend in, and is more successful with the full metal block:

So EK have an interesting and different design. You have to be impressed with their commitment to keep improving their designs and for trying new ideas.
Koolance CPU-400-A-S
Koolance CPU-400-A-S
Koolance were kind enough to send us an early sample of their Threadripper block when we reviewed the CPU-400 for Intel CPUs and shortly thereafter updated the design to improve performance. Today we will only be looking at the new design. We loved the CPU-400 on our 5820K because it provided the best cooling performance that we could recommend. So given that performance, we are expecting good things:
 Packaging is classic Koolance and hasn’t really changed much at all in over 5 years now.
 Nor have the accessories.
 Koolance’s thumb nuts and stand offs are present as is some basic TIM and a torx head allen key to open the block. Torx head screws are just a bit more resistant to stripping than the standard hex head bolts that a lot of manufacturer’s use. The four metal stickers are for placing a thermal probe between the block and the CPU. We would not recommend this as there is a good chance it will interfere with optimal mounting.
The block feels solid but not overly heavy and uses a nickel plated copper base with an acetal top. The acetal top then has a brushed metal top bent over it which gives a classy finish. The branding is on the smaller side which we prefer. The 8 holes in the thick powder coated steel mounting bracket enable the block to be mounted either way around providing a bit more flexibility in your loop order or tube routing. It does however not look as clean as having only four holes.
Koolance protects the back with the same plastic sticker from the round CPU-370 block. It does the job though so no complaints there.
 Overall the block looks good – minor niggles include how tall the thumb nuts are and that the black mount doesn’t cover all of the socket. The exposed metal always makes things look busier, and we are always a fan of clean lines.
After testing was complete we take the part apart to inspect the internals.

Taking apart the block is simple with the supplied torx head allen key:
Interestingly Koolance use a metal insert. This is part of the reason the block feels so solid and heavy. Most likely metal is used in order to provide a more intense bow than plastic would. However metal will also increase costs, as will the three o-rings used to seal the block and the insert altogether. A jetplate is used in addition to increase local flow through the channels. The channel direction however does look optimized to provide colder coolant to as much die area as possible.
The cooling area is substantial, and in effect the whole block just looks like a scaled up meaty version of an Intel block.
The channels are ~44mm long
The area of the base milled for channels is ~50mm wide:
This should provide plenty of cooling potential.
Watercool Heatkiller IV Pro Threadripper
Watercool Heatkiller IV Pro Threadripper
The Heatkiller IV Pro for Intel rewrote the rules on thermal performance when it launched. CPU performance had been stagnating for a while, and we had assumed nothing would really improve. Since then other manufacturers improved upon Watercool’s results, but their engineering team obviously has the ability to deliver the thermal goods.
 Packaging is pretty standard for watercool now, with only a sticker giving away what’s in the box.

Opening up the box reveals the instructions and whole lot of foam packaging:
It would have been nice to see some of the extra foam cementing the block in place on the sides too, but the block was in perfect condition despite the long travel from Germany.
The accessories are minimal but enough:
The long allen key is used to tighten the mounting screws. There is no allen key provided to open the block.
The black cable is for the built in RGB LEDs. We like the use of a standard 4 pin RGB header as it enables the LEDs to be synced with any built in lights of the motherboard. The sleeving is effective at hiding the wires, although it was certainly a bit baggy.
The block is quite low profile and can not be rotated 180 degrees to enable alternative tube routing. This however enables it to have a very clean look.
It’s nice to see the black surround on the acrylic window. It’s actually made out of anodized aluminum and clamps the block together without necessitating the screws to fix into the acrylic which can lead to cracking. More on that later. It also adds a nice design element and makes the block seem higher end. Full metal versions are available as well.
The nickel plated copper base is reasonably thick and is also used as the mount.
Most blocks only use 6 screws to mount the base to the top, Watercool uses 8 which is possibly more secure, but we never noted an issue with any other block. Presumably the milled outline represents the size of the Threadripper IHS, there is no functional reason for it to be there. Possibly it gives some space for extra TIM to squeeze out into and provide a closer mount, however there is far more space around the CPU in the socket so it seems unnecessary.
The finish is good and high quality. All the corners are bevelled.
The plating is good quality, however the base is not a full mirror finish as machining marks do remain.
The mounting screws are also low profile which we really like. One spare screw is included, but no spare springs. Once tightened they sit almost flush with the block and so give a very clean look.

Overall the aesthetic is great and makes us regret our choice in RAM:

After testing is complete the block is opened up to check the internals.
 The correct size allen key was not provided.
 Opening up the base shows a very large jetplate and a large cooling area. However that same cooling area still seems small compared to the overall size of the metal base.

The screws that seal the block thread into the anodized aluminum top which is a far better choice than the acrylic part. Acrylic is far more likely to crack when screws are over torqued and cracks can lead to leaks. The o-ring is on the thinner side and no spare is included.
The cooling channel area is 52mm wide.
The channels themselves are also about 52mm long. 
This gives the Watercool block the single largest xy area of cooling channels. In addition they are quite narrow, so with all this surface area we are expecting good things. Having said all of this, by using the base as a mount also, it’s possible watercool could even have increased the xy area even more!
XSPC Raystorm Neo Threadripper
XSPC Raystorm Neo Threadripper
XSPC were the first to market with a “real” Threadripper solution that scaled up a waterblock to Threadripper size rather than just adjusting mounts or baseplates and not changing the internals.
Packaging is updated now that XSPC have embraced RGB:

A tick mark indicates which version is inside the box, as does a sticker with a barcode and description. Opening up the package reveals a lot of accesories:
 The block itself is protected in bubble wrap as well as shrink wrap. Instructions are provided as well as TIM, mounting screws and two LEDs with 4 pin RGB headers and a mini RGB controller. This is the only block to include a controller as well as RGB lights.
The NEO consists of a copper base and an acrylic top with a free floating mounting bracket.
 In this case the mount plate is a dark nickel, though other choices are offered including a full metal design.
 The block is attractive, though the mixed metals may not be everyone’s taste, nor is it easy to match to a motherboard design.
 The plate lifts off the rest of the block as is typical on all XSPC cpu block designs. We would rather it be attached, particuarly as this would mean that the screws would thread into the metal mount rather than the acrylic. However it’s not the end of the world.
 The copper base is protected by a thin plastic sticker which is hard to see as there is print on it. Indeed the block had already been shrink wrapped so at first I did not notice it was even there.
 The result was that I was surprised by the quality of the mirror finish being subpar – but that is purely the sticker.

Once removed, the finish is pure mirror:
 The mount consists of a threaded post, a plastic washer, a spring and a thumb nut that bottoms out:
Although this is fine, and is at least less chunky than Koolance’s, we still prefer a low profile design like Watercool and Aquacomputer.
 Those thumb nuts really stick up, and the two tone metal colors can be hard to pull off:

After testing I take the block apart to inspect the internals:

6 screws secure the block, but no allen key is provided to open it. The copper base as always quickly tarnishes.
Two o-rings are used, one to seal the block and one to seal the jetplate. The jetplate is keyed to help keep it in place during assembly.
The channels are in an optimal orientation and measure ~47mm long.
The channel area is also quite wide at ~51mm. The width of the channels is quite narrow so we are expecting good performance from so much surface area.
Flow Rate Testing
Flow Rate Testing aka Restriction
Although we usually think of thermal performance as the be all and end all of cpu block testing, the truth is that there are other factors that we must also consider. If a block is so restrictive that flow rate is affected then you will either have worse thermal performance through out the entire system or you will need to increase pump power and consquently noise.
To measure restriction we vary the flow rate of coolant through a block and measure the pressure difference across the block. For more on this consider reading this article. Unlike previous restriction testing we have a new setup that is more usable in an apartment with no outside space. The flow meter is now more accurate and the pressure meter remains the same. The AquaComputer NEXT block was measured as the same with the new setup and the old setup (within margin of error). It should be noted that the Alphacool Eisblock XPX block did not measure the same as previously. This is because the Eisblock XPX is not user serviceable and changes it’s performance once opened. Therefore we have shown the results *before* the block was opened, under the assumption that if you are buying the block that you understand these conditions and will not open it.

This plot gets a bit busy but gives the full data. Our general rule of thumb for acceptable restriction is to be below 1PSI at 1GPM. Of these blocks, only the Bitspower is really noticeably above this. This is surprising as previous Bitspower designs are usually quite low in restriction. Also noticeable is just how low restriction some of the blocks are. It’s rare to see blocks below 0.5PSI at 1GPM, but here we have two – the XPSC is around 0.4PSI and the EK is a staggeringly low 0.2PSI. While low restriction is generally a positive thing, when it’s as low as 0.2PSI you have to wonder if EK are giving up thermal performance in order to achieve such a low number. Of course the real question is whether this is intentional or a sign of accidental “blow by” fluid flow skipping past the jetplate where it isn’t fully sealed.
Comparing the 1GPM data points (red) against every CPU block we’ve ever tested (blue) we see that the Threadripper blocks are distributed fairly evenly:

In other words, none particularly stand out beyond the EK block which recorded the lowest restriction ever measured. Note that the DT5Noz used 5 parallel jetplates to record such a low restriction, while the MIPS used a matrix structure to have many more effective mini jetplates.
Let’s finally now look at the thermal results.
Thermal Results
As previously mentioned, the thermal data was the result of averaging 7 mounts of each block. Each mount was tested for 2×2 hour sessions where the temperature delta between coolant and CPU was averaged over the last 90 minutes of the 2 hours. This meant over 28 hours of data logging per block. Based on taking a ton of data on the first block, we therefore expect the margin of error to be around +/- 0.125C.
TIM Spread Struggles
TIM spread was a huge problem with several blocks during our testing. The motherboard used for testing (Asrock X399M) uses the Lottes socket, and from talking to manufacturers it seems that most product testing was actually done on FoxConn, with only a few testing both sockets. It’s possible that the Lottes socket requires a slightly different block mounting height and that with precision mounts being used that this difference is large enough to cause some blocks problems. However without testing on a foxconn socket we are simply not sure if these are design or manufacturing flaws with the following blocks.
The worst offender is the Bitspower block which barely made contact with the Threadripper IHS at all. Even coating the IHS with a massively thick layer of TIM yielded this ugly mess which was the best we could do:
 In addition our first sample of the AquaComputer NEXT block struggled to get a good TIM spread. A second sample corrected this and performed ~5C better, although the TIM could have been thinner still. We would have liked to have tried additional mounting pressure, but we could find no parts that were compatible that would achieve this. We have shown only the better result of the two samples in our plots below as we assume the first sample was either damaged in shipping or had a defect. Here is the TIM spread of the first sample – to get good coverage of the IHS a thick layer of TIM needed to be used:

The Alphacool block had a decent TIM spread:

Out of the EK blocks – the Plexi had issues making contact on one side of the block. There was no apparant reason for this.
 The Acetal and Full Nickel made better contact, but still required a thicker layer of TIM than should be necessary to get good contact between block and IHS.

Using additional washers to increase pressure enabled a thinner layer of TIM to be used and performance to be increased. The modified thumb nut stack is also shown:

The Watercool, XSPC, Koolance and Alphacool blocks mounted well and gave good TIM spreads. XSPC and Koolance were both fairly flat, while Watercool was slightly more bowed. This is the Koolance TIM spread showing a good thin area of TIM in across much of the IHS:

The lesson from all of this is that checking your TIM spread on Threadripper is of paramount importance. A good thin even TIM spread should be achievable and if it isn’t there may be a problem with your block.
Thermal Results
So with all this in mind let’s take a look at the data:

So firstly – note that the bottom two blocks were based on a single data run. Threadripper is very temperature sensitive, and so when heavily loaded and overclocked it can become unstable if allowed to get too hot. Also know that by “CPU Core temp” we mean the actual TJ of the die, not the Tctl that AMD likes to report.
Bitspower of course had a horrible result as the block barely touched the CPU. Despite our best attempts to communicate the issues with Bitspower we have not received a 2nd sample to test or suggestions on how to improve performance. For now we simply advise staying away from this block.
Note that because the Alphacool Eisblock XPX was opened and especially because the restriction measured poorly we can assume that a fresh block will perform differently. However as Alphacool did not send a new block we had to test with what we had.
EK as mentioned had mounting problems and we saw clear gains when using additional washers to increase the mount pressure. This put the block within spitting distance of the top performers. In truth the mounting pressure was probably a little high after the washers were added as the spread of results went from being “too loose” to extremely tight. This is best shown by looking at the 99% confidence intervals:

However we have to wonder if performance could be improved further still by narrowing the jetplate opening and using finer channels. In addition EK may benefit from increased XY area of the cooling engine. If we take the results only with good mounts (in order to reduce the mounting error variable) we can see that XY area of the cooling engine appears to correlate with the thermal result:

As always correlation is not causation, there are many other variables at play here, but it’s something to think about for the manufacturers. Afterall, the IHS is partly designed to spread heat, so covering as much of the IHS with channels as possible may not be a bad idea.
So while EK did something different from the herd with the double jetplate, we do think there are some key areas that they could improve performance still, both in terms of mount and the actual cooling engine itself.
AquaComputer also showed that a good Intel block with a mount change can be “only” 6C worse than an optimized block design. This coupled with how sensitive Threadripper is to temperatures means that we would recommend reusing an intel block as only a stopgap measure until you can source a real Threadripper block. Hopefully AquaComputer will finish their optimized true Threadripper only block design soon.
Of the top three, all performed well and all mounted with no problems. Of the three the Watercool block edged out the rest with a small but repeatable thermal lead. We also had a preference for Watercool’s mount. The low profile screws give a clean look to the design and we also appreciate that the screws that seal the block thread into metal rather than the acrylic window that might crack.
Summary
Summary
We have tried to summarize performance by giving points for various categories of which we regard thermal performance as the most important. We’ll start with the best and work our way down.
Watercool Heatkiller IV TR4-PRO – Gold Award
The Heatkiller IV TR4-PRO was our top performing block thermally. The price and restriction are not sacrificed to make this happen and the quality and aesthetics are top notch. This is our favorite block alongside the XSPC Raystorm NEO. We think the Heatkiller has the edge and it’s what we would personally buy, however the XSPC has a slight edge on price and is much lower restriction.

Thermal Performance – 10/10 – The best performing block sets the standard.
Mount – 5/5 – Low profile and perfect TIM spread
Restriction – 4/5 – Low, but not ultra low
Price – 3/5 – $105-117 puts this at the more expensive end
Aesthetics – 5/5 – Clean lines, sleeved LED wire, low profile mount, hides the ugly socket
Features – 4/5 – Instructions and a spare mount screw, but no TIM, spare o-ring or allen key to open the block
Overall – 31/35 = 89%
XSPC Raystorm NEO – Gold Award
Props to XSPC for being the first to pioneer the massive cooling engine and setting the standard for what was achievable and expected for Threadripper. The NEO still performs at the top, and of the top blocks provides the best value and lowest restriction.
Thermal Performance – 9/10 – one notch behind the leader
Mount – 4/5 – Good TIM spread, but the thumb nuts are small and stick out quite far
Restriction – 5/5 – Ultra low
Price – 3/5 – $91-115, not as pricey as the Koolance, but also not significantly different to the Watercool block given that we are cooling CPUs at $1000+.
Aesthetics – 4/5 – The thumb nuts are a bit ugly and mismatched metals colors are hard to pull off
Features – 4/5 – Instructions, TIM, RGB LEDs and even an RGB controller, but no spare o-ring or allen key to open the block
Overall – 29/35 = 83%

Koolance CPU-400-A-S – Silver Award
Koolance’s block is a solid all rounder with good thermal performance and a good mount. It has no real weaknesses, the only complaint is that it’s significantly more expensive than both the higher performing Watercool and lower restriction XSPC.

Thermal Performance – 9/10
Mount – 4/5 – The mount was fine and we like that you can use a screw driver, but the thumb nuts are just so unnecessarily tall that they ruin the otherwise simple clean look.
Restriction – 3/5 – No complaints but not low restriction
Price – 2/5 – at $140 this is by far the most expensive block here
Aesthetics – 4/5 – Clean lines and generally good looking only ruined by those massive thumb nuts
Features – 4/5 – Everything you need but no spares.
Overall – 26/35 = 74%
EK Supremacy sTR4
This is EK’s third shot at a Threadripper design and so we were expecting the third time to be the charm. EK missed the mark here sadly. At a personal level we’re sad because we had previously floated the idea of a dual jetplate in a news post before the block launched and so we were excited to be vindicated. The major miss is on the mount where the block just can’t get a good TIM spread without modification, luckily modification is easy and corrects the performance acceptably. In addition one out of three samples must have had a manufacturing flaw as it couldn’t even get a good mount under any circumstances. Couple this poor mount with the weirdly low restriction and the smaller than competition cooling engine and you have to wonder why EK managed to drop the ball on three separate items in the design. This we would understand on the first iteration of a design, but this is the third try and it’s hard to have excuses at this point. Still we are hoping that there will be a V4 that finally gets it perfect because the Supremacy sTR4 otherwise look great and we still feel like the dual jetplate has potential if done right. If you are considering the block or have already bought it consider removing the circlips and adding additional washers to get a better TIM spread.
Thermal Performance – 7/10 – this is based on the result without adding extra washers. Adding the washers would have boosted this to a 9/10.
Mount – 1/5 – Poor TIM spread and not as nice as the low profile alternatives. Fixing this would have brought this up to a 4/5.
Restriction – 5/5 – The best result we’ve ever seen, even if it’ s somewhat unnecessarily low.
Price – 3/5 – $90-115 puts it in the middle of the pack, but at the low end of the blocks you should be focussed on.
Aesthetics – 5/5 – The block looks really good no matter which version you get
Features – 4/5 – Instructions, premium TIM, RGB LED, the only thing missing is an allen key to service the block and spare parts.
Overall – 25/35 = 71%

AquaComputer NEXT
While the NEXT performs great on Intel, it’s simply too unoptimized for Threadripper. If you already own the block then changing the mount is a good stopgap measure, but we’d still suggest maximizing your cooling with one of the top three instead. Hopefully Aquacomputer will launch their optimized Threadripper block soon because the renders look gorgeous.
Thermal Performance – 6/10 – Not bad, but if you’re overclocking you might run into thermal stability issues. Not for those in warmer climates.
Mount – 4/5 – We love the low profile mount, we disliked that the first sample gave us a poor mount and TIM spread. While the second sample improved this, it could have been better still.
Restriction – 3/5 – Acceptable
Price – 3/5 – $85+ puts it on par with some dedicated Threadripper blocks
Aesthetics – 4/5 – The block looks awesome on Intel, but it looks a little bit lost on the massive Threadripper socket where it doesn’t fully cover the IHS leaving excess TIM spread exposed.
Features – 5/5 – The NEXT comes in a million different versions including ones with an OLED screen and temperature sensor built in. It also comes with a TIM spreader and premium TIM. The only items missing are the correct allen key to open the block and a spare o-ring.
Overall – 25/35 = 71%

Alphacool Eisblock XPX
We previously reviewed the Eisblock for Intel. While it performed exceptionally well for Intel we did not like that the block was not user serviceable. That complaint of course stands for Threadripper too. However if you already have the block then simply buying the Threadripper mount can serve as a decent stop gap until you get a real thermal solution. However we would not recommend it otherwise.
Thermal Performance – 5/10 – while it can handle the job, you will be limited on overclocking by thermal stability issues. Given this block had been opened, it’s unclear how much better a virgin block would be.
Mount – 4/5 – the Threadripper bracket is easy to change and solid unlike the previous Intel one. TIM Spread was decent. We’d still prefer something low profile.
Restriction – 2/5 – While acceptable, it could certainly be better
Price – 3/5 – $83 makes it similar in price to dedicated threadripper blocks
Aesthetics – 3/5 – The finish of this silver version is coarse and feels a bit cheap. It’s not our taste and if this was the only version we would give it 1/5. However the plexi and the black versions are far more attractive and if you combine that with the various modding options that Alphacool given then we will up that to a 3/5.
Features – 3/5 – non RGB lighting plus modding options are great but the huge minus is that their is a history of performance getting worse if you open the block.
Overall – 20/35 = 57%

Bitspower Summit ELX Threadripper
In last place of course is Bitspower with it’s terrible thermal performance and mount. While Bitspower have never particularly impressed us with their thermal results, they have never been this bad. While the quality and the aesthetics appear to be good and the accessories supplied are decent, none of this can make us recommend a block that simply doesn’t make real contact with a CPU. We hope this is a one-off manufacturing flaw, but unless we can confirm that, then we have to simply assume all blocks are like this.
Thermal Performance – 0/10 – we could barely even measure how bad it was as it often overheated and crashed before we could even start datalogging.
Mount – 0/5 – while the mount isn’t ugly, the fact that good contact couldn’t be made makes it worthless. If you desperately want to use this block we’d suggest figuring out your own mounting strategy.
Restriction – 0/5 – At 1.4PSI at 1GPM it’s beyond what we consider acceptable.
Price – 5/5 – $56.50 makes it the cheapest dedicated Threadripper block
Aesthetics – 4/5 – Relatively clean/simple lines and nickel plexi is hard to mess up. However it’s not as macho a look as Threadripper deserves.
Features – 3/5 – RGB LED built in, spare o-ring and an allen key to service the block are pluses, but no instructions and no TIM leave the product feeling unfinished.
Overall – 12/25 = 34%

Summary
Overall we recommend the Watercool, XSPC and Koolance Threadripper blocks. For our personal preferences we rated the Watercool the best, followed by XSPC. Both those blocks win a gold award, while the Koolance wins a silver, mainly hampered by it’s higher price and failure to outright win any category.
The EK block on the other hand needs some design attention and we hope that EK will tweak the design and launch a v4 that finally gets it right. If that happens we imagine it will be at the top with the rest.
Bitspower also have some serious work to do. We’ve always questioned their commitment to good thermal performance, but this block takes it to a new level. This is a block that is only suitable for display and not for real use. While it may be a problem with this sample, we can’t assume that without a 2nd unit to check. For now we would advise avoiding this block like the plague.
Both AquaComputer and Alphacool have mount kits that will work to convert an existing Intel block to work with Threadripper. However we wouldn’t’ recommend buying either block specifically for Threadripper even though they will work just fine if you’re not looking to maximize your Threadripper overclocking performance. Consider them as stop-gap solutions, but if you are serious about Threadripper it would be wise to invest in an optimized solution.
Overall it’s been interesting to finally have a block comparison where there are noticeable winners and losers. We would like to thank manufacturers for participating and sponsoring this review with parts. It takes balls to send your products out to a website with a known penchant for strict testing, speaking the truth and being inflexible in massaging results. So please do support those vendors that took part even if you don’t buy this exact product. Also please let them know that our independent testing is valuable to you, the end customer. On the flip side, also consider those manufacturers, like Swiftech, who have a product but who have declined to participate in multiple roundups now. Those manufacturers are not interested in standing behind their product and so we would suggest you send your money elsewhere.
Lastly if this review was helpful, particularly if it saved you wasting money on a mistake then please consider a small donation to help run the site and support the testing. Unlike other sites we only make money from googleads (which if you are smart you are most likely blocking) and we don’t take money from sponsors. Believe it or not donations also help motivate us to keep doing the hard work in our evenings and weekends!


Awesome reviews and love how detailed and simple the articles are, it really helps a lot when coming in choosing different parts which I am currently building, and I am glad I have chosen heatkiller too, athou I am a little worried about the acrylic version overtime while 2990 is in OC status (hot stuff..). fingers crossed.
Comments are closed.