


Bench Setup
The Mk III Bench served a good long run for testing CPU blocks on my 5820K. However I had to move into a city apartment which meant I no longer had a spacious garage to do my testing in. Luckily this coincided with switching to testing Threadripper instead of X99 and so I could rebuild the bench to be more compact and to fit under a desk without needing to retest everything on X99.
Here’s the new MK IV bench:
 Bench – Bastardized Spotswood Custom Testbench
Motherboard – Asrock X399M Taichi MATX (I’m a sucker for matx form factor)
CPU – AMD Threadripper 1950X (all the cores possible at least until the 2990WX releases)
RAM – Corsair Vengeance 4x4GB 2800
GPU – Galaxy GTX460 with EK Thermosphere (leftovers)
SSD – Crucial C300 128GB (more leftovers)
OS – Windows 10 Pro x64
Main PSU – EVGA NEX 1500 (the beast and more reliable than my many Corsair supplies)
Aux PSU (Loop bleeding duty) – Corsair AX850
PSU Switch – Master Chicken’s Aux PSU Switch
Loop Control and Monitor – AquaComputer Aquaero 6 and MPS400
Thermal Logging – Crystalfontz CF633 USB with Dallas One Wire Digital Temp Sensors
Flow Meter – King Instruments 2 GPM 10″ Rotameter (nice to have a quick visual)
Pumps – Swiftech MCP35x2 with heatsinks, PWM controlled
Reservoir – EK X3 400
Radiators – 2x Alphacool UT60 White
Fans – Gentle Typhoon AP-15 x 12 (Not shown 800rpm Noiseblockers for VRM cooling)
Tube – EK ZMT 3×8 x 5/8
Quick Disconnects – Koolance QD4, QD3, VL3N with adapters as necessary
Fittings and Rotary Adapters – Bitspower – mainly brass barbs but some nickel plated
Clamps – Worm clamps, partly because I’m often stretching 3/8″ ID tube over 1/2″ barbs, partly because I don’t trust tube not to loosen over time.
Stop fittings – mainly Monsoon, but some Bitspower, Koolance and EK
 For CPU testing it’s paramount to have the CPU block easy to get to. Low profile RAM and making sure to place the GPU a few slots down really helps.
 As this would go under a desk, all of the monitor and switches needed to be easily accessed and viewed from the front. The Aquaero got mounted between the reservoirs. The PSU switches are on the side, but at least near the front. The PSU Switcher is at least central.
 Radiators are at the back, with drain ports located slightly outside the frame for easier draining. MCP35x2 mounted at the base for easier bleeding.
 The unused QDCs and reservoir on the right side are for restriction testing. Previously this was done in my garden by hooking up a flow meter and faucet to an outdoor hose tap. Not having the luxury of a garden anymore means I needed to build that into the system. Now flow is provided by two D5 pumps connected with an EK series top. This should provide enough power to test even restrictive blocks. The flow meter has a tap built into in order to vary flow. To test a block QDCs with pressure taps are attached to the block under test and connected to the QDCS shown below:
 The pressure taps connect to a differential manometer which reads the pressure across the block. The flow meter sets and measures the flow.
 QDCs are used on the CPU block and GPU block so that CPU blocks, GPU blocks and even hardware can be swapped and tested easily.
 The cooling is overkill but thats ok. Previously the 5820K setup had a ~1C delta to ambient under load, however as the testing was done in a garage without AC, the ambient temperature could vary widely. Now the ambient temperature has to be tolerated by me for long periods of time so it should move less (+/-5C) vs (+/-10C). I’m still not sure whether using the Aquaero to keep coolant at a fixed temperature regardless of ambient would improve data or make it worse. I’m also not sure how to prove which is better or worse. For now I’ll keep the fans constant so that the coolant to air delta is constant rather than trying to fix coolant temperature.
 So that’s the bench. That explains the physical side of the test setup. In terms of software I use HwInfo to track CPU temperatures, and Crystalfontz WinTest software to log coolant temperature. While I could use the Aquaero, and love it for normal use, I prefer the crystalfontz data logging and the Dallas digital temperature probes are also superior unless you calibrate the crap out of the 2 pin aquaero resistor type. The first month of testing was spent purely calibrating the bench. I like to do this every time I set up a new bench. Every processor has some error in it’s temperature reading. The temperature circuits are there to be a rough indicator of temperature but are not designed with accuracy in mind. So the first step is to remove the common mode error, i.e. as the room temperature fluctuates, how much error can we remove from the CPU temperature measurements. For example – logging a few mounts for long periods of times show the following data when we compare the CPU Delta under load vs the Coolant Temperature:

In general you can see a trend from bottom left to top right. The CPU temperature under load should be fixed. The load (prime95 in this case) isn’t changing, only the ambient temperature. So we can remove this with some math:

The lines are now flatter over temperature – this is good because testing can take months, and ambient temperatures can vary from hour to hour let alone month to month. Note that there is still quite some variation in offset between runs. For some reason I’ve yet to figure out why some runs are just better or worse than others. This error is repeatable even without changing the block mount and it seems to occur only when the PC is reset. The best theory I’ve come up with is that it’s to do with the PWM control of the pumps at startup hitting slightly different RPMs. I need to monitor the RPMs on enough runs to be sure. However this leads us on to the next segment which is how to make sure our data is accurate and repeatable. One of the biggest errors in measuring CPU block thermal data is the mount – mount pressure can often vary from run to run, but by far the biggest factor is the TIM application. While a “bad” application of TIM is obvious, there are still significant variations in performance between applications that seem visually “good”. In previous tests I’ve mounted the CPU block 5 or 6 times. Each mount was usually run for 1.5 – 2 hours and data logged. However seeing this difference in measurement based on resetting the PC had me startled and so for my preliminary measurements on the first block I measured ten mounts each 6 times for a total of 60 runs. First I looked at how did the number of runs affect the accuracy of a single mount:

This data says that even with everything I’ve tried to do to minimize error, that a data log average over 1.5 hrs is still only accurate to +/-0.5 DegC. For this reason I will no longer publish results based on a single data point. It is simply too inaccurate for the small differences between blocks that we often see. Note that to get to +/-0.1C accuracy I needed to average 4 runs, each run is 2 hours if you factor in the 30 min warm up time. If I wanted to do 6 mounts as I had done on the X99 bench, then I figured each block would require 6 mounts x 4 runs x 2 hours = 48 hours per block. However I knew that averaging many mount results would also help reduce the error, so I created a table compiling the various combinations of number of mounts and number of runs and the resultant errors:
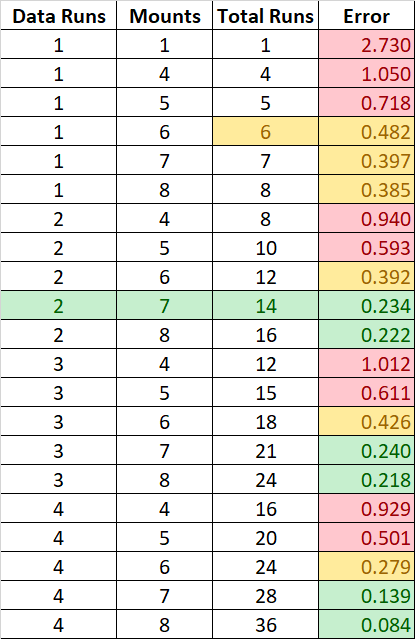
The easiest way to get error under 0.25C seemed to be 2 runs per mount and 7 mounts total for a total of 14 sets of 2 hours, i.e. 28 hours, or about a week per block. So this is what I decided to run with for this entire roundup. Bear in mind this error is total magnitude of max – min, i.e. the error is really +/-0.125C max. So next time you see a thermal review from another website that uses one mount and one data run, remember that the error in that measurement is most likely over +/-1C and that’s if they are even averaging the data over time. We’ve seen review sites measure only the maximum or minimum temperature of a single mount on a single run which is truly terrible.
The reason we go into all of this is to simply equip you the reader with the knowledge of how we do our work in order to be as open and honest as possible. There are many review sites out there, and in our opinion not all of them measure things accurately. Like everything you find on the web, it pays to be cynical and understand the data and to check the methods underneath that data. If a review site doesn’t take the time to go into those details, then it’s probably not worth your time either.
So now that we know what we are doing and why, let’s take a look at the contenders. As always let’s start alphabetically…


Awesome reviews and love how detailed and simple the articles are, it really helps a lot when coming in choosing different parts which I am currently building, and I am glad I have chosen heatkiller too, athou I am a little worried about the acrylic version overtime while 2990 is in OC status (hot stuff..). fingers crossed.
Comments are closed.