


Introduction
Alphacool NexXxos Monsta 360 Radiator Review

The intention of this write up is to provide information and performance data about the Alphacool Monsta 360mm Radiator for inclusion in the Extreme Rigs Radiator Round Up 2015. I’ll be keeping the review section short and factual, focusing on presenting the performance data compiled through the numerous tests carried out. First of all, a big thanks to AquaTuning for providing this sample of the Monsta 360.

Note: You may notice a slight change in the data presentation in this rad review as I’m now also including some test result data for push only fan installation. The push only fan testing is conducted at 1.0 GPM and the 3 fan speeds I test at (750, 1300 & 1850 RPM), so you now have direct comparison data for the two fan installation types. Keep an eye out for a Push only version of ER’s Radiator Round Up once we have collected more radiators results.
What’s in the Box?
The Monsta sample for scrutinizing came in full retail packaging

Opening the box, we can see the usual packing layout for the NexXxos series radiators. Alphacool really have done a great job in ensuring that the radiator has every possible chance of arriving to the purchaser in the best possible condition. I really like that the accessories are placed in a separate box at one end of the package.

Extent of delivery:
Alphacool states the following is supplied in the box:
1x Radiator
5x screw plug
12x M3x30mm hexagon socket screw
12x M3x35mm hexagon socket screw

All parts are present and accounted for, plus there is a hex key for the black M3 screws is also included.
The 7 ports are “plugged” with transit caps to keep moisture out.
The “branding” stickers are provided for the user to place where they choose, which is better than when they used to be already stuck onto the side of the rads and half the time were upside down after horizontal installation.
12 each of 30mm and 35mm hex key, cap screws are provided.

Taking the protective bubble wrap bag off and the thickness of the Monsta really starts to sink in. At 84mm it is thicker than the slim rads when fitted with 6 fans in Push/Pull !
 The Monsta is well packaged and comes complete with all the required accessories to get it incorporated into your loop.
Onwards to technical specifications!
Technical Specifications
Technical specifications as listed by Alphacool:
“Technical specifications:
Material internal: Mostly copper
Material casing: Side panels steel, threads brass, copper chambers
Colour: Black
Dimensions (LxWxH):399x124x80mm
Connection threads: 6×1/4“
Outlet Connection threads: 1×1/4“
Mounting thread size: M3
Pressure tested: 1.5bar”
Weight:2375g
Dimensions Measured on the radiator tested (retail unit):

There are some variances between my measurements and the specs listed by Alphacool. I measure the dimensions of the housing, then add extra in brackets which would be required if stop plugs are installed in unused ports.
I double checked my measurements and they were correct. Then I checked against the Tech Drawing dimension, and they are different again, so I really don’t know what Alphacool are measuring against (or with).
Radiator Core Dimensions:

The core is four layers deep x 10 tubes wide of 15mm x 1.5mm copper tubes run parallel in a standard U-Pattern flow path. The single louvered fins were laid out quite evenly between the rows of tubes and have an averaged count of 10 FPI (Fins Per Inch). The following pic however shows about 11 FPI on the fins each side of the ruler.

Finish and Features
The Monsta has a satin black finish, which is in between a full gloss and matte black. The finish is nice and smooth and I found that my sample to be blemish free, as good as one could hope for.
A White Special Edition Monsta 360 is also currently available.

The Monsta 360 comes equipped with 7 ports in total.

3 inlet and 3 outlet, offering every possible combination available (on a U-Flow Rad) for placement of fittings, a fill port, and a drain port. This is as good as it gets!!
In addition, another port is fitted on the return end tank, offering further options for filling, draining or air bleeding when mounted in a vertical installation.

Note: The bleeder port is not intended to be used as a fitting port.
There are screw protector plates fitted under the M3 threads for case installation and fan attachment. As the mounting holes are located directly over the top of the outside tubes, theses plates would save the rad from almost certain irreparable damage if the wrong length screws were used.

So we have a massively thick radiator that has a low density fin structure on it’s thick core. I can’t help but think that the Monsta should have some amazing heat dissipation in the low fan speed Push/Pull tests, but I’ve been wrong before so…..let’s see how it performs.
Flow Performance
The Data
As all the testing in this round up was performed with the exact same equipment, using the exact same methods I have decided to keep each radiators page uncluttered by posting our testing methodology, test set-ups and equipment used in a single location. To see exactly how the tests were carried out, details of the test set ups and equipment used, please head back to the RRU’15 Test Equipment Page.
Restriction Test
It’s generally agreed that radiators are one of, if not the least restrictive components in the water cooling loop. There are some exceptions however, so this must still be verified through testing:

The above photo is for referencing the restriction test bench. The Alphacool Monsta is not loaded so please disregard the data in the picture as it does not relate to the Monsta 360.
Here is the raw data at the tested flow rates, displaying the measured Differential Pressure across the Monsta as flow rate was increased.

The table numbers indicate that the Monsta 360 is a very low restriction radiator. However numbers in isolation can only tell half the story. By plotting against other components it more easily shows the whole story. I have decided to use a HeatKiller 3.0 CPU block as the reference in this plots for two reasons. Firstly there is no chance of the plot being cluttered by curves overlapping and secondly it gives a reference point against a fairly common loop component of average restriction. For radiator to radiator restriction comparisons please see the RRU’15 data pages. As with all the radiator restriction plots I have limited the maximum flow rate displayed to 2.0 GPM as I suspect there are very few systems that operate above 2.0 GPM. For more information on how to read a restriction plot check out our guide.
This plot confirms that the Monsta 360 is indeed very low in restriction relative to a common component.

The next plots shows the Monsta’s restriction level at three flow rates relative to other radiators in the test group. It would appear that the quad parallel flow path of the Monsta really keeps the restriction level low!


Onwards to Thermal Performance!
Thermal Performance
The Thermal Data
Moving on from the restriction test bench the Alphacool Monsta 360 was loaded into the thermal test chamber for a series of 9 tests – consisting of 3 flow rates, each having 3 different fan rpm rates tested. I felt the thermal test data was most important and which you as the reader would be most interested in.
Below is the final data results gathered from at least 2 data logging runs at each flow rate and fan rpm combination. The most stable 15 minute period from each logging run was used and then averaged with the other runs to obtain the data for the table below. A total of 16 temperature sensors were used in the thermal test chamber (8 air in, 2 air out, 3 water in, 3 water out) each take a reading every second and logged via a CrystalFontz unit. The data in the table below is the result of the logging runs which has then been used to create all the plots and tables there-after.
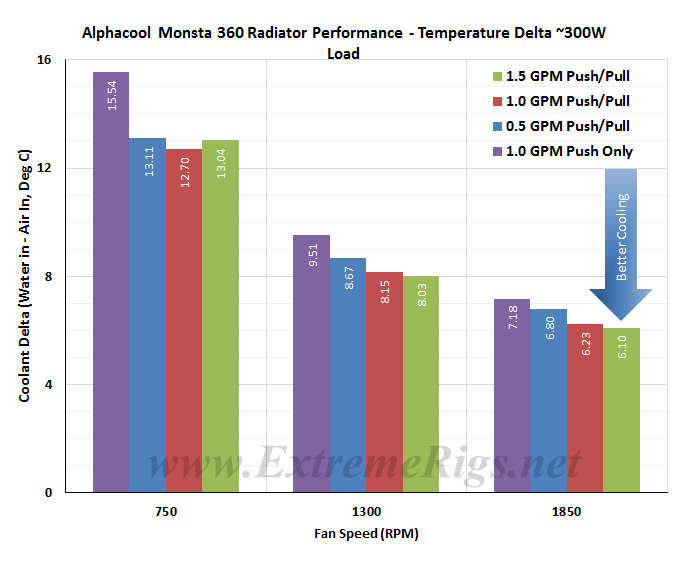
The performance metric of critical importance is the delta between the warm coolant temperature in and the cold ambient air temperature in to the radiator. Given that the system is well insulated and in equilibrium and we know the heat input to the system then we can also calculate a very important number – that is the amount of power required to raise the coolant temperature 1C (or 10C which is more useful reference point).

Like the vast majority of the other radiators tested, the Monsta 360 cares little about flow rate for thermal performance when run in Push/Pull, particularly above 1.0GPM.

In this bar chart the 1.0gpm 750 rpm P/P results shows that it has a lower delta temp than the 1.5 gpm rpm tests – this is misleading because the pump power is also higher at 1.5GPM – this explains why the W/Delta T numbers are still better at 1.5GPM.
So the performance is not greatly affected by varying flow rate. However Delta T is not always helpful when thinking about how many radiators you would need to cool your system. Instead it’s more useful to know the delta/W, or more usefully, the inverse metric of W/delta C. The metric plotted below tells us how many watts are dissipated by the radiator when the coolant rises 10C above ambient temperatures (10 Delta T). This calculation also factors in the varying ambient temps during the tests, so is a true measure of the actual heat dissipation performance of the radiator.
 As expected increasing airflow through the radiator is the primary determinant in changing the radiators performance. We can see that the lower Delta temps in the previous Delta Temp plot did not translate into better performance for the 1.0 GPM Push/Pull at 1300 RPM, but it is interesting how close all the results are at the low fan speed.
The Monsta has produced some impressive results here as the data comparisons later will show.
This data can now be plotted as a pretty curve so that an end user can interpolate their own fan speed. Note again that the extrapolation of the curve is much more sensitive to error than in between the tested range. Let’s exclude the push data for now and come back to it:
 This makes it easier to see that at higher fan speeds that a low flow starts to impact the cooling performance. This makes sense if you take it to the extreme and think about a very low flow rate where the coolant is already cooled 99% of the way to ambient with 10% of its journey through the radiator. In this example the radiator is not being efficiently used. 90% of the radiator surface area would then be wasted and you could have used a smaller radiator. Both coolant flow and air flow can limit thermal performance, however in typical systems flow is a much weaker effect than airflow due to typical choices of fans and pumps.

If we now come back to the push data it’s good to compare only the push to push/pull data in an “apples to apples” fashion by only looking at the 1GPM data:
Push gives around 85% (averaged) of the performance of Push/Pull across the range tested on this radiator. If you do combine all the plots you’ll also see that at high enough air flow that 1.0GPM Push would overtake 0.5GPM Push/Pull as the flow rate starts to limit performance.
Having said all of this about flow effects they are in reality small. So in this next plot all three flow rate results were averaged together to produce one curve. Averaging reduces test error of course so this helps further to be sure of our data and is more useful therefore for comparing to other radiators.
Here one of the top performing and worst performing rads have been plotted also to see how the Monsta 360 compares against them. As you can see the Monsta performs better in at low fan speeds against the Koolance, but drops off as the fan speeds increase.

Now let’s analyze that data.
Push/Pull Data Analysis
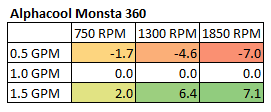
Using the data compiled from the Alphacool Monsta 360 thermal testing I have compiled the following tables in an attempt to show other ways of how the Monsta performance varies against itself at the flow rates and fan speeds tested. Let’s first look at the raw W/10DT data that we’ll be using to generate these:

Effectively these show percentage gains relative to a reference point. It’s an interesting way to show gains/losses while changing a variable. This first table shows performance gain or loss relative to 1.0GPM flow rate:

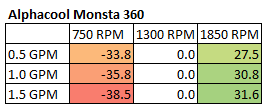
We can also focus on 1300RPM as our reference and see how much gain or loss in performance we get by changing fan speed:

As expected the change is dramatic. How about we combine both flow rate and fan speed as reference points and have a look at 0.5 GPM & 750 RPM as the reference point.

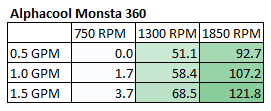
Lastly, we change the reference and choose our center 1300 RPM and 1.0 GPM as our reference point to show both effects concurrently:

So from the data above we can get a very good idea of how the Monsta 360 performs relative to itself. But there is a large selection of 360mm radiator models to choose from, released from numerous manufacturers. So, we need to start comparing performance between them. To see how the Monsta performed against the other radiators tested, I have included the averaged flow rate comparison charts from the Round Up. We know that the flow rate has little impact on thermal performance so averaging of the 3 flow rate results gives us a good look at head to head performance at the rpm speeds tested at with even less error.
Let’s start off with the Push only data:

The monsta starts off at 750RPM in the middle of the pack. Given the thickness of the radiator it’s surprising that it can still compete at all with such low static pressure.

At 1300 RPM we expected the Monsta to start doing better. Sadly this is not the case.

AT 1850RPM the Monsta is doing worse relative to the competition. Let’s now look at push/pull to see if the static pressure helps it out:

At 750RPM the Monsta is at the very top for performance. This is a huge difference from the Push only data. Clearly this fat radiator loves a second set of fans.

At 1300RPM the Monsta is still holding it’s own, but it’s starting to be overtaken by radiators that are geared for very high static pressures and flow rates with much higher FPI.

Despite the thickness of the Monsta – it’s low FPI is not going to compete at the very top once the airflow gets high enough.
With such a thick radiator it can be interesting to compare whether a push/pull setup would beat the Monsta in push while maintaining a similar or slimmer thickness. To do this comparison we focus on only 1GPM data and combine push (red) and push/pull (blue) data.

At 750RPM the Monsta in push is beaten by any other radiator in push/pull. This includes tiny slim radiators. Of course it’s also beaten by a slim radiator like the GTS in push too.
At this flow rate though the Monsta in push/pull is unbeatable. This plot shows just how much of a difference push/pull can make on the right radiator at the right test point.

At 1300 RPM the Monsta results move towards each other simultaneaously getting worse and better relative to the competition.

At 1850RPM there are plenty of choices that beat the Monsta whether or not you run push or push/pull.
From all of these results we can create a “master performance factor”. The radiator with the best cooling ability (W/10ΔT) at each gpm/rpm combo was awarded a score of 100, and each other radiators W/10ΔT result was scored as percentage of the top performer:

All those high numbers and green boxes confirm what was shown previously, that the Monsta 360 is a great performer, particularly with low speed Push/Pull fans, taking 1st place in one of the three flow rates tested at 750 rpm. Despite this particularly niche tuning the Monsta never does badly as an all rounder though.
Then all these percentage scores were averaged giving us the Averaged Performance Factor of each radiator. This way of looking at the comparison takes away any advantages that a radiator may have at higher or lower fan speeds and looks at an overall average. While this appears fair it does tend to favor those radiators that are all-rounders and those radiators which do very well at high RPM. Most users should be more focused on their specific use case. Check in the Round Up for performance comparisons at every gpm/rpm combo for even more details and cross comparison results.
Again let’s start off with push only data:

We already know that the Monsta prefers push/pull. However the score of 88.2 is respectable and puts the Monsta in 15th place.

For Push/Pull the monsta is far more compelling and finishes in 6th place.
Next up – Summary!
Summary
Push Performance – 3/5
Push/Pull Performance – 4/5
Overall Performance – 3.5/5
The performance rating of 3.5 is arrived at from the Average Performance Factor. Being a thick radiator with a low fin count I wasn’t sure that the Monsta 360’s core would have the balance to perform well across the range of thermal tests. While the Monsta excels with low speed push/pull setups it never does badly either.

Overall the Monsta was an excellent all-round performer with ultra-low restriction levels!
Features & Quality – 4/5
The Monsta has a smooth, satin black finish that will please the vast majority of purchasers. My review sample was flawless and exceeded my expectations based on previous rads I have had from Alphacool.
The ultra thick design means there is plenty of material to work with on the tanks, and Alphacool have used it well. The Monsta has the maximum number of port options with 3 inlet and outlet port options. The addition of a bleeder port is a bonus for vertical installations, giving the user an easy solution for filling/air bleeding or draining depending on the orientation implemented.
There are protector plates for the mounting screws which is a good thing as the mounting holes have tubes directly beneath them.
The main feature of the Monsta is of course its thickness, and as shown in the performance data, the Monsta’s tuning can be can be manipulated somewhat with the fan assembly and the speeds they are set at. This makes it a very versatile rad performance wise.
At 134mm total thickness with a Push/Pull fan assembly attached, the Monsta will not fit in very many cases, so it may alienate itself from many potential buyers simple because they cannot fit it in their case.
The Monsta has a very low fin count (10 FPI) which means it’s not really a dust hog and will require less time dedicated to cleaning and maintenance.
A White Special Edition Monsta 360 is also currently available.
Lastly, I have to mention Alphacool radiators reputation for being the dirtiest rads. Yes, no surprises, this one was no exception. All soldered tube radiators have some residue that must be flushed; it’s just one of those chores that has to be done when preparing to install any new radiator to your loop. However Alphacool seem to have more than the other brands. With the recent launch of specialty radiator cleaning fluids, this chore has been made easier and with far better results than we used to be able to achieve.
Summary – 4/5
The Monsta 360 core design proved to be an excellent all-round performer which excelled with Push/Pull fans at low speed.
It has multiple port options allowing for fill ports/drain ports in all possible orientations, however….the Monsta is a super thick radiator, make no mistake, so ensure you case can accommodate this 84mm thick beast (plus fans) prior to making a purchase decision.
Where to buy: AquaTuning – $119


[…] Alphacool Monsta 360 Radiator Alphacool ST30 360 Radiator AquaComputer Airplex Radical Copper 360 Radiator AquaComputer AMS 360 Radiator Coolgate CG 360 Radiator EK SE 360 Radiator EK XTX 360 Radiator EK XE 360 Radiator Hardware Labs Black Ice GTX 360 Radiator Hardware Labs SR2 360 Radiator Phobya G-Changer HPC 360 Radiator XSPC RX v2 360 Radiator […]
[…] […]
[…] the thickest 280mm radiator of our test group. We saw some interesting and unexpected results when we reviewed the Monsta 360 last year. The 280mm version only has ~10% less surface are than the 360, so might come up with […]
Comments are closed.