Introduction
Hello and Welcome to ExtremeRigs 2015 Radiator Review Round Up!
First of a big thank you to all sponsors – AquaTuning, AquaComputer, Coolgate, EK, HardwareLabs, Koolance, Magicool, Mayhems, Performance PC’s, Watercool and XSPC. Without these companies generous support this epic journey would not have happened. It’s much appreciated when a company supports us even when they think that a product may not necessarily do well in a roundup. Some companies choose not to participate when they think they won’t win, however surprises sometimes happen as you’ll see. ExtremeRigs feels that, you, the reader really wins when you get to see everything that is out there and compare across the board, so please support those who spend real money to support us doing accurate testing for you!
In this round up we will be comparing a variety of “360” sized radiators – that is radiators that support 3x120mm fans per side. We will test performance in Push Only (3 fans fitted) and also with 6 fans mounted in “Push and Pull”. I.E. 3 fans per side:
Each radiator has it’s own specific review (see the links below for these). This round up page will feature on the technical nature of the review and the round-up as a whole and will not delve into the specific features of each radiator. Currently this round-up page has been updated with data for the 27 radiators listed below. The links below have more accurate review data in each sub-review.
The contenders…
Alphacool Monsta 360 Radiator
Alphacool ST30 360 Radiator
Alphacool UT60 360 Radiator
Alphacool XT45 360 Radiator
AquaComputer Airplex Radical Copper 360 Radiator
AquaComputer AMS 360 Radiator
Bitspower Leviathan Slim 360 Radiator
Coolgate CG 360 Radiator
Coolgate G2 360 Radiator
EK PE 360 Radiator
EK SE 360 Radiator
EK XTX 360 Radiator
EK XE 360 Radiator
Hardware Labs Alpha Extreme III 360 Radiator
Hardware Labs Black Ice GTX 360 Radiator
Hardware Labs Nemesis GTS 360 Radiator
Hardware Labs Nemesis GTS 360 X-Flow Radiator
Hardware Labs Nemesis GTX 360 Radiator
Hardware Labs SR-1 360 Radiator
Hardware Labs SR2 360 Radiator
Koolance HX-360XC 360 Radiator
Koolance HX-CU1020V
Magicool G2 Slim 360 Radiator
Mayhem’s Havoc 360 Radiator
Phobya G-Changer HPC 360 Radiator
Phobya G-Changer V2 Full Copper 360 Radiator
Swiftech MCR320-XP Radiator
Swiftech MCR320-QPK Radiator
Watercool HTSF2 3×120 LT 360 Radiator
XSPC AX360 Radiator
XSPC EX 360 Radiator
XSPC RX v2 360 Radiator
XSPC RX v3 360 Radiator
In addition we have also reviewed the following radiators which are different sizes and hence not incorporated in this 360 only round up:
EK XE 240 Radiator
Hardware Labs SR2 240 Radiator
EK CE 140 Radiator
Hardware Labs Nemesis GTS 140 Radiator
Hardware Labs Nemesis GTX 140 Radiator
Hardware Labs SR2 140 Radiator
Phobya G-Changer 140 Radiator
Alphacool ST30 280 Radiator
Alphacool UT60 280 Radiator Review
Alphacool Monsta 280 Radiator
EK CE 280 Radiator
Hardware Labs Nemesis GTS 280 Radiator
Hardware Labs Nemesis GTS 280 X-Flow Radiator
Hardware Labs Nemesis GTX 280 Radiator
Hardware Labs SR2 Radiator
XSPC AX 280 Radiator
EK CE 420 Radiator
Hardware Labs SR2 420 Radiator
There may even be more arriving soon!
First let’s talk about the testing setup
Test Setup
There were two parts of testing – the less interesting but necessary restriction/flow testing, and the more interesting and hard thermal testing. If you want to skip on to the thermal result analysis then please do – but if you’re interested in the technical details (and you should be) then read on.
Restriction/Flow Rate Testing
The goal of this test is to measure the pressure across a component as flow is varied through it. This produces a plot like this one which enables the user to interpret how well a component may work in their loop with respect to pump power:
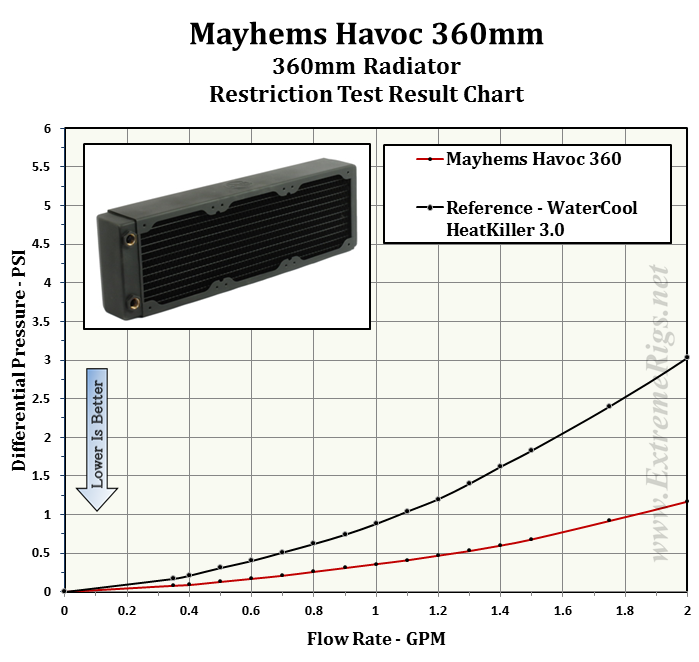 If you don’t know and would like to learn what this plot means, check out our guide.
The setup for this test involves a larger reservoir, a variety of pumps that get switched in and out including the mammothly beasty pump shown here (the Iwaki RD-30), a flow meter (to measure flow), a differential manometer (to measure pressure drop across the radiator) and a faucet (or tap) to vary the flow through the system. The setup looks like this:
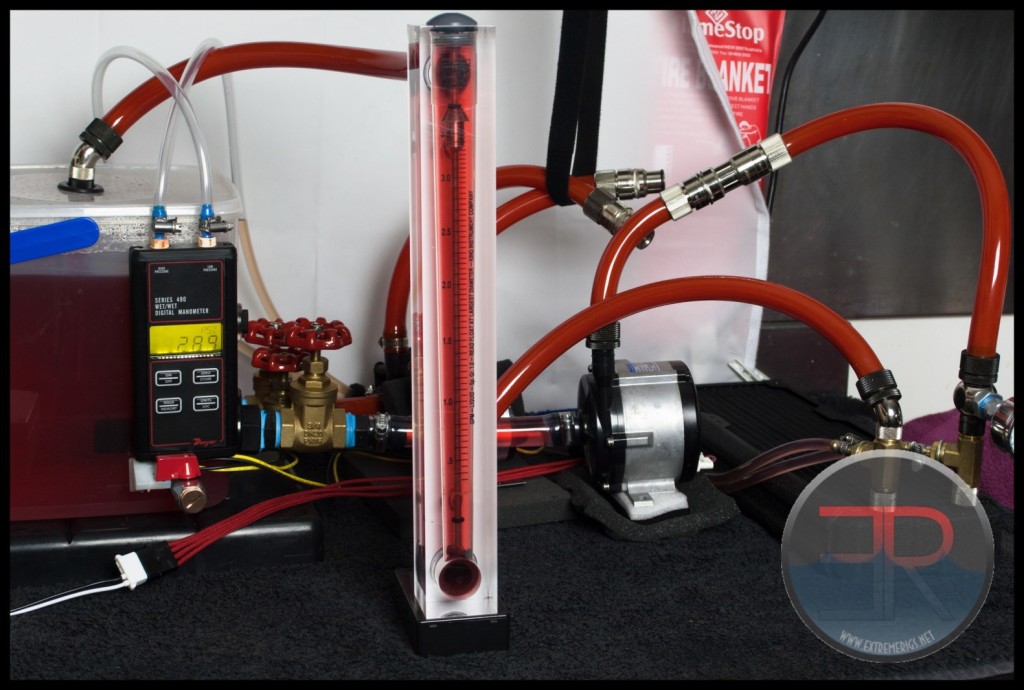 The differential manometer is the black box with the yellow screen which is a Dwyer 490-3 wet-wet manometer. The tall thing in the middle is a King Instruments Rotameter which measures flow. Both of these were chosen to have sufficient accuracy for the testing involved.
Thermal Test Setup
Push/Pull vs Push vs Pull Fans
For testing of the first group of 15 – we initially ran Push/Pull only fan setups in order to maximize performance. After feedback on this initial publication of data we added Push data in addition and went back to remeasure the Group A radiators also. In order to save time on the push data we tested only at 1 GPM flow rate.
Radiators are by far the hardest water cooling component to test accurately and repeatably. Note the “and” in that sentence. Some reviewers can repeat their measurements, but it doesn’t mean that their performance numbers are accurate, just that they are doing the same thing consistently. Let’s delve into the problems.
Signal to Noise Ratio
In electrical engineering we will often talk about signal to noise ratio, i.e. how strong is the signal that we want compared to all the crap that we want to ignore. In other words how clean is it. This idea carries through into testing. I.E. How large is your measurement compared to the sources of error. The larger the ratio of measurement to error the easier it is to be repeatable and accurate. When we judge radiator performance we are looking at how well the radiator cools coolant. To measure this we are therefore fundamentally measuring air and coolant temperatures while we vary other factors (such as radiator, air flow and coolant flow). All of the following factors affect just how well we can measure air and coolant temperatures of the system:
Air currents
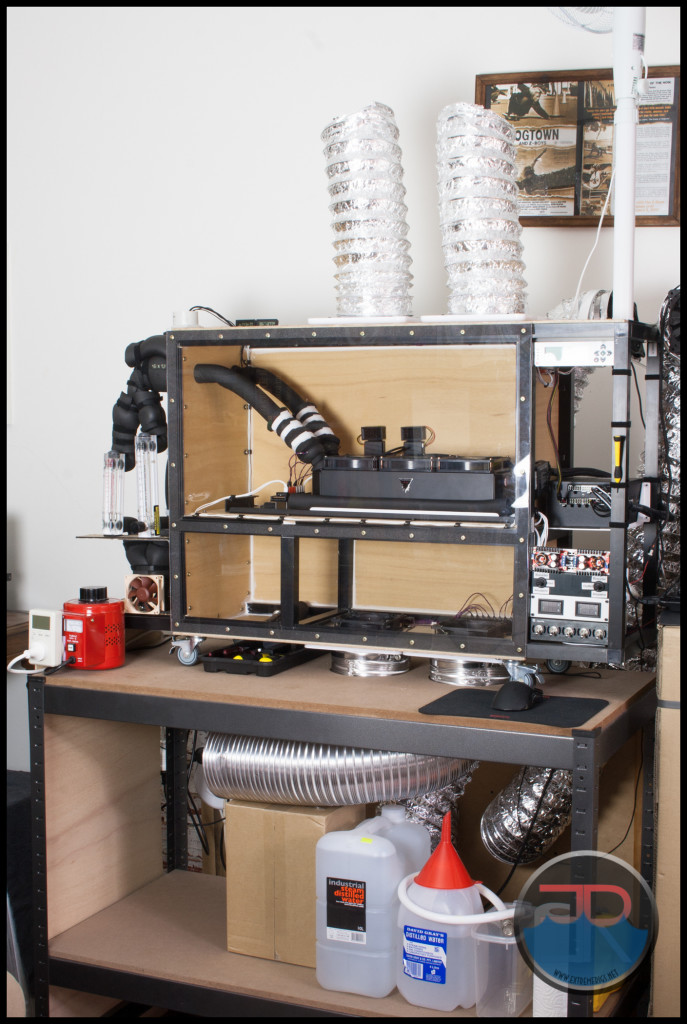
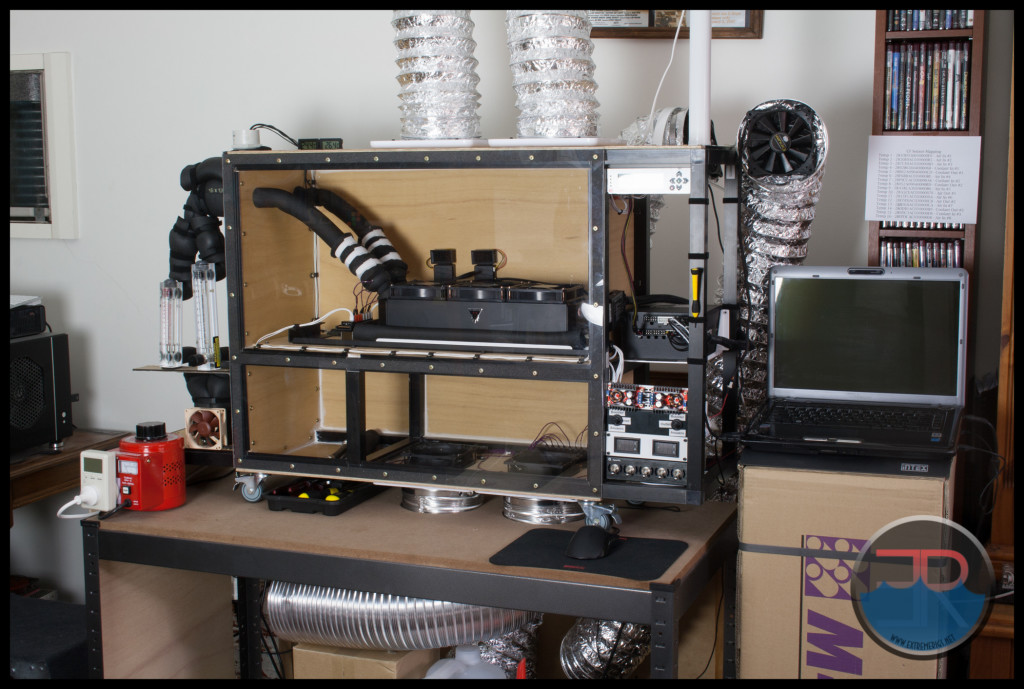
A large radiator has a whole lot of air being fed into it. Some of that air will be of slightly different temperature to the rest of it due to localized air pockets in the room as well as air currents in the room due to wind, doors opening or movement about the room. The only way to avoid such things is to use a chamber that the radiator is mounted in. However unless that chamber is temperature controlled, or large enough it can not be sealed and so is still subjective to air currents around the room. Ducting the inlet to such a chamber and baffling it therefore helps to shield the chamber from local air currents. Note that the inlet should not be too restrictive otherwise the airflow will also be restricted. This can be checked by measuring fan RPM – the fan should be running at the same speed it does when outside of the chamber.
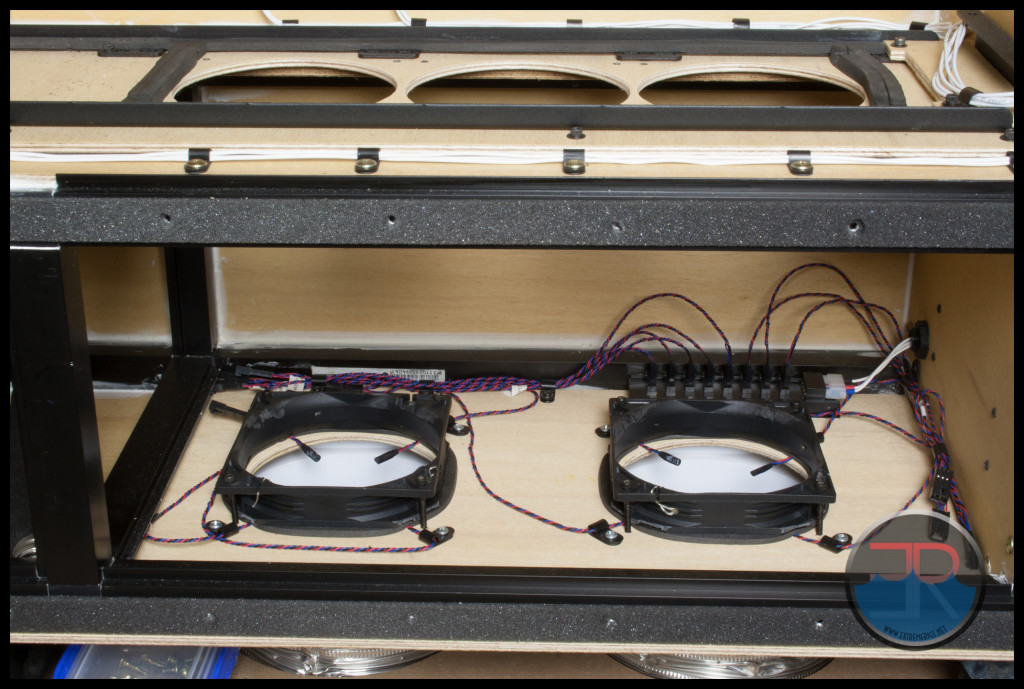
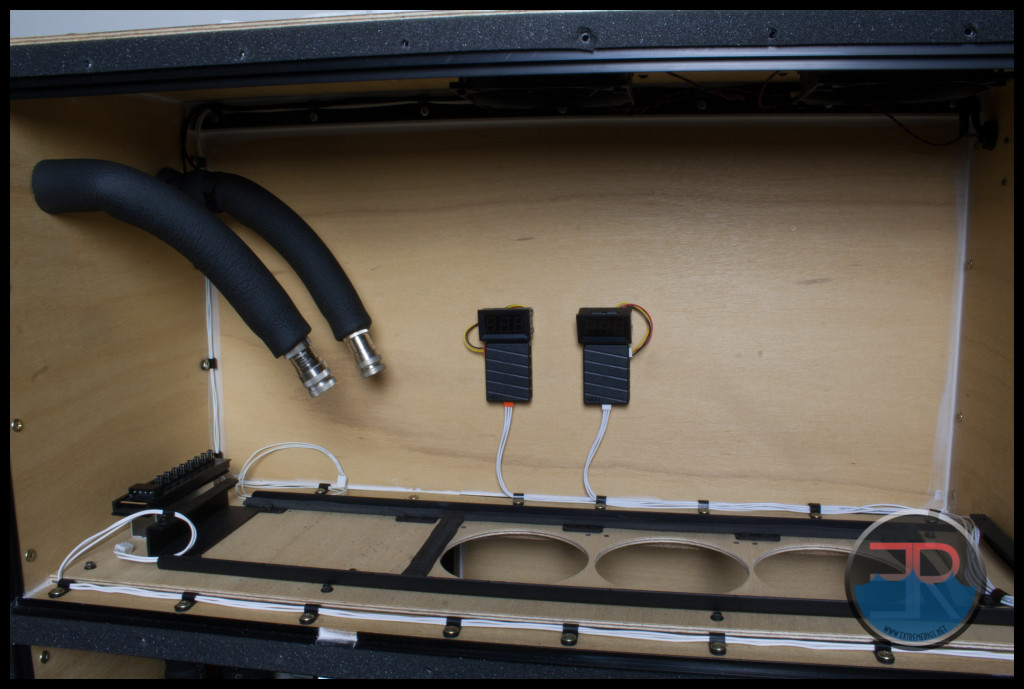
This is the test chamber that we built for this setup. Note a plexiglass window is installed in the front to seal the chamber.
RPM vs CFM
So now that you’re forcing consistent amounts of air through a radiator are you keeping the fan speed constant or are you keeping air flow constant? Then if you keep fan speed constant do you measure the air flow and do you plot performance vs air flow or vs fan speed? In an ideal world we would strip things down to the basic ideas – i.e. what really matters is the airflow through the radiator. Then you can simply test a radiator and correlate whatever airflow setting your setup has and measure off the performance. However for this to be possible we would need a database of many fans and their airflows through different radiators under different situations. However without such a huge database (and you can not trust a manufacturer’s fan specifications at all) then the data again becomes an approximation and at that point you’re back to correlating with one fan on one radiator. By testing vs RPM we are at least testing with one type of fan across each radiator. It’s also easier to understand at a glance and therefore for Noob’s to understand.
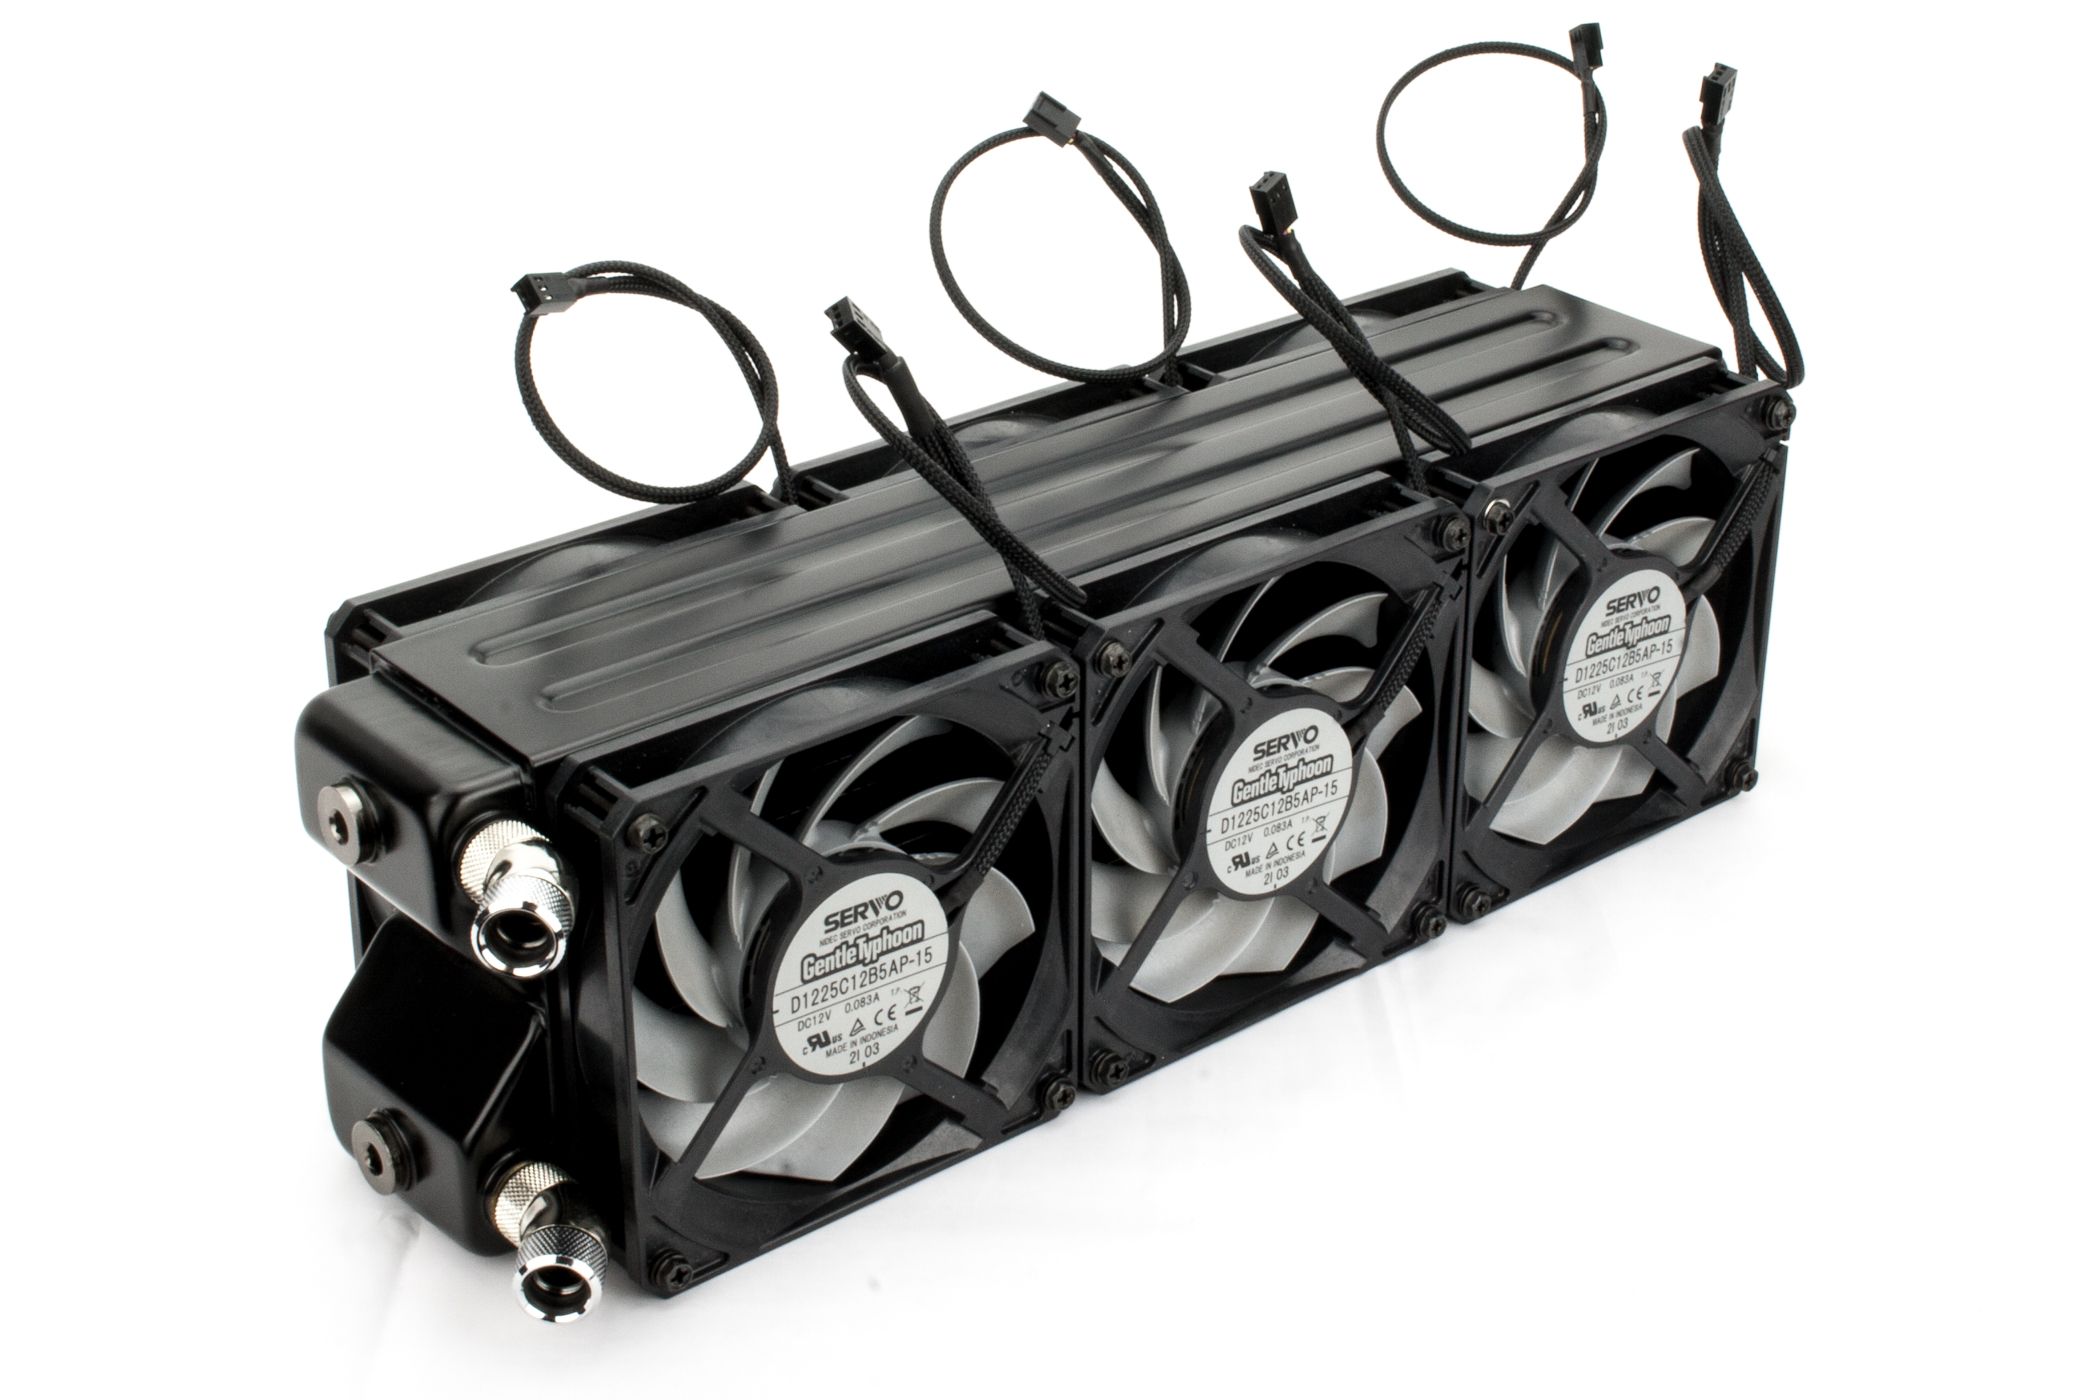
So yes – CFM is better in an ideal world, but sadly it’s not an ideal world that we live in. Therefore all our plots are vs RPM of the excellent Gentle Typhoon AP15. While this fan is essentially discontinued, the EK Vardar has very similar performance. For all other fans with less static pressure you may need to adjust the RPMs a bit in your mind (i.e. an 1850rpm AP15 might be equal to a 2000rpm lesser fan for example) for the equivalent performance.
Temperature Sensors
Now that you have a reasonably shielded air flow input that is unrestricted you need to measure the air temperatures coming in. This is not as easy as it sounds. The air temperature will still vary some amount across the ducts. We found that 8 temperature sensors were needed to get “acceptable” data for the air in temperature which was horribly noisey. As you are primarily concerned with air temperature in, then you can skimp on the air temperature out temperature sensors (which are more uniform anyway). We used two sensors for air out for example which is only used to generate the “Air Efficiency” metric that is of little interest.
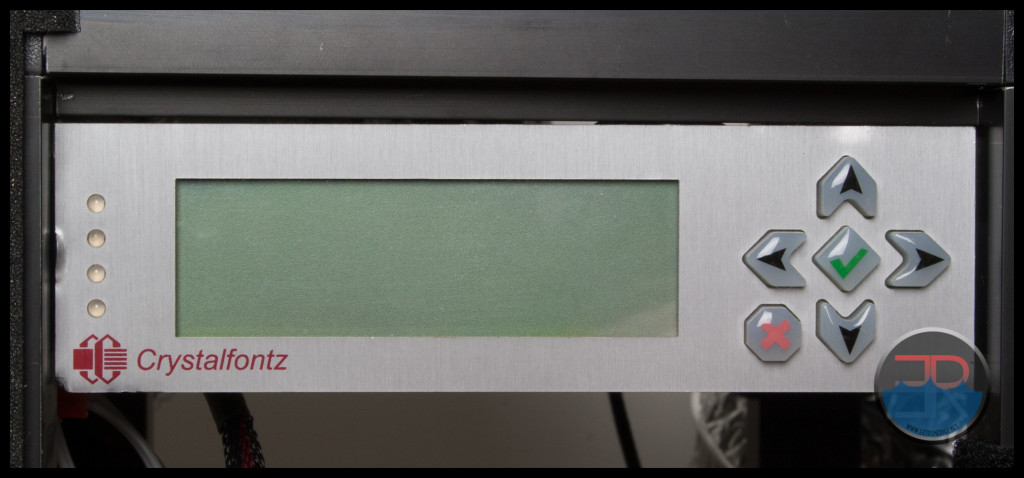
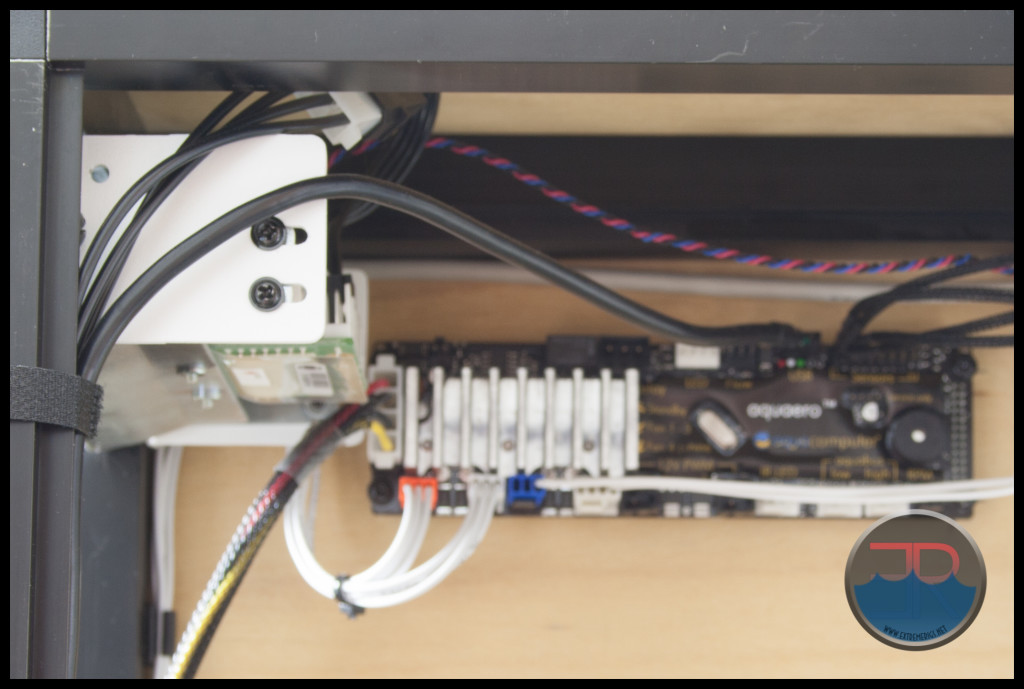
Now bear in mind that not all temperature sensors are equal. Our first iteration of the test rig used two Aquaeros and bunch of standard temperature sensors. These sensors even after calibration were found to be too inaccurate. Under a 300W load with fans at maximum speed we would see a 7-8 degree temperature delta. In order to acheive a +/- 1% error therefore we needed to have sensors with +/- 0.07 degree accuracy. The Aquaero setup was at best giving us 0.5-1.0C degree accuracy which is well beyond what was needed. We upgraded to a Crystalfontz setup with Maxim/Dallas “one-wire digital sensors”. Each sensor has an accuracy of 0.5C over a range of -10 to 85C. As we are operating in the middle of that range (30-40C) then we can expect greater accuracy, particularly after averaging many sensors:
Note that an offset on the mean doesn’t matter because the delta is a relative measurement and all probes used are the same. The sigma is really what is key here. The 3 sigma number is about 0.25 deg C. Because of this we fitted as many water sensors as we could (3 to inlet and 3 to outlet) in order to reduce the spread further. These coolant sensors had to be custom made where the sensor was glued into a fitting housing.
Ambient Drift
Assuming your chamber is not sealed then the air being fed into the chamber will have a certain temperature that will vary over time. This may be a slow drift through out the day or it may be a quick change as a door or window is opened, or an AC unit kicks on. Some reviewers make a big deal about having a temperature controlled environment by which they often mean that they have an AC unit programmed to a specific temperature but the temperature spike from an AC unit can absolutely destroy a set of results because it takes time for the system to equalize and settle out. Controlling ambients helps take out any common mode drift of your sensors, however if your sensors are good and generally drift together then a delta type measurement doesn’t get affected by it much. Controlling temperature spikes on the other hand is critical. Even in the case of a more advanced setup where a sealed temperature chamber is used, the chamber may still have heating and cooling devices that will kick on and off and cause such temperature spikes. The most advanced setups will use PID control to avoid spikes while maintaining a controlled ambient. Such systems however are very expensive, particularly in a large enough size to fit the test system as a whole inside. As we did not have such a system we had to make do with merely controlling the temperature spikes and suffering from some ambient drift. However ambient drift was minimized by only testing during the night. Daytime, and particularly sunrise/sunset caused too many problems in accuracy and repeatability so we went the extra mile and stayed up late for months on end to make sure we got the best data possible. How many reviewers would do that?
Data Logging
All these temperatures of course need to be recorded. There are two factors here:
1. The total amount of time you log for – i.e. the testing window. Generally the longer the window the more any temperature spikes get averaged out. However the longer period also means you are more likely to get a temperature spike. We decided to choose a 15 minute interval. Longer than that did give better data, but the downside was that it was hard to find a longer section of time that was clear of spikes. The other factor is that when testing a lot of radiators over a lot of different settings then the total time adds up. A review that never gets finished is a waste of time and at some point you have to say “it’s good enough”. We really do try and make things as scientific as possible, but even we sometimes have limits due to time and finances.
2. Logging frequency – i.e. how often is the data sampled. We did some experiments on this. Logging at either every 1 second or every 10 seconds showed little difference. However logging every 60 seconds showed an introduction of increased error. As 1 second produced tolerably sized data logs we went with that option. Do not ever manually log data by hand, for a start you can not do it fast enough. In addition humans are always the worst introduction of error, and the more you can avoid human error the better. Plus it means less work for the reviewer.
Heat Source
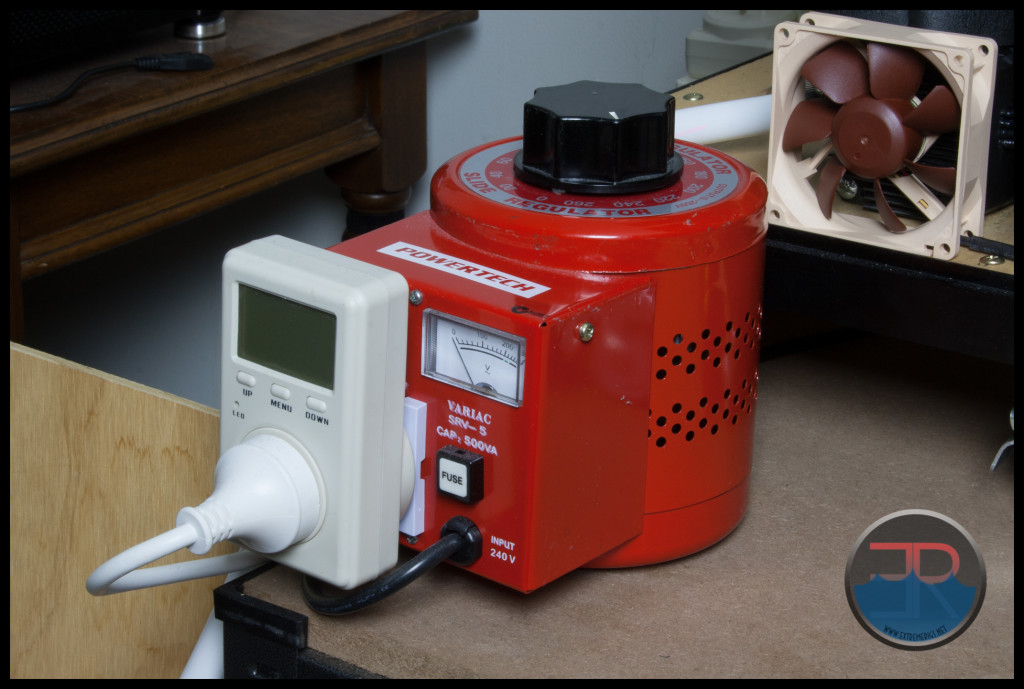
To test the cooling ability of the radiator we first have to heat it up. Some reviewers use a computer because they already have one and it gives the feel of “system setup” and how the radiator is used in real life. However this is a mistake in a similar way to a noob doing a ‘cpu block review’ by only ever looking at absolute cpu temperatures at idle load. The computer itself also cools coolant as well as heats coolant. You also have to wonder about consistent heat load. Running Valley for example on GPUs IMO is not good enough (which is why we test GPU blocks with Furmark instead). This is not said idley. Our initial setup tried to use this and the results were horrible. Our final setup used an inline wet aquarium heater located in a reservoir with a Variac to dial in the power load exactly. It also had to be modified to stay “always on”. So why is using a computer so bad?
Insulation
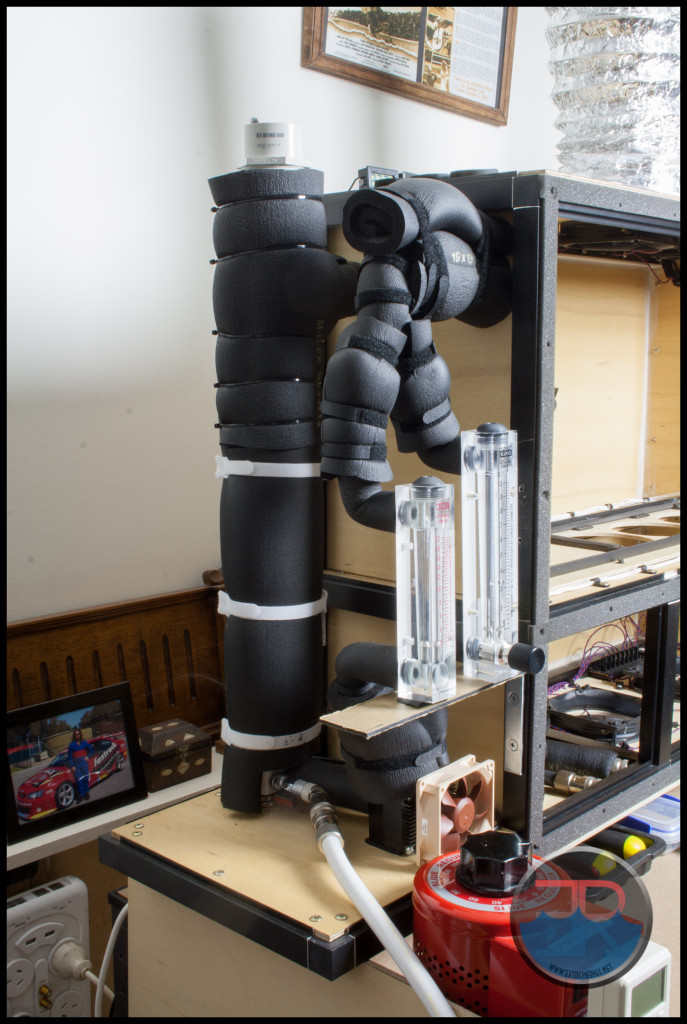
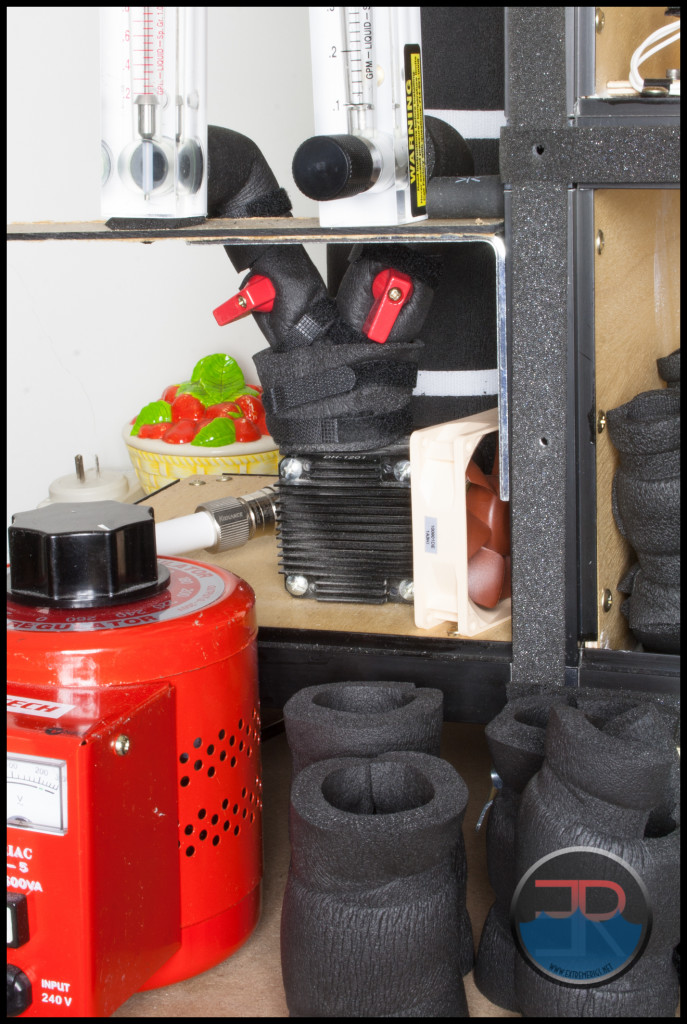
A computer as a heat source is bad because of insulation, or rather a lack of it. For a start you do not know the heatload going into the coolant. You can measure input power to the PC, but you have no idea what percentage of that power is transferred to the coolant. Once the coolant is heated, how much of that heat is lost to the surroundings before it gets cooled by the radiator? How does that amount of cooling vary depending on ambients or localized air flow changes. While we mentioned 7-8C deltas for the high air flow cases when running low air flow cases then the deltas can be significantly higher (20C). With a high temperature delta it’s actually quite impressive how much heat can be dissipated simply passively to the air by blocks, tube and fittings. To be accurate you have to insulate the crap out of everything *but* the radiator, which let’s be honest you probably don’t want to do with your PC. It is also worth using norprene tubing in order to provide some insulation on the tubes too.
The advantage of an aquarium heater sitting in the water is that 100% of the power turns into heat that transfers to the coolant because there is nowhere else for it to go. This gives the advantage that we can then calculate the coolant rise for a certain amount of power, or indeed the flipside of that. That is, the amount of power for a fixed coolant temperature rise.
Flow rate
What flow rate are you going to test at? Is it fixed or are you fixing pump power? In a test setup that uses a computer I generally favor fixing pump power because it means a more restrictive component will get lower flow just as it would in a real system. However as we are not using a “real” system to test then the system may be much more sensitive to restriction changes and so we decided to go with fixed flow rates instead. This will give a slight benefit to radiators that are more restrictive. Luckily the majority of radiators are not very restrictive. Sadly there is no right answer on this one, luckily it doesn’t matter much as long as you’re consistent.
The other factor is how do you achieve the flow? Obviously a pump is required but if you are fixing flow then how do you make it the same given different radiator restrictions. Do you use a fixed pump power and then vary flow with a tap/faucet or vary the flow of the pump by PWM or voltage control? We are using the heater power input into the loop as a factor in the calculation so we either need to know or limit any pump power dump to the loop. By measuring the pump power we could try and choose some percentage to add as a fudge factor. However it’s hard to know what the fudge factor should be. I believe Martin (of Martin’s Liquid Lab) used 6W out of 15W measured for example. However instead we took a different approach. We tried to reduce power dump to the loop by using a DDC pump with PWM. DDC’s generally do not dump much heat to the coolant anyway. In addition PWM generally causes the pump to heat up less than a voltage controlled version. The DDC then had a heatsink attached with a fan blowing air on it so as to avoid any pump heat being dumped in the loop. At the end of the day this is a source of error and we hope that the heatsink only dumps heat from the pump, and does not cool the coolant. We also hope that the pump itself does not dump any heat to the loop. We also avoided using a faucet to control flow as they can sometimes cause turbulence that can affect results.
Repeat, Repeat, Repeat…
How do you know how good your results are? Well do they make sense, are they inline with expectations? Do the measurements and calculations still work when the heater is turned off. Are they repeatable? Before we embarked on retesting all our rads for the 2nd time in the “improved” setup we did tons of correlation runs to prove out repeatability. Then after every five runs we repeated a radiator in order to make sure nothing had drifted over time. With all this repetition we never saw more than 2% between results, indicating a possible +/-1% test error. In addition we took a minimum of 2 data runs and averaged for increased accuracy. Later tested radiators would often have 4-10 runs in order to increase accuracy further. The push/pull numbers that average across all three flow rates are expected to be even more reliable.
Retrospect
In retrospect it might have been better to increase and decrease heater power so that approximate deltas always remain the same. Running a 15C delta at all times for example would really help the high air flow cases were errors will be larger due to smaller deltas in the current setup.
So in summary..
1. Build a test chamber
2. Duct the inlets
3. Use really accurate temperature sensors
4. Use lots of these temperature sensors
5. Control ambient temperatures as much as possible both static and dynamically
6. Log over a long enough time period
7. Log frequently enough
8. Use a modified always on aquarium heater that lives in the coolant
9. Insulate everything. Use Norprene tubing. Insulate some more.
10. Fix flow rate rather than pump power
11. Either isolate pump heat from the loop, or measure the pump power, insulate and correlate the heat dump to the loop, then add to your calculations
12. Repeat tests every so often to check for drift over time and that accuracy is meeting expectations
If you’re comparing our numbers to a review that hasn’t gone through similar steps then the results are simply not going to be as accurate. Now if you’ve made it through all of this text – you’ll be hungry for some real data, and you’ll be aware of just how bad some other test data is that is out there. We are not trying to belittle the work of others but instead we hope to set standards for increased testing accuracy that help to reward good design! Inaccurate testing rewards poor products which leads readers to buy poor products.
And now… finally… results are up next!
Test Results – Flow
Results – Flow Data
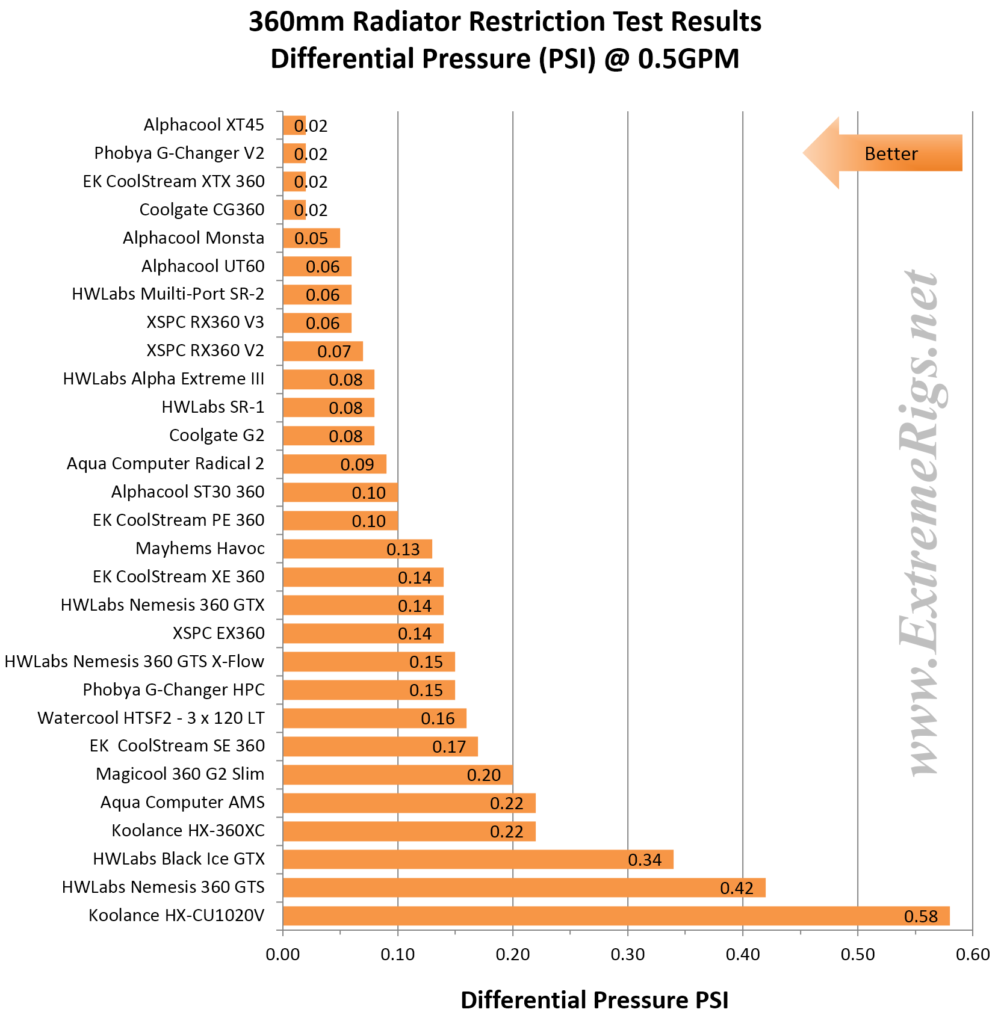
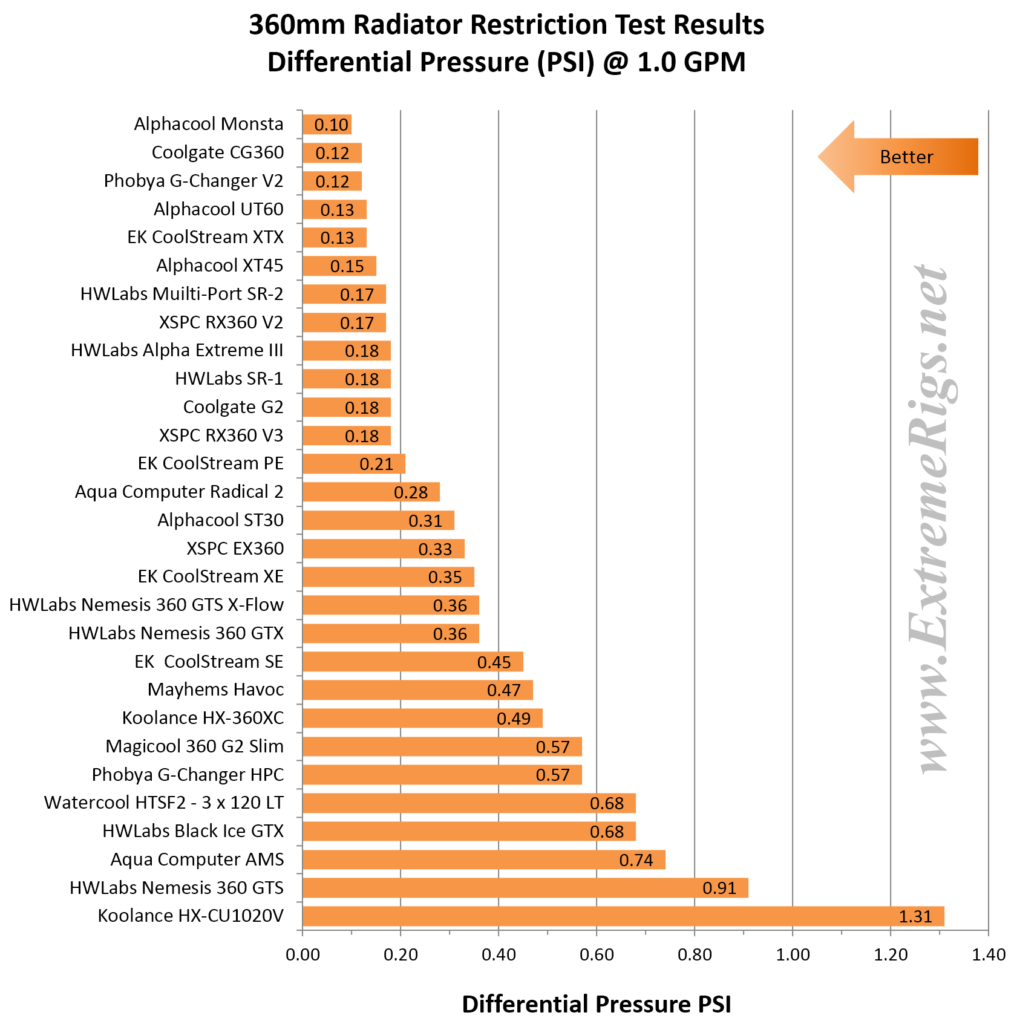
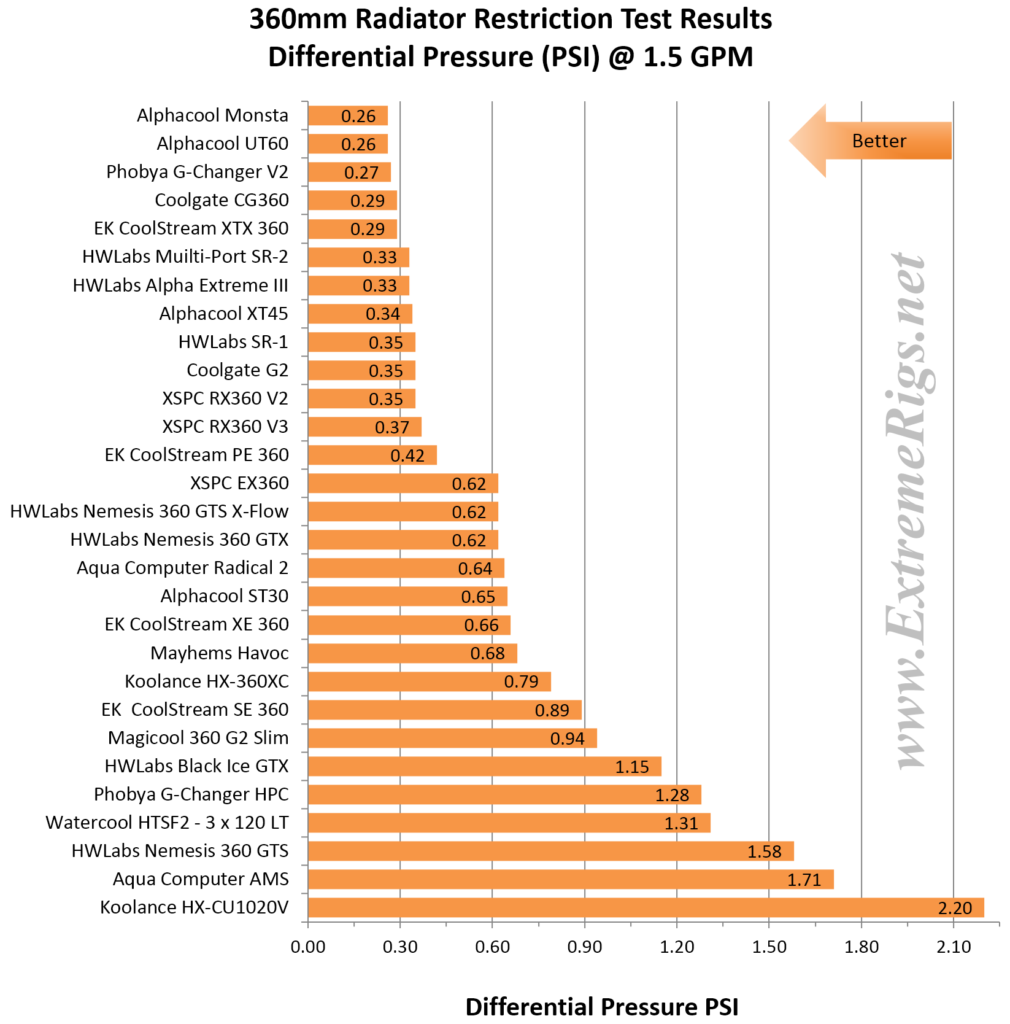
Let’s start with the boring flow results. In general radiators are quite low in restriction and the restriction is generally determined by the total cross sectional area of the tubes in the radiator and how many passes of the radiator the coolant does. Each individual radiator’s review page has their full pressure/flow data, here we are going to focus on a comparison of the restriction e.g. pressure loss across the radiator at specific flow rates. This makes it much easier to compare:
At 0.5GPM none of these radiators are particularly restrictive, however the Hardware Labs Nemesis GTS and Koolance HX are particularly worse than any other radiator. This is not just because they are slim, because other slim radiators such as the Magicool G2 Slim are not so restrictive.
At 1GPM nearly all of the radiators still have acceptable restriction, however again we see that the GTS and Koolance are just significantly different than the rest. If you are running multiple radiators in series, you may need to consider dual pump options for the bottom few radiators.
If you are running multiple radiators in series and wanting to achieve high flow rates then there are plenty of options. Nearly half of the radiators have less than 0.5 PSI pressure drop at 1.5GPM. That is really low!
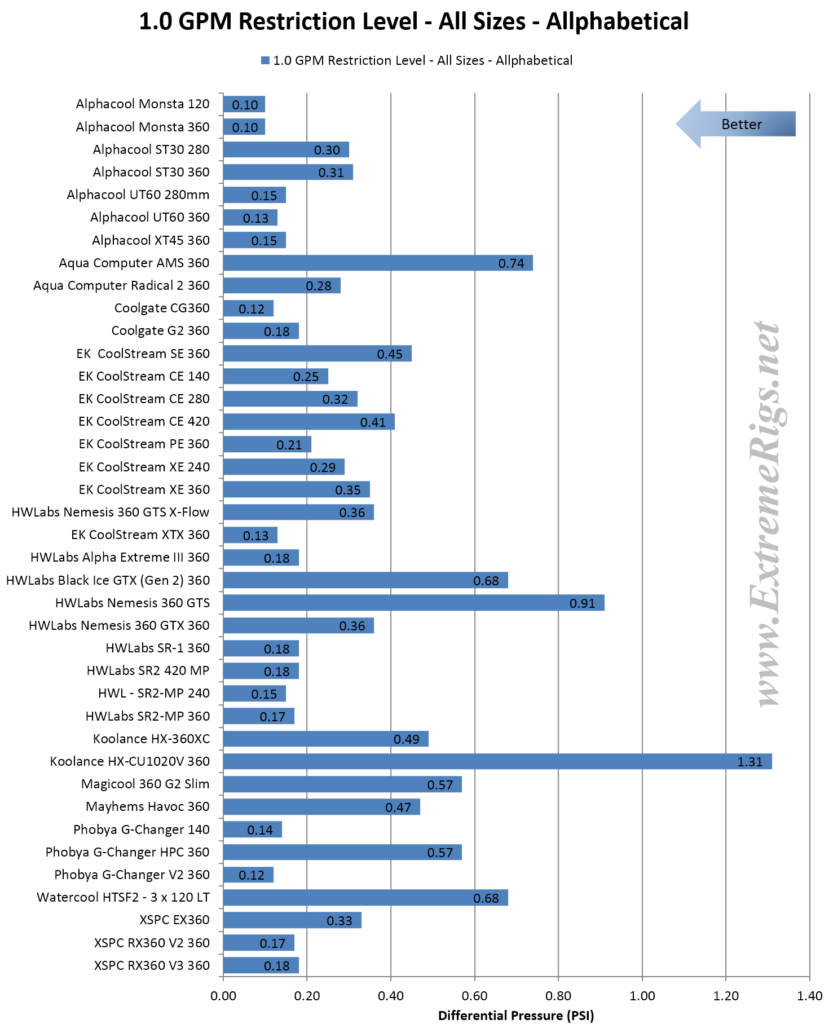
Just for interest let’s compare all the other radiators we’ve tested including other sizes – this time sorted alphabetically:
Now let’s look at the far more interesting thermal performance.
Test Results – Thermal
Results – Thermal Data
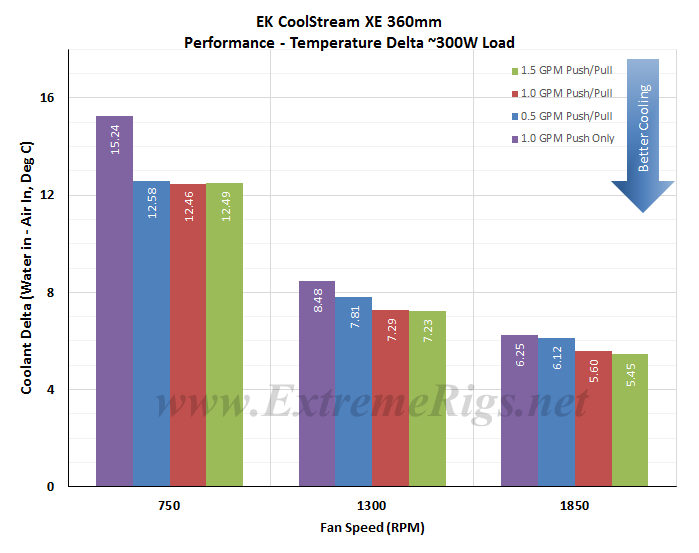
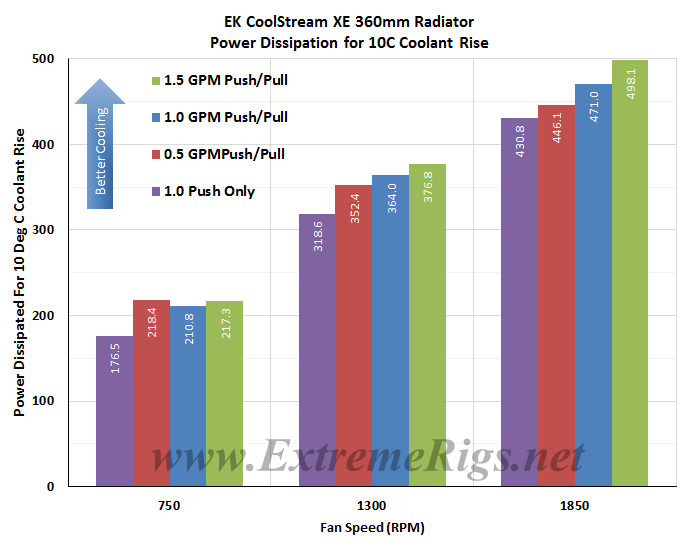
We tested three fan speeds and three flow rates as we were intrigued just how things changed with flow rate as we had never seen it tested before. Each individual radiator’s specific detailed thermal test data will be featured in their individual review. But we’ve included one example here to try and help give perspective on the numbers and results before we launch into the big round-up wide comparison. So let’s take the EK XE 360 as an example: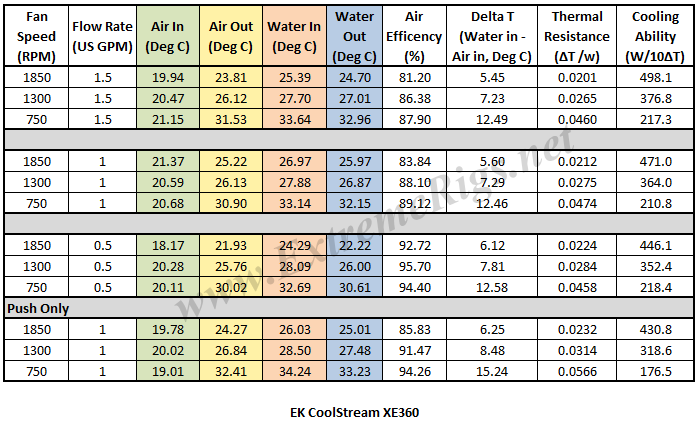
Above is the final data results gathered from at least 2 data logging runs at each flow rate and fan rpm combination. The most stable 15 minute period from each logging run was used and then averaged with the other runs to obtain the data for the table below. A total of 16 temperature sensors were used in the thermal test chamber (8 air in, 2 air out, 3 water in, 3 water out) each take a reading every second and logged via a CrystalFontz unit. The data in the table above is the result of the logging runs which has then been used to create all the plots and tables there-after.
Like the vast majority of the other radiators tested, the XE 360 cares little about flow rate, particularly above 1.0GPM. Here are some plots to show the variance:
So the performance is not greatly affected by varying flow rate. However Delta T is not always helpful when thinking about how many radiators you would need to cool your system. Instead it’s more useful to know the delta/W, or more usefully, the inverse metric of W/delta C. This also enables us to calculate the power dissipation and take out secondary effects such as pump power variance and system power losses that might vary with flow.
The metric plotted below tells us how many watts are dissipated by the radiator when the coolant rises 10C above ambient temperatures. (10 Delta T):
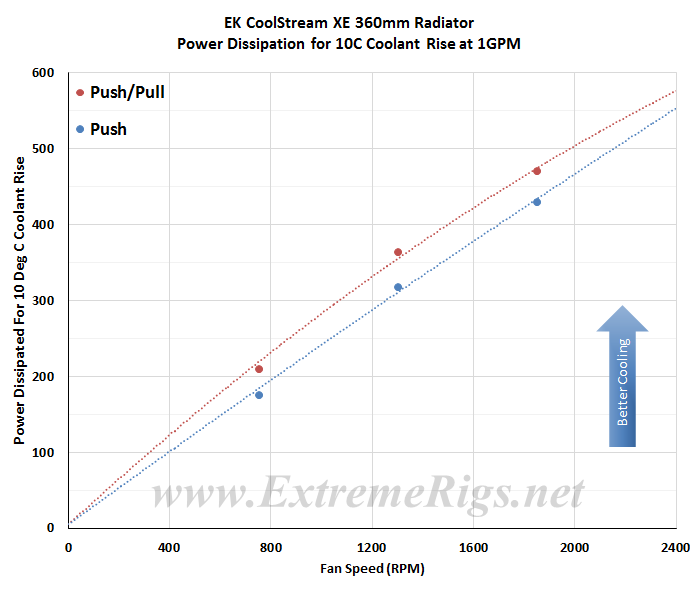
As expected increasing fan speed and therefore airflow through the radiator is the primary determinant in changing the radiators performance. This data can now be plotted as a pretty curve so that an end user can interpolate their own fan speed. Note again that the extrapolation of the curve is much more sensitive to error than in between the tested range.
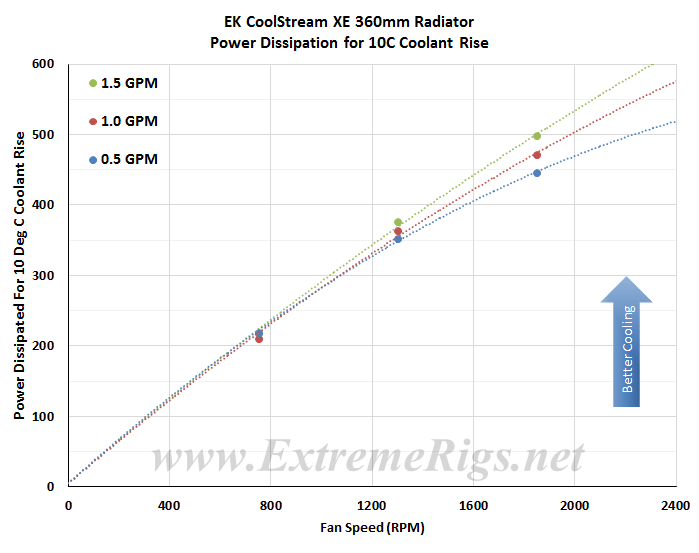
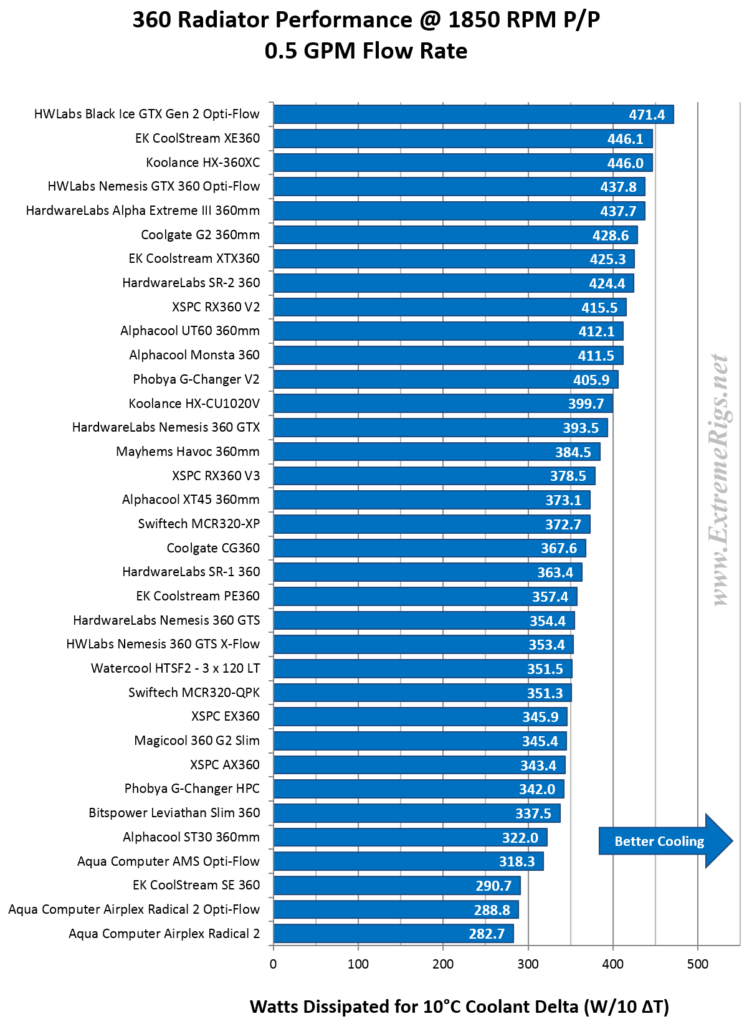
This makes it easier to see that at higher fan speeds that a low flow starts to impact the cooling performance. This makes sense if you take it to the extreme and think about a very low flow rate where the coolant is already cooled 99% of the way to ambient with 10% of its journey through the radiator. In this extreme example the radiator is not being efficiently used. 90% of the radiator surface area would then be wasted and you could have used a smaller radiator. Nearly every radiator performed the same way, i.e. at the air flow rates of interest increasing flow above 1GPM does not seem to help or hurt the radiator performance. However dropping to 0.5GPM can show some loss of performance at high airflow.
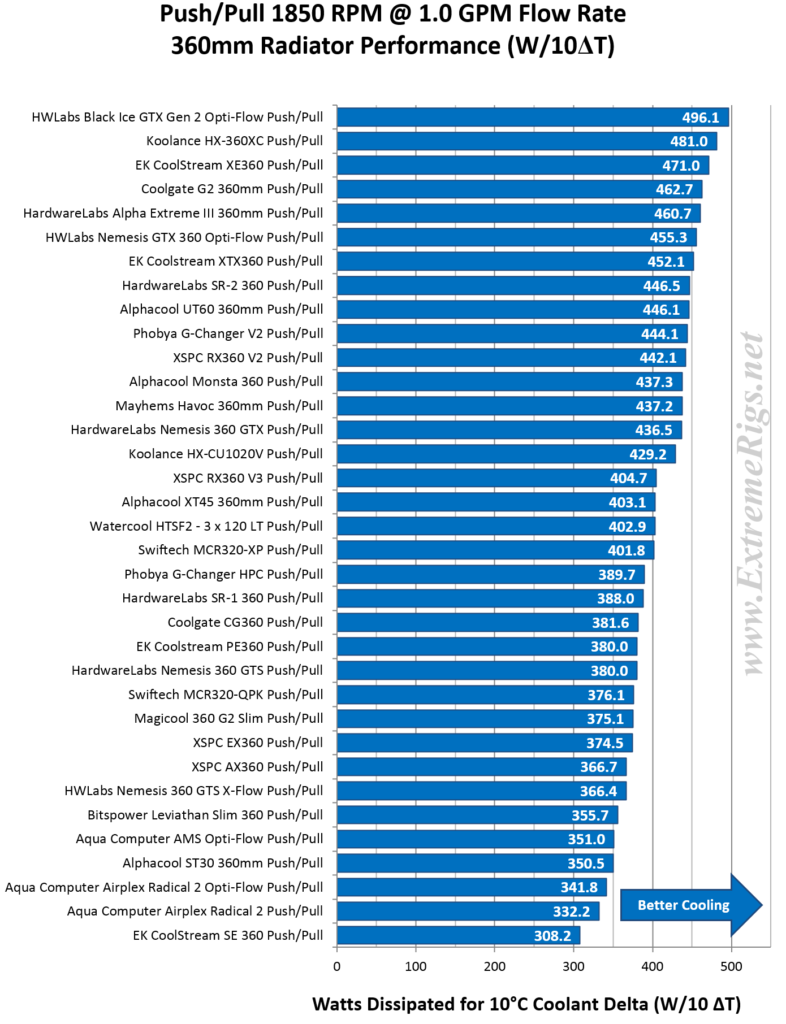
Lastly we can also compare the Push Only to Push/Pull results at 1GPM:
Each radiator had a different split in performance between push and push/pull depending on it’s own air restriction.
So now that we understand what the results are for one radiator let’s analyze that data by comparing to other radiators in a variety of ways.
Thermal Data Analysis
We find that the W/10DeltaT numbers are by far the most useful way to look at performance. If we put all these numbers together in tables then we have a sea of numbers and it’s hard to see exactly which radiators are good or bad even if we color code the results:
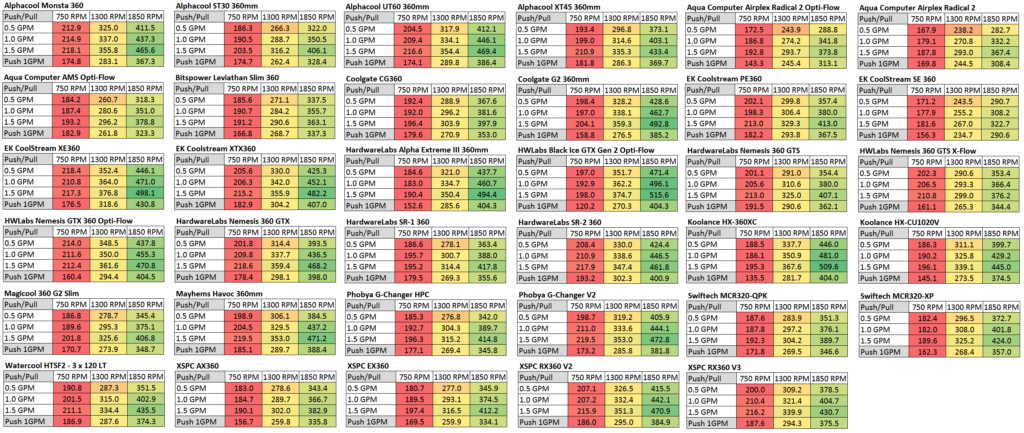
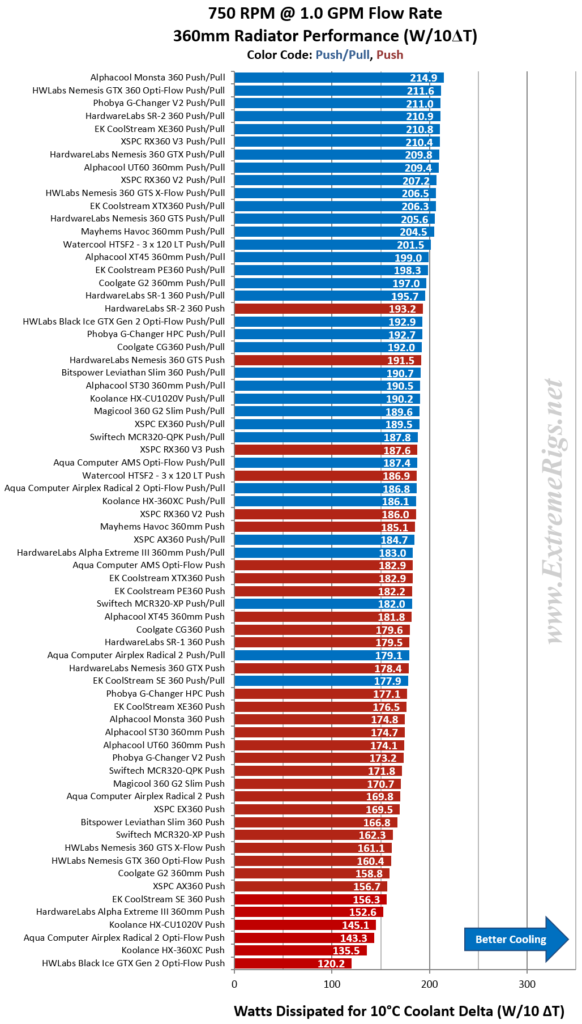
So let’s split up the test points and compare each in turn starting with the push only data at 750RPM.
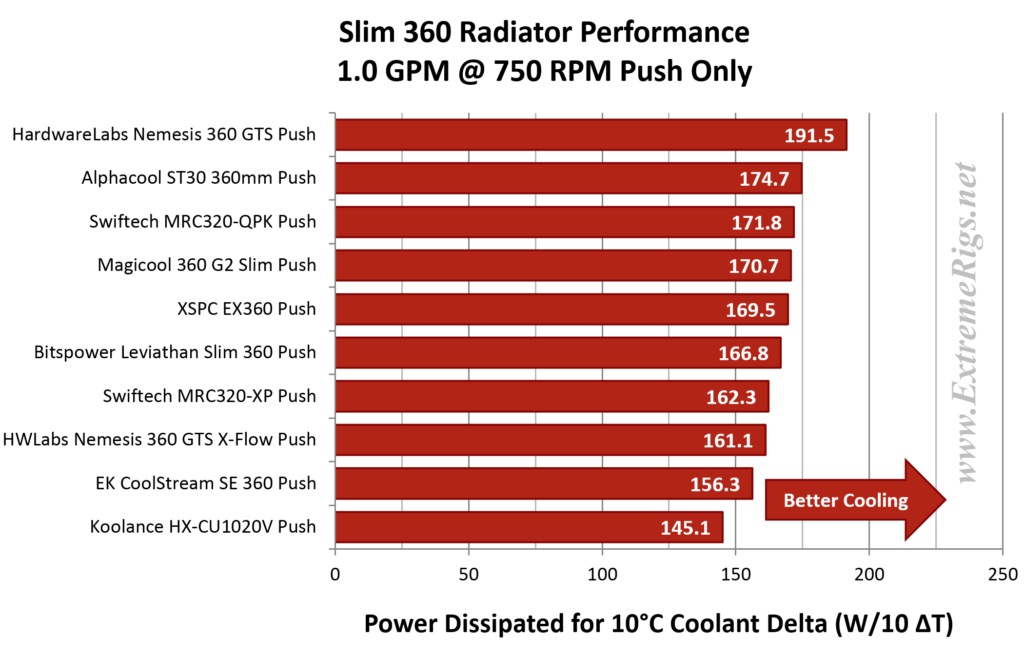
Performance with GT AP15 Fans in Push at 750 rpm Comparison:
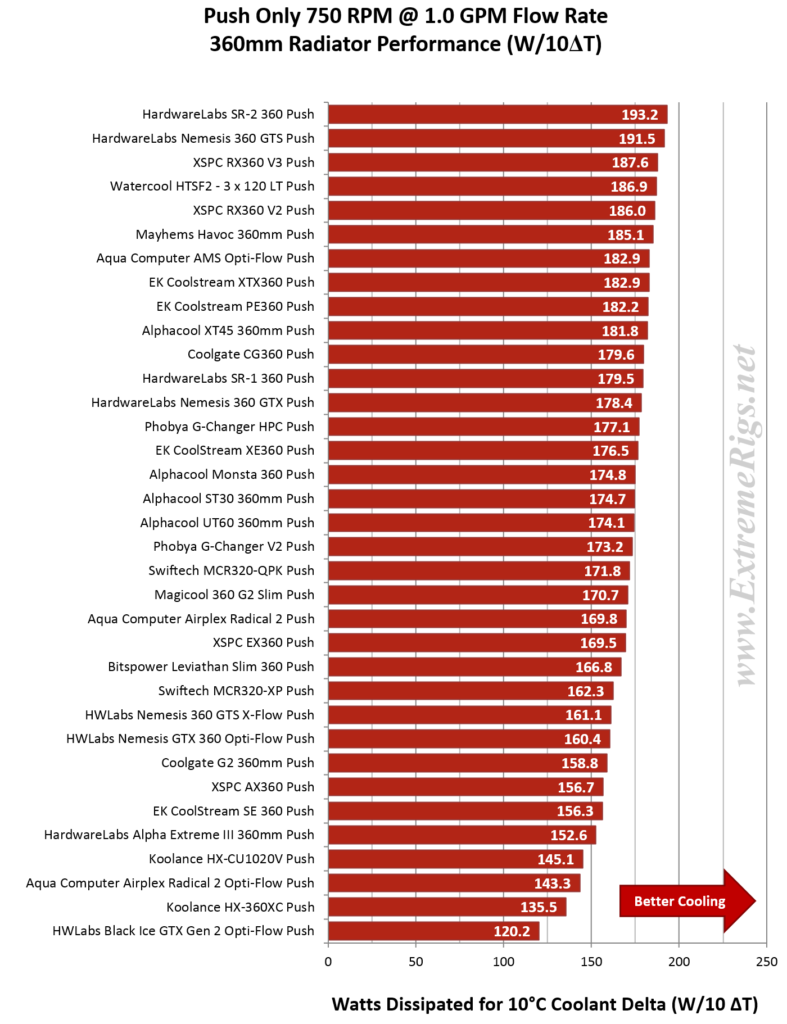
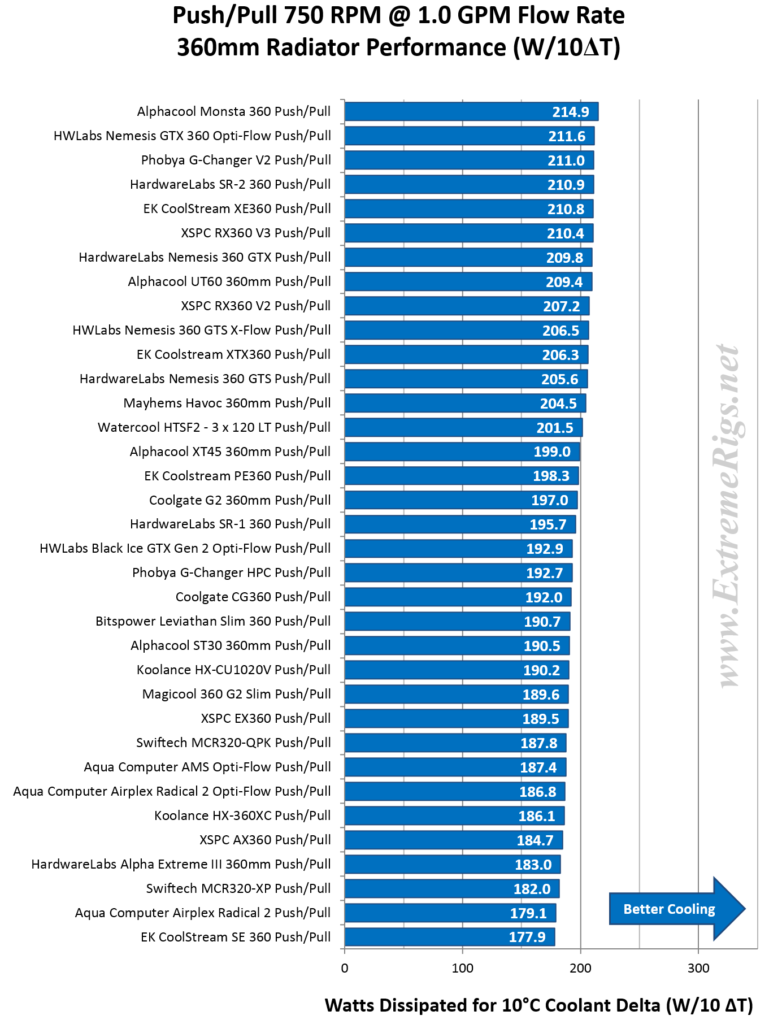
First off let’s note just how low these power dissipation numbers are. A single 360 radiator at 750RPM is going to struggle to cool a fully loaded overclocked hex core cpu or GPU. At 750RPM we can also see that in the middle of the pack that 22 radiators have only a small difference between them – approximately 20W or 10% is the total spread of those 22. The lowest two performers are radiators with very dense fins (high fpi) that are geared towards much higher air pressures/flows. At this low RPM the fans can not push much air through the dense fin structure. While the SR-2 leads this plot the real surprise is just how well the slim HWLabs Nemesis GTS radiator does. Usually a slim radiator is a performance compromise, but here we are not seeing any compromise.
As this is our first real comparison plot it’s worth again reiterating our measurement error. Despite our best efforts to measure everything far more accurately than any other test has been done we still end up with at best a +/- 1% error. With 22 radiators taking up the same 10% then clearly there is a lot of performance overlap.
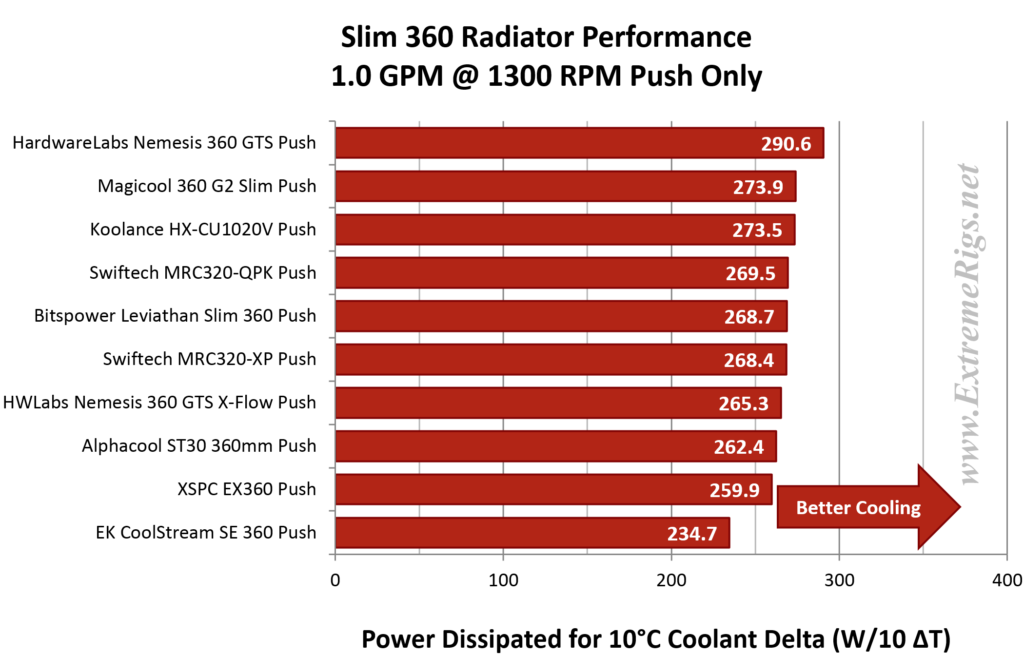
Let’s now focus on only the slim radiators – these are radiators that are below 35mm in width:
While the Nemesis GTS didn’t stand out before when comparing all radiators, once the other slim radiators are isolated it’s much more obvious just how much of a dominating result it is.
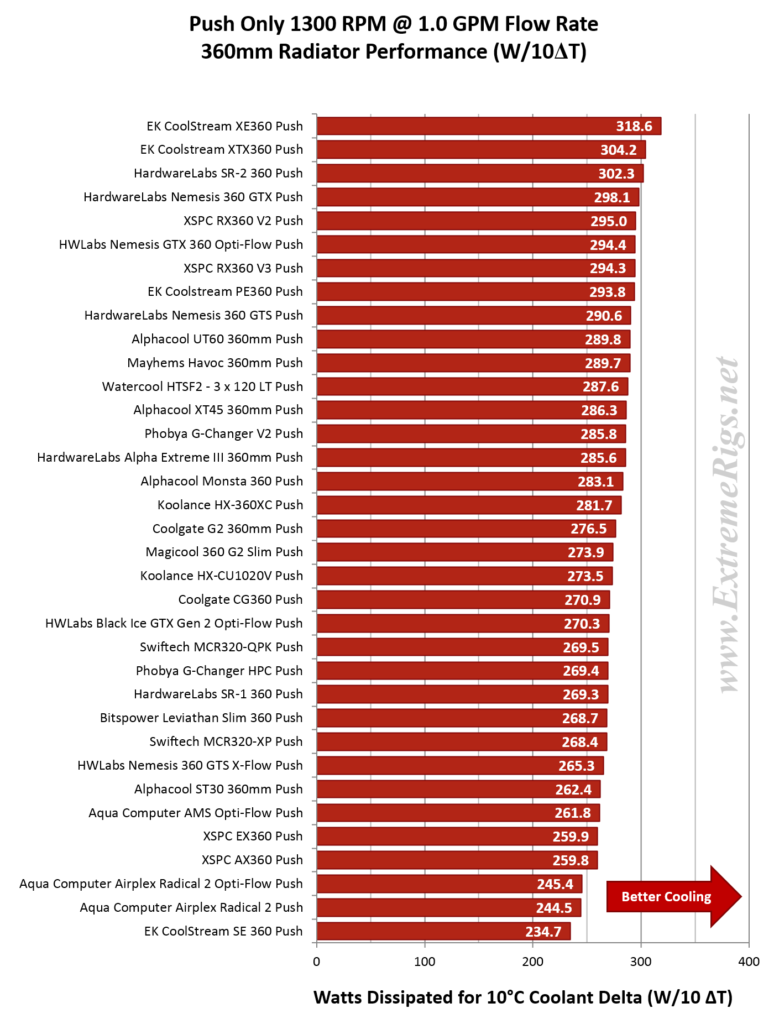
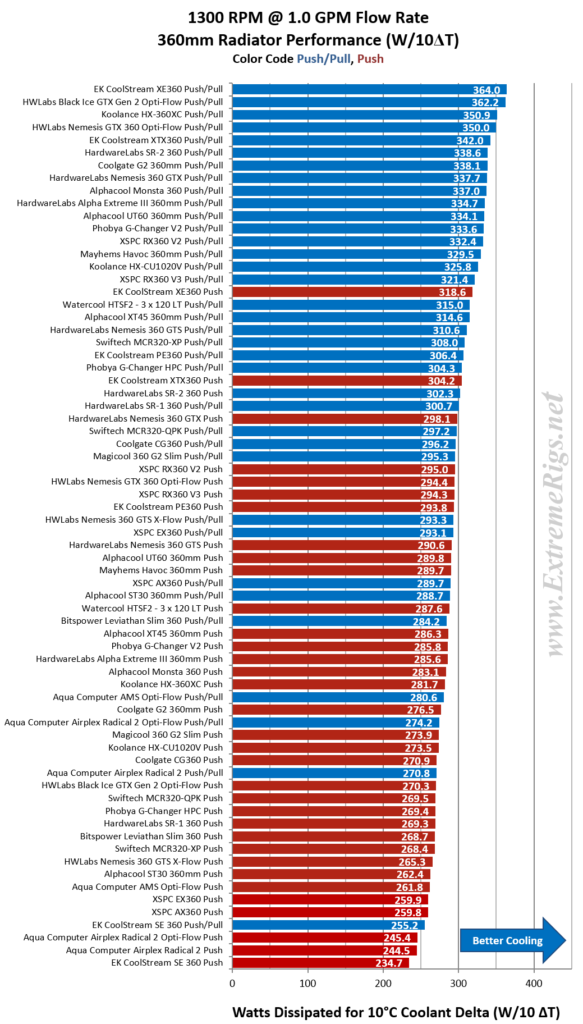
Performance with GT AP15 Fans in Push at 1300 rpm Comparison:
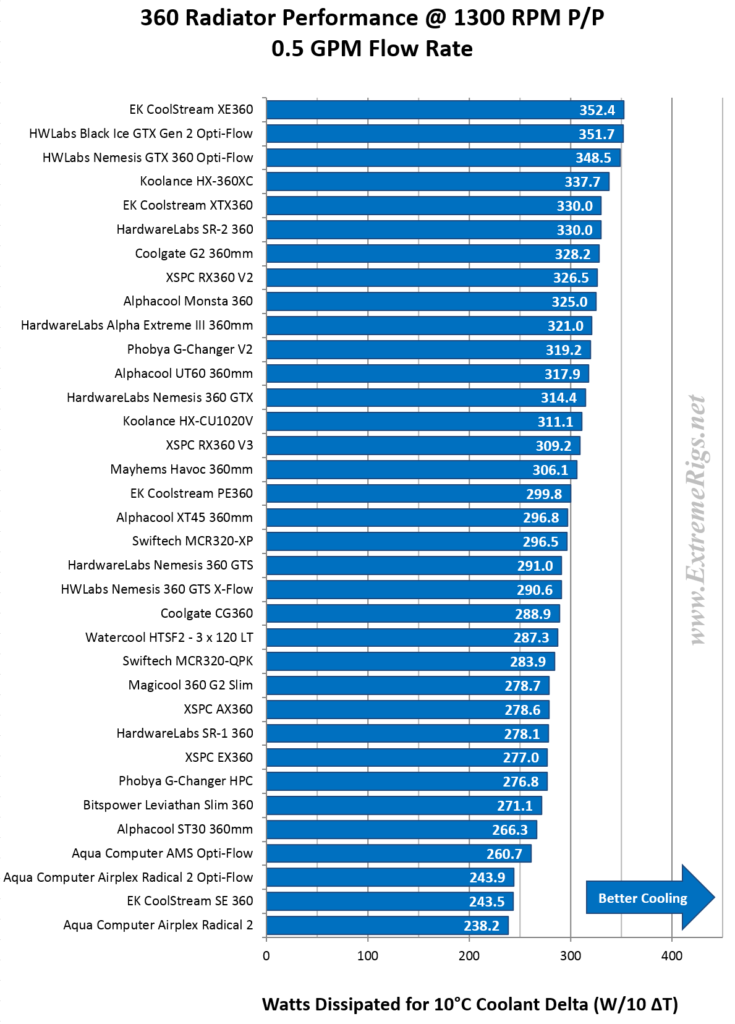
At 1300 RPM fan noise levels are still very quiet but we see a meaningful increase in amount of power that can be dissipated. We also start seeing the group spread apart a bit. The XE takes a clear lead of ~5% over the next radiator which is far beyond our measurement error. While the main pack has spread out a small amount the most noticeable thing is that the super dense radiators that really struggled at 750RPM have now accelerated up the charts.
If we focus on the slim radiators only we see that the Nemesis GTS is still in the lead by a good chunk:
While EK’s SE trails at the bottom of the pack it should be remembered that the SE is not only the slimmest radiator at 27mm but it’s also narrow. This means that it has the smallest volume “core” of any radiator in the test.
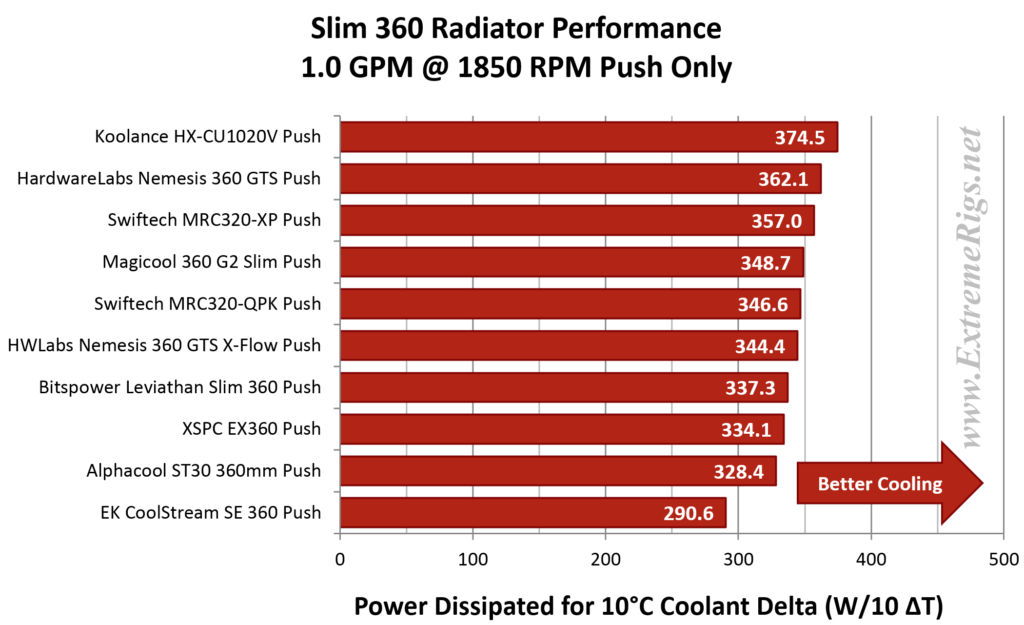
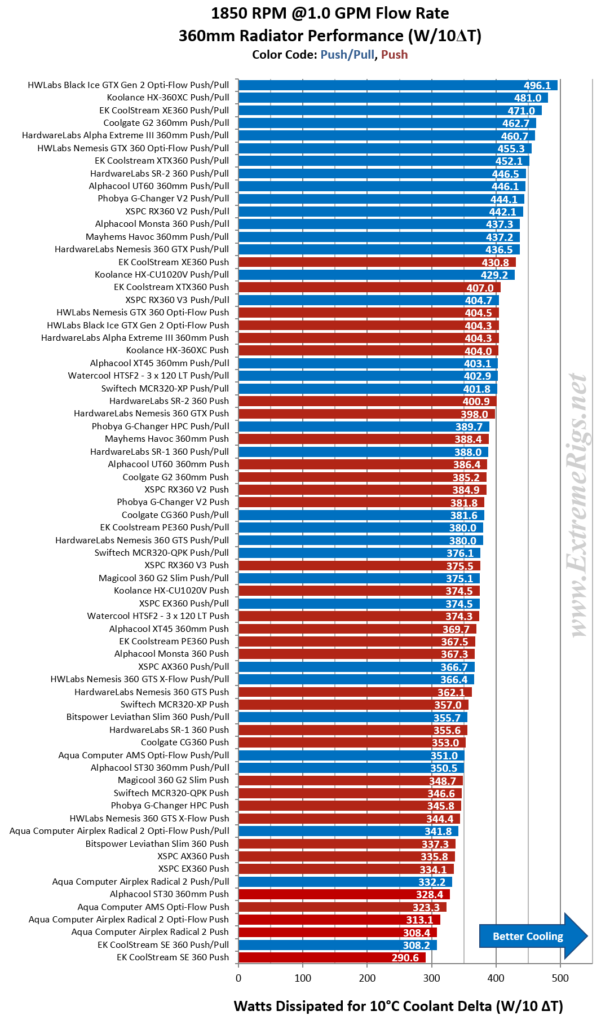
Performance with GT AP15 Fans in Push at 1850 rpm Comparison:
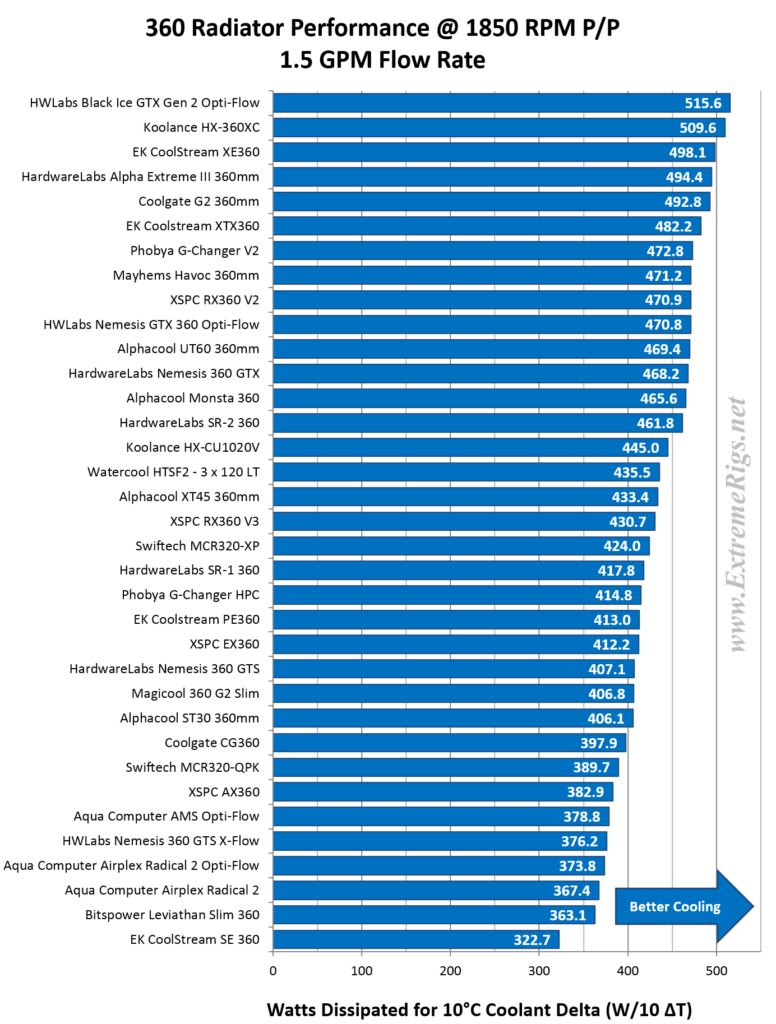
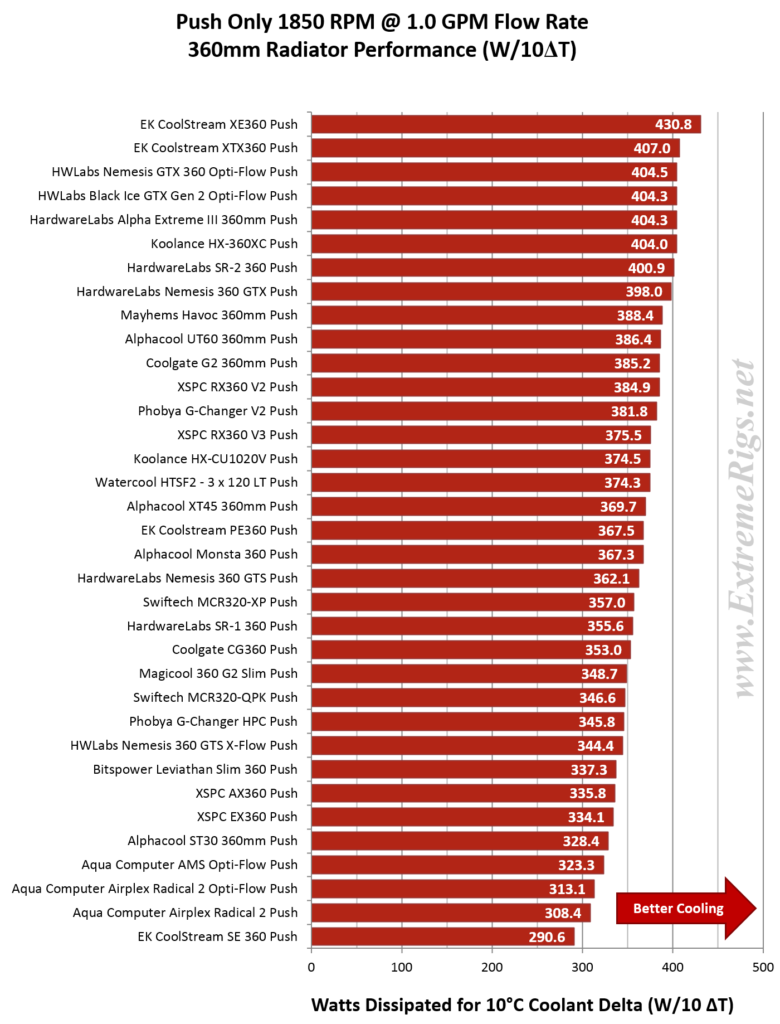 At 1850RPM fans become noisy enough to annoy those with sensitive ears. However the performance jump here is significant. The XE is extending it’s lead to 6% over the next nearest radiator. This is a huge surprise that given all the radiator improvements we’ve seen over the years that one radiator could dominate this test point so much. At this air speed we really start to see the thinner radiators starting to fall behind. In particular the slimmest design, EK’s SE, is now 33% behind it’s thicker brother (XE).
Unlike the EK’s XE, the Nemesis GTS does get overtaken at this higher speed. Koolance’s radiator is designed for higher airflow as it has a much more dense array of fins. Therefore this is not unsurprising.
Push/Pull
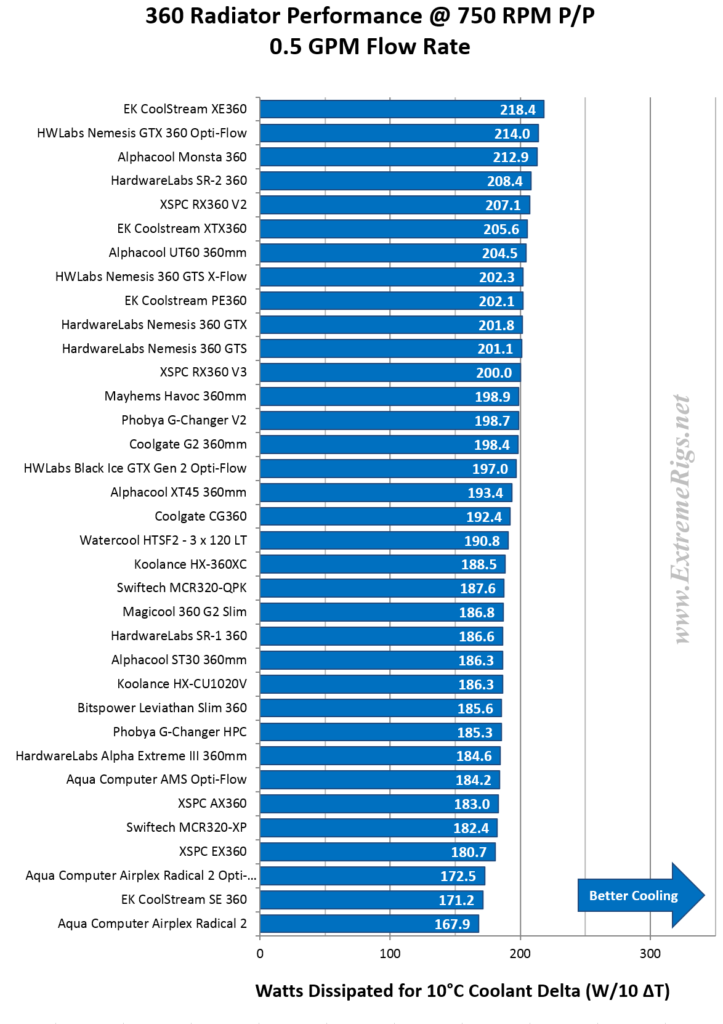
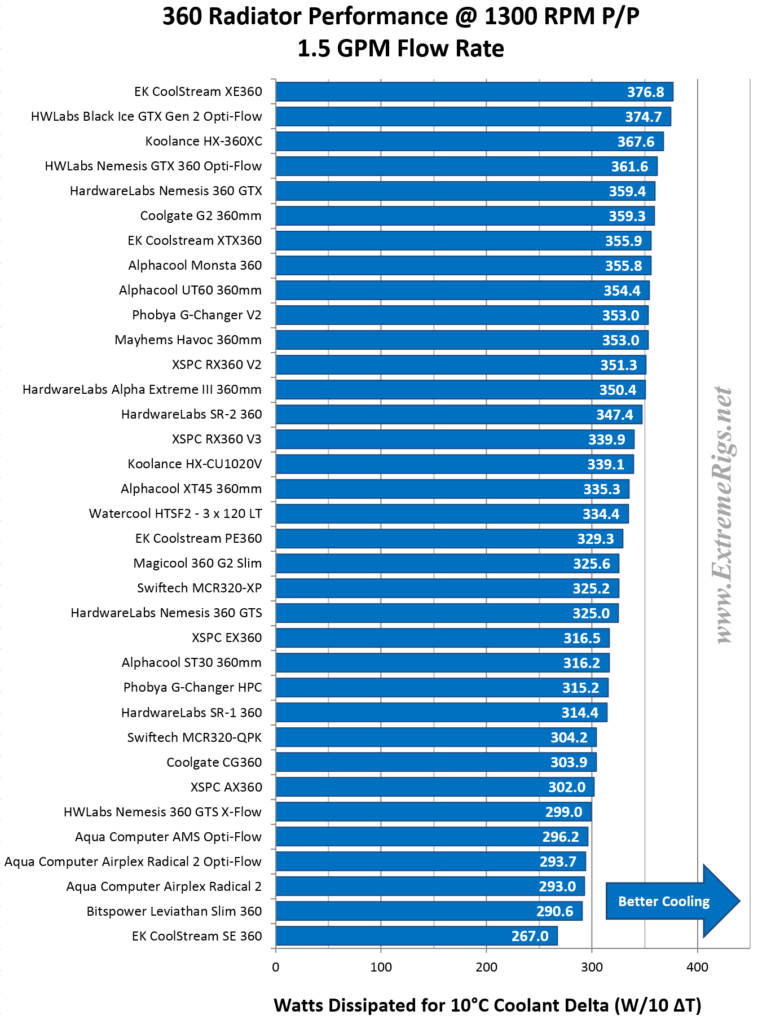
For Push/Pull data we measured 3 flow rates. Most radiators showed little variation with flow. Therefore in order to keep our extensive array of plots down we’ve chosen to just show the average of all three flow rates by default. If you’re a numbers junky we have presented all the flow rate data behind a spoiler at the bottom of this section.
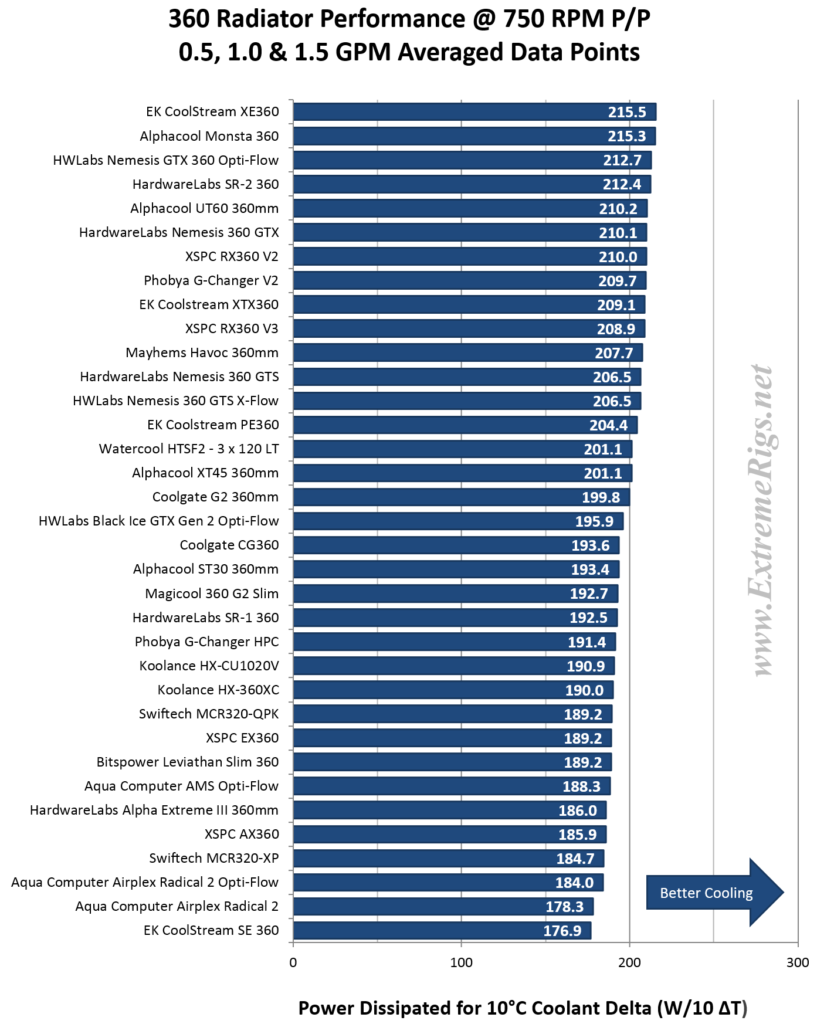
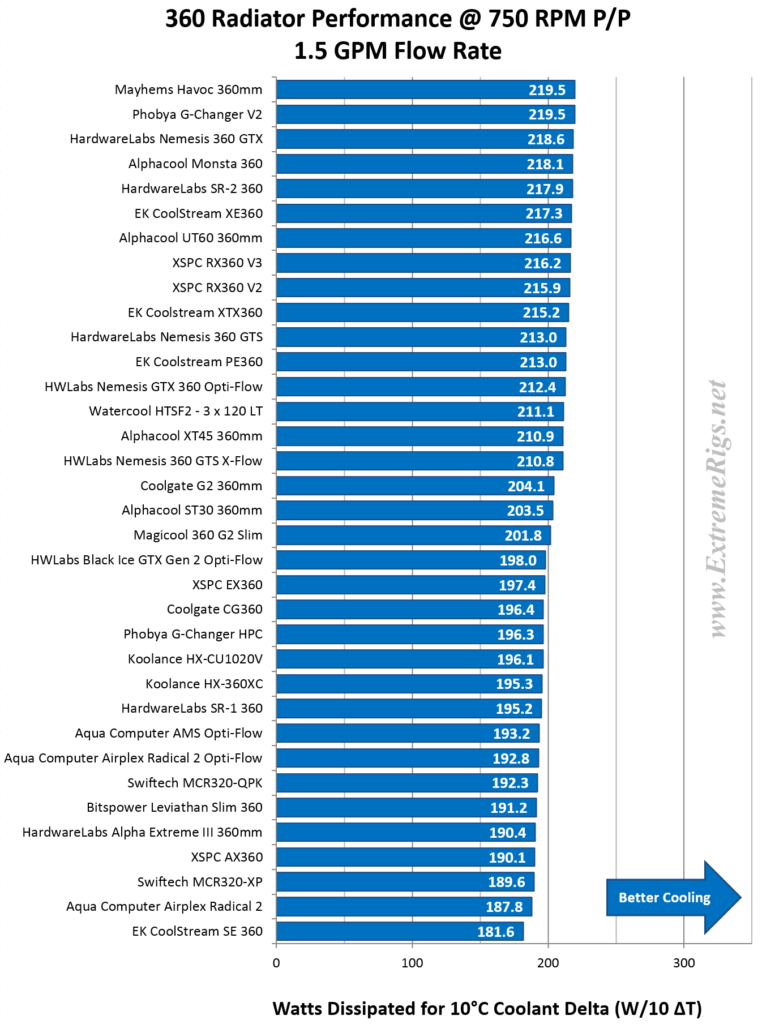
Performance with GT AP15 Fans in Push/Pull at 750 rpm Comparison:
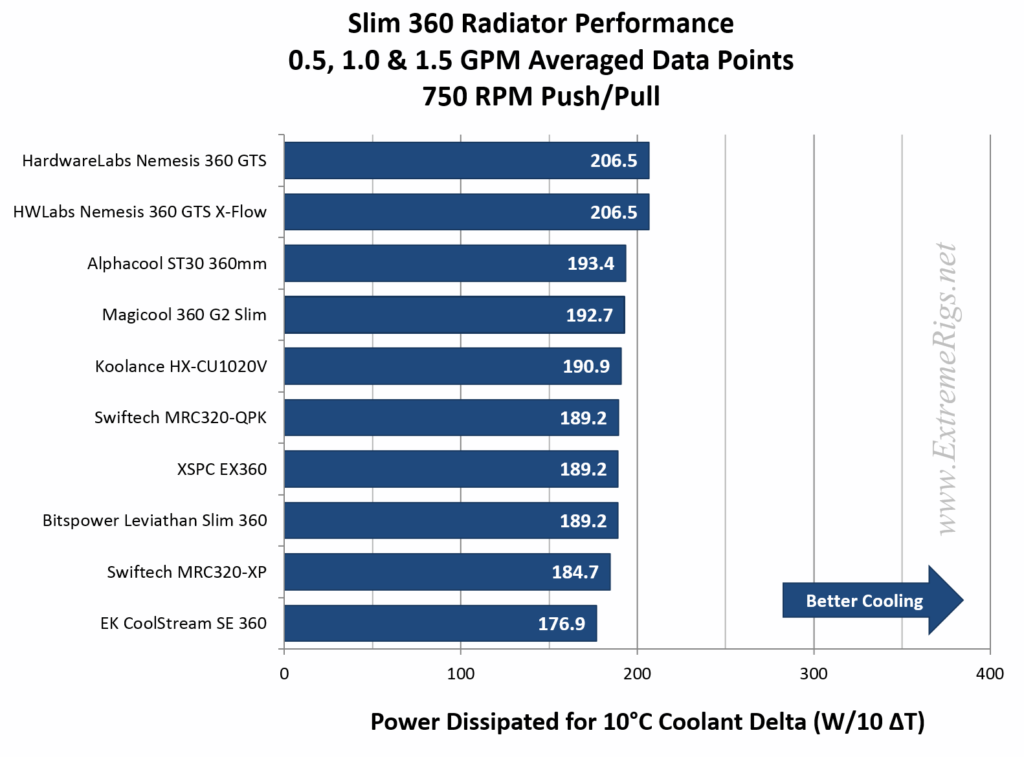
At 750RPM in Push/Pull the numbers are even closer than in push as the high FPI radiators do not suffer as the dual action really helps to get air through the radiator even at these low speeds. The SR2 is no longer top dog, though it’s still near the top. All the competitors are quite tightly grouped with no visible splits between the groups. Let’s also separate out the slim radiators by themselves:
Slim radiators aren’t typically used in push/pull, but the data is interesting nonetheless. As with the push case the Nemesis GTS in both variations is dominating with a good 6% over it’s nearest rival. EK’s super tiny SE radiator is of course at the bottom.
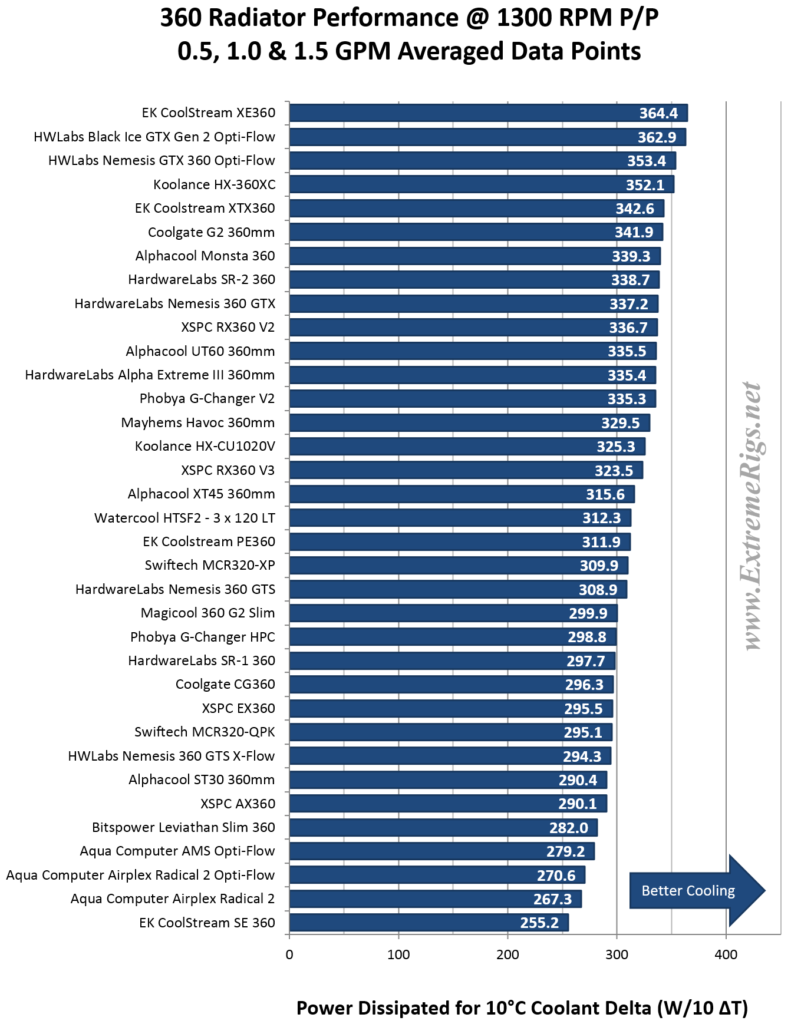
Performance with GT AP15 Fans in Push/Pull at 1300 rpm Comparison:
At 1300 RPM the radiators start diverging, with some radiators failing to scale to higher air pressures/flows, while those that do are starting to take off.
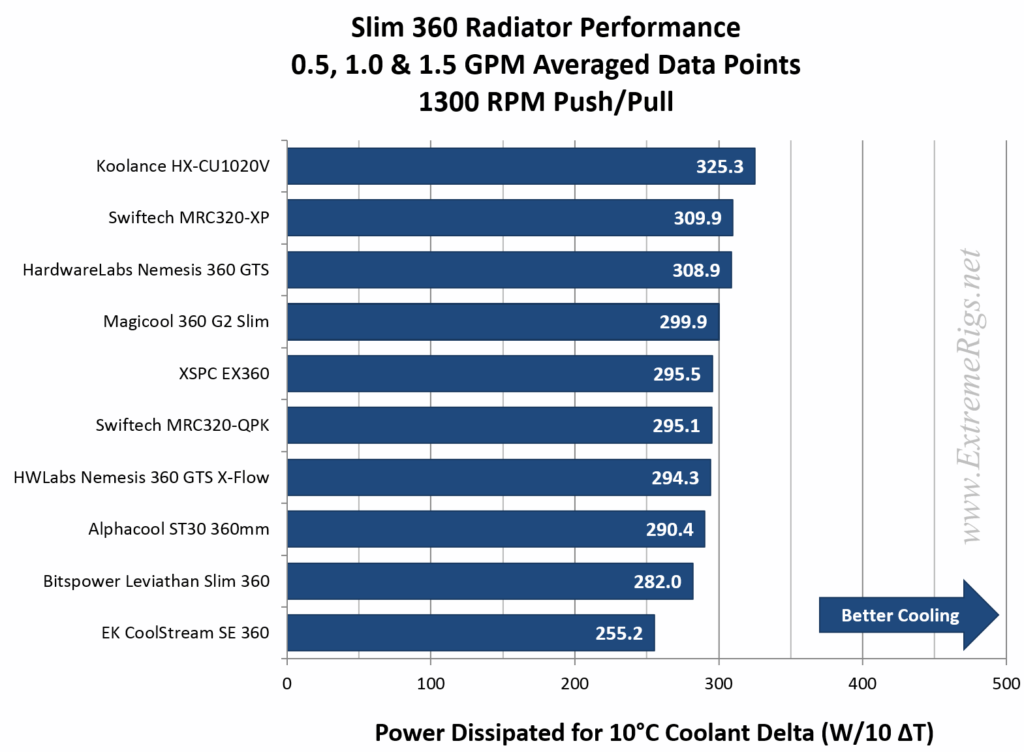
Let’s single out those slim radiators:
At 1300RPM the higher FPI radiators are starting to take over from the GTS. At 1850RPM this will no doubt continue.
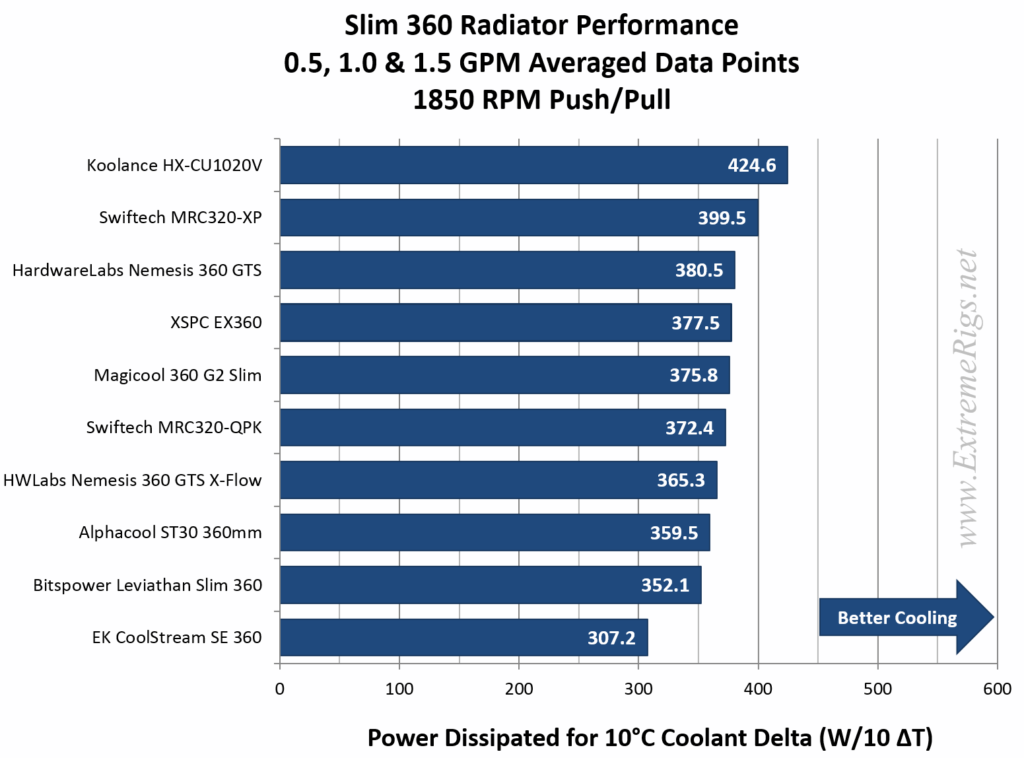
Performance with GT AP15 Fans in Push/Pull at 1850 rpm Comparison:
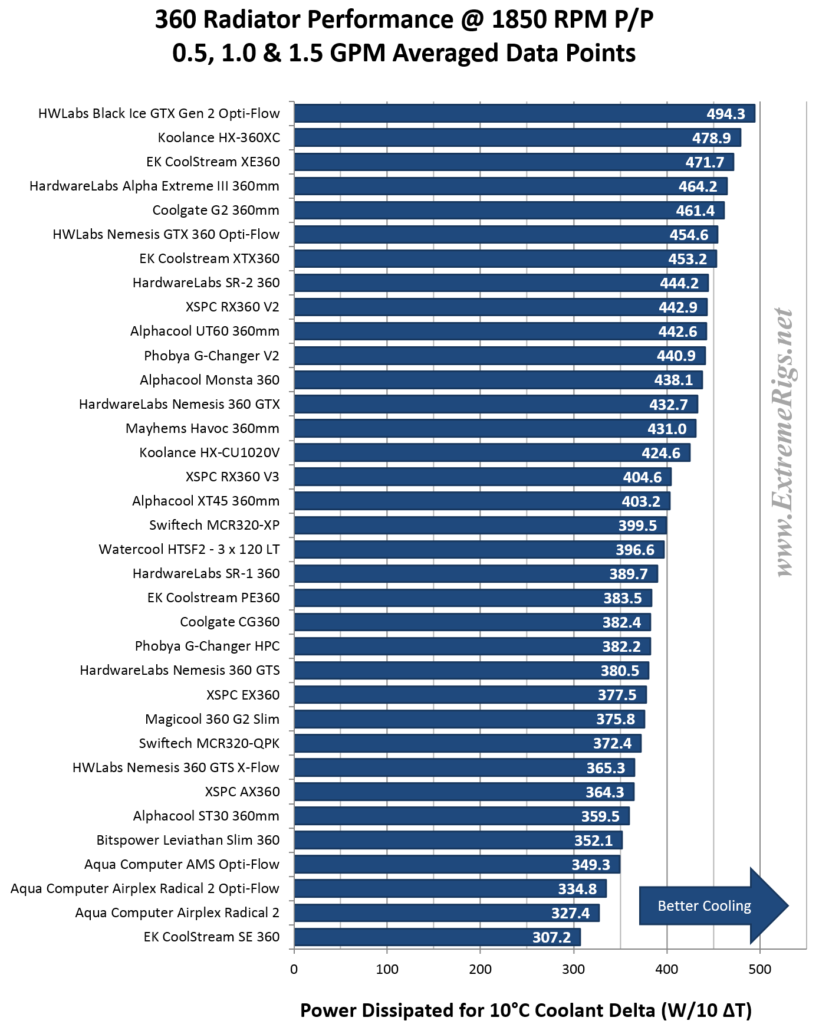
At 1850RPM the radiator that was the worst at 750RPM in push is now leading the pack. At 494W dissipation that is over 4 times what the same radiator acheived at 750RPM in push. Choosing the right radiator for your setup then is critical to maximizing performance. The performance spread now is quite large too, with the slimmest lowest performer lagging 38% behind the leading performer.
Koolance’s high FPI radiator pulls ahead further here, leaving the more balanced Swiftech XP behind. The GTS still takes third though which is very respectable given it’s performance across the entire range. The two narrow radiators take the two bottom spots, sorted by thickness.
Hidden Data vs Flow Rate:
Merged Data
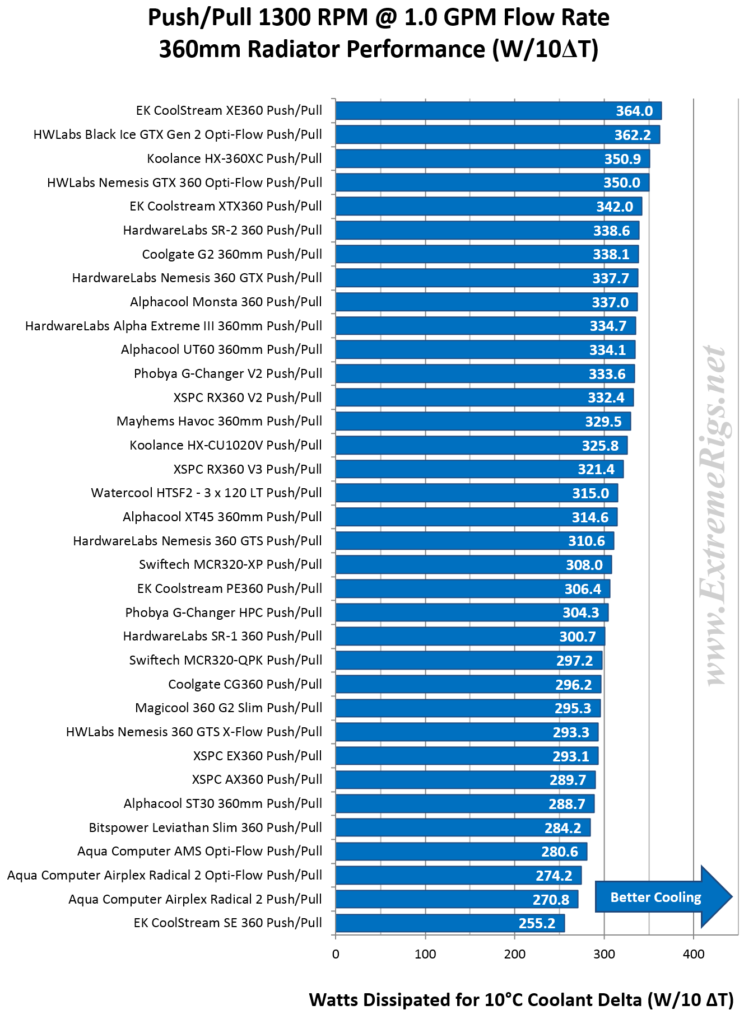
Now to make all this *even* more confusing we can combine push and push/pull data at 1GPM into individual plots. However they get very busy and might be best viewed in a separate window zoomed in. Again let’s start with 750RPM.
Merged Push/Pull and Push Data at 750 RPM & 1GPM:
At 750RPM we can see that there is overlap between push and push/pull setups. Our original belief that push/pull was universally better in performance than push is not proven out by the real data. However there is still a significant boost to be had by choosing push/pull across the board for any radiator. Hardware Labs radiators here really stand out from the pack in a push setup with the SR2 and GTS quite far up the rankings in comparison to the next best from XSPC. Alphacool’s Monsta turns in it’s relatively best performance here too. Push/Pull helps to make use of it’s thickness while the low FPI suits the lower RPM fans.
Merged Push/Pull and Push Data at 1300 RPM & 1GPM:
At 1300RPM the overlap between push and push/pull increases even though the top performing push/pull radiators now start pulling away from the middle of the pack. Here again it’s clear to see that EK’s XE radiator is significantly far ahead in a push setup beating out quite a few push/pull setups. It also manages to top the push/pull charts by a narrower margin.
Merged Push/Pull and Push Data at 1850 RPM & 1GPM:
At 1850RPM the top two push/pull radiators are accelerating away as they grow into their element. The XE is turning in an amazing performance. With a radiator like the XE you really are not giving up much performance when using only push, and if you choose to run push/pull it’s still packing top notch performance.
Relative Scores
Having separated the results out like this though helps to pick winners of individual categories but it’s still not obvious how each radiators is tuned – i.e. whether they are all-rounders or more specifically focused for higher or lower speeds. To do this we assign 100 to the highest performer at each setting that we test. Then every radiator gets a score as a percentage of this:
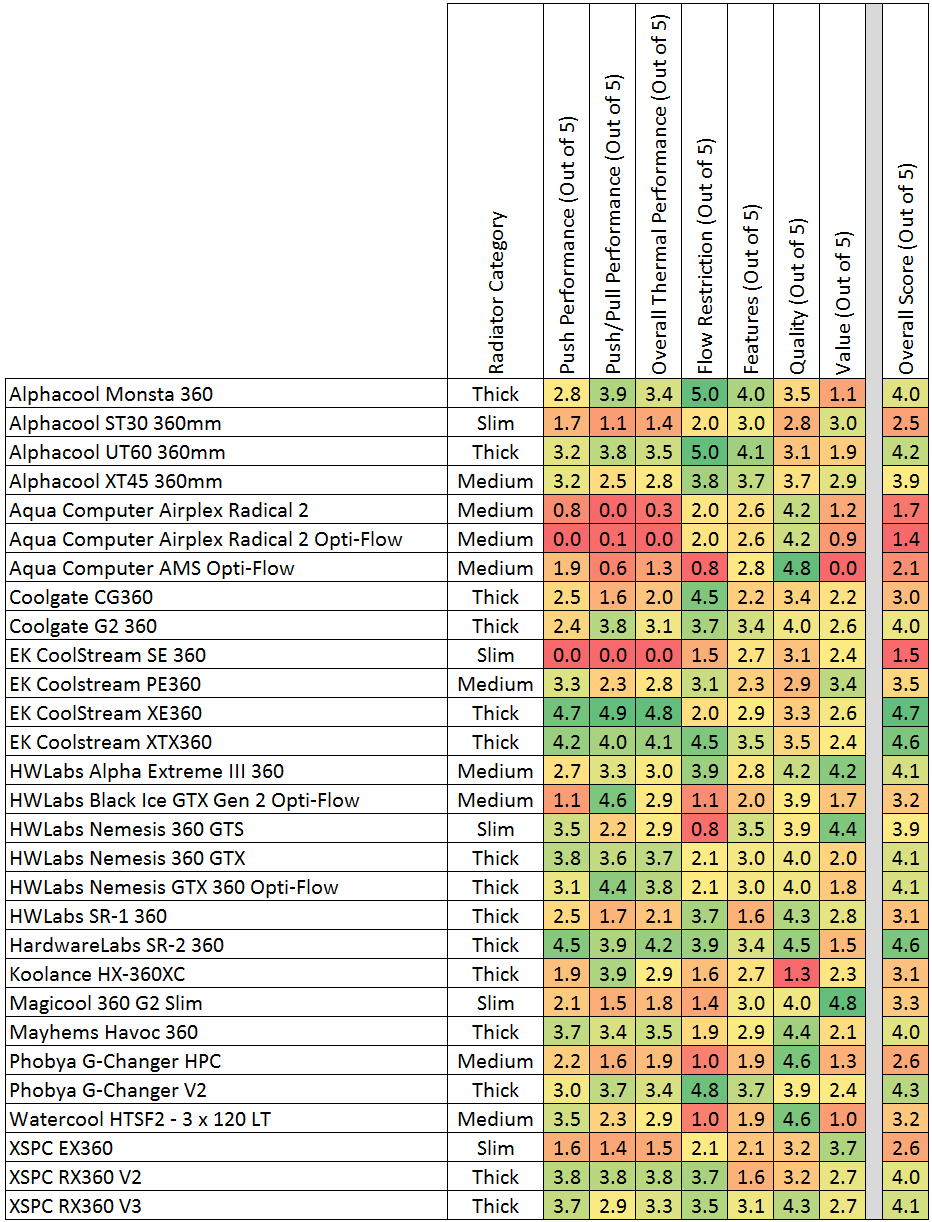
While this is useful for looking at a specific radiator, it’s really hard to take all this in and remember how each radiator did. There are a few standouts though that show a lot of green – the XE 360 and the Hardware Labs Black Ice GTX. The former excels across the board, while the GTX excels at push/pull.
It also lets us see which radiators just don’t perform well at all like the EK SE 360. However we have to also bear in mind that some of these radiators are targeted at different markets. Some are slim radiators for smaller cases. Some like the SR-1 are designed for optimized air flow, while others bring more features to the table.
Now that we’ve looked at specific cases – let’s make some simpler more general performance metrics:
Averaged Performance
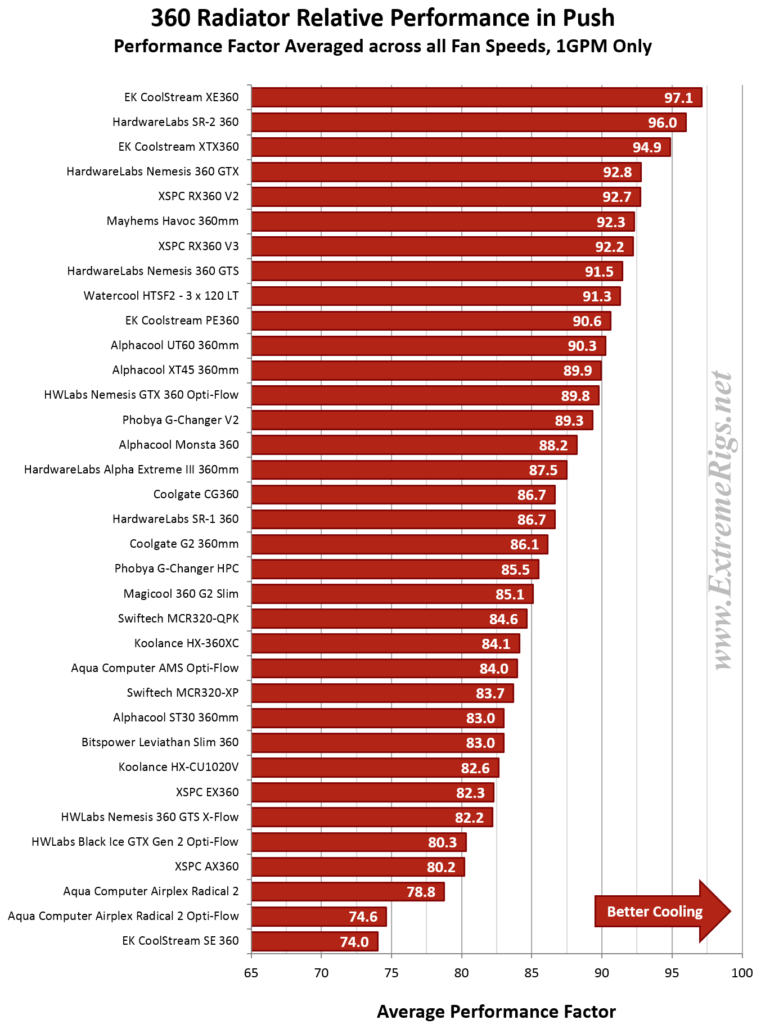
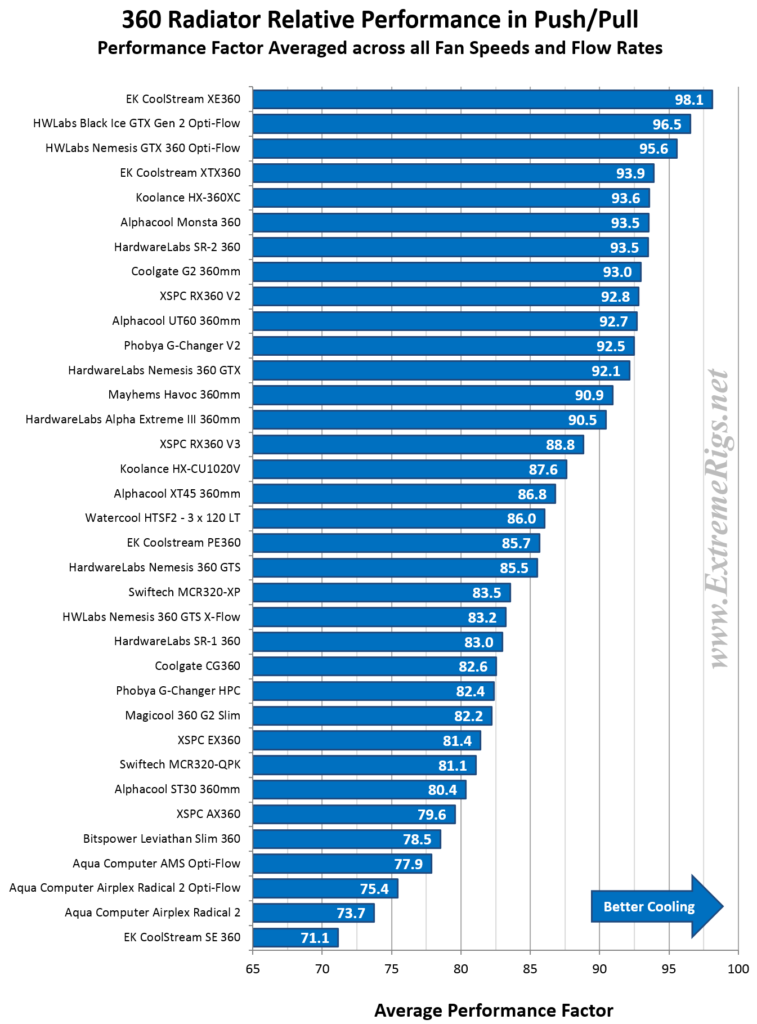
So let’s try and take a look at assigning a single value to each of these radiators so that we can then compare them against other factors such as thickness. To do this we are going to create a single thermal performance metric for each radiator by averaging the results above. This is of course grossly unfair. It will favor radiators that perform well on average as well as those that do well at the higher fan speed settings where power numbers diverge more. First let’s take a look at the push only data:
The XE 360 has a clear lead, this should be no surprise as it is a strong all rounder. The SR2 comes in as a strong 2nd place based primarily on it’s high performance at low speeds. Like most Hardware Labs radiators it seems to perform decently even when not in it’s target zone.
The XSPC RX radiators are essentially within the margin of error. Too close to say that the V3 is an upgrade, although it is more efficient. The unexpected result was the Nemesis GTS beating out the GTX. The GTX perhaps is just a bit too dense to do well in this metic while the GTS is just absurdly good for it’s size.
Predictably thicker radiators do better than thinner radiators with very few expectations. The most noticeable exception are Aqua Computer’s radiatiors. These are novel, beautiful and have compromised performance in order to achieve a solderless and sometimes modular design.
Let’s now look how things change in Push/Pull:
Amazingly the XE360 *also* leads the Push/Pull numbers. The Black Ice GTX is close behind and is more well tuned for higher fan speeds, while the XE is more tuned for lower fan speeds in Push/Pull. This is quite surprising indeed that one radiator could put in such a well rounded performance. The Push/Pull numbers are even more dominated by the radiator size than the push results. EK’s SE takes the bottom in both metrics simply because it’s the thinnest and slimmest radiator in the group.
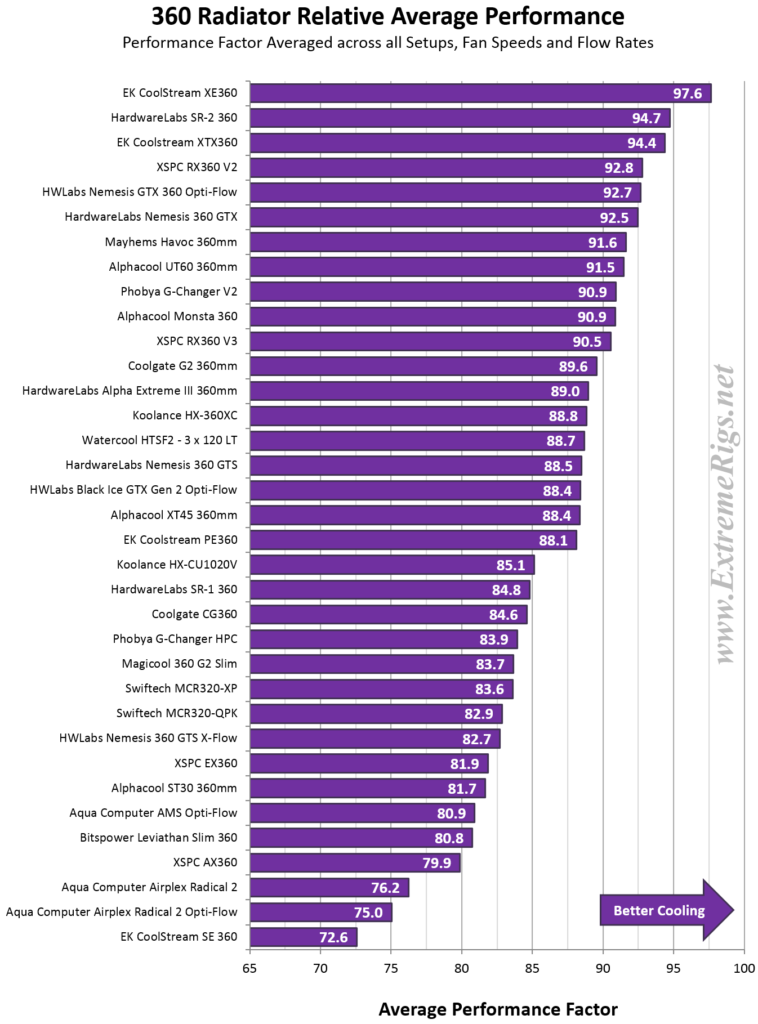
We can of course combine and average these two plots though the winner of such a metric must by now be clear:
Here three radiators really stand out as all round performance leviathans. EK’s XE leads the pack as the all rounder, with the SR2 and the now discontinued XTX slightly behind.
While this is sorted in order with the numbers showing the exact performance factor, it’s perhaps not the best way to sort the data. Instead the reader might prefer to know what the best radiator setup for a given amount of space might be, or for a given amount of money.
Performance vs Total Thickness
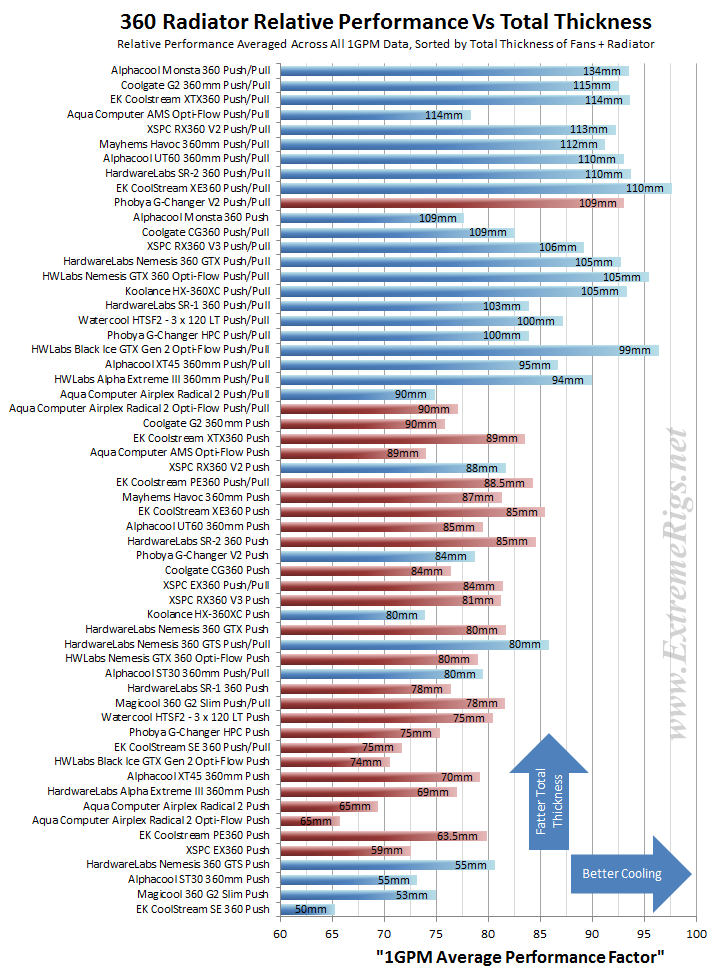
Instead of plotting alphabetically we can take our performance results and plot them in order of thickness:
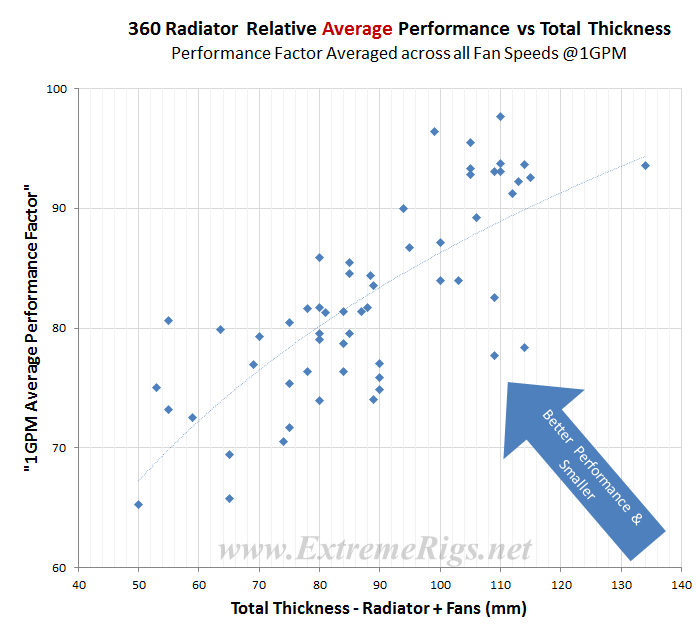
In general then we see that as a general trend that thicker radiators equate to better performance. This is perhaps better shown in the following scatter plot that shows all the combinations of thickness vs performance:
Now bear in mind this is still an average of three different fan speeds. Let’s separate out the three fan speeds and see which radiators stand out for each case:
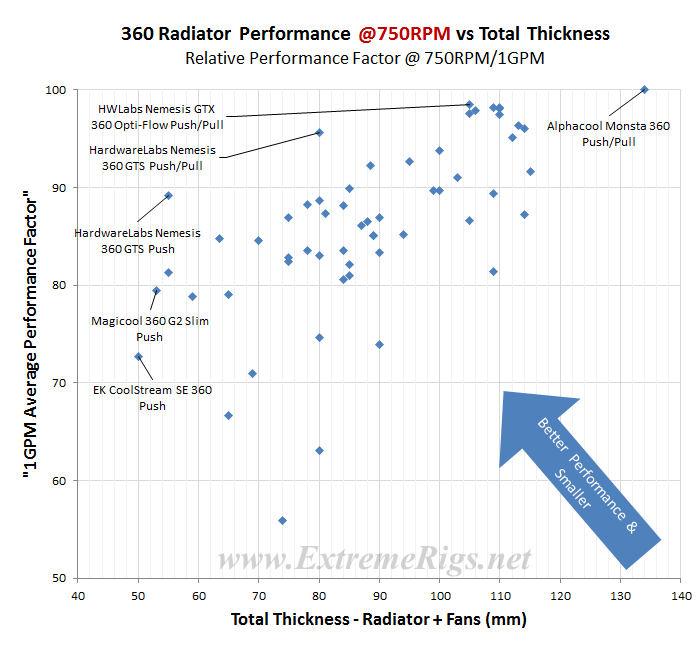
750RPM Performance vs Thickness:
So the real stand out in this case is the Nemesis GTS – despite being so slim it does awesomely well. While there are slimmer rads and higher performing rads this radiator really takes the biscuit for space efficiency at 750RPM.
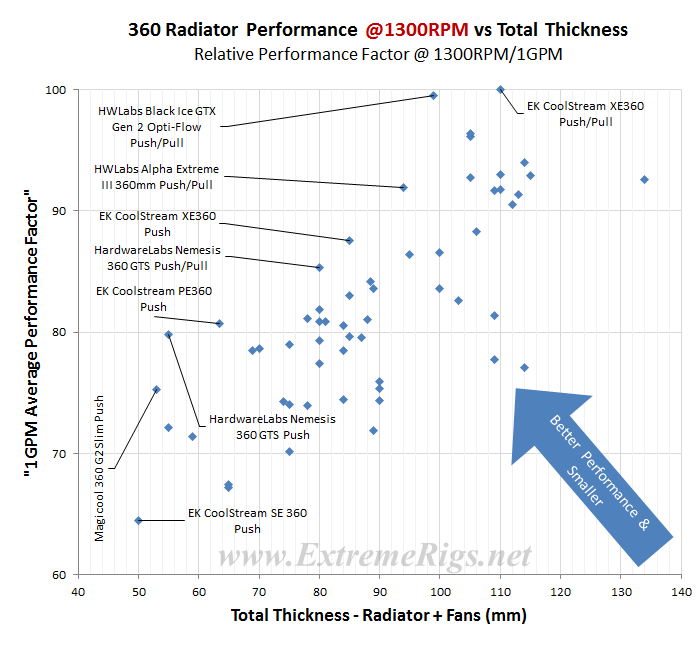
1300RPM Performance vs Thickness:
At 1300RPM the picture is more balanced, although the GTS does stand out quite prominently still. It’s amazing how many of these radiators that stand out are from HardwareLabs and EK.
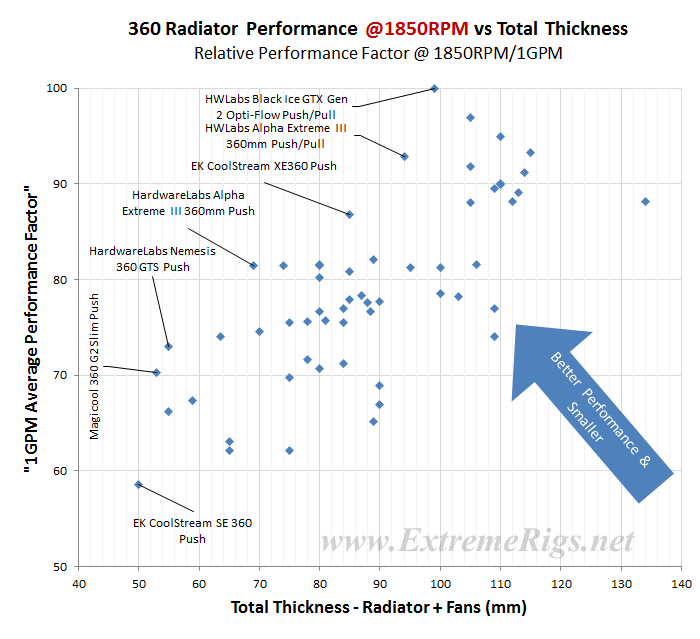
1850RPM Performance vs Thickness:
At 1850 RPM the older designs that are medium thickness but high FPI rads start to really shine. Most recent designs are tuned for lower RPM.
So we can see that while thicker radiators generally equate to better performance there are a few that pack a lot of punch without going “monsta” thick. The real stand out is the HardwareLabs Nemesis GTS which performs amazingly well for it’s size at all three fan speeds.
So clearly we’ve learned some things by looking at performance vs thickness. What about other trends that might affect performance of the radiator?
Shroud Height
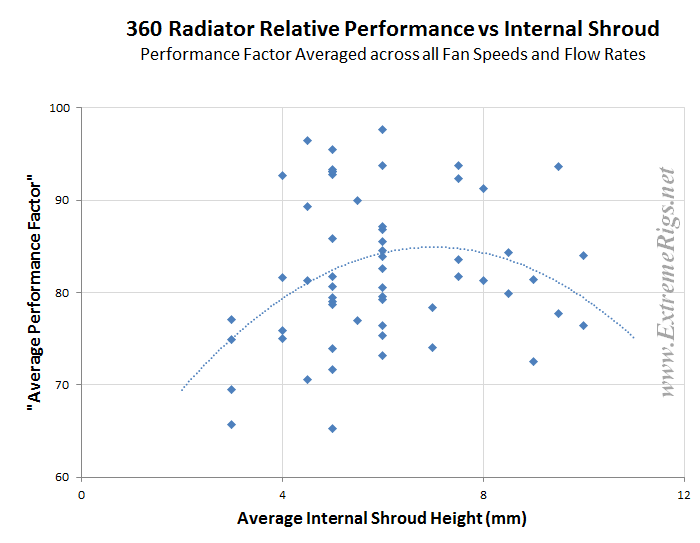
Shrouds – i.e. the distance between the fan and the radiator core have always been a variable with seemingly no correct answer. A fan that is close has a larger deadzone in the middle where little air can flow. However the further away a fan is the lower the static pressure will be.
With the designs tested we’ve seen numbers all over the map. Generally speaking then we see a really weak trend – below 4mm of shroud performance might dip, while above 8mm it might be falling off again. The data isn’t really presenting a clear enough picture though to reliably say what the ideal shroud height is, however despite this we’ve plotted a curve of best fit.
FPI
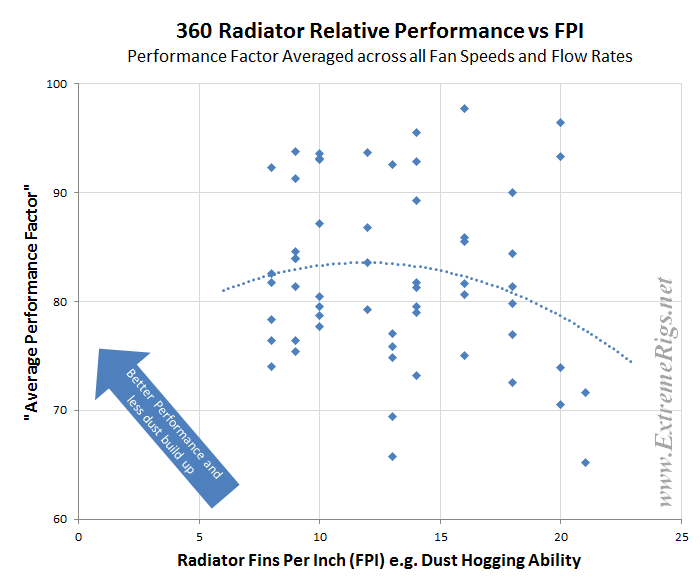
Fins per inch is another major variable. The more fins the more surface area a radiator has. However too many fins will restrict airflow and require more static pressure to push the same amount of airflow through the radiator. If we do a scatter plot of FPI vs average performance we see another muddle of data:
Primarily this is muddled because there are too many variables here. We also need to plot a third axis showing the fan speed. Practically speaking higher FPI should work better at high RPM, while lower FPI should work better at lower RPM. However the real data can be muddled by core thickness and the type of fin design used. However given that the correlation is weak it seems that manufacturers should try and move towards a lower FPI design so that dust buildup is lower.
The next metric is value, but that really deserves a page of it’s own!
Value
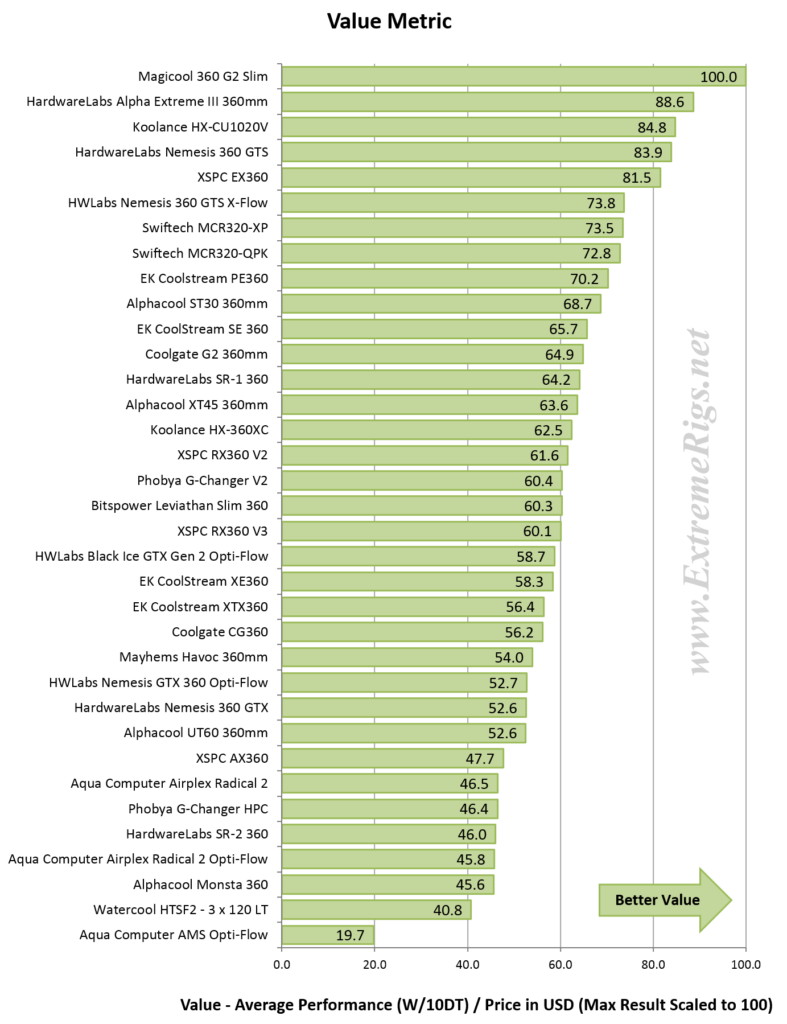
The simple analysis of value would usually say that the cheapest radiator wins. However let’s try and pry further into something more advanced. First let’s take our “average performance” metric and divide it by the price of the radiator to give a “bang for the buck”.
In this case, the cheapest radiator definitely is the best value. While differences in performance are small, differences in prices are major. However the reality is not so simple because some users have options for how to setup their case. I.E. Should you buy three cheap rads or two pricey rads in push/pull? Sadly this will depend partly on the cost of the fans you’re going to buy. $20 fans on a cheap radiator will favor push setups, while $10 fans on $150 radiator may favor a push/pull setup.
So what does all this tell us? Firstly – we already know that push/pull setups only give a small increase in performance, so despite the last paragraph we can assume that anyone seeking value will choose to run push setups only. With this in mind there are bargains to be had – and as price roughly tracks radiator thickness then most of the deals are on slimmer radiators. The Magicool G2 slim is the best value simply because it’s so damn cheap but it doesn’t compromise performance much despite this. The Koolance and the Nemesis GTS also does well because as it’s slim it’s quite cheap, however it’s performance is far better than the G2 Slim so despite the higher price it still does quite well. Lastly the Alpha Xtreme III is on sale as a clearance item so it’s price is “not normal” or representative but it does make it great value for now.
Of the thicker radiators the 60mm thick Coolgate G2 is the first on the list, with the old SR-1 design not far behind.
So enough on the price – let’s talk about what we liked and didn’t like and then hand out some awards!
Likes and Dislikes
Extra Ports and Bleeders
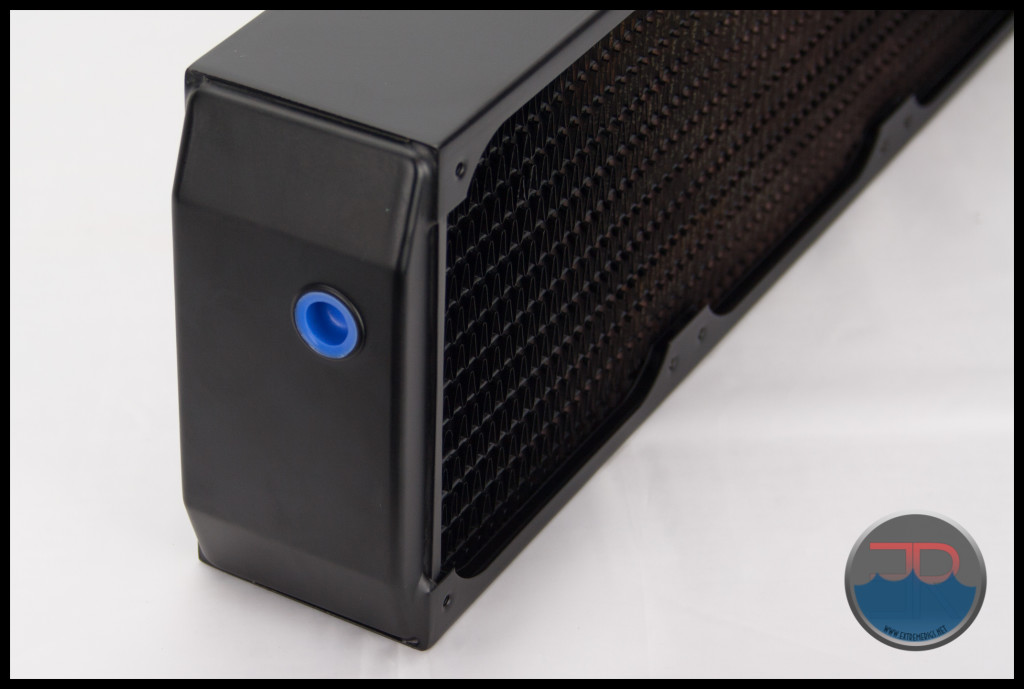
Some radiators mounted extra inlet and outlet ports on the radiator. We really like this because it gives a lot more mounting options for fittings:
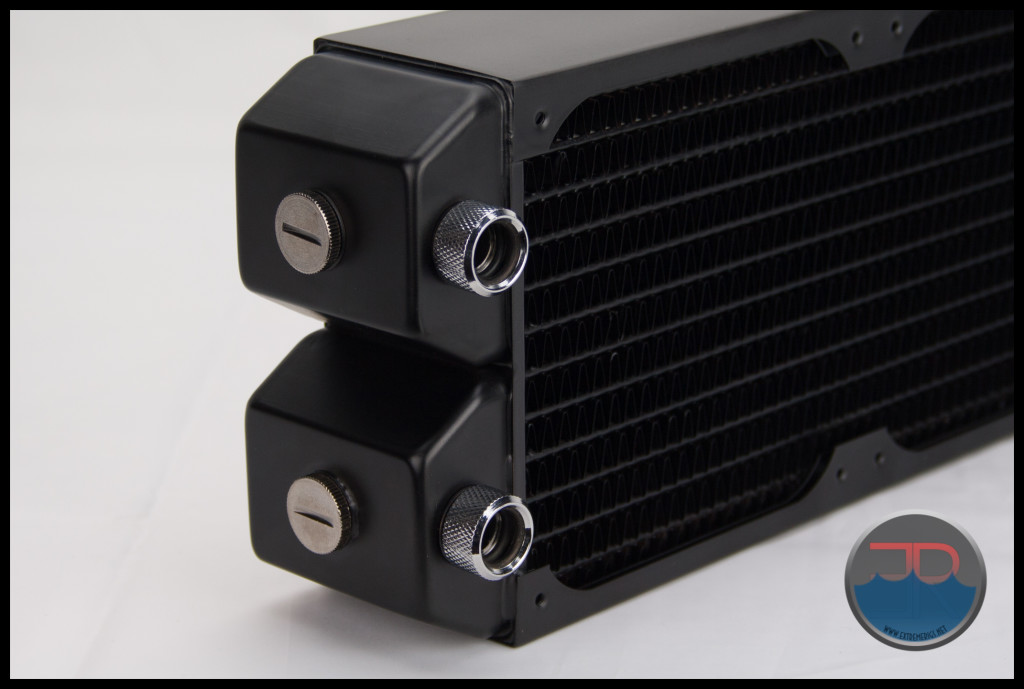
They can also be used to fill the radiator. Bleeder ports at the other end of the radiator are also most welcome.
Tube Protection
Some radiators could be damaged by using the wrong screw. Some had protection plates so that screws could not hit the tubes underneath. Some didn’t have tubes directly underneath the srcrew holes. We like to be safe, so we would like protection plates to be fitted any time the tubes are liable to be damaged by a rogue screw.
Finish
We love a matte black finish, but in addition to some of the more unique finishes like Hardware Lab’s “Dark Matter” we also appreciated that some radiators come in other colors such as white or even red. Mostly the radiators had very good finishes with the worst by far being the Koolance:
Alternative colors available on radiators:
Alphacool UT60 – Also comes in white
Alphacool Monsta – Also comes in white
HardwareLabs Nemesis GTS/GTX – Also comes in matte black, red and white
XSPC AX – not reviewed here but similar to EK PE, also comes in white
Packaging
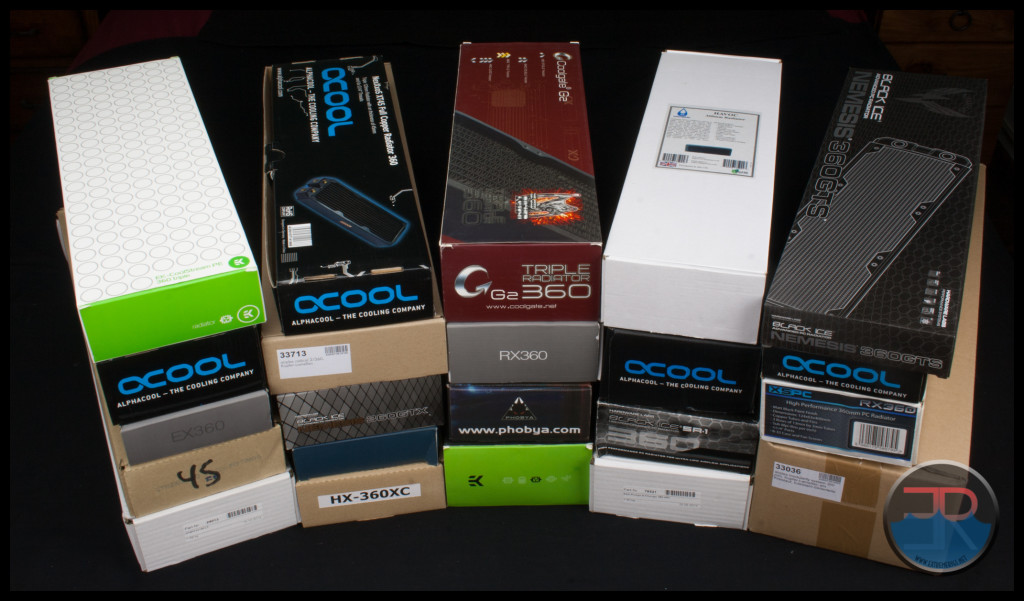
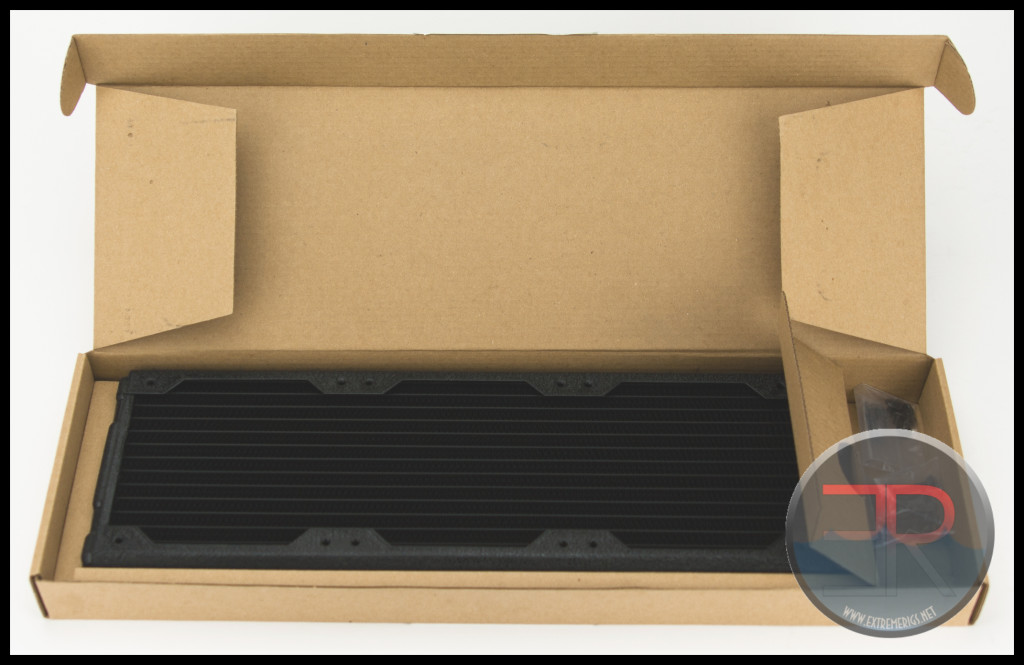
We love double boxing of the radiators, and we love bubble wrap sleeves for the radiators. We also loved companies that had a separate box at the end for screws and stop fittings. We did not love when they were thrown on top of the radiator itself.
Restriction
Generally most radiators were of low restriction. This is great. The Nemesis GTS stood out in particular for it’s high restriction. Thankfully it put in a stunning performance for it’s size making up for it.
FPI and Shrouds
As we did not find any conclusion of performance vs FPI or performance vs increased shroud size we are therefore going to say that we like lower FPI and smaller shrouds in order to reduce dust and maintain a smaller overall radiator size respectively.
Now let’s finish up with the award ceremony!
Awards
So let’s finish up with some awards. Out of principle I hate reviews where everybody gets an award in order not to offend any sponsors. It dilutes all the work the reviewer does to try and weed out the good from the bad. Hopefully sponsors see the value in independent feedback. Let’s start off with reviewing the data and assign some awards based on it.
Best All Round Any Thickness Radiator
EK’s XE 360 dominated the overall standings with it’s great performance in every area. It had features that we love such as extra ports and it had great quality. It even had a good price at $100. The only downside to the XE 360 is that it’s quite thick. At 60mm it’s the one of the thicker radiators and some cases may not fit it.
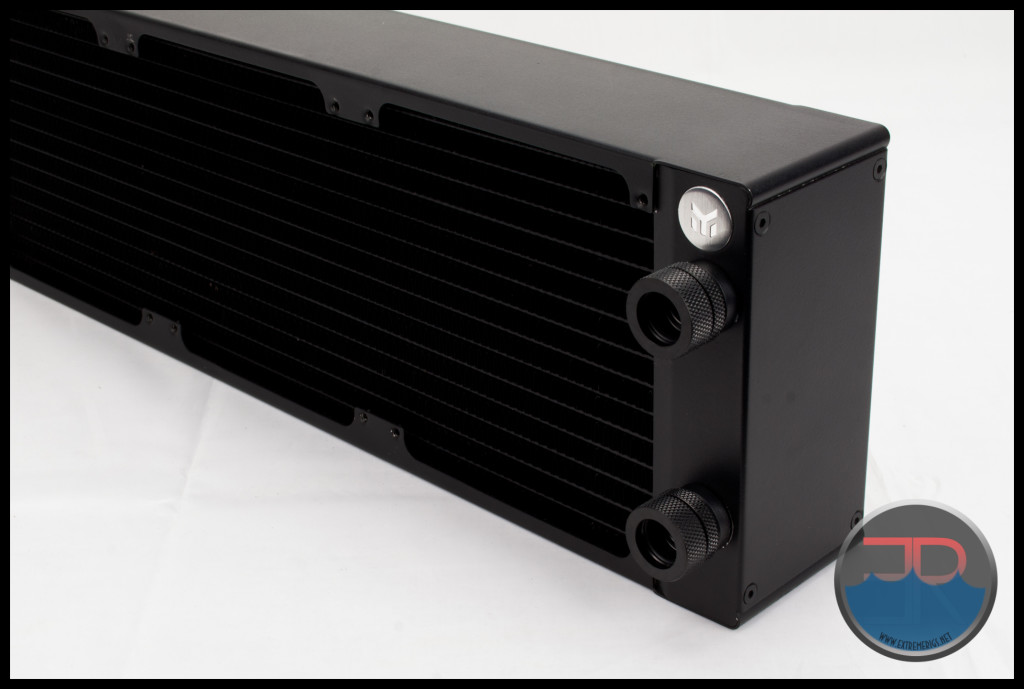
Best Runner Up – Performance – Hardware Labs SR2
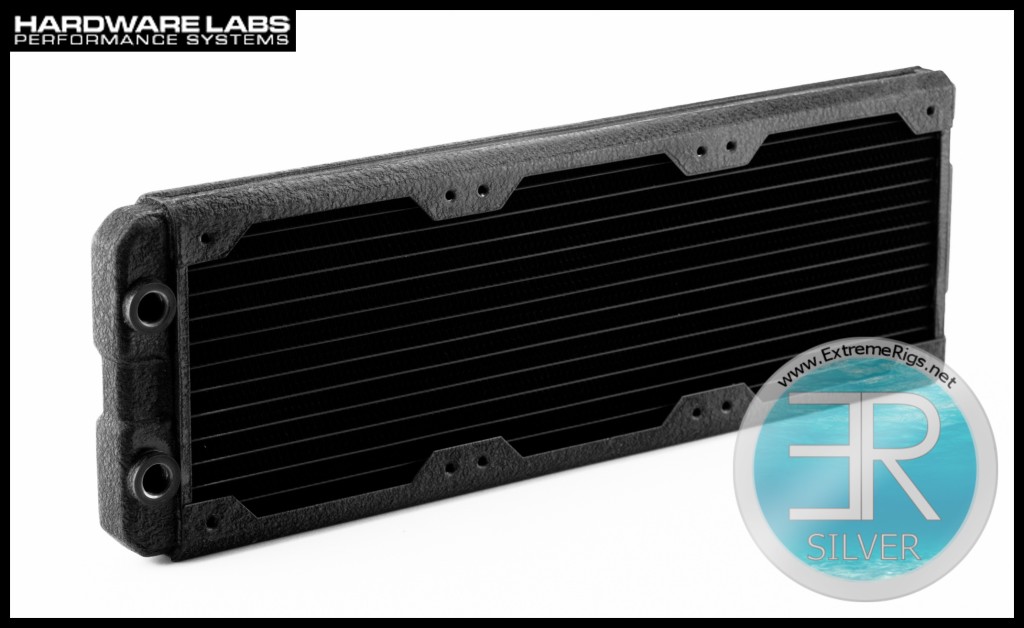
After seeing the performance numbers on the SR2 we were sure it would take the overall win. That is until the XE came along and crushed those dreams. The SR2 is almost as good though and has HardwareLabs legendary quality and finish. It has more ports, but is more expensive though, but the lower FPI means you’ll have to worry less about dust.
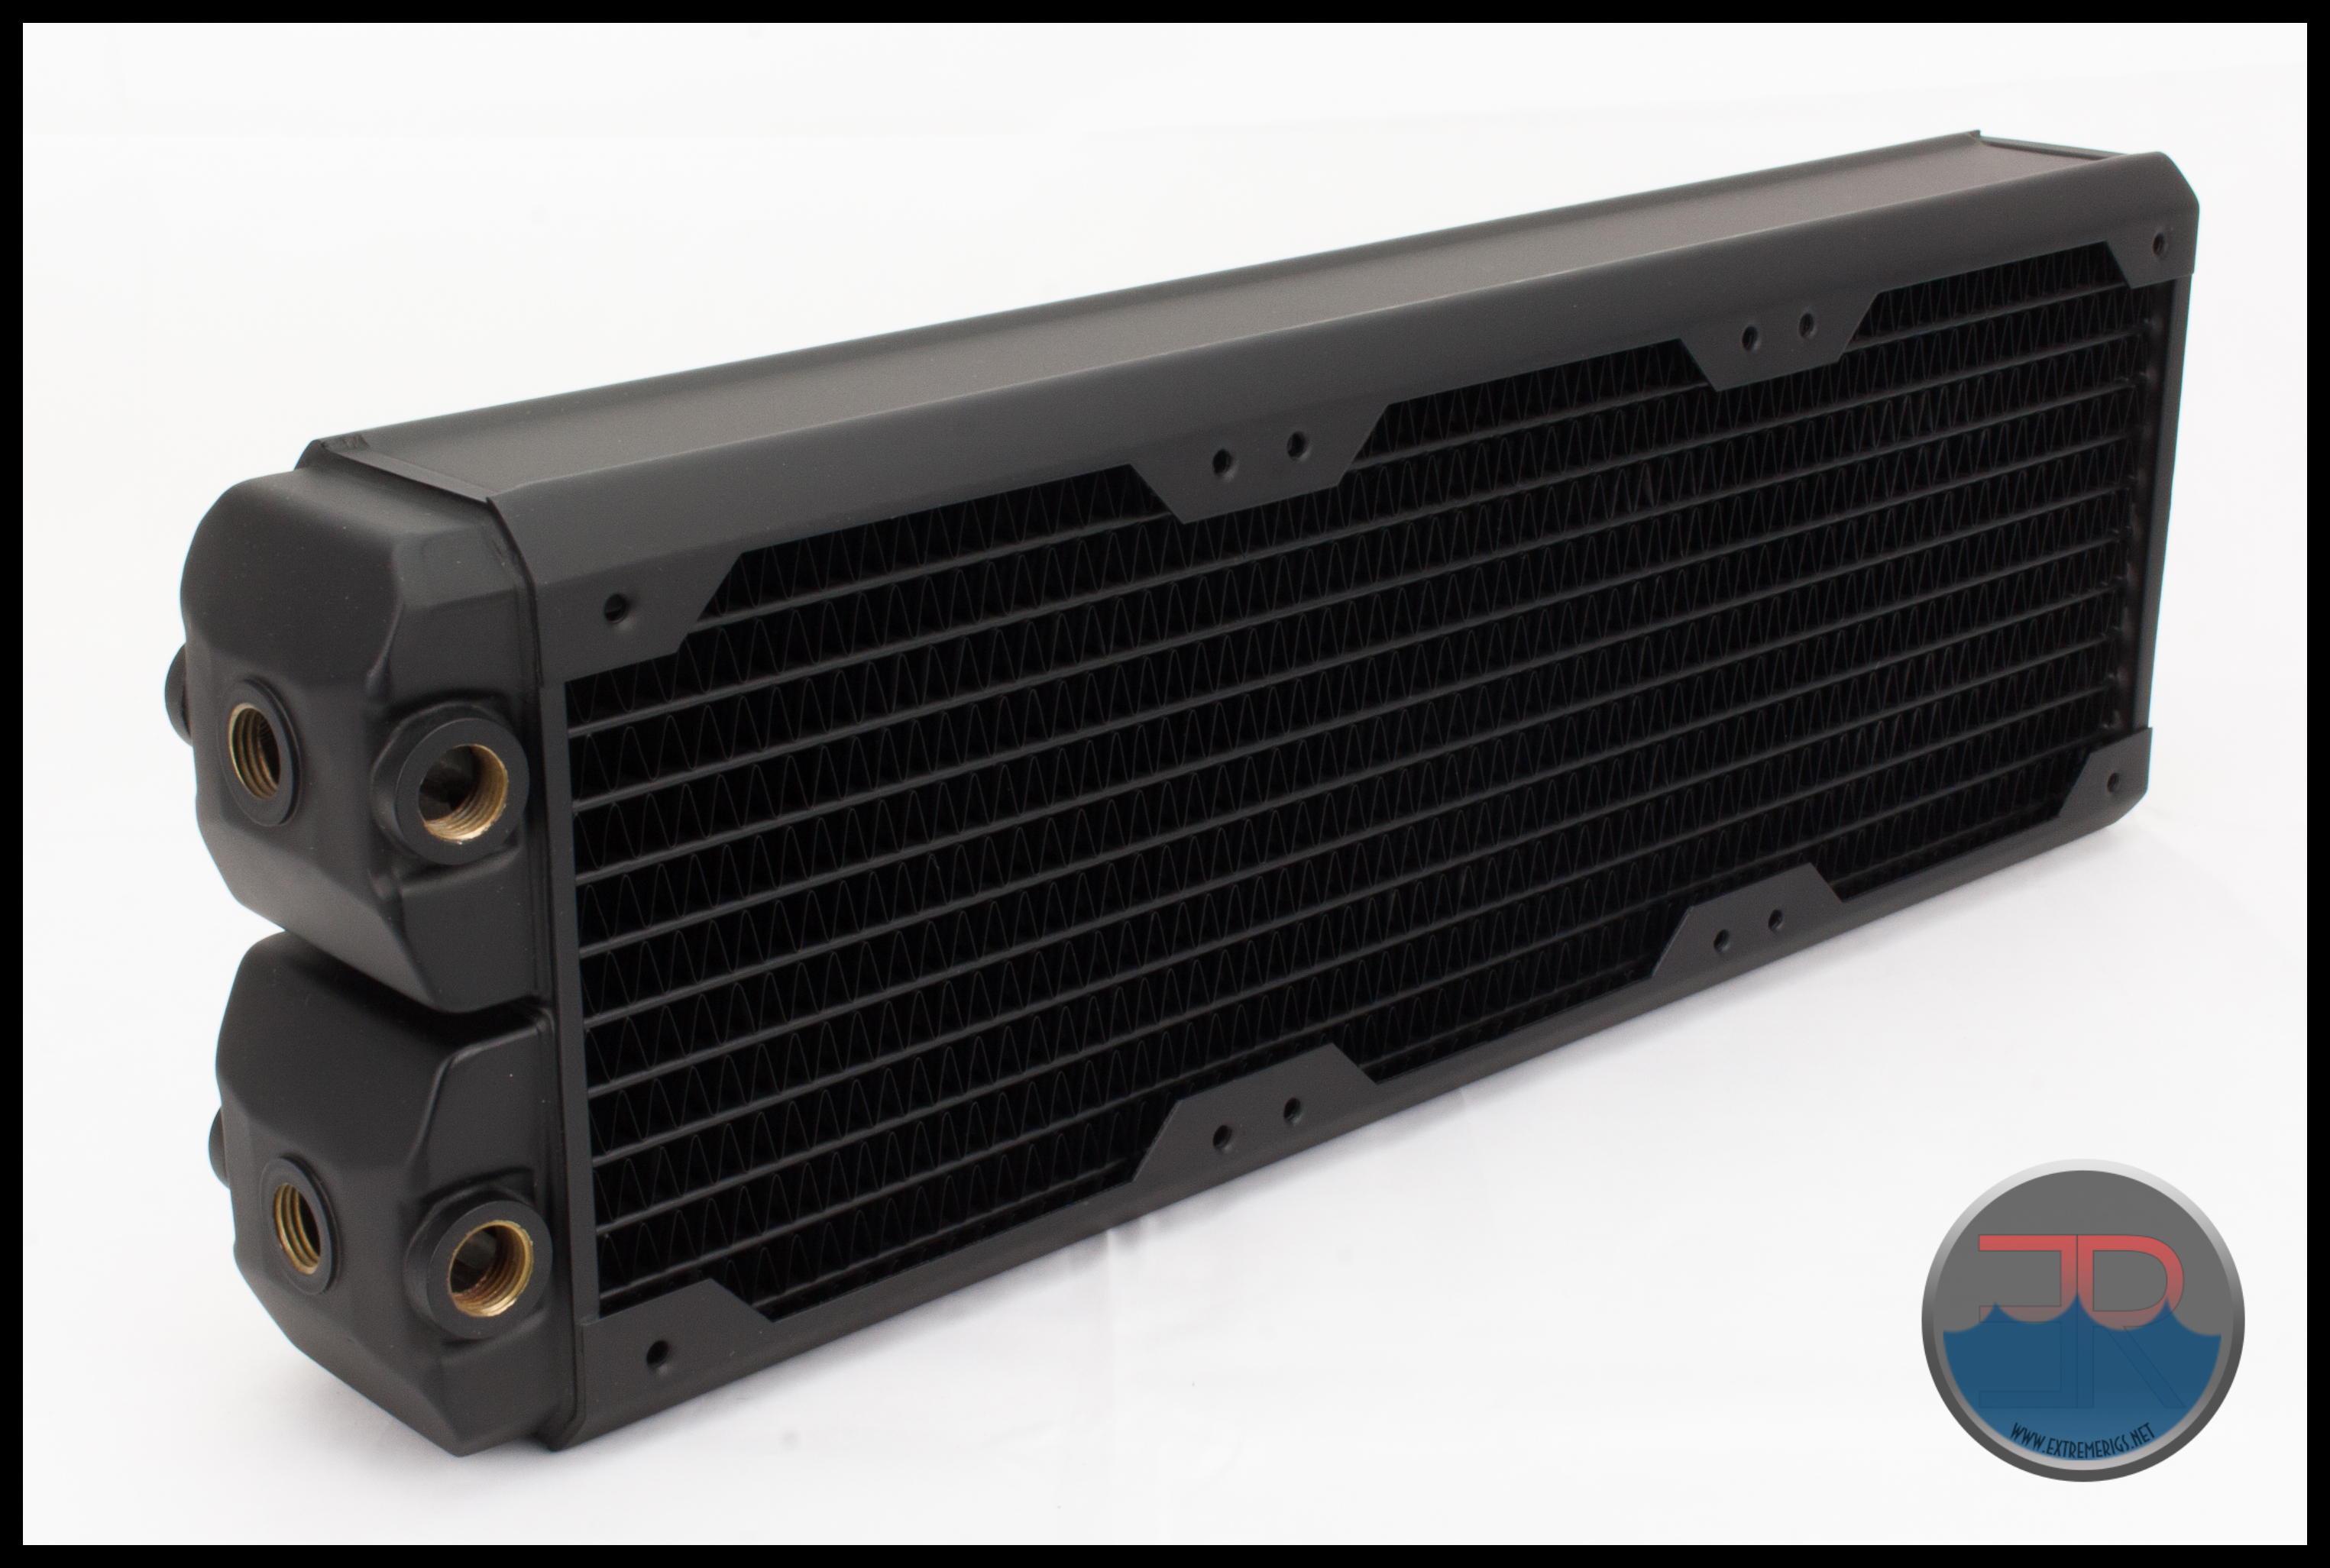
Best Slim Radiator – Hardware Labs Nemesis GTS
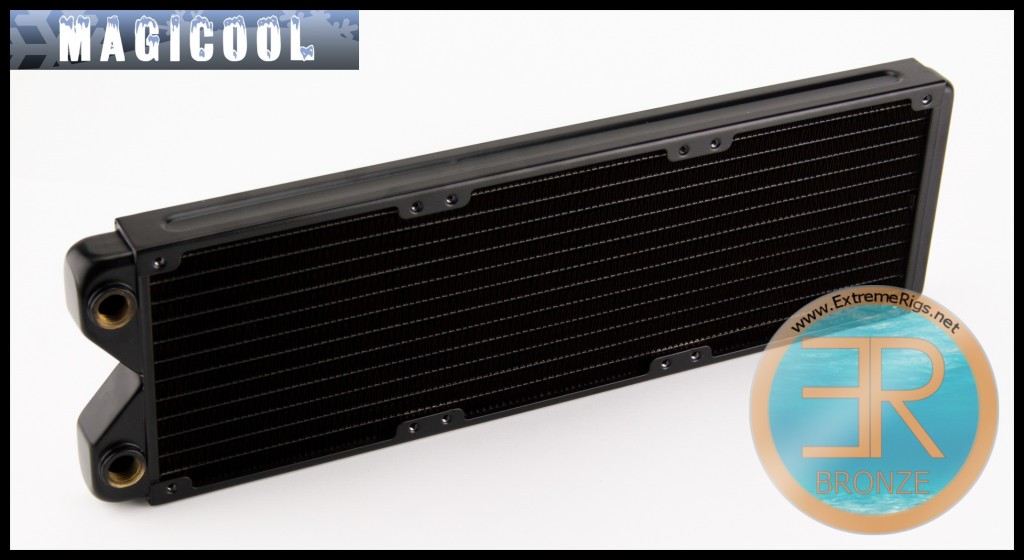
The slim category again was fiercely competitive. Both the Magicool G2 Slim and the Hardware Labs Nemesis GTS did very well here. The GTS however has the performance edge due to it’s greater performance at 750RPM. The finish and quality are excellent, the only thing lacking is the flow restriction. If the design could be altered to lower the restriction without affecting performance then this clearly would be the best slim radiator.
Best Value
Value is a category that of course favors the slimmer radiators that use less material. At $50 the Magicool G2 Slim is the cheapest radiator in the roundup. As a slim radiator it’s performance is not that great compared to the thicker designs but it’s high quality and decent performance for the size means that this is still really good value. After all you could buy two of these for the price of some of the other radiators, and two of these radiators would perform better than one single thicker and more expensive alternative.
Summary
Overall there were not really any “bad” radiators. Even the SE360 which scored the lowest overall score still competes well based on being the slimmest smallest radiator out there. The reader must realize that therefore so much of the choice depends on more factors than one simple performance metric and make their decision appropriately. It will really help you to decide what budget, fan speed, and what case you’re using first as that will rule out a lot of the options. Plus as mentioned at the start – we have more radiators to still go through and we will be updating the results as we learn more. For now though congratulations to EK on being the overall winner with their great all-rounder the XE 360! If you haven’t checked out the individual reviews yet, then here are the links:
Alphacool Monsta 360 Radiator
Alphacool ST30 360 Radiator
Alphacool UT60 360 Radiator
Alphacool XT45 360 Radiator
AquaComputer Airplex Radical Copper 360 Radiator
AquaComputer AMS 360 Radiator
Bitspower Leviathan Slim 360 Radiator
Coolgate CG 360 Radiator
Coolgate G2 360 Radiator
EK PE 360 Radiator
EK SE 360 Radiator
EK XTX 360 Radiator
EK XE 360 Radiator
Hardware Labs Alpha Extreme III 360 Radiator
Hardware Labs Black Ice GTX 360 Radiator
Hardware Labs Nemesis GTS 360 Radiator
Hardware Labs Nemesis GTS 360 X-Flow Radiator
Hardware Labs Nemesis GTX 360 Radiator
Hardware Labs SR-1 360 Radiator
Hardware Labs SR2 360 Radiator
Koolance HX-360XC 360 Radiator
Koolance HX-CU1020V
Magicool G2 Slim 360 Radiator
Mayhem’s Havoc 360 Radiator
Phobya G-Changer HPC 360 Radiator
Phobya G-Changer V2 Full Copper 360 Radiator
Swiftech MCR320-XP Radiator
Swiftech MCR320-QPK Radiator
Watercool HTSF2 3×120 LT 360 Radiator
XSPC AX360 Radiator
XSPC EX 360 Radiator
XSPC RX v2 360 Radiator
XSPC RX v3 360 Radiator









Great Work … a new standard for radiator testing.
The Koolance was a surprisingly good result. Push pull makes a bigger difference than many think.
I’m happy my EK PE rads did OK, mostly keeping up with the XT45 rads they replaced.
The extra 5mm the PE rads allowed made the difference between push only and push pull for an overall better result
Yeah the huge shrouds on the PE mean that it’s really a slim radiator core tucked into the body of a medium radiator wrapper. I do wonder if reducing the shrouds would have made no real change in performance but would have meant it could have won a slim award!
Also not sure what you mean about push only – we haven’t tested one set of fans yet 🙂
I meant in my system
This is the best radiator test review I´ve ever seen, great job, guys!
[…] we published the 2015 Radiator Round Up data, there was some pushback from quite a few different manufacturers claiming our use of […]
[…] information and performance data about the Mayhems Havoc 360mm Radiator for inclusion in the Extreme Rigs Rad Round Up 2015. I’ll be keeping the review section short and factual, focusing on presenting the performance […]
[…] […]
Weighing in a bit late, but I just found this article (and the site). This was a great read! Thank you for doing this type of thing. There are many of us out there who want to upgrade, add to, or change our rigs completely. In depth articles like this are the life-bread for us regular folk to gather REAL information.
I do have a question and of course am hoping you find this comment: How about testing the XSPC AX series radiators? I don’t know how you get your samples, but it would be interesting to see how they perform against the rads in this test.
More fan tests would be a wonderful thing as well. Enermax has had the UCTP12P High Static Pressure PWM 120mm Fan out for some time with no virtually no information anywhere as to their validity for use a radiator fan. I noticed you folks have a pre-production sample Vardar from EK. I look forward to seeing how that plays out in production.
Yes we wanted to test the AX series too! We are planning to do more fan tests also 🙂
[…] and performance data about the HardwareLabs Nemesis 360 GTS Radiator for inclusion in the Extreme Rigs Rad Round Up 2015. I’ll be keeping the review section short and factual, focusing on presenting the performance […]
[…] is to provide information and performance data about the EK XTX 360mm Radiator for inclusion in the Extreme Rigs Rad Round Up 2015. I’ll be keeping the review section short and factual, focusing on presenting the performance […]
[…] a lot on radiator that which i should get for… i found a great… probably best… article at Radiator Review Round Up 2015 – ExtremeRigs.net you can notice that coolgate g2 radiator is really great radiator for both performance and […]
[…] information and performance data about the XSPC EX360 v2 360mm Radiator for inclusion in the Extreme Rigs Rad Round Up 2015. I’ll be keeping the review section short and factual, focusing on presenting the performance […]
[…] information and performance data about the Alphacool UT60 360mm Radiator for inclusion in the Extreme Rigs Rad Round Up 2015. I’ll be keeping the review section short and factual, focusing on presenting the performance […]
[…] information and performance data about the Alphacool Monsta 360mm Radiator for inclusion in the Extreme Rigs Radiator Round Up 2015. I’ll be keeping the review section short and factual, focusing on presenting the performance […]
Hey fast nate
i was wondering how close you are to finishing the radiator roundup with just the push fan setup? thanks man
Hey Mike – Stren here, fast_fate is working hard but there’s probably still a few more weeks to go. For the most recent push data take a look at the Monsta review which has the “so far” data:
https://www.xtremerigs.net/2015/03/25/alphacool-nexxxos-monsta-360-radiator-review/6/
[…] We expect the performance to be identical to the current version as only the port options appear to be different. We’ll be getting this one into the thermal test chamber for some performance scrutiny very soon so look forward to a full review soon and inclusion into the Rad Review Round Up 2015. […]
[…] […]
Well, I think that the reviewers always get a mint rad. I already had to send back a Phobya G-ghanger 360 V2, a Phobya G-canger 420 V2, a Alphacool UT 60 420 , a Coolgate CG360CG2 and a Coolgate CG480CG2 , this because of heavy paint faults, scuff marks on the side panels , matt grey spots where paint is of, and the phobya 420 had a piece loose inside the rad. Al bad rads and these al got delivered and send back the last 2 months. The brands are asking good money, but deliver bad quality.
[…] about the Aqua Computer AMS (Airplex Modularity System) Copper 360mm Radiator for inclusion in the Extreme Rigs Rad Round Up 2015. I’ll be attempting to keeping the review section short and factual, focusing on presenting the […]
[…] provide information and performance data about the HWLabs SR2 360mm Radiator for inclusion in the Extreme Rigs Rad Round Up 2015. I’ll be keeping the review section short and factual, focusing on presenting the performance […]
[…] information and performance data about the Phobya G-Changer HPC 360mm Radiator for inclusion in the Extreme Rigs Rad Round Up 2015. I’ll be keeping the review section short and factual, focusing on presenting the performance […]
[…] is to provide information and performance data about the EK XE 360mm Radiator for inclusion in the Extreme Rigs Rad Round Up 2015. I’ll be keeping the review section short and factual, focusing on presenting the performance […]
I just posted this same comment on the other review for the Coolgate CG-360G2. I want to thank you for this extensive and extremely detailed review; an updated version to SkinneeLabs.com’s review and Martinliquidlab’s review on radiators (found here: https://martinsliquidlab.wordpress.com/category/radiators/). I was debating (as I’m a reseller for Koolance), weather or not to purchase the Koolance HX-360XC product or the Coolgate CG-360G2. As a result of your thorough testing I’m going to go with the Coolgate CG-360G2. I know you mentioned that it’s hard enough to put just one of these bad boys in your CaseLabs PC Case, but I’m going to put TWO of them in. My config will be set up like this:
25mm Fan/65mm Rad/25mm Fan/65mm Rad/25mm Fan = 205 (sandwiched together side by side)
Which will just cover the bottom of the width of my Origin Genesis PC Case. I’ll post the results later in a couple of months once I’m finished with my (hopeful) new Hackintosh build. We’ll see what happens. Again, thank you for your help. Greatly appreciated !!!
[…] is to provide information and performance data about the EK PE 360mm Radiator for inclusion in the Extreme Rigs Rad Round Up 2015. I’ll be keeping the review section short and factual, focusing on presenting the performance […]
[…] information and performance data about the Koolance HX-360XC 360mm Radiator for inclusion in the Extreme Rigs Rad Round Up 2015. I’ll be keeping the review section short and factual, focusing on presenting the performance […]
[…] information and performance data about the Watercool HTSF2 3 x 120 LT radiator for inclusion in the Extreme Rigs Rad Round Up 2015. I’ll be keeping the review section short and factual, focusing on presenting the performance […]
[…] is to provide information and performance data about the XSPC EX360 Radiator for inclusion in the Extreme Rigs Rad Round Up 2015. I’ll be keeping the review section short and factual, focusing on presenting the performance […]
[…] to provide information and performance data about the XSPC RX360 v3 Radiator for inclusion in the Extreme Rigs Rad Round Up 2015. I’ll be keeping the review section short and factual, focusing on presenting the performance […]
[…] information and performance data about the Alphacool ST30 360mm Radiator for inclusion in the Extreme Rigs Rad Round Up 2015. I’ll be keeping the review section short and factual, focusing on presenting the performance […]
[…] and performance data about the Aqua Computer Radical2 Copper 360mm Radiator for inclusion in the Extreme Rigs Rad Round Up 2015. I’ll be keeping the review section short and factual, focusing on presenting the performance […]
[…] provide information and performance data about the HWLabs GTX 360mm Radiator for inclusion in the Extreme Rigs Rad Round Up 2015. I’ll be keeping the review section short and factual, focusing on presenting the performance […]
Looks like the review is complete! Kudos!
Yeah, I can guess how much it took to go through this painstaking review of 27 (!) radiators, and 486 (OMG!!!!) tests – and that so accurately and reliably. My greatest respect to you fast_fate, and all those who helped you on it.
Needless to say, we are all missing the XS-PC AX360. Could you reach out to XS-PC and ask for a sample maybe? Or get a retail one? Anyway, we are all looking forward to that.
The Round Up will never be complete….
Thanks for following along through the journey.
It is a massive task to update, too much work to keep updating the individual reviews……
which is why we had to make the decision to not keep updating all the screen-shots included in each indivdual radiator review.
As each radiator test results is linked to every other radiator’s results for the relative scoring system, when a new set of results are added – all the old published data became redundant.
So from now on, each new rad will still be included in the Round-Up, but will have a slightly different format in the individual reviews, so all currently published results do not appear incorrect.
The AX360 has always been a noticeable ommission from the list.
XSPC were kind enough to sponsor the RX360 V3 for inclusion, but the AX was never sent.
If one becomes available it will be an inclusion for sure – but expect performance results to be very very similar to the EK PE360.
thanks for the reply, fast_fate 🙂
[…] data about the EK CoolStream SE 360mm Radiator. We will be including the test results in the Extreme Rigs Rad Round Up 2015, however in this review rather than comparing the SE to all the rads we made a decision to start a […]
[…] mal ein umfangreicher Radiatortest, auch mit push/pull: Radiator Review Round Up 2015 – ExtremeRigs.net Verkaufe Plextor M6e 512GB, i3 & Pentium CPUs, Alphacool NexXxos ST30 360 Radiator. […]
I’d really love to see similar testing on 140mm class radiators too. 140×2 (60.8 sq in) would be awesome since they’re so close to 360 rads (66.9 sq in)
280 Rads will be starting soon 🙂
[…] […]
how about the tfc x changer 360 ?
how good or bad is it against al other rads ?
If TFC send then we will test 🙂
[…] data about the Magicool G2 Slim 360mm Radiator. We will be including the test results in the Extreme Rigs Rad Round Up 2015, however in this review rather than comparing the SE to all the rads we made a decision to start a […]
[…] about Koolance’s Slim HX-CU1020V 360mm Radiator. We will be including the test results in the Extreme Rigs Radiator Round Up 2015, however in this review rather than comparing it to all the radiators we made a decision to start a […]
[…] XE 360 am besten ab! Ich glaube dann wird es der EK-CoolStream XE 360 auch werden. quelle: Radiator Review Round Up 2015 – Page 5 of 10 – ExtremeRigs.net […]
The links for the EK SE/PE reviews have become combined and lead to the SE review.
Hi Thomas,
Thanks for the heads-up.
The links to each review are now in order.
[…] the new EK XE radiator that won a Gold award and the all-round best performance category in our 28 way 360 roundup. The issue started with one OCN’er finding a leak in his brand new XE radiator that was […]
[…] we published the most recent of the 360mm radiators for inclusion in the Extreme Rigs Rad Round Up 2015, we’ve kept busy conducting more radiator testing. However samples from various sponsors were […]
[…] reviewed the 360mm version for the Extreme Rigs Rad Round Up 2015, so if the 360mm size is more your flavor be sure to check out it’s full review after you’re […]
Are you going to do a review on the Nemesis XFlow?
It’s actually getting tested right now 😉
Review is up here: https://www.xtremerigs.net/2015/09/19/hwlabs-nemesis-360-gts-x-flow-360mm-radiator-review/
About the awards, if the XTX360 were available along with the XE360, where would it place? Would it replace the SR2 360 as runner up or share a “co-spot” with it or another radiator?
Most likely it would be a runnner up alongside the SR2 MP. It has similar thermal performance, less optional ports than the SR2 MP, but it gains a drain port. Still a great radiator. I have to say though if you’re buying EK, the only reason to get the XTX over the XE is price, aesthetic or because you really want that drain port.
[…] to take good data requires a lot of attention to detail and data logging time. Just look at our radiator round up for how hard it is to accurately measure air temperature into a radiator. The reality is that the mainstream review sites simply don’t have time to […]
[…] we published the most recent of the 360mm radiators for inclusion in the Extreme Rigs Rad Round Up 2015, we had completed thermal testing on 8 various sized 140.x radiators before our chosen 140mm fans […]
Im kinda of noob on this, dont understand to much the graphs.
According to this review, what rads should i use for using Scythe GT ran @ idle =400rpms / load = 800rpms ? HL SR2 or EK XE or another?
SR2 is best for low speed push setup
[…] […]
Was wondering why you didn’t have any Swfitech rads. Was it you could not get any?
I used Swiftech, EK, XSPC and Alphacool
I end up most times going with Swiftech for most of my builds.
Swiftech would not sponsor, it would be helpful to let Swiftech know that their buyers like our reviews and would like them to participate 🙂
Great job guys! Keep it up.
After Martin has abandoned testing, you are the first who uses such high quality engineering standards.
I think that you should think about more SEO for you site, found it accidently 🙂
Your perspective is all wrong because your all young men and look to buy a single radiator that has the best specs but the price to performance ratio is really what matters because you could take the side of the case off and turn it into a wall of radiators so really being compact and having the highest spec radiator is simply a waste of money unless of course you used all the available nearby space(really this is impossible) and thus cooling power per dollar is king(as most people are not rich) and buying multiple magicools is truly the best solution(rad stacking doesnt work each one needs its own fresh supply of cool air you will have to think about your design. Really for the average person running your pc with the radio exhausting push pull and feeding a tube of air conditioned air off your air conditioner into the case sealing it and having all the rads exhausting is the cheapest easiest setup for cooling during gaming sessions. Then when your done gaming turn your ac off(you also have to set the temp very low so it runs continuous which also leads to the evaporator coils icing over after many hours(or days if temps above 70f into the 80s of course every ac is different) or outdoor temps below 70f). But this is hardly very efficient also if you have many magicool rads you dont really even have to run fans you can cool the pc passively while its idle and only turn the fans and ac on when you game that way you would spend the absolute least amount on electricity. Of course to be completely efficient with power would require allot more money and design skills in the future we should have much better condenser units outside with far more efficient assymetrical blade fans to limit noise and daisy chain from a very large outdoor compressor providing the first stage to smaller ones inside the house possibly even coupled with very large water cooling loops to second and third stages tied directly to the main processors. That way you get phase cooling to all your crucial chips and all heat is exhausted outside direct connections to the cooling loops would be the most efficient. We also need systems to switch from active phase for gaming and another maybe water cooling loop passive or with light fans for idle or home office web browsing usage.
Huh?! Holy smokes!
Great job and good review.
In the last my worklogs alwats I installed 1×360(60mm) and 1×240(60mm).
And now I would like if is this necessary for 5930k and 980 Ti Classified with a modered OC or is valid with a 2×240 and 30mm thick.
Thanks for your job
Regards!!!
It always depends on your fan speed, but I’d say 2×240 should be fine for that 🙂
Hi, maybe that is a noob question, but are you only testing push configurations because push is better than pull? Heard some people say they have better results with pull.
Originally we did only test / publish Push Only results after our comparison tests showed Push Only performed better than Pull Only.
Then we added Push/Pull to go along with the Push Only data.
To do Pull only would add a significant amount of time to the testing process, so we chose the best of the two (+ Push/Pull)
Some fan manufactures say Pull Only is what the fans are designed for and will possibly even last longer when run in that configuration.
Without some data to back those statements up we are kind of skeptical. We’ve had fans fail prematurely in both scenarios and likewise have fans which have run seemingly forever.
Thanks for the detailed answer! Did your comparison tests show that push only also works better at low fan speeds (below 1000rpm)? I read that people having slightly better results with pull only at low speeds.
Has anyone actually tried fitting HWL nemesis GTX 420 radiator ontop of a define r5 or define S ?
I cant make up my mind if I should go for a rad that certainly fits like EK-CE 420 or Alphacool UT60 but hwl nemesis GTX is the best radiator but im not sure if it fits or not, it clears the memory wich is the highest part out of my mobo.
Awesome review! I’m wondering if any of the brands you tested had radiators that had fill ports that were on both sides? I’m wondering if anyone knows of a radiator that, like many Thermaltake Pacific radiators, has ports on both sides of the radiators. I’m planning a setup in which several radiators are stacked to do an experimental convection driven counter current loop (the coolest air cools the coolest radiators, the warmest radiators cooled by the warmest air, and all the hot air pulled out the top). That means that it would be most efficient to have the “in” ports on one surface of radiator, and the out on the other surface. Unfortunately the Thermaltakes are made of aluminum, which I don’t really trust…
Just off the top of my head – Alphacool have a bunch such as the UT60, XT45. HardwareLabs SR2 MP version does. Yes I wouldn’t trust those TT rads. BTW HardwareLabs does have a front to back type flow on the Nemesis GTX if thats what you’re looking for. It helps at lower flow rates although they advise the coldest air to get the hottest coolant, but once flow rate is high enough then the coolant is already ‘fully’ cooled before it leaves the rad anyway.
Comments are closed.