


Introduction
Hardware Labs SR2 140 Multi-Port Radiator Review
Welcome to another Extreme Rigs review. Today we’re again in 140mm radiator territory. This time it’s the SR2 140 Multi-Port from Hardware Labs receiving the Extreme Rigs attention. This 140mm radiator with a ton of port options certainly looks interesting. The SR2 series of radiators are the successors to the the original SR1. The SR1 focussed on low speed fans, while the SR2 also focuses on high coolant flow. The SR2 MP is an update for the SR2 which were originally released with just single port options. The low density core is touted to be “Optimized for sub-800 rpm ultra-stealth fans” which proved to be be an accurate statement when we tested the 360mm version earlier in the year. Will the 140mm perform as well ? We’ll find out how it performs and much much more as we take a close look at the what makes the SR2 140 MP tick.
HWLabs have again been kind enough to supply review samples for our radiator reviews. This includes this SR2 140 Multi-Port that we’ll be focusing on today. A big thanks to the crew at HWLabs for their continued support!


Once again we would like to say thanks to Noctua for providing the NF-A14 Industrial PPC-2000 IP67 PWM 140mm fans which are being used in the thermal chamber.

What’s in the Box?
The SR2 140 MP review sample arrived in full retail packaging. Existing packaging from the now EOL (end of life) SR2 140 has been used. The “MP MuiltiPort” labeling is a sticker which has been placed on the front of the retail sleeve.
 On the back of the retail sleeve a detailed technical drawing is provided along with a list of features. Because the sleeve is from the original single port SR2 140, there is no reference to the Multi-Port feature anywhere to be found. Nor are the extra ports shown on the technical drawing. We can confirm that the extra ports are the only difference between the new and old versions, so we expect to see the packaging updated in the future.
 Removing the retail sleeve we find a sturdy cardboard box with a factory sealed sticker.
 The seal is a reminder to use correct length mounting hardware, which we’ll touch on again a bit later.
 I really like the HWLabs style of boxing as the compartment at one end keeps the provided accessories away from the core. It would be nice to see a bubble wrap sleeve over the rad, but otherwise the SR2 140 MP has great packaging that should ensure safe arrival to the end user.
 Under the flap on the right hand side, we found 3 bags with the supplied accessories.

Extent of delivery:
1 x SR2 140 Multi-Port Radiator.
4 x M4 x 28mm screws.
4 x M4 x 5mm screws.
4 x Port Plugs (extras) .

Enough screws are provided to mount a single fan to one side of the radiator using the 28mm screws. Because the port plugs protrude ~4mm from the casing the 5mm screws can not be used to mount the radiator to a chassis unless the chassis has cutouts for the ports. We questioned HWLabs about the supplied screw lengths for the SR2 MP series and we were informed that the 5mm screws are “part of the standard screw package” and retained so as to provide options for “other bracket mounted accessories.”
This is a fair call and we like the inclusion of the short screws for the mounting of pump or reservoir brackets on the inside of the case:

Our biggest concern is that the supplied 28mm screws (which are the perfect length for attaching a fan directly to the radiator) are not long enough in most instances to mount a fan between a chassis panel and the radiator.
We attempted to fit a fan between the radiator and 6 different case panels of varying thickness. We had “success” only once, with a 1.1mm thick panel belonging to an InWin chassis. When we say “success”, it was because we could not even get one full turn of the screw. This is hardly ideal and is not sufficient in our opinion to consider the radiator truly secure.
Effectively this means that the radiator can not be mounted securely, if at all, to your chassis with the provided screws. How annoyed will you be when you discover you can not fit your new radiator to your case because the supplied screws sets are the wrong size.
For most case panels and brackets (up to 2.5mm thickness) M4 x 30mm screws are going to be required. Alternatively an 8mm screw coupled with a gasket would also be an option.
HWlabs seem very hesitant about providing 30mm screws as part of the “standard screw package” because “with a longer screw the possibility of damaging the core would be greater.” We totally agree with this, the risk is higher because if 30mm screws (instead of the 28mm) were used to mount a fan directly to the radiator the screws would be touching the screw protection plates. However clear labeling would significantly lower the risk of using the wrong length screws. We hope that HWLabs will change their mind and also include 30mm screws along with a specific warning only to use them for mounting to a chassis. The buyer is for now advised to purchase their own M4x30mm screws from their favorite hardware vendor.

HWLabs also provides 4 spare port plugs with the Multi-Port version of the SR2 140. These are in addition to 6 plugs that are pre-installed in 6 of the 8 the ports of the radiator. This is fantastic because the radiator is ready for flushing straight from the box. A total of 10 stop fittings is supplied then, which is great, but somewhat overkill. Because of this HWLabs had to keep the cost down and so these are not made of brass but instead of POM, aka Delrin. In other words they are plastic and if you note there is an allen key socket in the head for tightening it.
 HWLabs recommends only using fingers to tighten down the port plugs. However, given that using an allen key is an optional method of tightening/loosening these plugs, we found the recessed key rounds off after a couple of uses.
 Despite HWLabs’ hand tightening recommendation we discovered that some of the hex key slots on the pre-installed port plugs were already partly rounded off. Presumably the rounding off was caused from having been tightened with a tool during assembly. We were unable to remove half of the pre-fitted stop plugs by hand. Some of those then rounding off and needle nose pliers were required to loosen off the remaining stop plugs.
 Ultimately end users will decide whether or not they choose to replace these factory fitted plugs with plated/painted brass ones. I suspect that most will be happy to keep the stock plugs in place as they certainly function perfectly and look good too. HWLabs have made a good decision to include all the port plugs (inc. the 4 extra) and so the cost saving benefit of using the plastic material is justified.

Onwards to technical specifications!
Technical Specifications
Technical specifications as listed by Hardware Labs:


- Built-in 8-PORT Inlet/Outlet manifold system
- 140 mm x 1 fan Xtreme+ form factor 3-row radiator
- 172mm x 153mm x 60mm (L x W x H)
- 9 FPI 45 Micron Copper Fins
- Optimized for sub-800 rpm ultra-stealth fans
- Supercruise™ optimizations for scalable performance with higher speed fans
- 50% more tubing area than the Black Ice® SR1-140
- Increased internal coolant flow rates optimized for multi-stage cooling configurations
- Standard G 1/4″ inlet/outlet fittings
- Standard M4 mounting threads
- Compatible with Black Ice® GTX® 140 and Black Ice® SR1® 140 radiators
- Custom Black Carbon™ high quality finish
- Fully ROHS Compliant
- 100% Made from conflict-free materials
- Industry standard Black Ice® quality
- Lifetime warranty against manufacturing defects*
Thanks to HWLabs we have a couple of Technical Drawing of the SR2 140 MP, but note that none of the dimensions take consideration for the extra 4mm that each port plug requires:


I made mention above of the extra 4mm on each port adding to the dimensions. The following photo shows that each port face is flush with the casing, a ruler is placed over one of the side ports. So whatever plugs you use, their thickness should be added for a final dimension size.

Dimensions Measured on the Radiator Tested:
 The (+4) and (+4 +4) are the addition measurements if the supplied port plugs are fitted.
Radiator Core Dimensions:
 The core is made of a three rows of 16 tubes arranged in the standard U-Flow configuration. The fin arrangement is made of single louvered fins and the review sample had a fin count of 9 FPI which matches HWL specs. This low fin count on it’s thick core should equate to some very good push only thermal results just as we saw on the longer but narrower 360mm version of the SR2 MP.
The following picture is a reference which shows a typical U-Flow coolant flow path, where the coolant travels up all the tubes on one side (left in pic) of the rad and then returns down the other side. U-Flow is most easily recognized when the port end has 2 separate tanks such as the SR2 140 MP.

 The single louvered fins are very evenly spaced and our sample measured in at 9 FPI.
 Please Note: alternate lighting was needed to get a decent picture of the fins. This distorts the color of the finish and it is not a true representation of the “almost” black shade of the “Black Carbon” paint finish.
Zoom in a little and we can better see the even fin spacing and the louvered fins.

Finish and Features
HWLabs calls the finish “Black Carbon”, which is an accurate description. The finish on our sample of the SR2 140 MP could almost be described matte black. However it is more like an extremely deep charcoal grey. It has a subtle yet stylish look which should work in great with almost any build’s them
 The SR2 140 MP is also available with a Satin White finish. Picture courtesy of PPCs.

The SR2 140 MP is equipped with 8 ports in total, 4 each inlet and outlet to choose from and HWLabs describe the port tanks as a manifold system.
We have seen side ports before, but not combined with 3 other alternatives for each side of the radiator. This “manifold system” offers the most ports of any radiator currently available and is the stand out feature of the SR2 MP series.
 Extra ports offer installation flexibility and the option to install coolant temp sensors or a drainage valve without having to use a T or splitter fitting.
 On the return end tank there is no auxiliary port fitted, which unfortunately is something which is missing on all HWLabs radiators.
 The auxiliary ports often come in so handy as a drain or fill port option on vertical installations, so again it is on our wish list for a future revision.
Care has been taken during painting to ensure paint did not get into either of the G ¼ ports.

The SR2 140 MP has screw protection plates fitted under each mounting hole.
 The mounting holes are located over the side tubes, so it’s great that HWLabs chose to fit the protection plates.

The SR2 140 MP looks great when paired up with some black fittings…
 Add your chosen fan/s, and it’s ready for business.
 With Push/Pull fans fitted the overall thickness is 110mm and probably won’t fit in all locations. Best to do some measuring first.

So here we have a ~60mm thick 140mm radiator with a low fin count which has 8 usable G 1/4 port options. The build quality is excellent, as is the “black carbon” paint finish.
Let’s see how it performs…
Flow Rate Testing
The Data
All the testing was performed with the exact same equipment as the 360mm radiator roundup. The only exception is the use of the 140mm Noctua Industrial fans replace the 120mm GT fans. We used the exact same methods as in the 360mm round-up. To see exactly how the tests were carried out, details of the test set ups and equipment used, please head over to the RRU Test Setup page.
Restriction Test
It’s generally agreed that radiators are some of the least restrictive components in the water cooling loop. There are some exceptions, so this must still be verified through testing:
 The above photo of the restriction test bench is for reference. The SR2 140 MP is not loaded so please disregard any data from the picture.
Here is the raw data at the tested flow rates. Flow rate was increased and the differential pressure was measured:
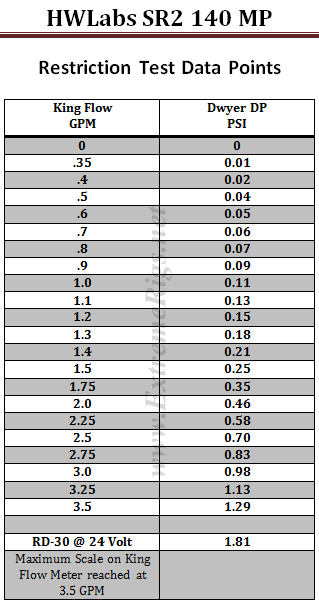 The table numbers show that the SR2 140 MP is quite a low restriction radiator. However numbers in isolation can only tell half the story. By plotting against other components it more easily shows the whole story.
We have decided to use a HeatKiller 3.0 CPU block as the reference in this next plot for two reasons. Firstly there is no chance of the plot being cluttered by curves overlapping. Secondly it gives a reference point against a common loop component of average restriction.
We have limited the maximum flow rate displayed to 2.0 GPM as we suspect there are few systems that operate above 2.0 GPM. For more information on how to read a restriction plot check out our guide.
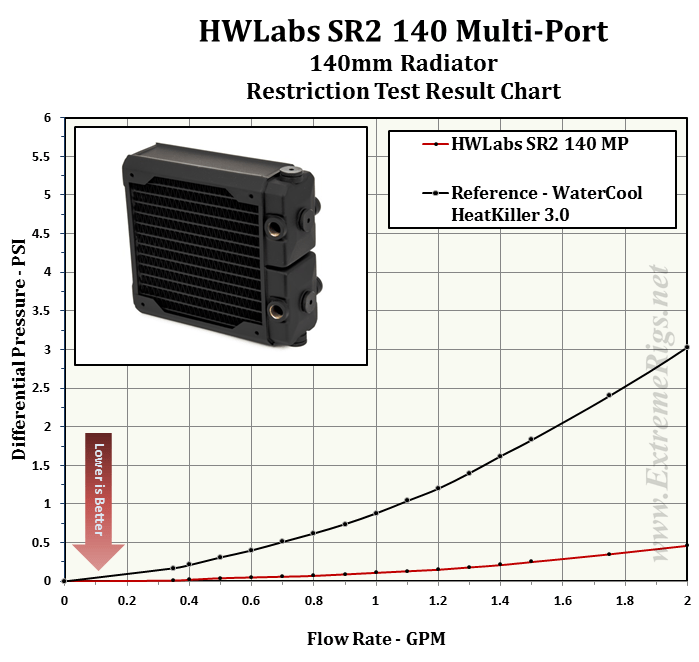 This plot indicates the Nemesis 140 GTS is an extremely low restriction loop component. What about compared to other radiators?
The next three plots show the restriction level at three different flow rates compared to the other 140mm radiators tested. We consider the chosen GPM rates to represent systems which have low, medium and high flow rates.


 These 3 plots show us that the SR2 140 MP is actually a very low restriction radiator when compared to some other 140mm models.
To give a bit more perspective on the restrictiveness, lets now take a look at where the SR2 140 MP fits in relation to all the radiators we have tested. For this plot, only results for 1.0 GPM have been used for the comparison.
 When put into context with all the radiators, we rate the SR2 140 MP as a radiator with a very low restriction level.
Before we move on, let’s isolate the current HWLabs radiators from the rest and see how they line up at 1.0 GPM. We have separated the SR2, Nemesis GTX and Nemesis GTS series by color coding and it show us nicely how each series restriction level scales as the size increases.

Essentially all the radiators scale up in restriction as they grow in length. However the SR2 models are always extremely low, while the GTX is in the middle and the GTS is quite high indeed.
Onwards to Thermal Performance!
Thermal Testing
The Thermal Data
A total of 6 tests were conducted at 1.0 GPM with fan speeds of 750 rpm, 1300 rpm and 1850 rpm being run in Push Only and Push/Pull. All inclusive this testing takes between 40 – 50 hours of logging time (plus processing the data) to get the results that are presented.
Below is the final data results gathered from at least 5 data logging runs at the flow rate and fan rpm combination. The most stable 15 minute period from each logging run was used and then averaged with the other runs to obtain the data for the table below. A total of 16 temperature sensors were used in the thermal test chamber (8 air in, 2 air out, 3 water in, 3 water out). Each sensor takes a reading every second and is logged via a CrystalFontz unit.
The data in the table below is the averaged results of the logging runs which has then been used to create all the plots and tables there-after.
 The performance metric of critical importance is the delta between the warm coolant temperature in and the cold ambient air temperature going in to the radiator. Given that the system is well insulated and in equilibrium and we know the heat input to the system then we can also calculate a very important number. That number is the amount of power required to raise the coolant temperature by set amount. That amount is typically 1C or 10C. The latter is a more useful reference point.
Let’s take a look at the Delta T results from the tests. Note that the extrapolation of the curve is much more sensitive to error than in between the tested range.
 I was not too concerned about the actual delta numbers, more so the trend pattern, and as we should expect, the deltas come down significantly as the fan speed is increased.
Delta T results (as above) are not always helpful when thinking about how many radiators you would need to cool your system. Instead it’s more useful to know the metric of W/delta C as plotted below. It tells us how many watts are dissipated by the radiator when the coolant rises 10C above ambient temperatures. (W/10 Delta T):
 We can clearly see more separation between Push Only and Push/Pull at 1850 rpm, indicating that the thick core is able to effectively use the extra air flow that Push/Pull offers. At both 750 rpm and 1300 rpm the difference was ~16.5% while at 1850 rpm the difference increases to ~21%. Surprisingly then, the SR2 140 MP efficiency continues to get better with increased air flow.
This same data can now be plotted on a chart so that an end user can interpolate their own fan speed. Note again that the extrapolation of the curve is much more sensitive to error than in between the tested range.
 As we just saw, a push only fan installation is very efficient on this radiator. However because the core is very thick there is a decent boost from adding the second fan. At each fan speed adding a second fan (Push/Pull) yielded an average performance increase of ~18%.
Now let’s analyze that data some more…
Data Analysis
This first table shows the HWLabs SR2 140 MP’s Watts/10 Delta Temp results with our flow rate of 1.0 GPM.

Using this data we can effectively show percentage gains/losses relative to a reference point. It’s an interesting way to show gains/losses while changing a variable.
So, let’s focus on 1300 RPM as our reference and see how much gain or loss in performance we get by changing fan speed.
 While previously we pointed out the air efficiency of the SR2 140 MP with high fan speed in Push Only, the tables above shows the brute force benefits of Push/Pull as the fan speeds increase.
So from the data above we have a good idea of how the SR2 140 MP radiator performs relative to itself. But there is a large selection of 140mm radiator models to choose from.
We have some other 140mm radiators with thermal testing completed. So let’s put the SR2 140 MP’s results into some comparison charts.
Push Only Data vs Competition
Let’s focus on the Push Only results for now and come back to the Push/Pull data later.
Starting with 750 RPM let’s see how the SR2 140 MP performs comparatively.
 Results are always close at this data point and the SR2 140 MP comes in second place. It has the lowest fin count of the group and therefore this is the data point in which we thought is was likely to have it’s best results.
Now let’s look at 1300 rpm:
 At 1300 rpm Push Only the Nemesis GTX which placed last at 750 rpm shoots out to take the lead. There is something about the Nemesis GTX rads where they perform poorly at low rpm at Push Only. The SR2 140 MP finished in third place ~7.5% behind the leader.
 At 1850 rpm the SR2 140 MP falls further behind the radiators with denser cores, but stays ahead of the slim Nemesis GTS.
Of the four rads over 30mm in thickness, the SR2 140 MP has the lowest FPI count, and while we hesitate to make predictions the Push Only results fell in line with our expectations for each data point.
Things get more interesting with Push/Pull as each model’s core reacts differently to the air flow changes and there always seems to be a surprise. Will it be the case with the SR2 140 MP in Push/Pull?
Let’s find out.
Push/Pull Data vs. Competition
Let’s now look at the Push/Pull results and see how the SR2 140 MP compares.
Again the 750 rpm first:
 Taking 4th place ~7% behind the winning rad, the SR2 140 MP turns out a respectable result and isn’t too much behind it’s denser cored peers.
Let’s move to 1300 rpm:

At both 1300 rpm and 1850 rpm Push/Pull the SR2 140 MP takes second place, while it’s stable mate the Nemesis 140 GTX takes both wins. We’ll be honest here and admit that both of these comparison results and rankings surprised us a little.
Despite the SR2 140 MP being 60mm thick it has the lowest fin count and because of this we would normally see comparative performance weaken against denser core rads. While we won’t speculate, other design factors must be at play here such as the louvered fins and possibly the amount of tubes and the thickness of the tubes.
1850RPM:
 The SR2 140 exceeds our expectations at this data point and finishes second just 6.5% behind the winner.
Let’s now combine the Push Only and Push/Pull results of our 1.0 GPM flow rate tests into one plot for each fan speed tested. Sometimes these combined plots show up some points of interest.
Again the 750 rpm first:

Now the 1300 combined:

Finally the 1850 rpm combined:
 No surprises showed up there given the data we have already reviewed.
One last alternate view of the data before we move onto the summary, this time plotted as curves and adding some extrapolation.
Push Only first up:
 This plot perhaps best shows just how close the results are between all the 140mm rad we tested. Only at the high fan speeds do we see the strongest and the weakest really split from the pack.
In the Push/Pull we see a bit more separation occurring, particularly as the fan speeds are increased and the different core designs show their strengths and weaknesses.
 From all the test results we created “Average Performance Factor” charts for both Push and Push/Pull. We then made a combined plot which averages all the results and called it the “Master Performance Factor”. The radiator with the best cooling ability (W/10ΔT) at each rpm was awarded a score of 100. Each other radiators W/10ΔT result was scored as percentage of the top performer.
This way of looking at the comparison takes away any advantages that a radiator may have at higher or lower fan speeds and looks at an overall average. While this appears fair it does tend to favor those radiators that are all-rounders and those radiators which do very well at high RPM. Most users should be more focused on their specific use case.
Firstly – the Push Only APF:

With all of it’s results over 90%, the SR2 140 MP proved to be a much better all rounder than anticipated, especially as it is marketed as a being “Optimized for sub-800 rpm ultra-stealth fans“. What we may have overlooked previously and is perhaps a much more important feature from the SR2 marketing material:
“Supercruise™ optimizations for scalable performance with higher speed fans“.
Hats off to HWLabs and Supercruise™ we say, because it certainly seems to be working effectively on the SR2 140 MP!
The percentage numbers in the table offer another way of looking at the SR2 140 MP’s results. But for our scoring system we need a way to reduce the categories while retaining the data. To do this we average the results for each fan assembly type giving us Averaged Performance Factors. We calculate this for push only, push/pull and finally an average of everything.
Firstly – the Push Only APF:
 The SR2 140 MP’s Push Only APF score of 92.5 was ~4.5% behind the leader and resulted in a tie for 3rd place with the EK CE 140 which is thinner but has higher FPI.
Now the Push/Pull APF:
 The Push/Pull APF result of 92.3 is an excellent result and second place is somewhat of a surprise. The only thing more amazing is the 100% winning score of the Nemesis GTX.
Finally we created the Master Performance Factor which is calculated from the averaged results of all the Push Only and Push/Pull thermal tests, at all fan speeds.
 Overall the SR2 140 MP placed 3rd in our thermal tests, but by the smallest of margins. The 1.3% difference between 2nd and 4th is very small and on the border of our test error margin.
Next up – Summary!
Summary
Thermal Performance
Thermal Performance scores are derived from the relevant Performance Factor scores. We set this scale with 72.5% and below as the 0 mark, with each 2.5% increase in relative performance adding 0.5 to the awarded performance score.
Push Only Thermal Performance
- 4/5
The SR2 140 MP’s Push Only APF result of 92.5% translated into a thermal performance score of 4/5 and a tie for 3rd place. It had great results at each fan speed we tested, but it’s best comparative result was with low speed fans.
Push/Pull Thermal Performance
- 3.5/5
The Push/Pull Performance results were dominated by the Nemesis 140 GTX while our SR2 140 MP came in a clear second place.
Overall Thermal Performance
- 3.5/5
The Master Performance score of 92.4 generates a respectable overall performance score of 3.5/5 especially given how dominant the winning radiator was. Based on the numbers generated this gives the SR2 140 MP a third place overall finish. However our test error margin is on the limits here with the 2nd to 4th place rads, so effectively we have to call a three way tie for 2nd place.
Features & Quality – 4/5
Like all HWLabs radiators, the SR2 140 Multi-Port radiator has excellent packaging, but it is lacking bubble wrap protection. Screws are provided for installation and mounting of a single 25mm thick fan. We believe that most users will not be able to mount the radiator to their case without purchasing addition M4 x 30mm screws.
The build quality of the SR2 140 MP is excellent as is the “Black Carbon” finish of the review sample. The 8 port options are unprecedented and excellent, but there is no auxiliary bleeder/fill port fitted. Tube protection plates are included to protect the core which has a very low 9 FPI count. Downtime for cleaning will be minimal because of the low density core. It has a very low restriction level so pump power should never be an issue even when running multiple SR2 series radiators in the system.
At 60mm thick the SR-2 140 MP is unlikely to be compatible with all installation scenarios, particularly in smaller cases. If it can fit in your chassis then the 8 ports provide opportunities for shorter, neater tubing runs, perhaps even hidden tubing runs. The extra ports add flexibility for installation orientation while also increasing the ease in which temp sensors and drain valves can be placed in the loop.
Fitting of port plugs will add ~8mm to the overall width, which could cause compatibility issues with some installation scenarios, so be sure to check the width of your intended location. Having to purchase additional screws to mount the radiator is not ideal, but something you will soon forget once the installation is complete.

Summary – Silver Award 4/5
The SR2 140 Multi-Port has so much potential for creating easier and neater tubing runs and proved to be an excellent all round thermal performer. The build quality and finish is great and for these reasons it receives our Silver Award.

Where to buy:
Performance PCs:
SR2 140 MP Carbon Black – $70 + Shipping from USA.
SR2 140 MP Satin White – $70 + Shipping from USA.


[…] let us down. After all we’ve already seen it perform well in our reviews for the SR2 140 MP and SR2 420 […]
Comments are closed.