


Introduction Unboxing & Features
Welcome back to Extreme Rigs. Today we’ll be looking at the Eispumpe VPP755 (Ice Pump) from Alphacool. The VPP755 is a the latest addition to Alphacool’s “Ice” range of water cooling products.
Alphacool have stated they developed the VPP755 in-house, yet it appears remarkably similar to the D5 pumps which we are probably all familiar with. The familiar appearance should come as no surprise given that Alphacool have even stated that the VPP755 is “compatible to D5 mounting places“. This means the VPP755 should be mountable to all currently available D5 tops which is great news as it means end users are not forced to purchase new tops along with a new pump.
Special mention go to one of our long terms sponsors, Aqua Tuning for providing not only the VPP755 review sample, but also the Plexi Esidecke D5 pump top, used during the testing. Without the support of sponsors willing to put their money where their mouth is, and have their products scrutinized and reviewed in a professional, unbiased manner, the ER team would not be able to bring you the factual based reviews which we strive to publish. Thanks Aqua Tuning and Alphacool.
![]()
![]()
 Some of the features being floated about on social media in the weeks leading up to release certainly got our attention with Alphacool claiming the VPP755 is “stronger and quieter than the normal D5” and that “you can control it over PWM or on the knob or both“. Additionally it is said that the VPP755 can be run dry, although we feel a valid reason for doing so might be difficult to justify.
A reliable pump is the heart of any water cooling system, reliable being the key work here and is one of primary reasons that the D5 (and DDC) series of pumps have been the go-to pumps for enthusiasts for over a decade. We have had more compact and less efficient pumps added to the mix in recent times, but no serious contenders have come along that have competed with the D5. Maybe the VPP755 is that contender. We’ll be running our VPP755 pre-release sample through it’s paces and find out if it’s performance lives up to the hype by thorough testing. We’ll endevour to find out it’s performance in terms of flow rate, pressure, noise and control.
Unboxing
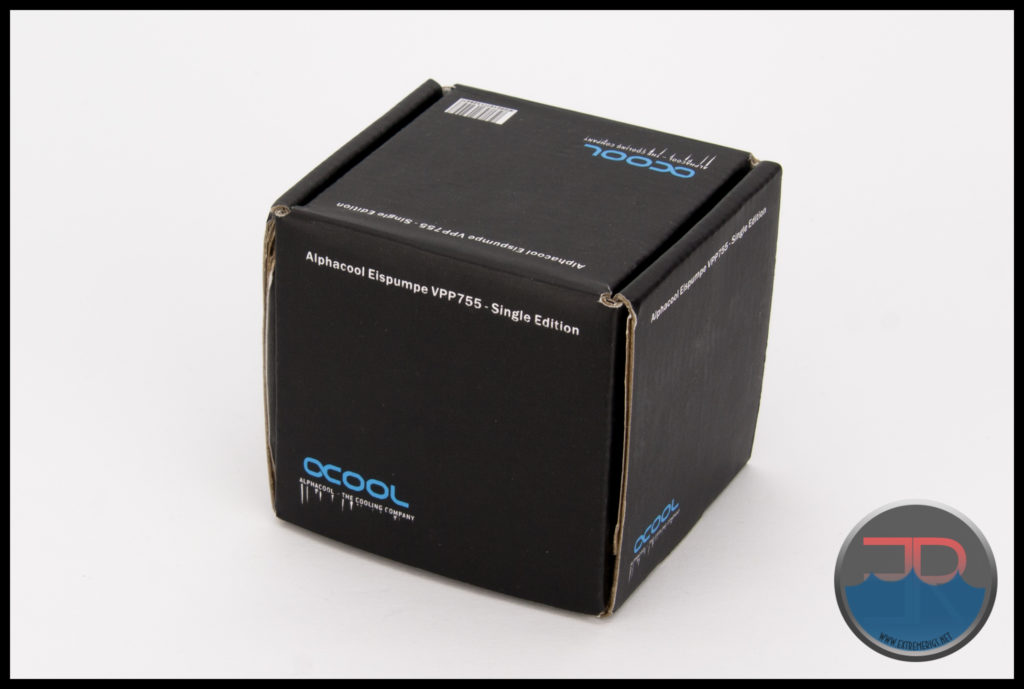
The Eispumpe VPP755 comes packaged in a sturdy little box which has Alphacool’s usual white writing and blue logos. At the top of each face in rather small writing we are informed of the contents: “Alphacool Eispumpe VPP755 – Single Edition“, meaning that included is the pump motor only and does not include a pump top which the end user must provide in order to use the pump. At launch, or not long after we would not be at all surprised to find the VPP755 available pre-mounted to an Alphacool Eisdecke D5 Pump Top which we reviewed earlier this year or even one of their top/res combo.
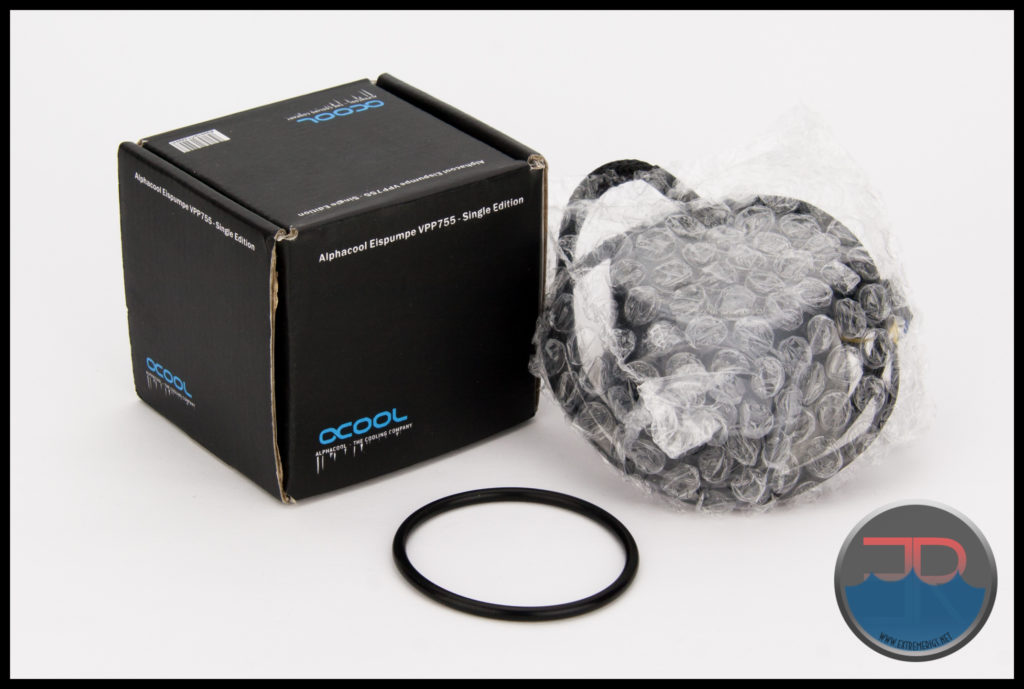
Flipping the lid we found an o-ring seal placed on top of the pump motor within a protective layer of bubble-wrap.
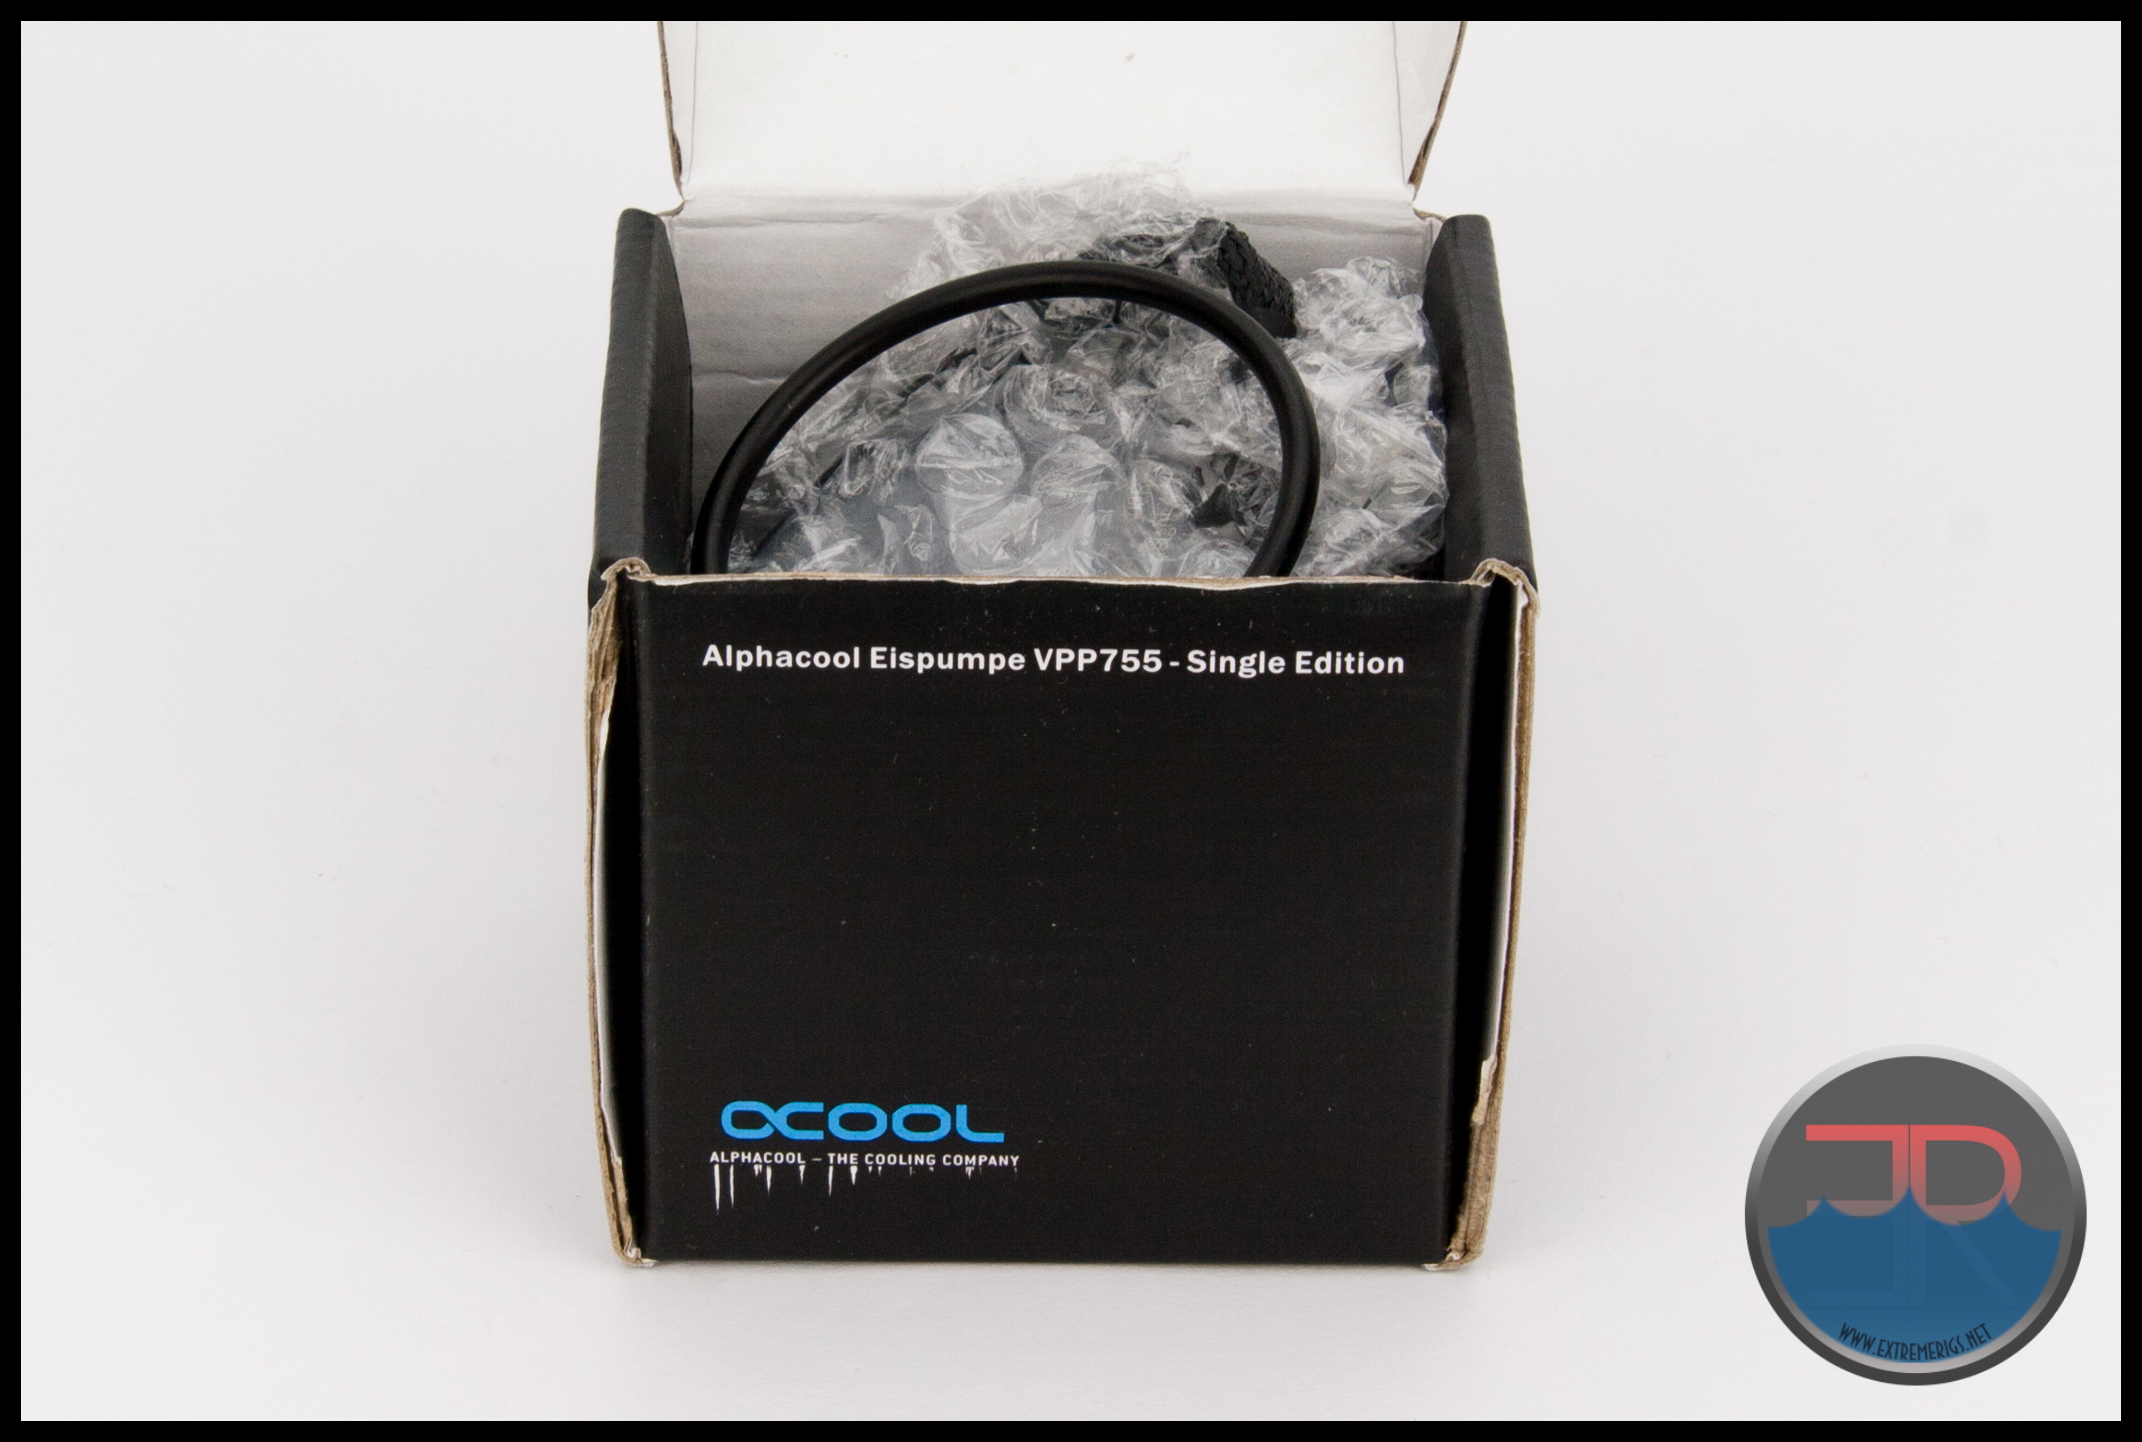 We didn’t expect anything fancy in terms of packaging. The way in which the VPP755 is packed meets our expectations and does a good job of ensuring the pump arrives to the purchaser in perfect condition.
Pump Cover
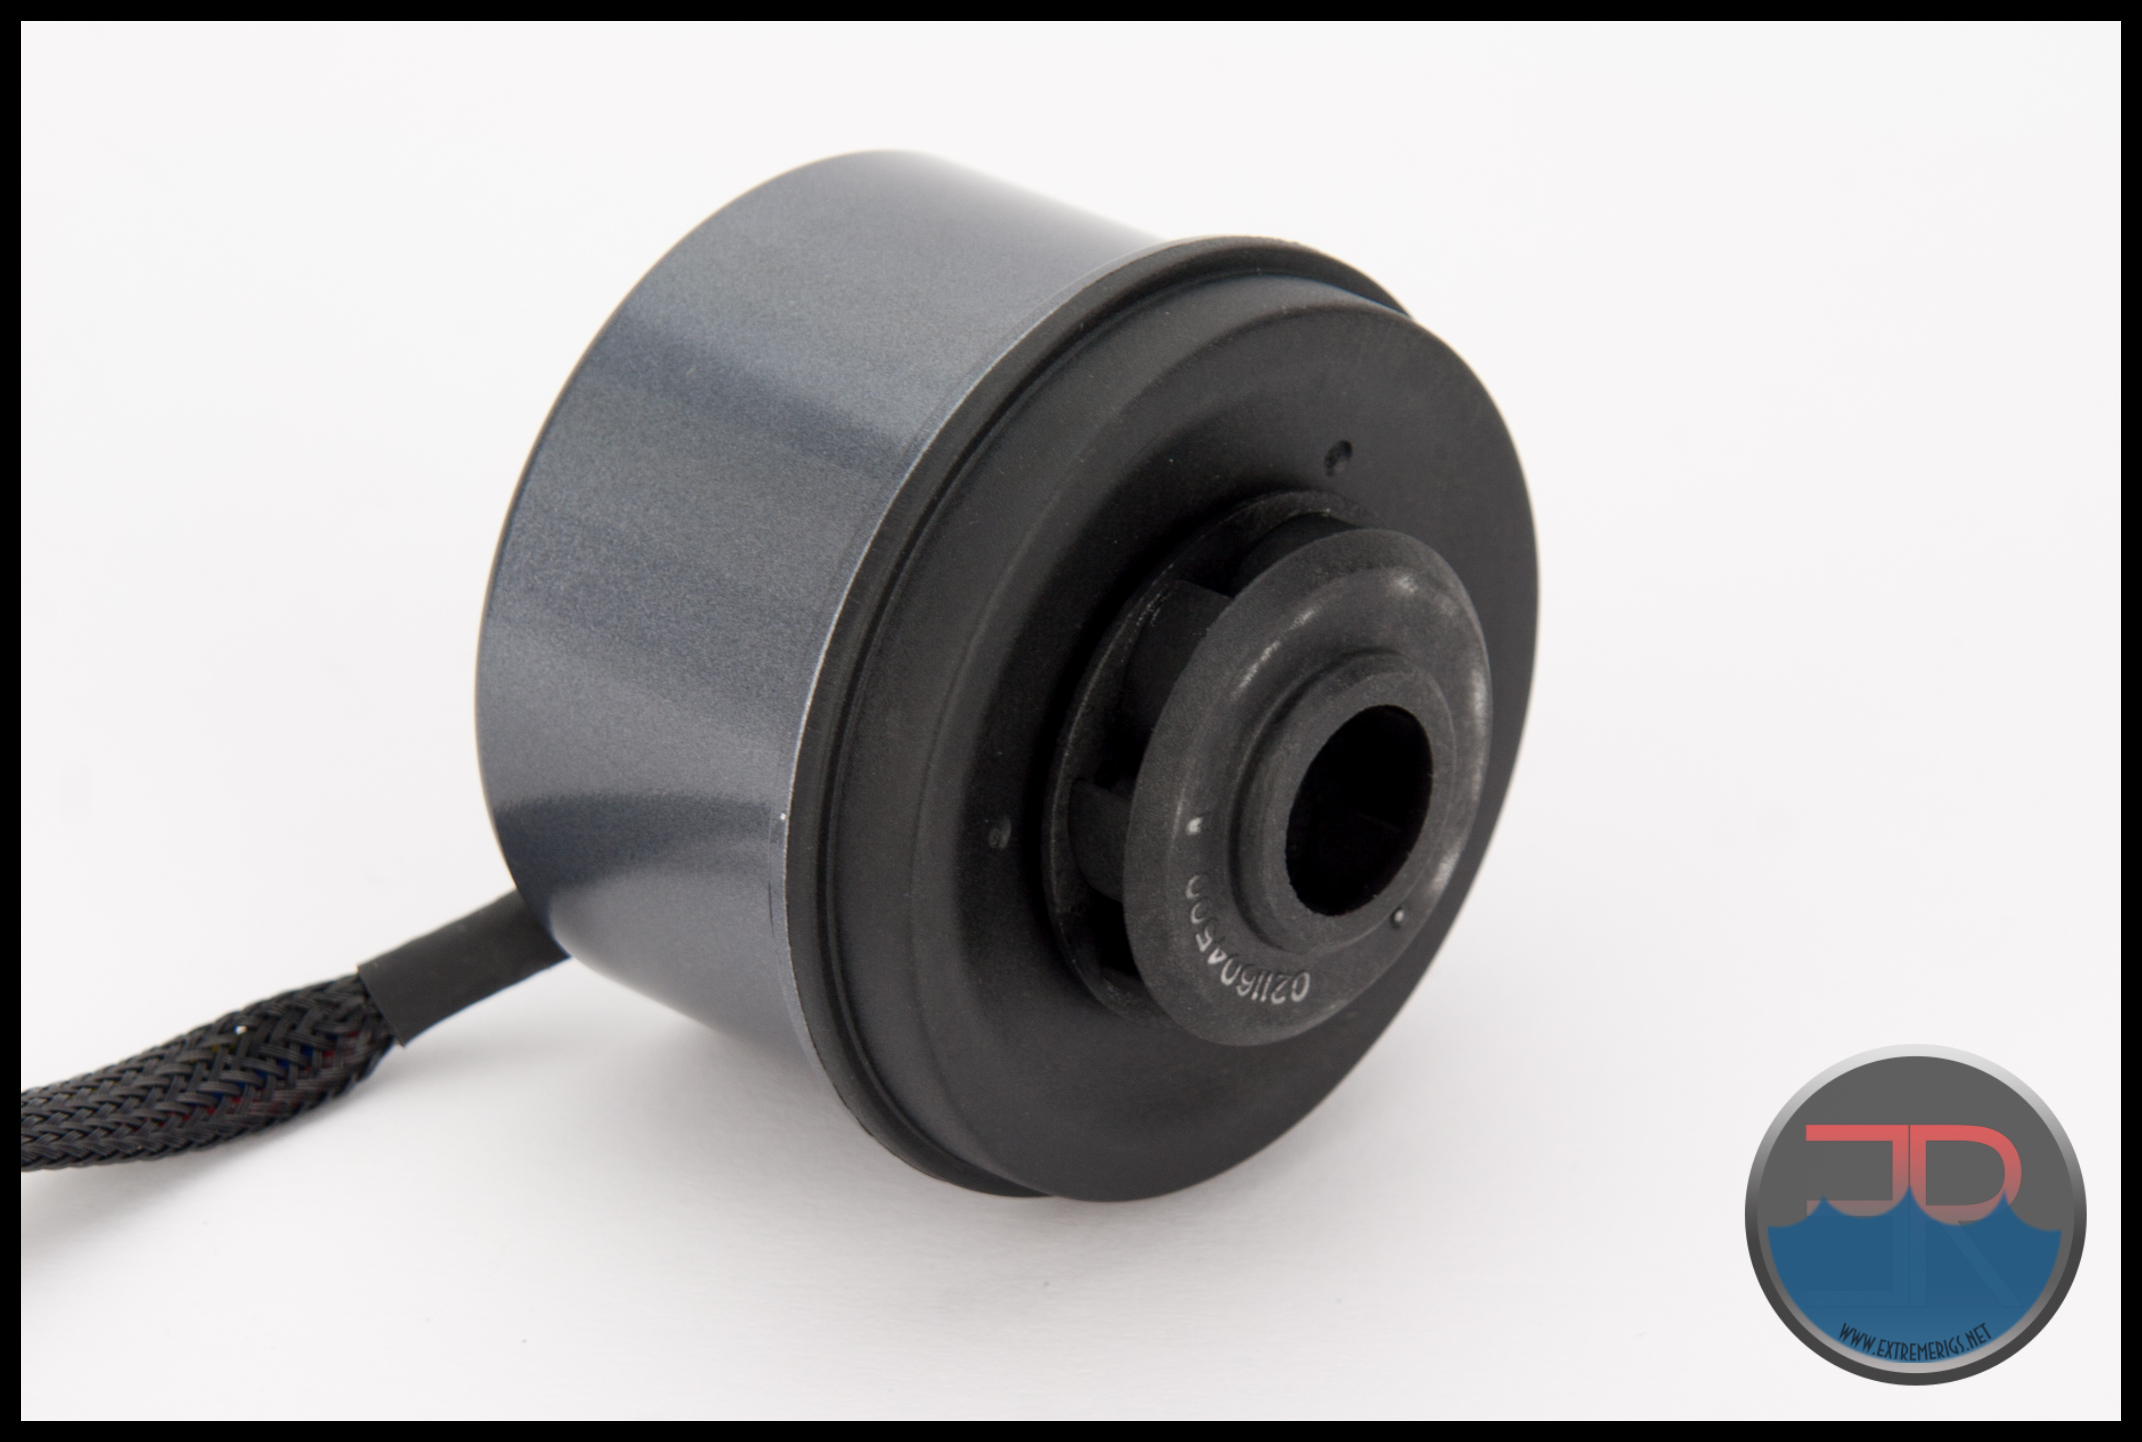
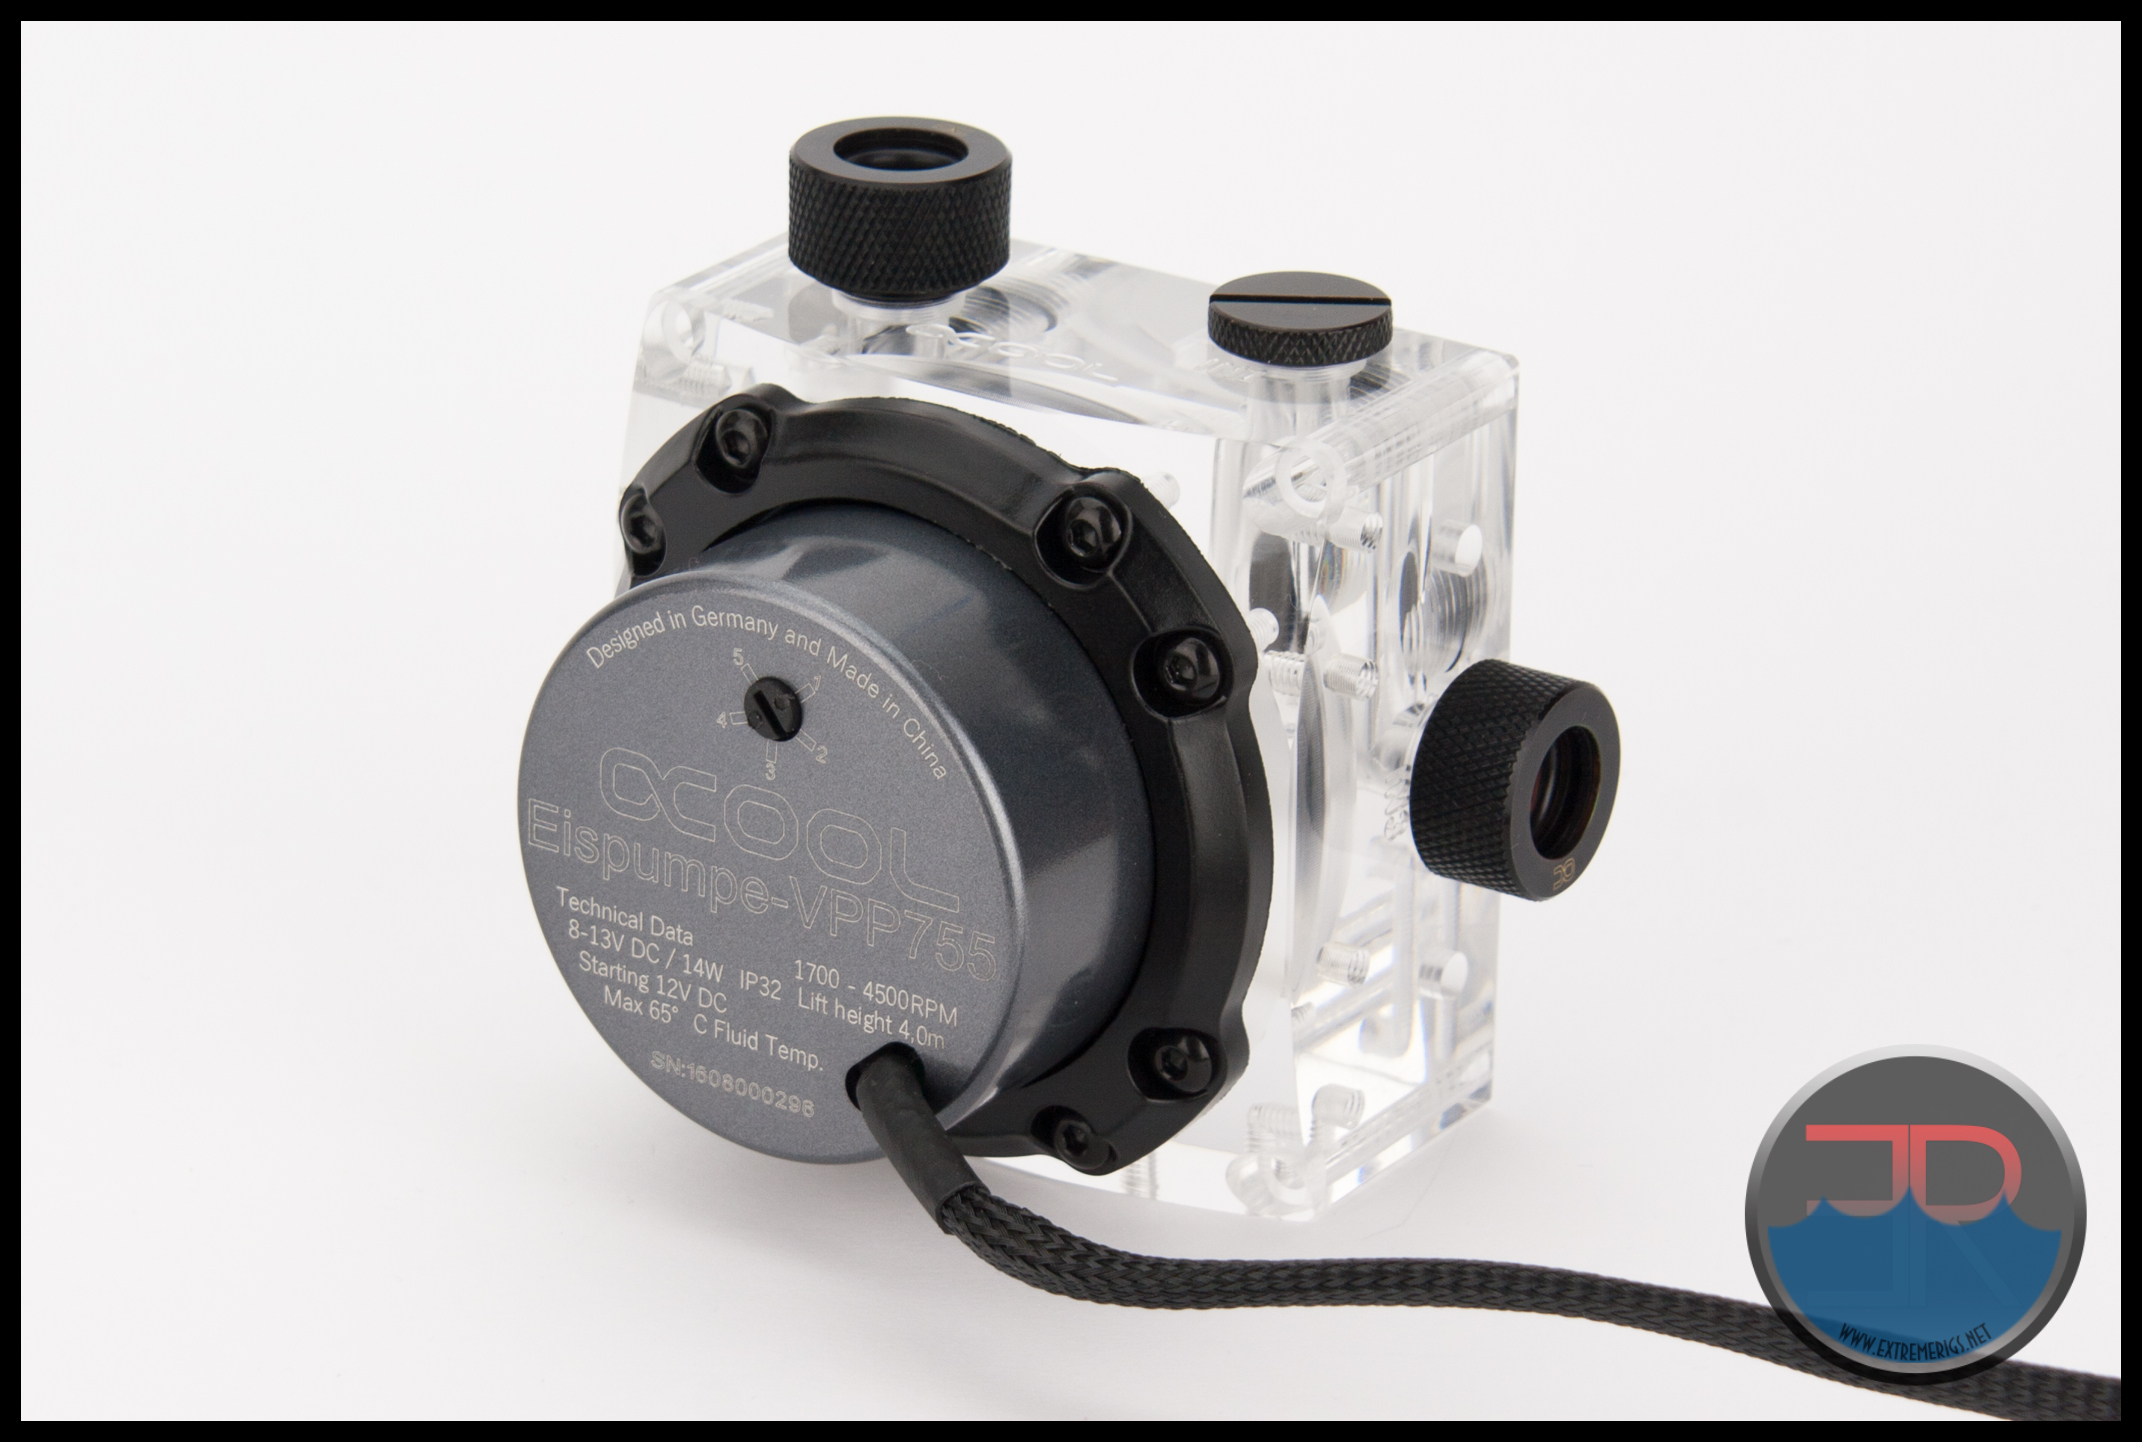
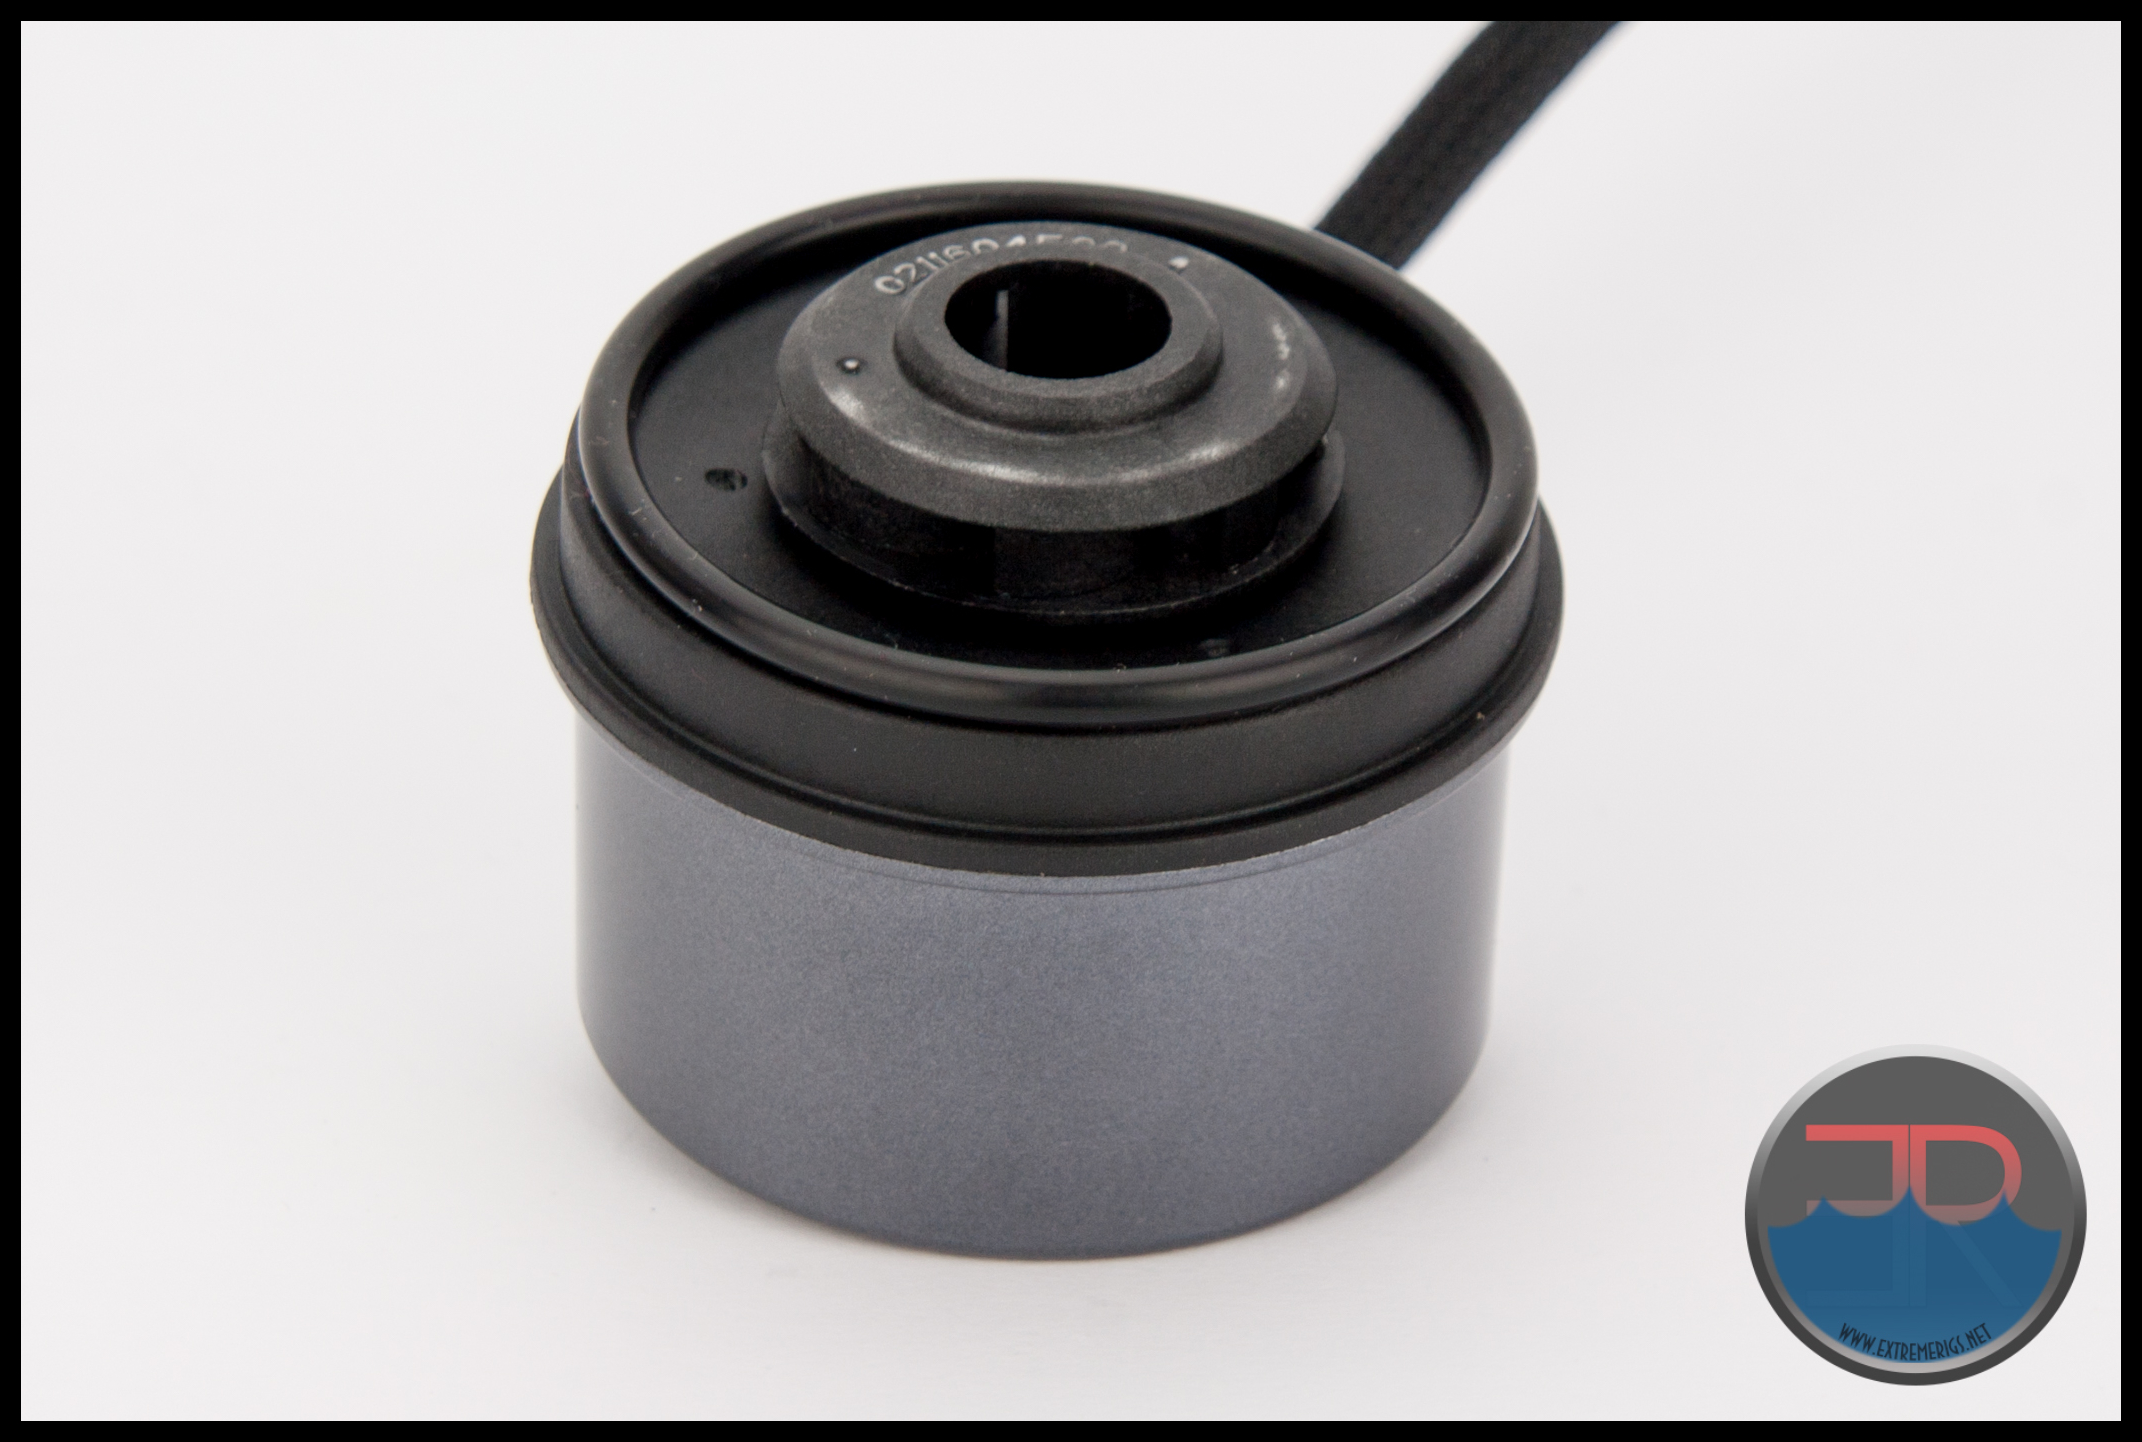
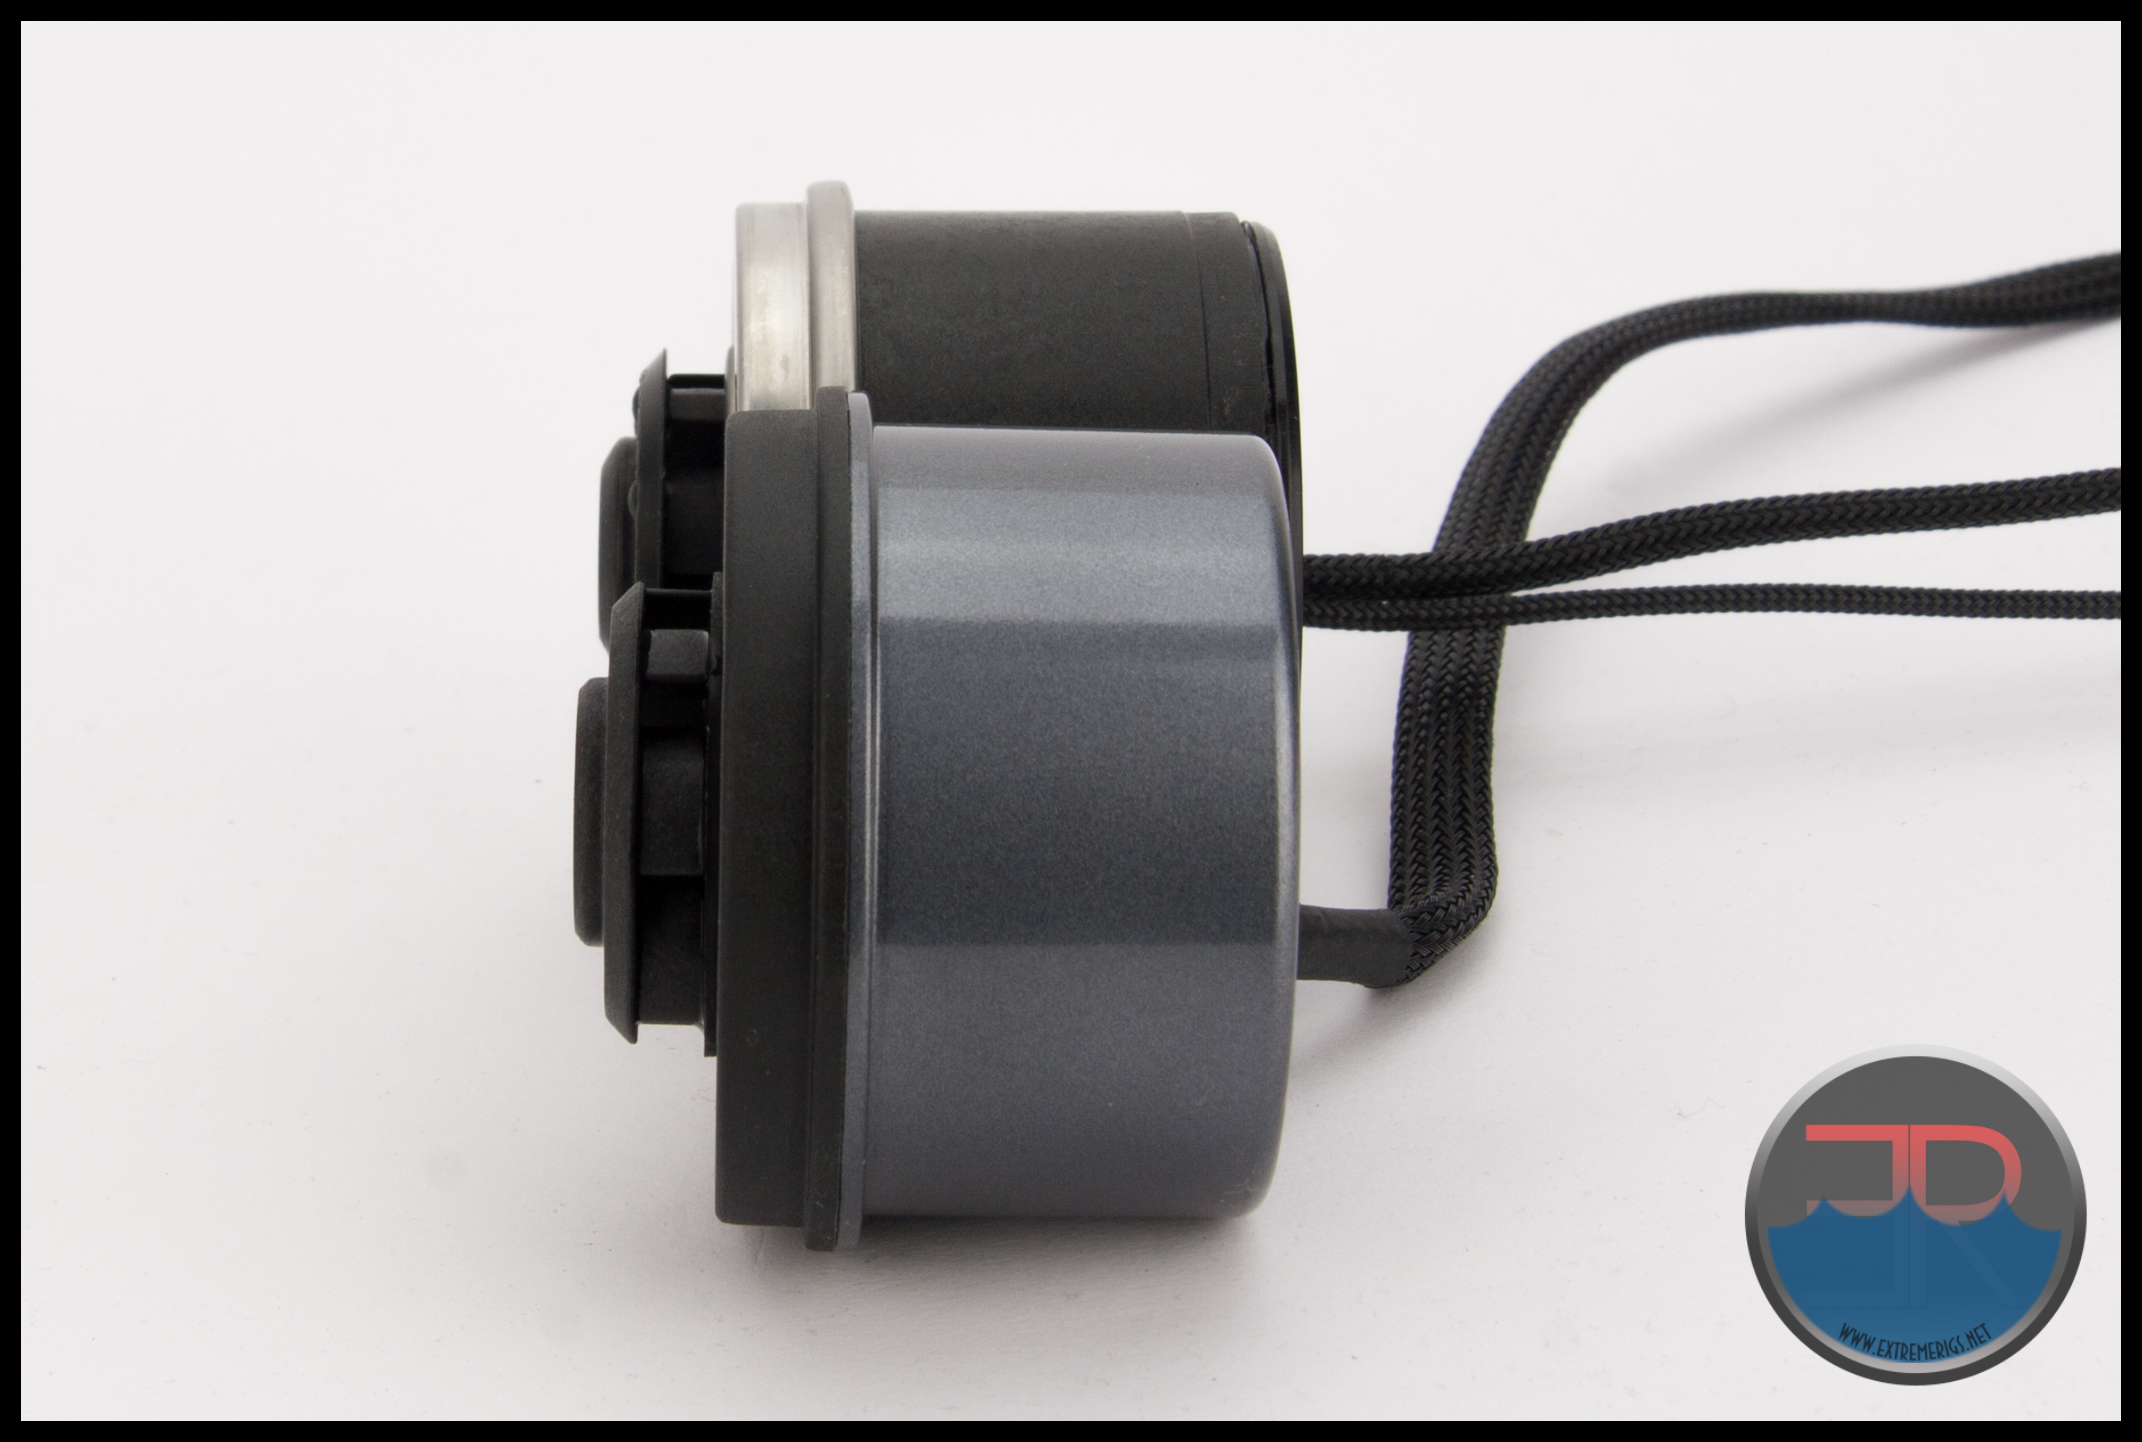
After removing the bubble wrap we got our first look at the VPP755 and immediately the gun metal grey painted finish on the motor cover got out attention. The grey finish has a slight speckle in it and is silky smooth to touch. Alphacool have indicated that they will be releasing alternate color motor covers so you match your pump in with your color scheme. The cover adds a slick, professional looking finish to the VPP755 pump and we’re sure you will like it as much as we do.
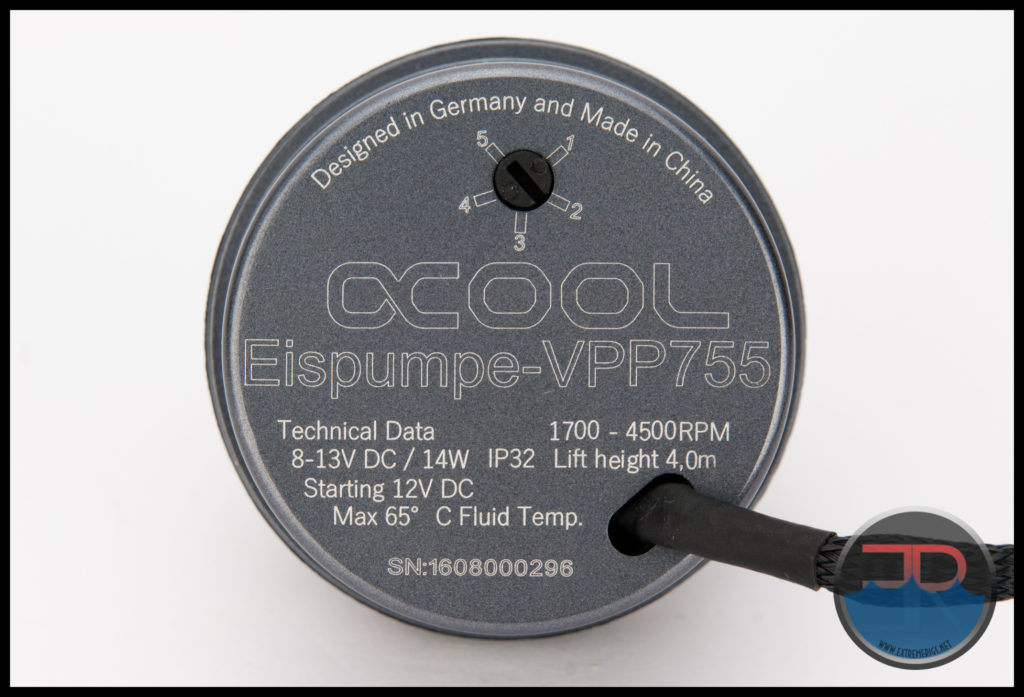
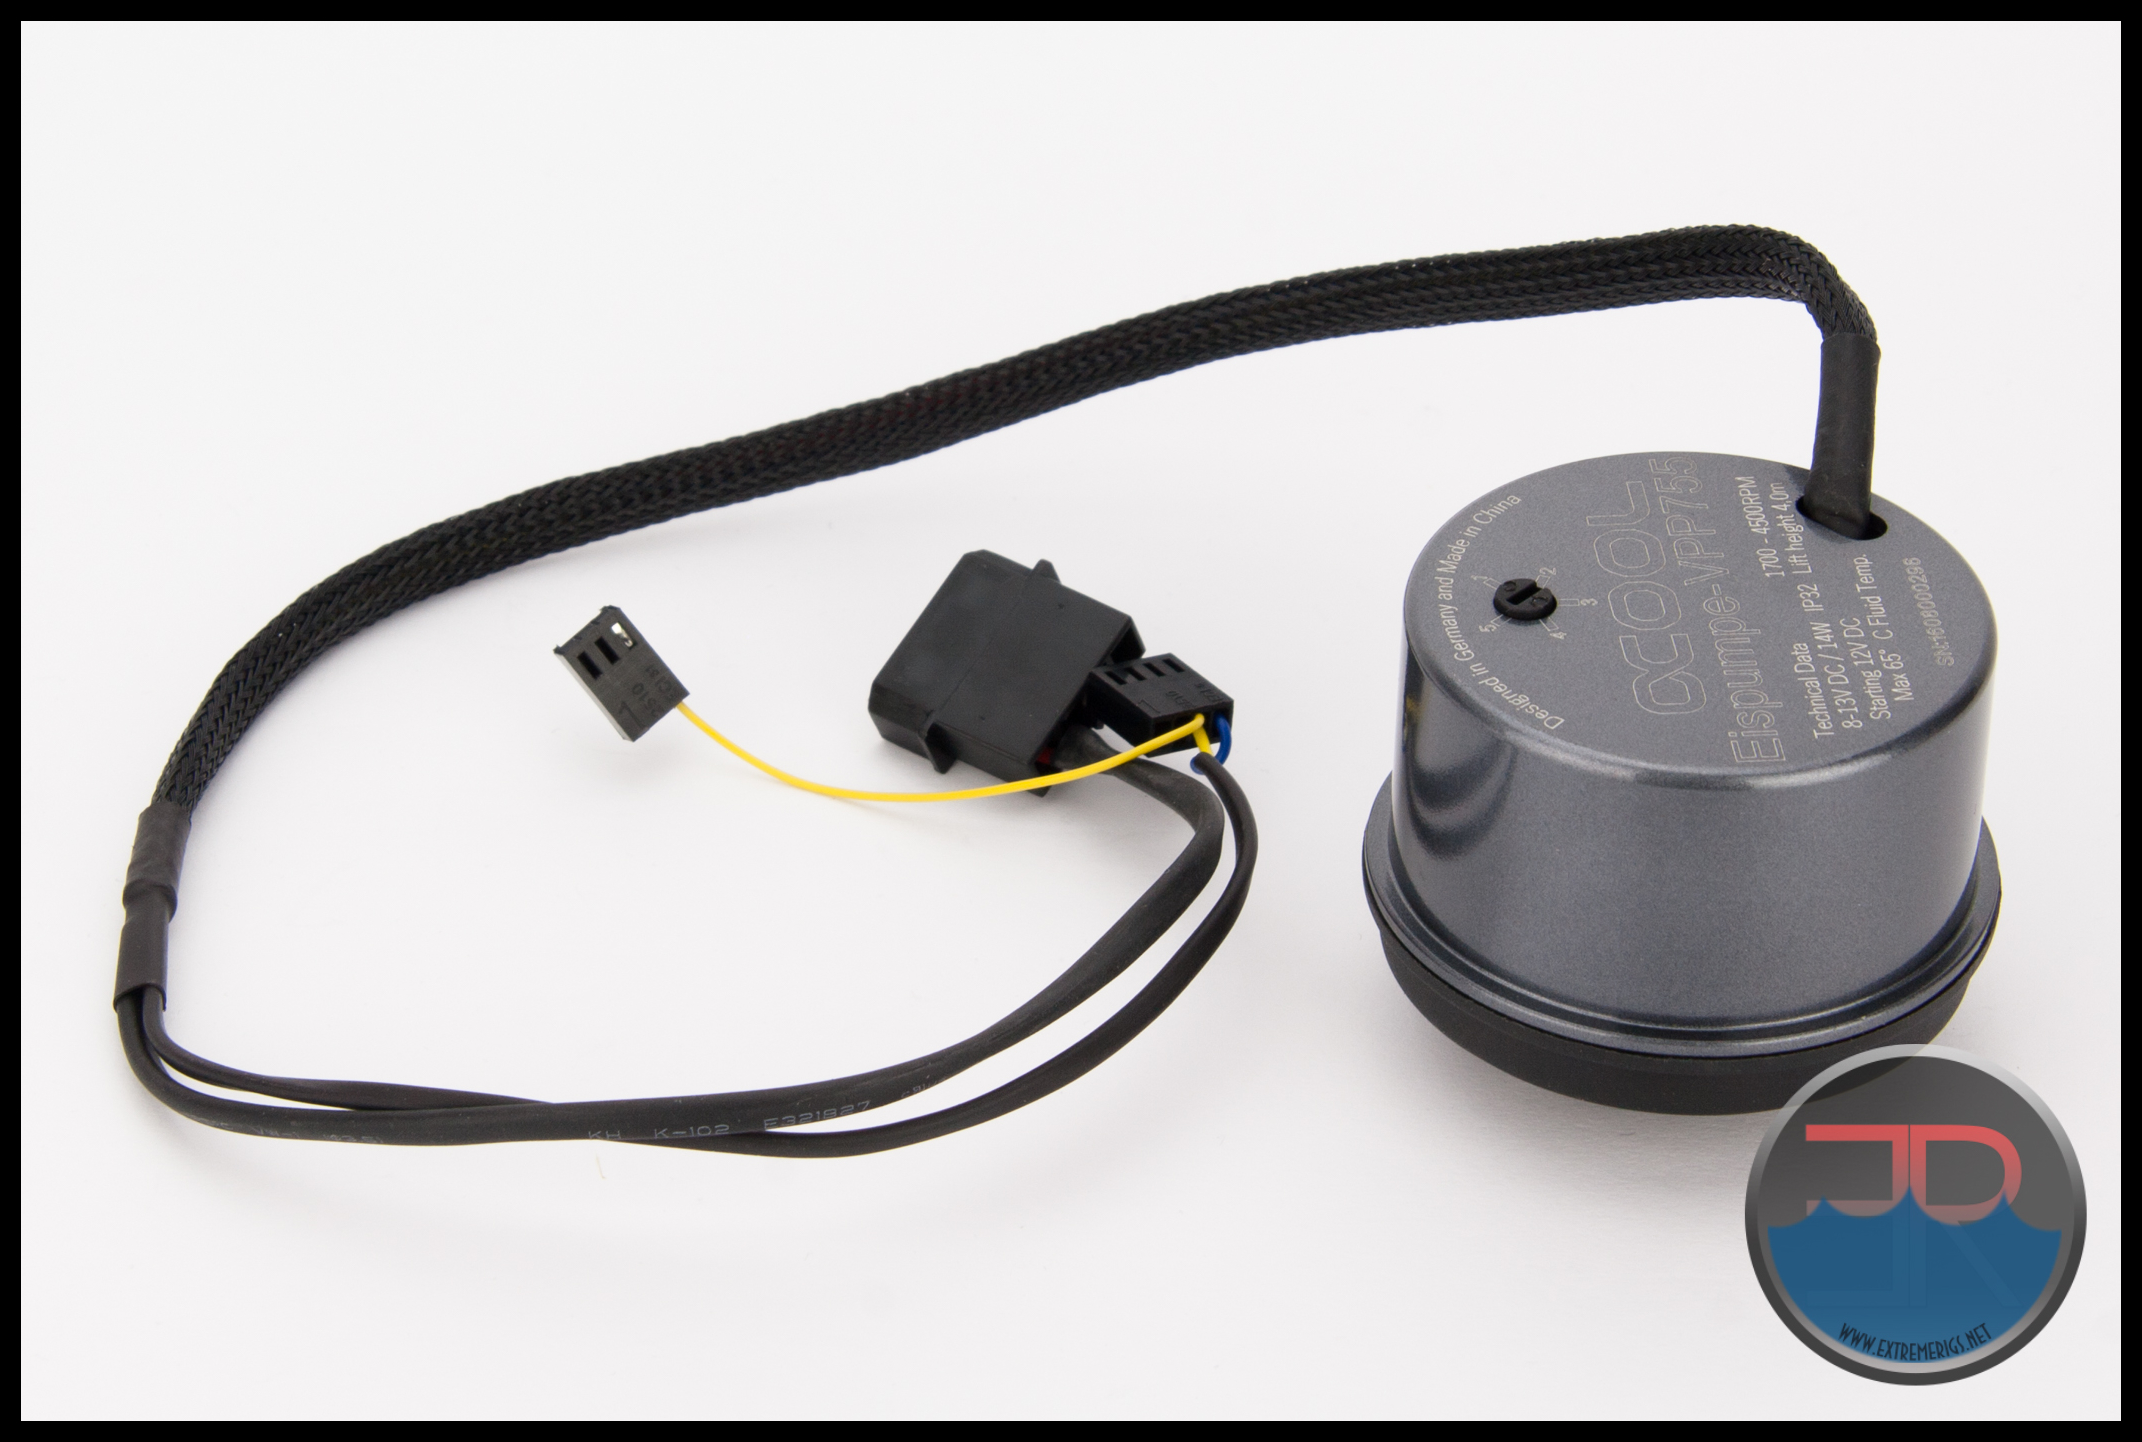
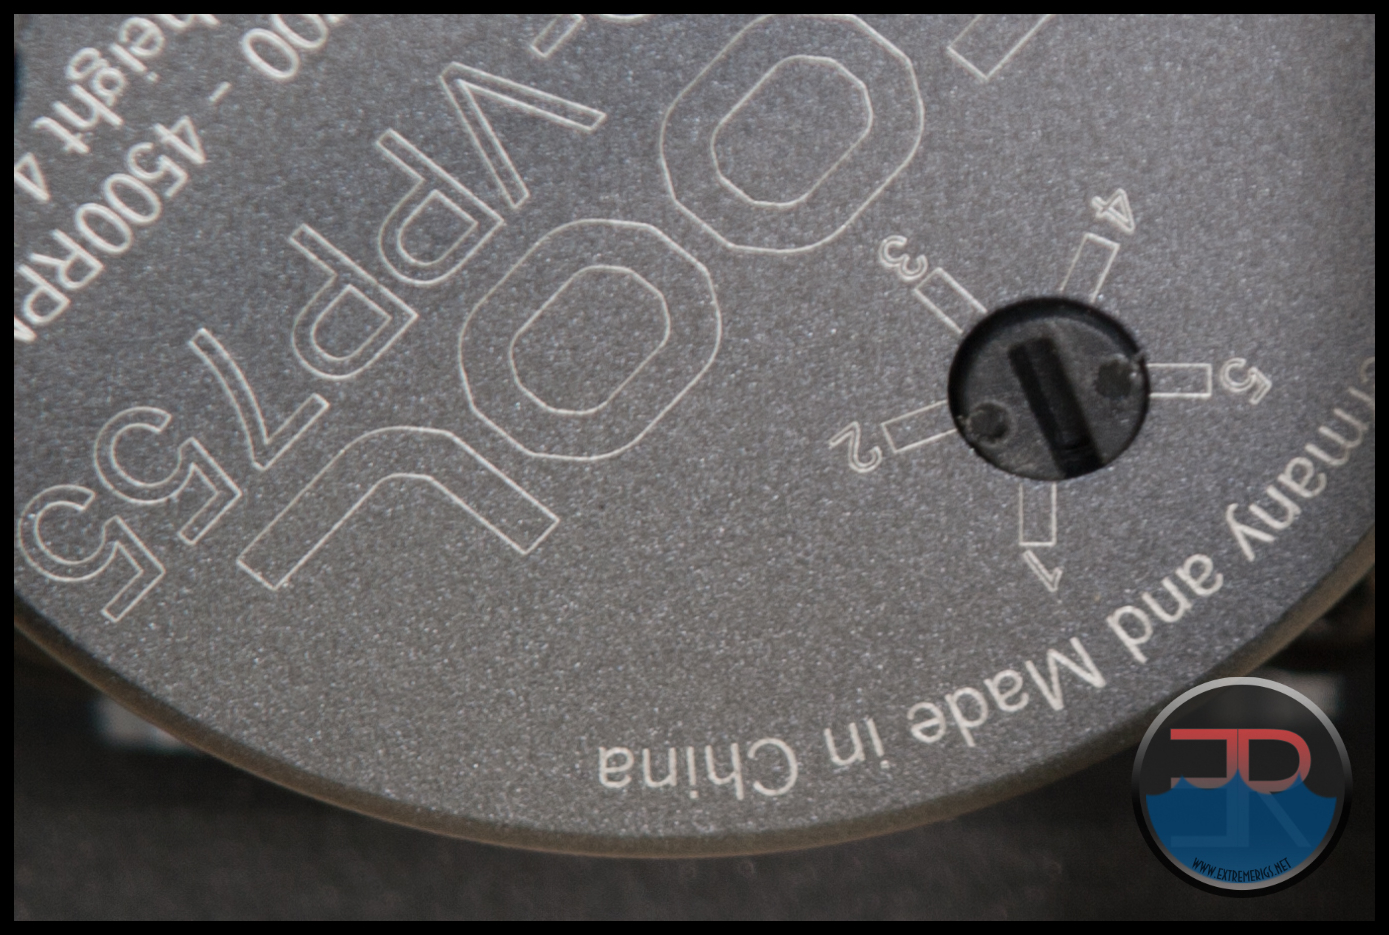
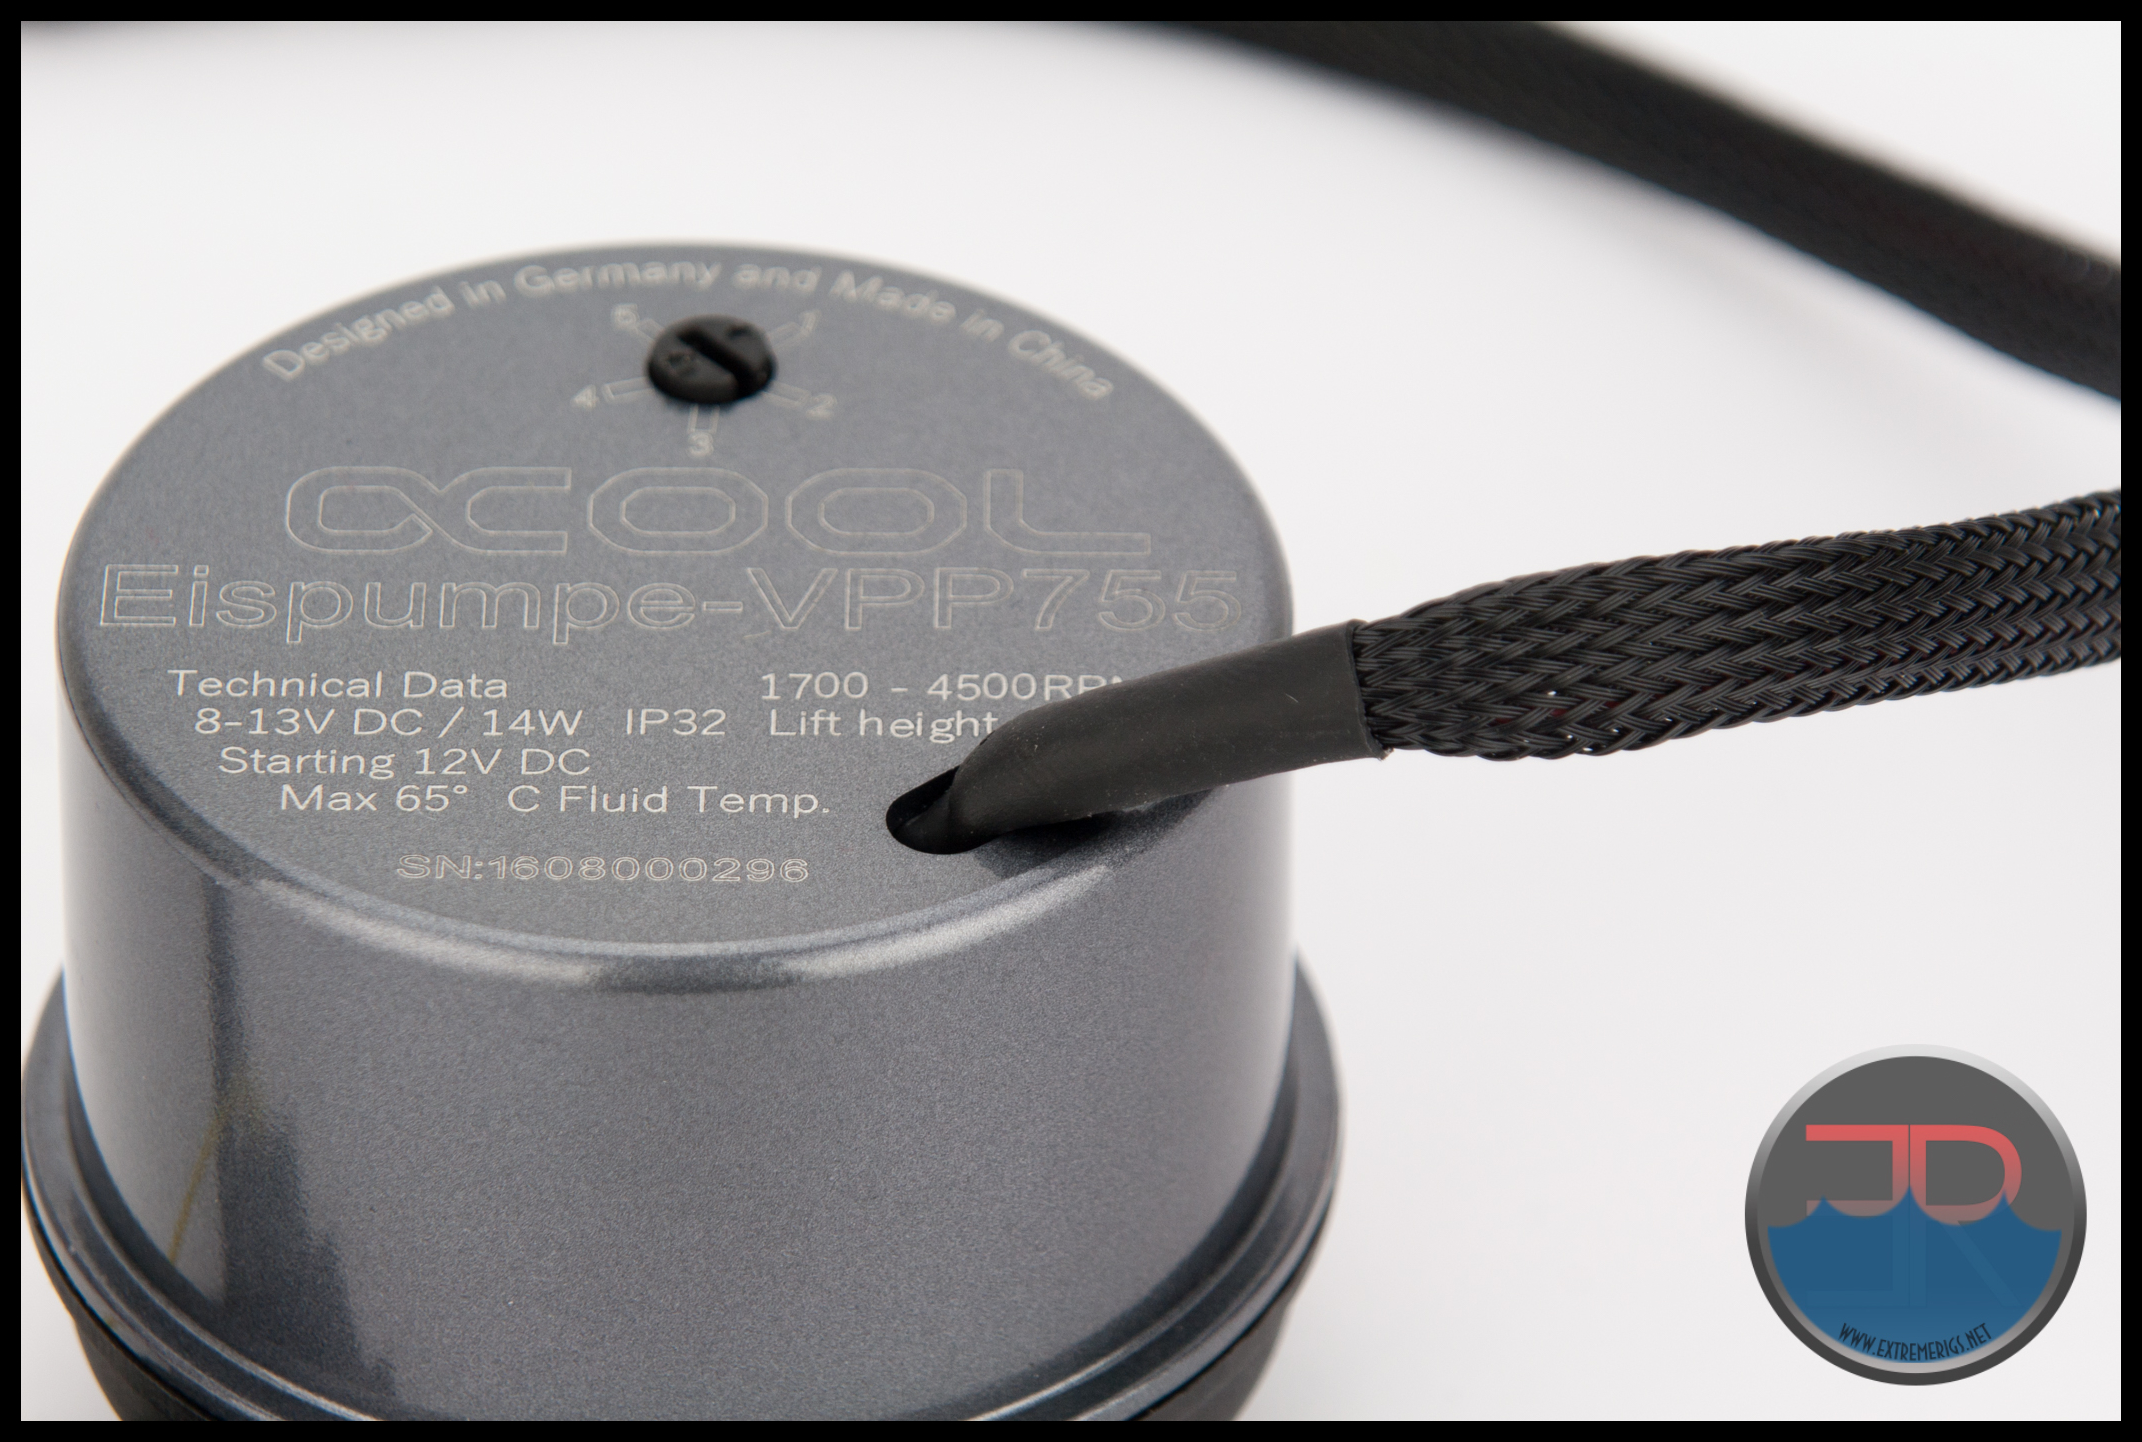 On the bottom of the cover are some “Technical Data” about the motor, which are not to be found anywhere else, at least not with our review sample, which had no specs on the box and did not have an instruction/information sheet enclosed.
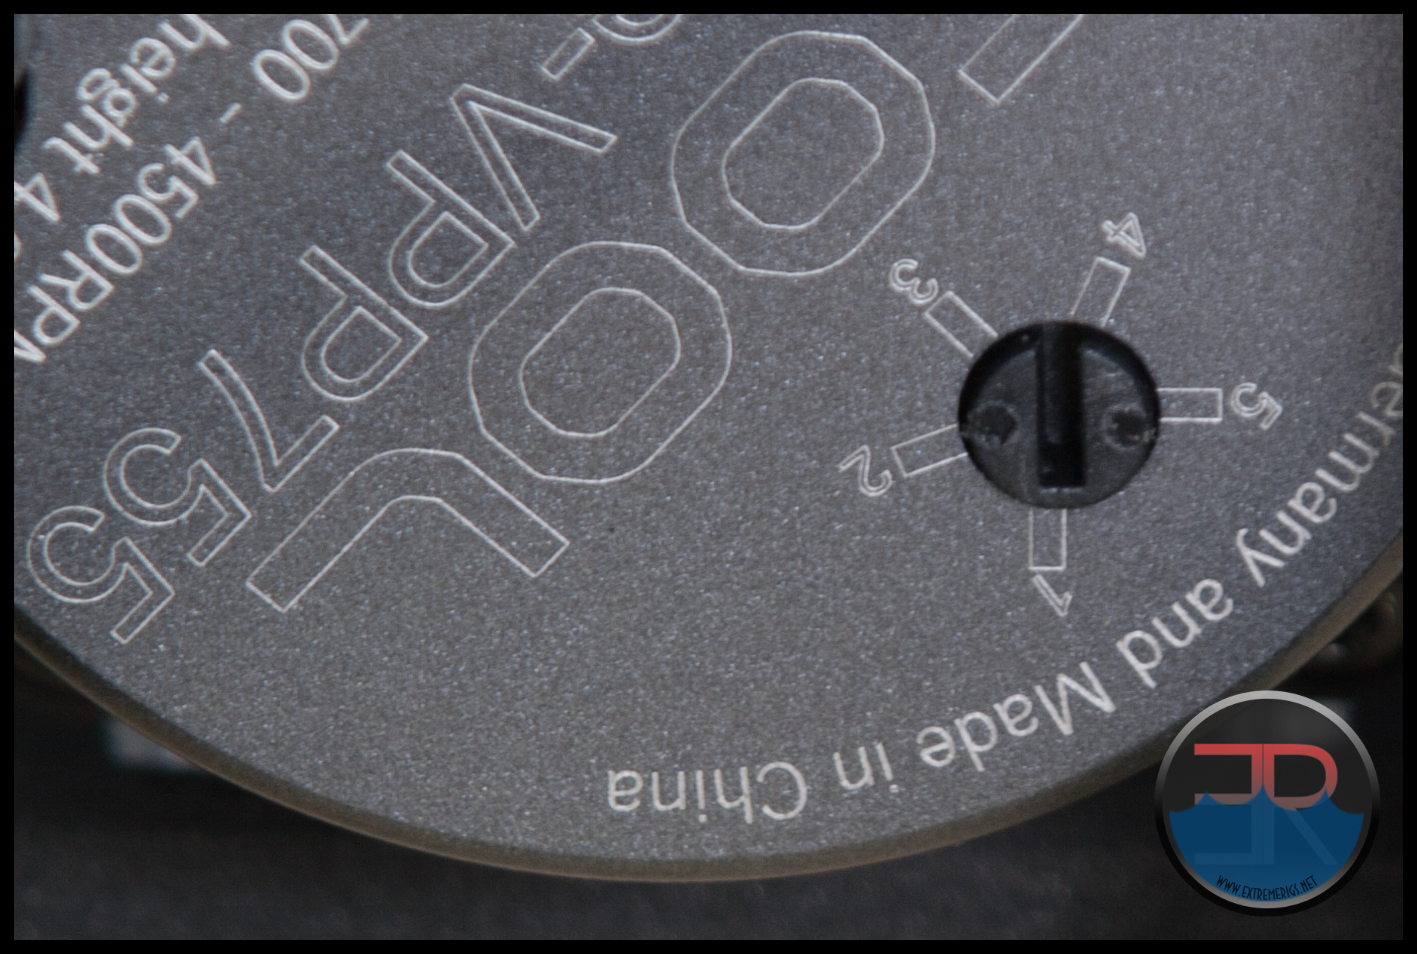
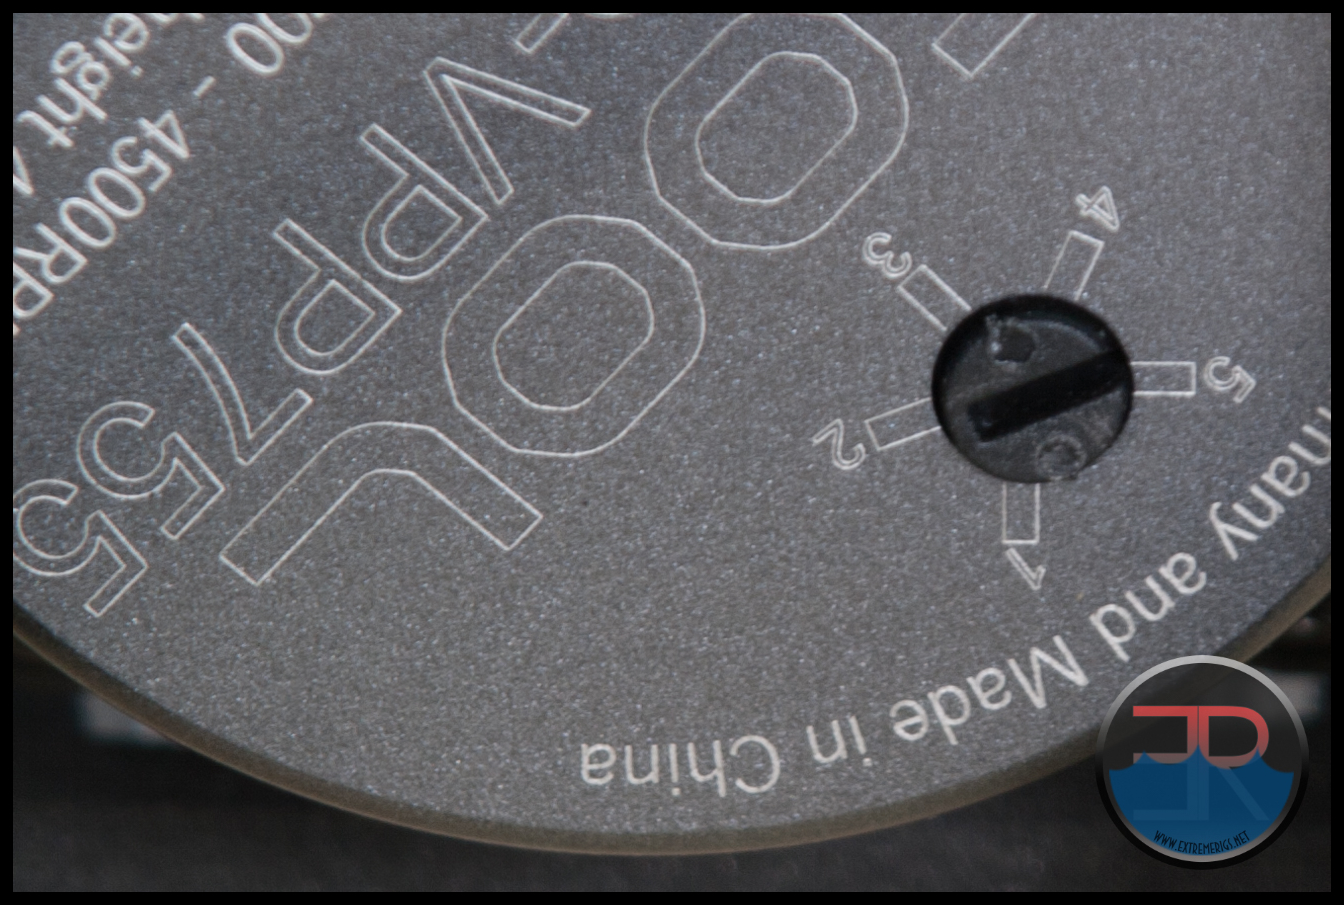
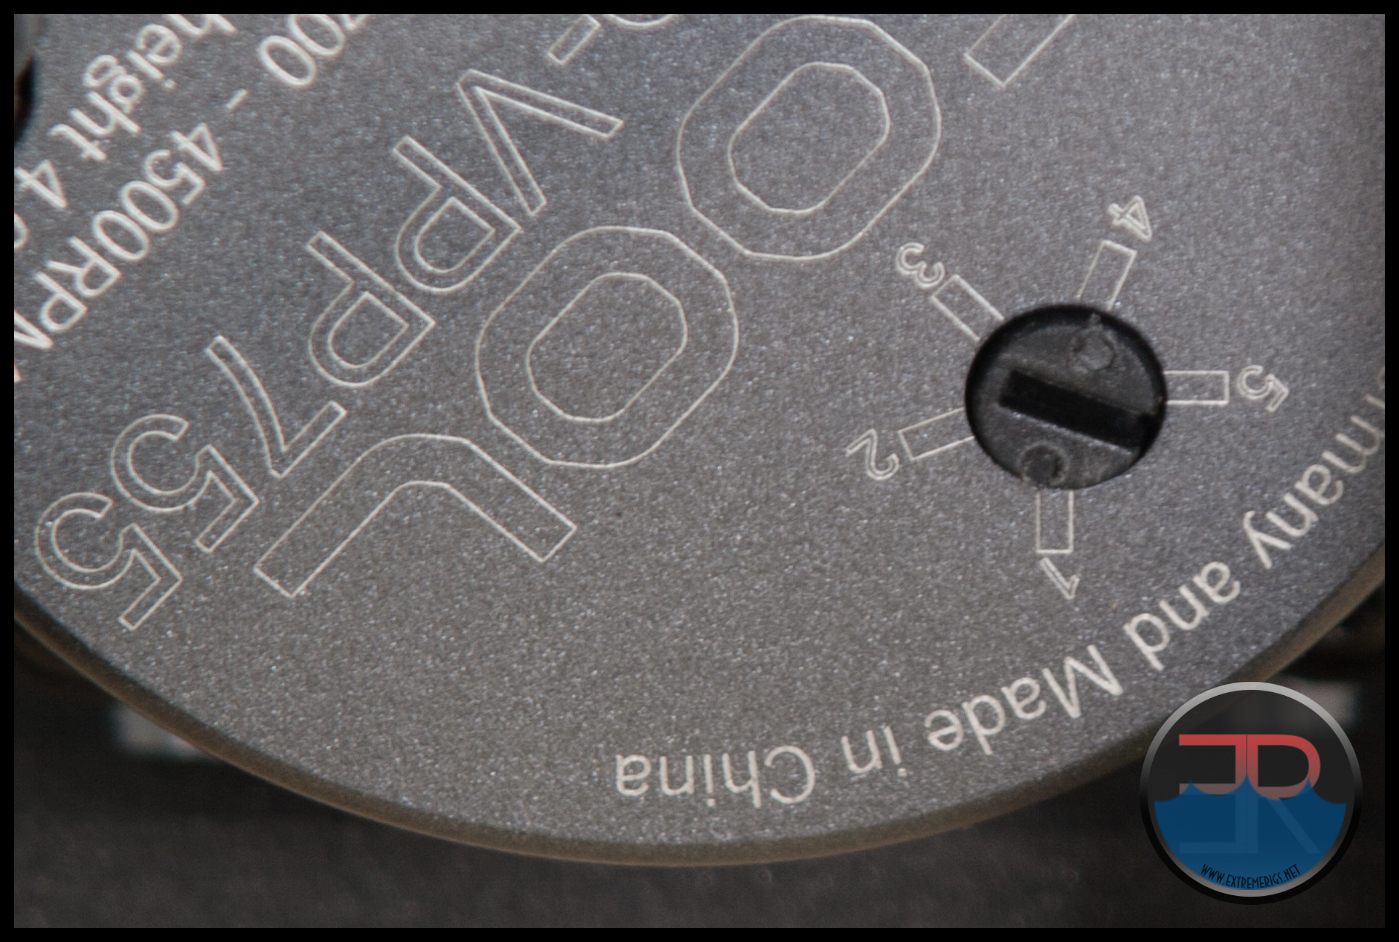
Let’s list that Technical Data provided and briefly comment on each. We’ll delve much deeper into each as we work through the testing process.
1700 – 4500 RPM – good low range for silent builds, 4500 is lower than the D5’s 4800.
8 – 13 Volt DC / 14 Watts – pretty standard Voltage range for our water cooling pumps to operate at, however for a “performance pump” 14 W does seem on the low side.
Starting 12 Volts DC – bit worried that pump may not start when set at lower power/rpm speeds, but this depends on the control which has been implemented.
IP32 – Ingress Protection against solid objects over 2.5mm and protected against falling drops of water.
Lift Height 4.0m – not our preferred method of rating a pump’s performance.
Max 65°C Fluid Temp – perfect, as coolant temp above 45° are not recommended for water cooling systems anyway.
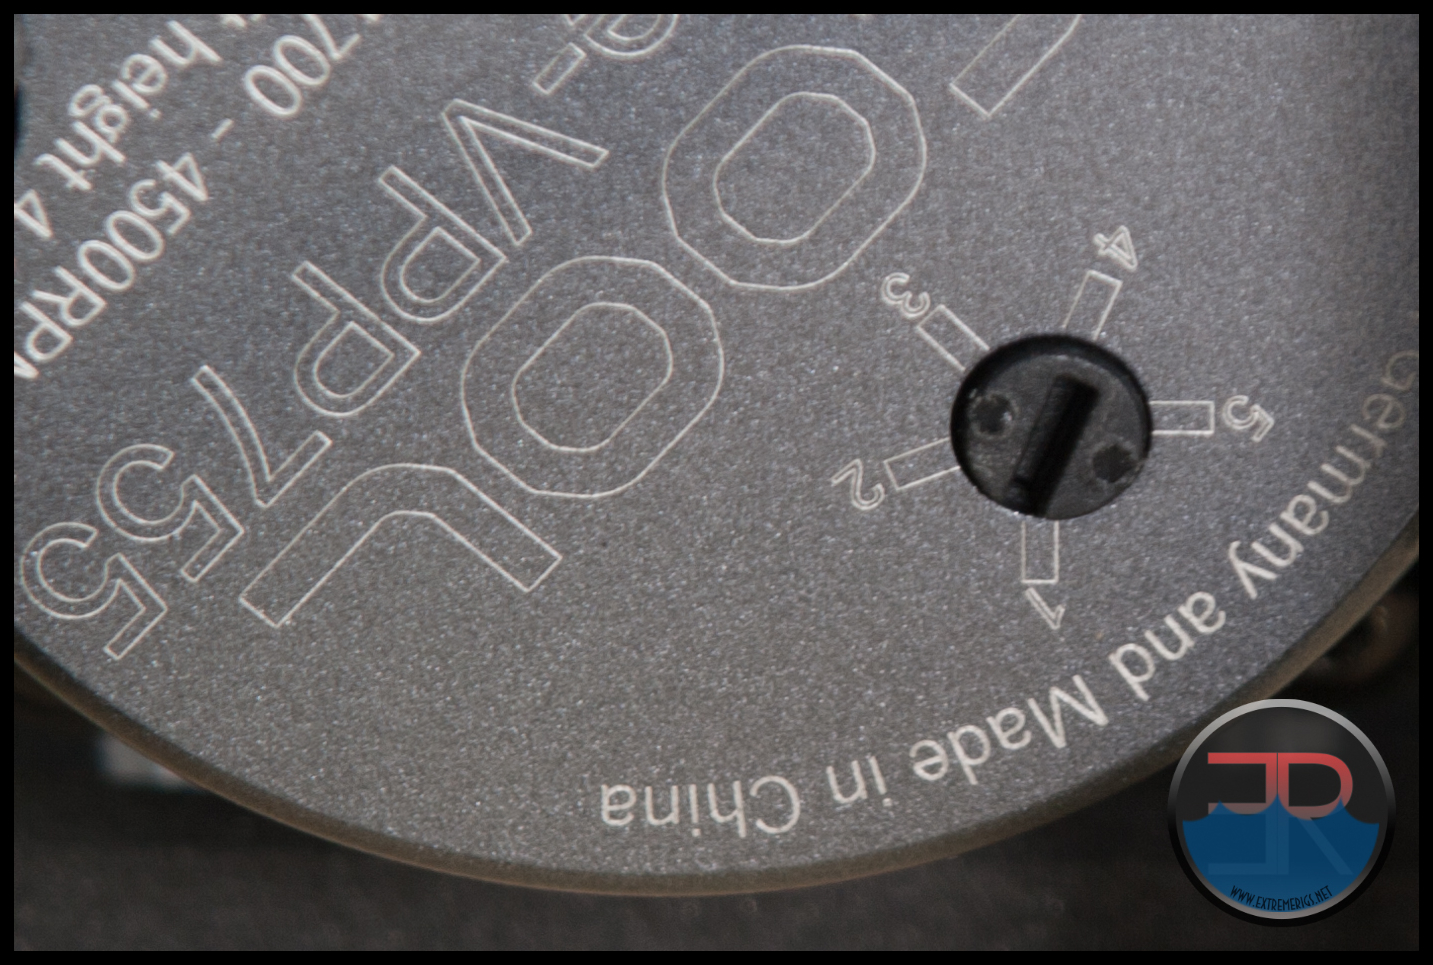
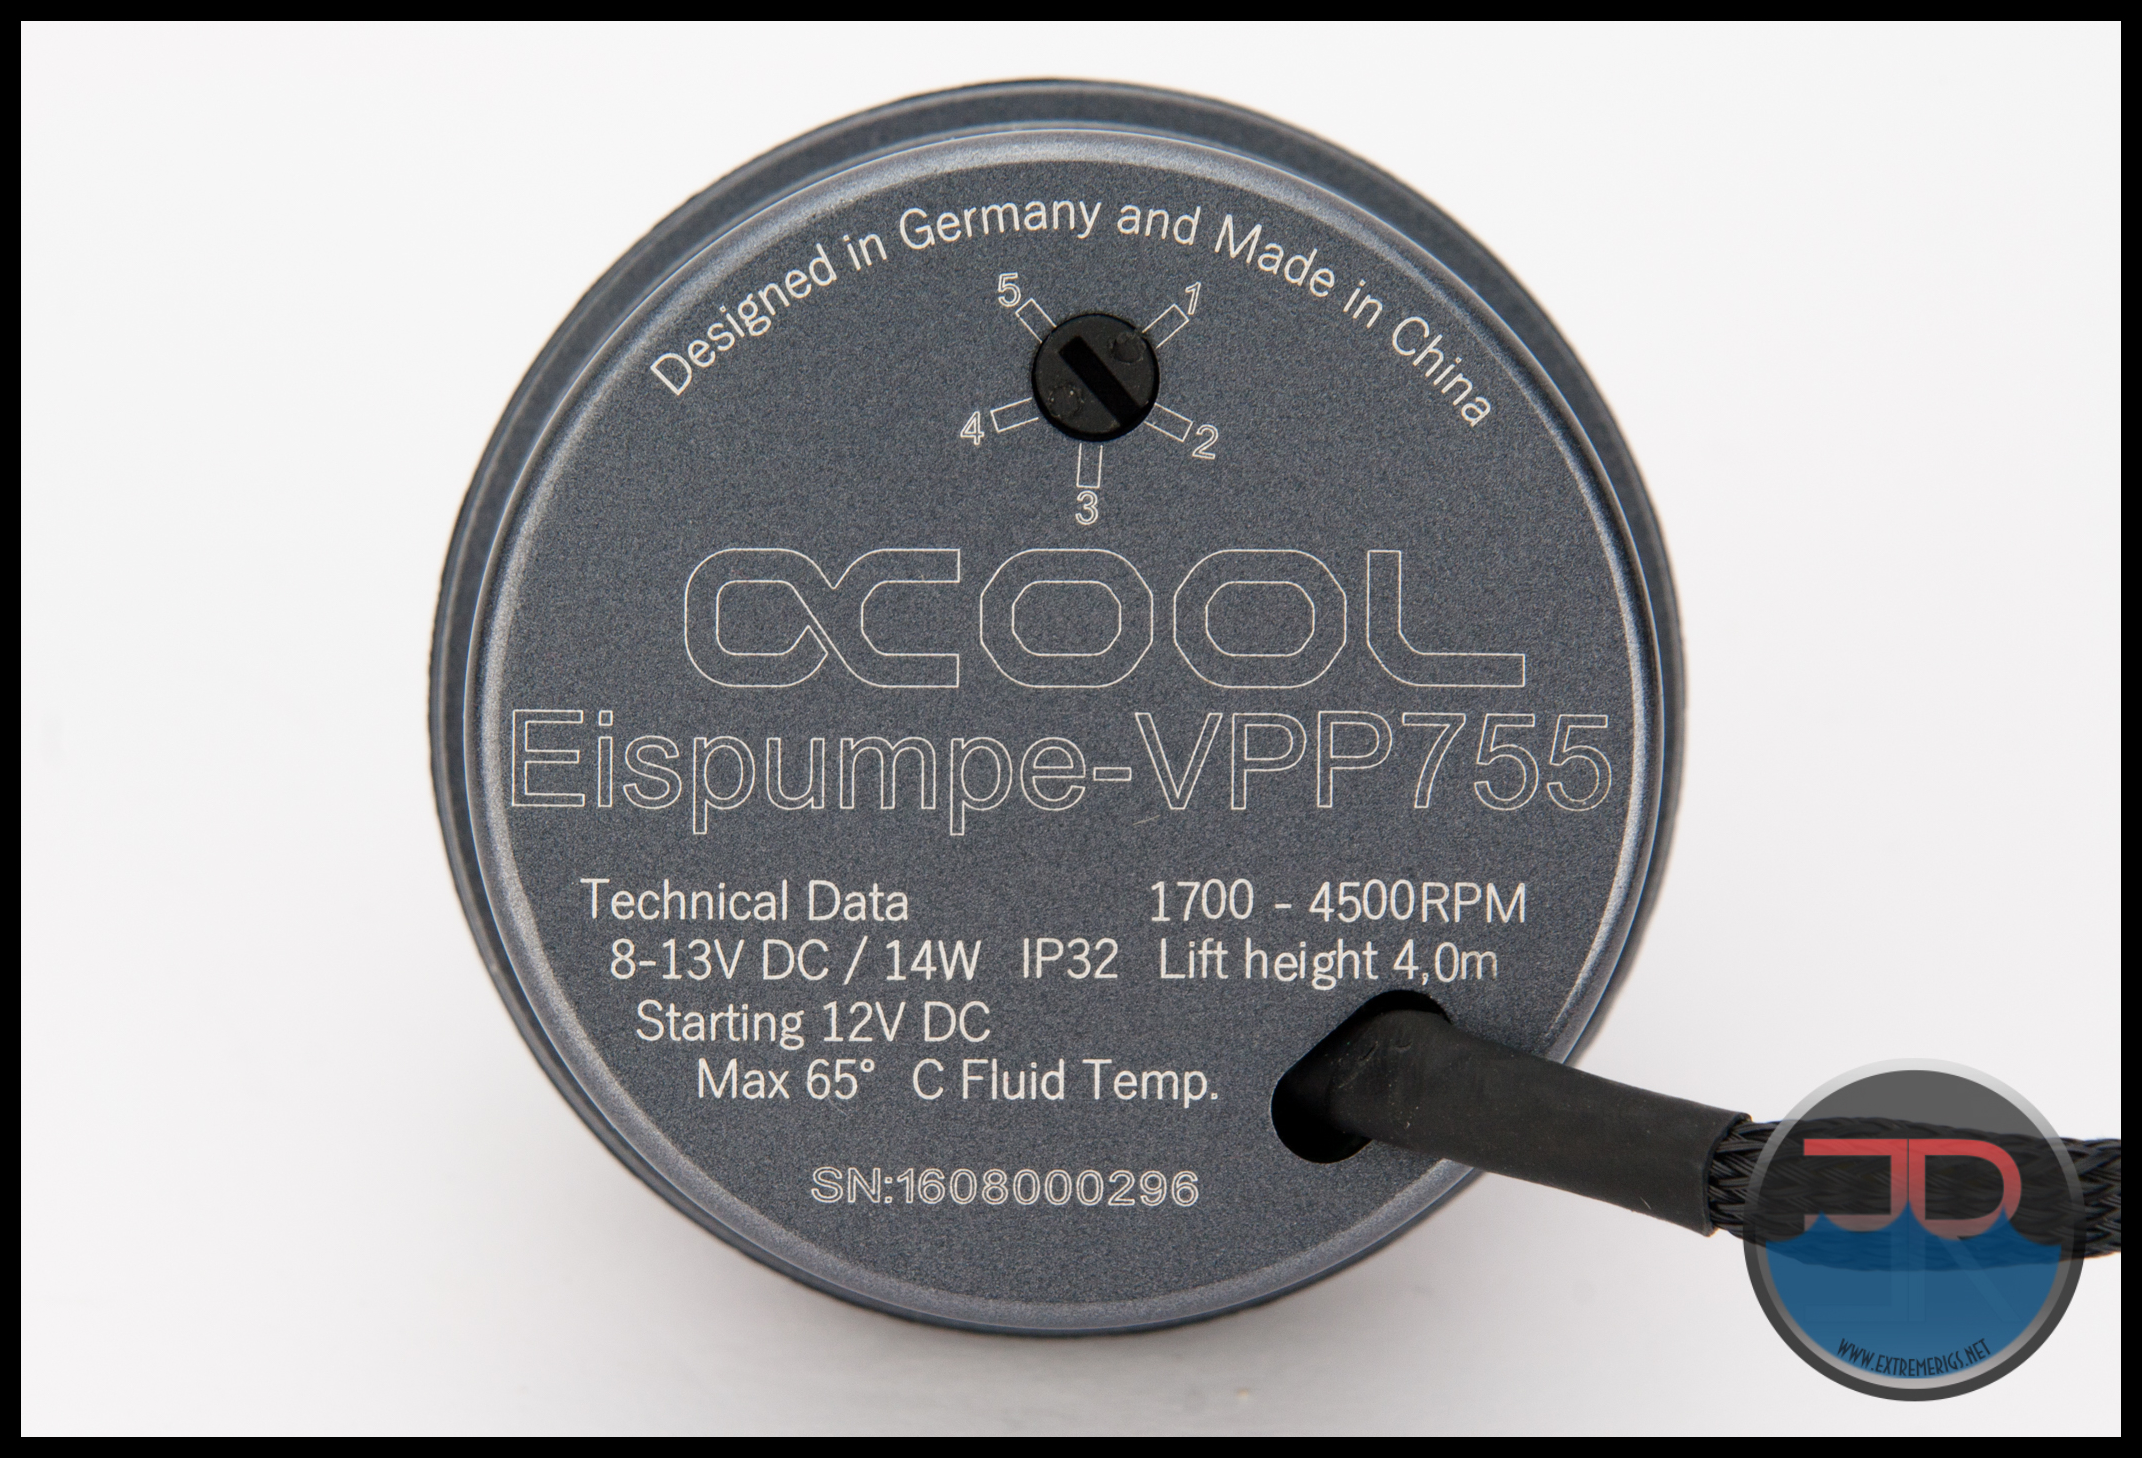 As seen in the above image, some laser etching has been done on the cover base for the logo/model and serial number of the pump. Again we find it very pleasing that Alphacool have made the extra effort and the result is a very smart looking pump.
Also a feature on the base is the “Vario style” speed adjuster, which is scaled 1 to 5, with 1 being the lowest setting and 5 is the highest. We’ve seen claims that the manual adjuster can work in conjunction with the PWM control that the VPP755 also features. We’ll have to see about that and delve deeper into both control methods during testing. For now it’s good to know that manual pump speed adjustment is present on the VPP755 as well as featuring PWM control.
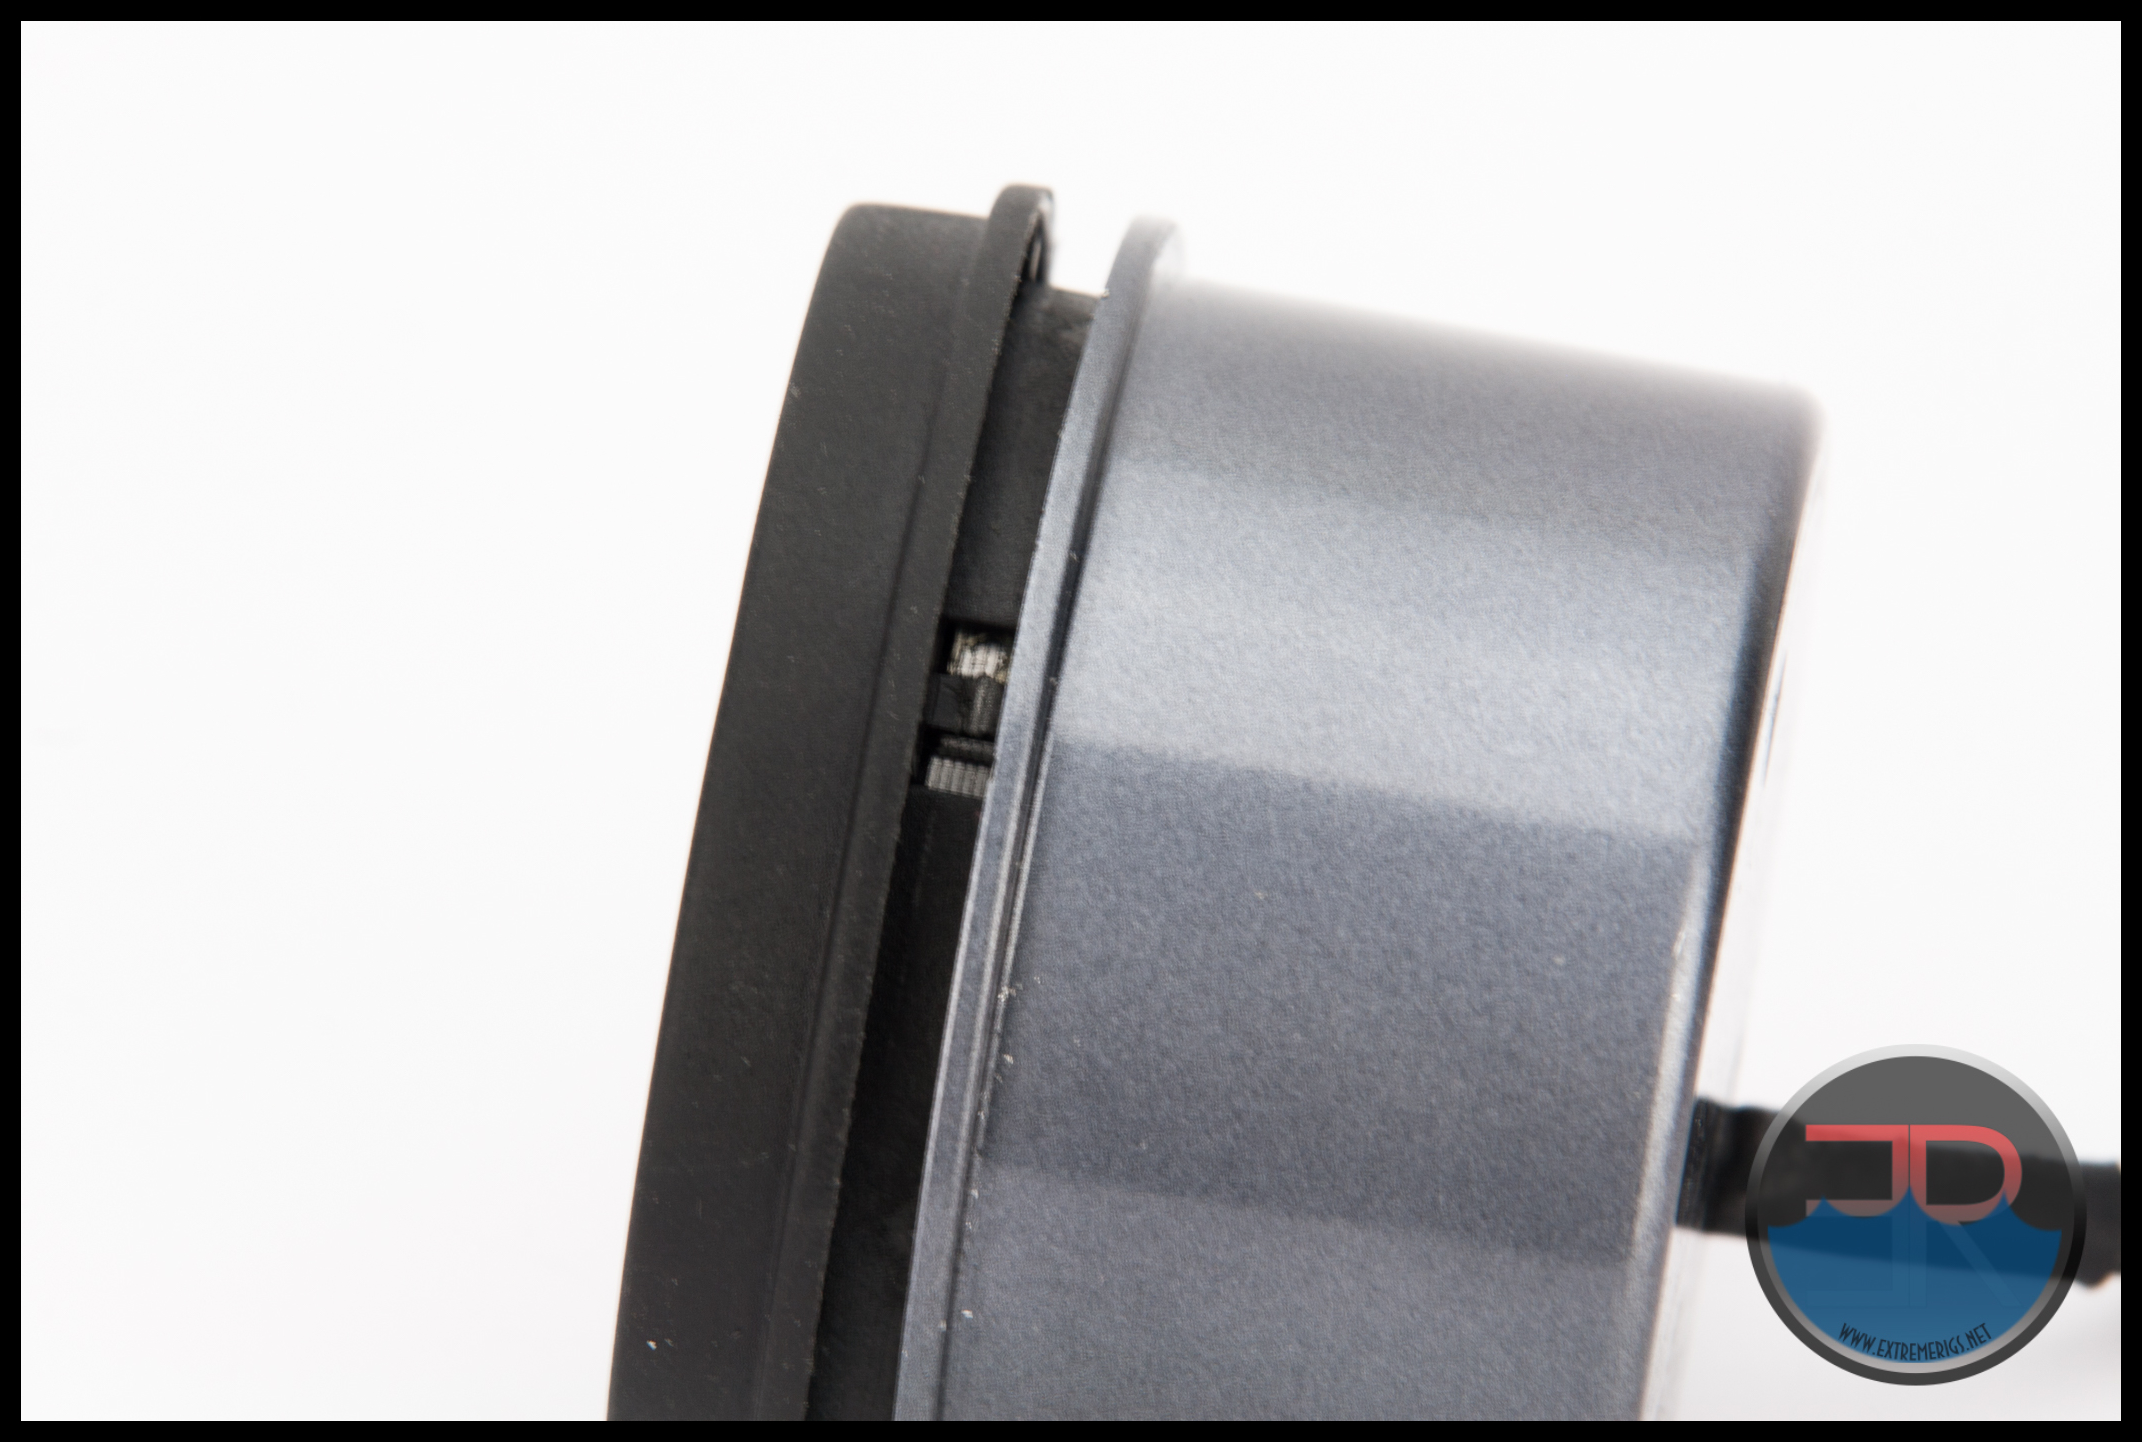
The cover is removable on the VPP755, as one might expect given that different color covers are going to be made available, however removal is not as simple a process as it is on a D5. There are 3 clips on the motor side which lock the cover in place and getting all 3 unlatched at the same time is challenging, although doable.
 Apart from changing the cover to a different color, the only other reason one might need to remove the cover is for doing a custom wire sleeve job, so most users will never have to worry about cover removal.
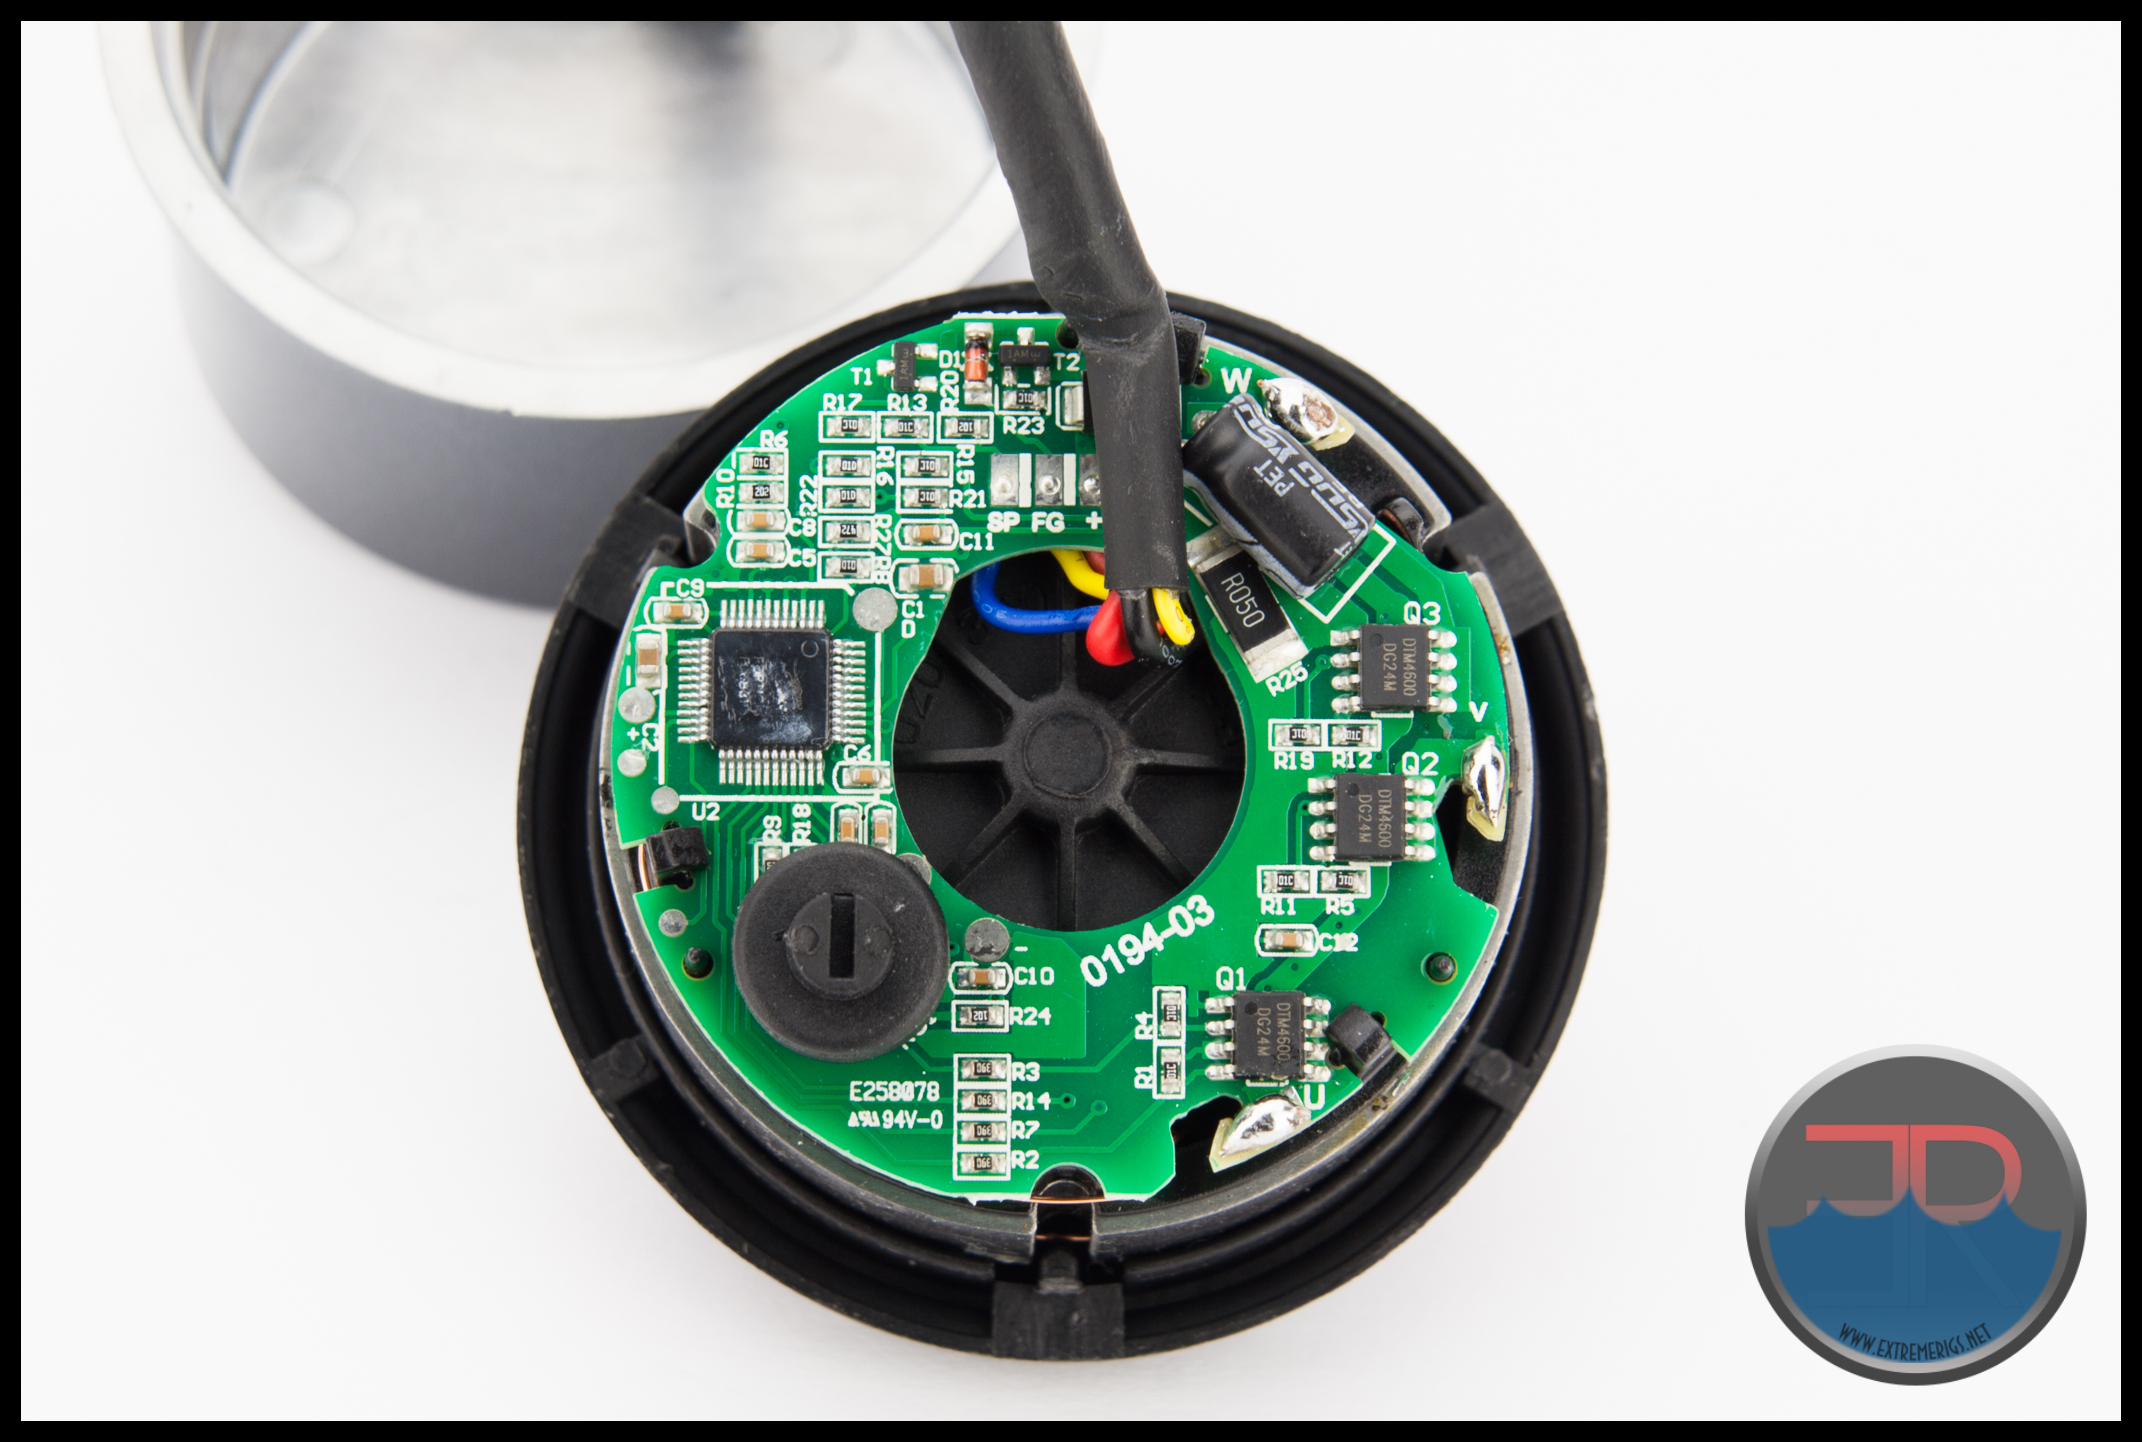
With the cover removed, the circuit board is on display. While all the soldering all looks good, the placement of the board retention clips is a little unusual. This image shows one is located directly on a trace and another is on solder spot. Also unusual is the apparent effort that has been made to conceal the chip identity evidenced by the scratch and scuff marks on top of the chip.
Wiring & Connectors
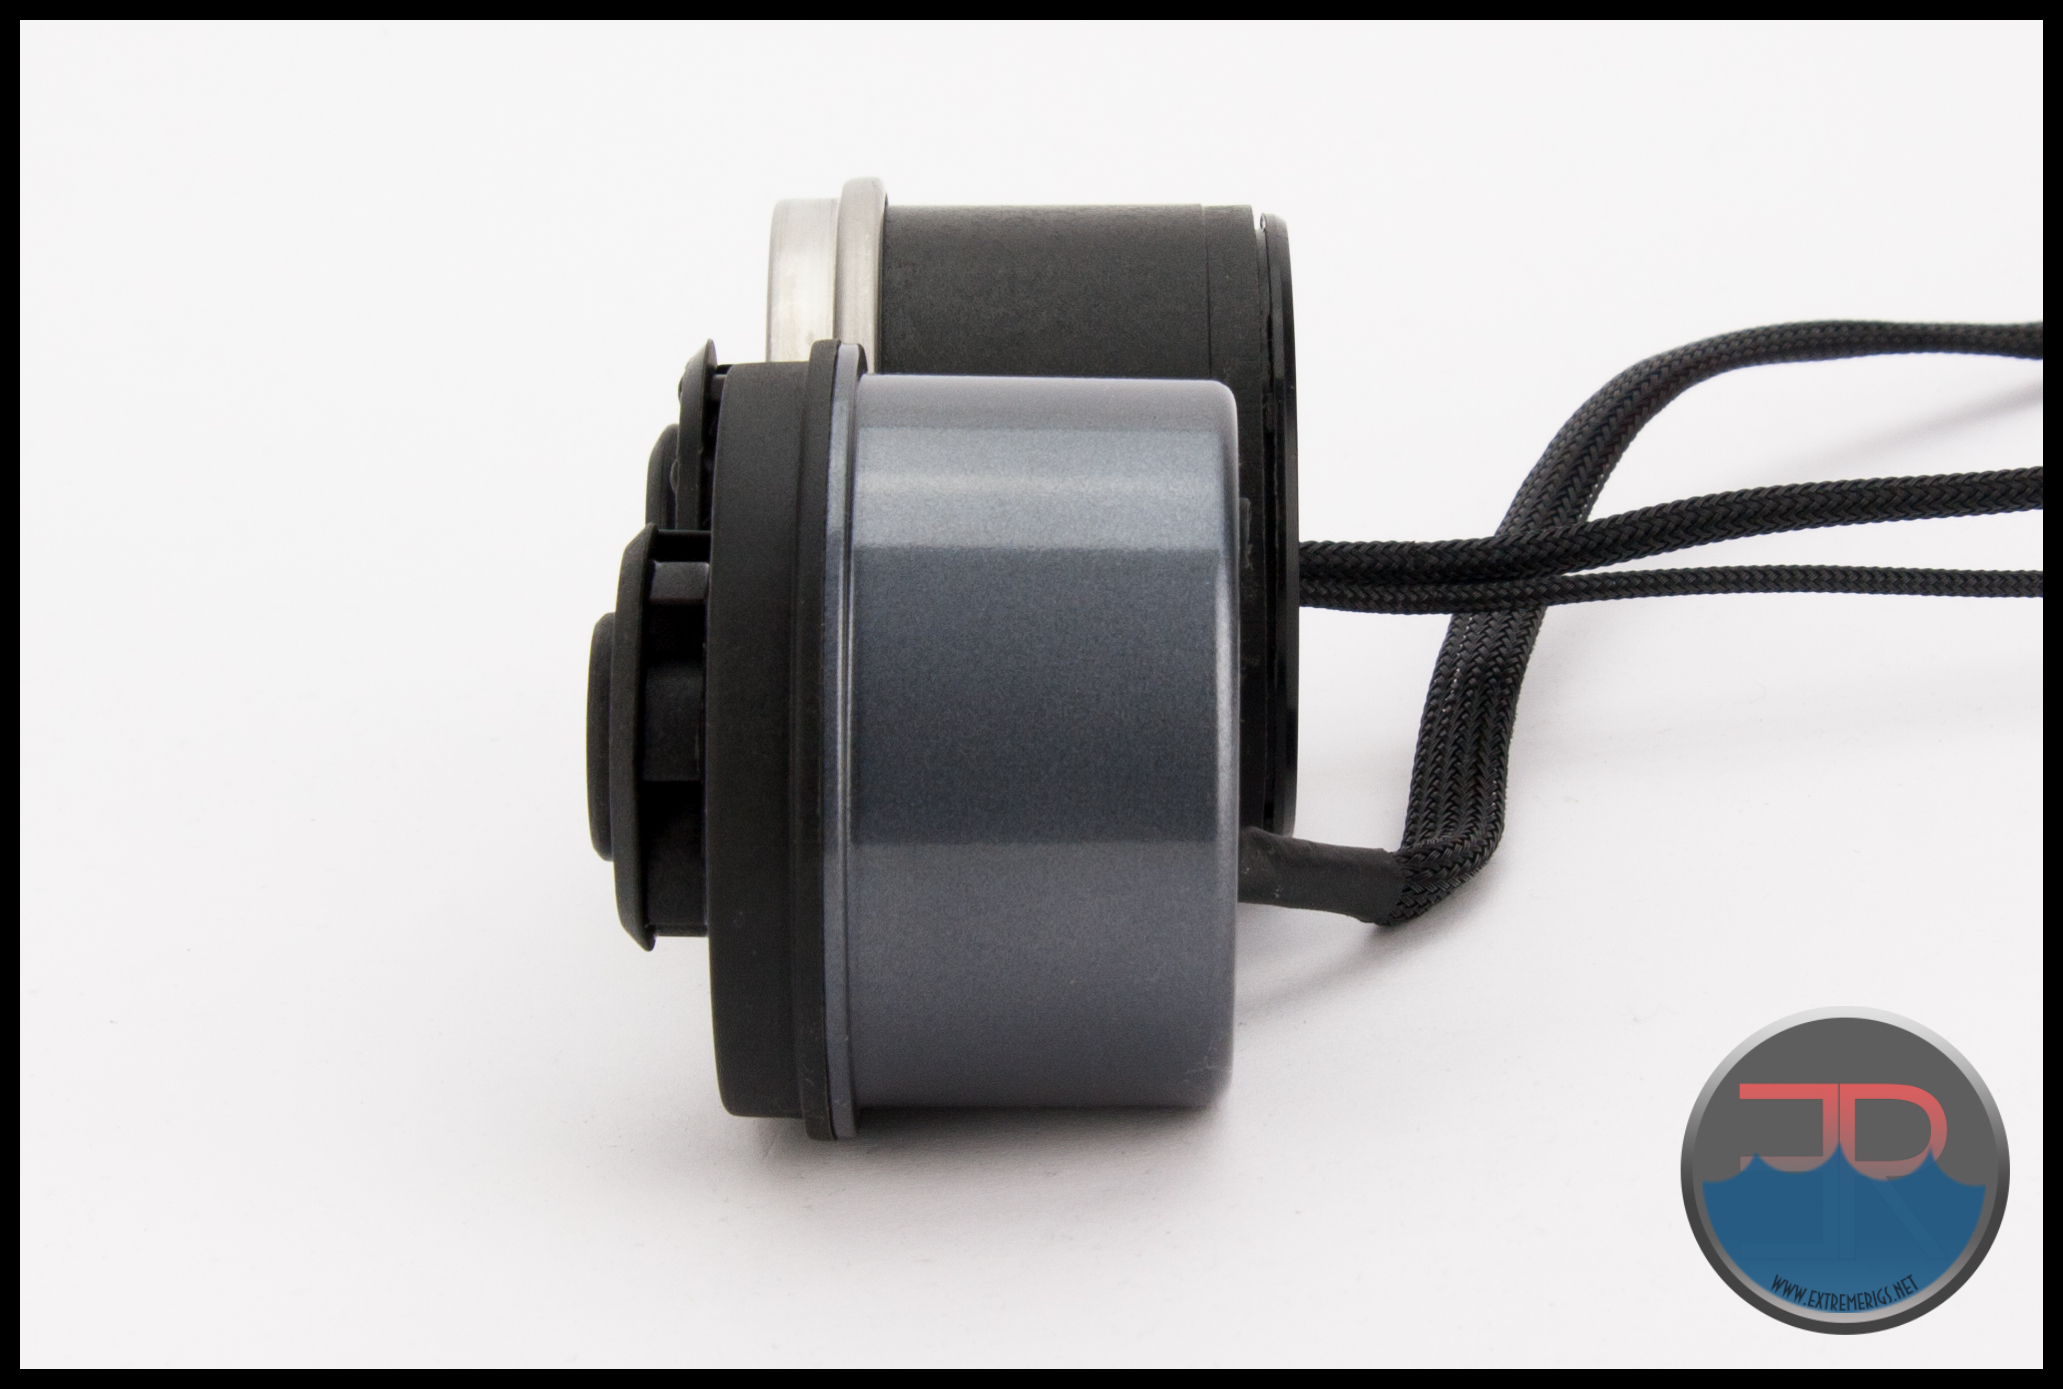
You may have noticed some cable sleeving on the wires in the previous images, and yes the VPP755 does indeed come with it’s wires pre-sleeved, sort of.
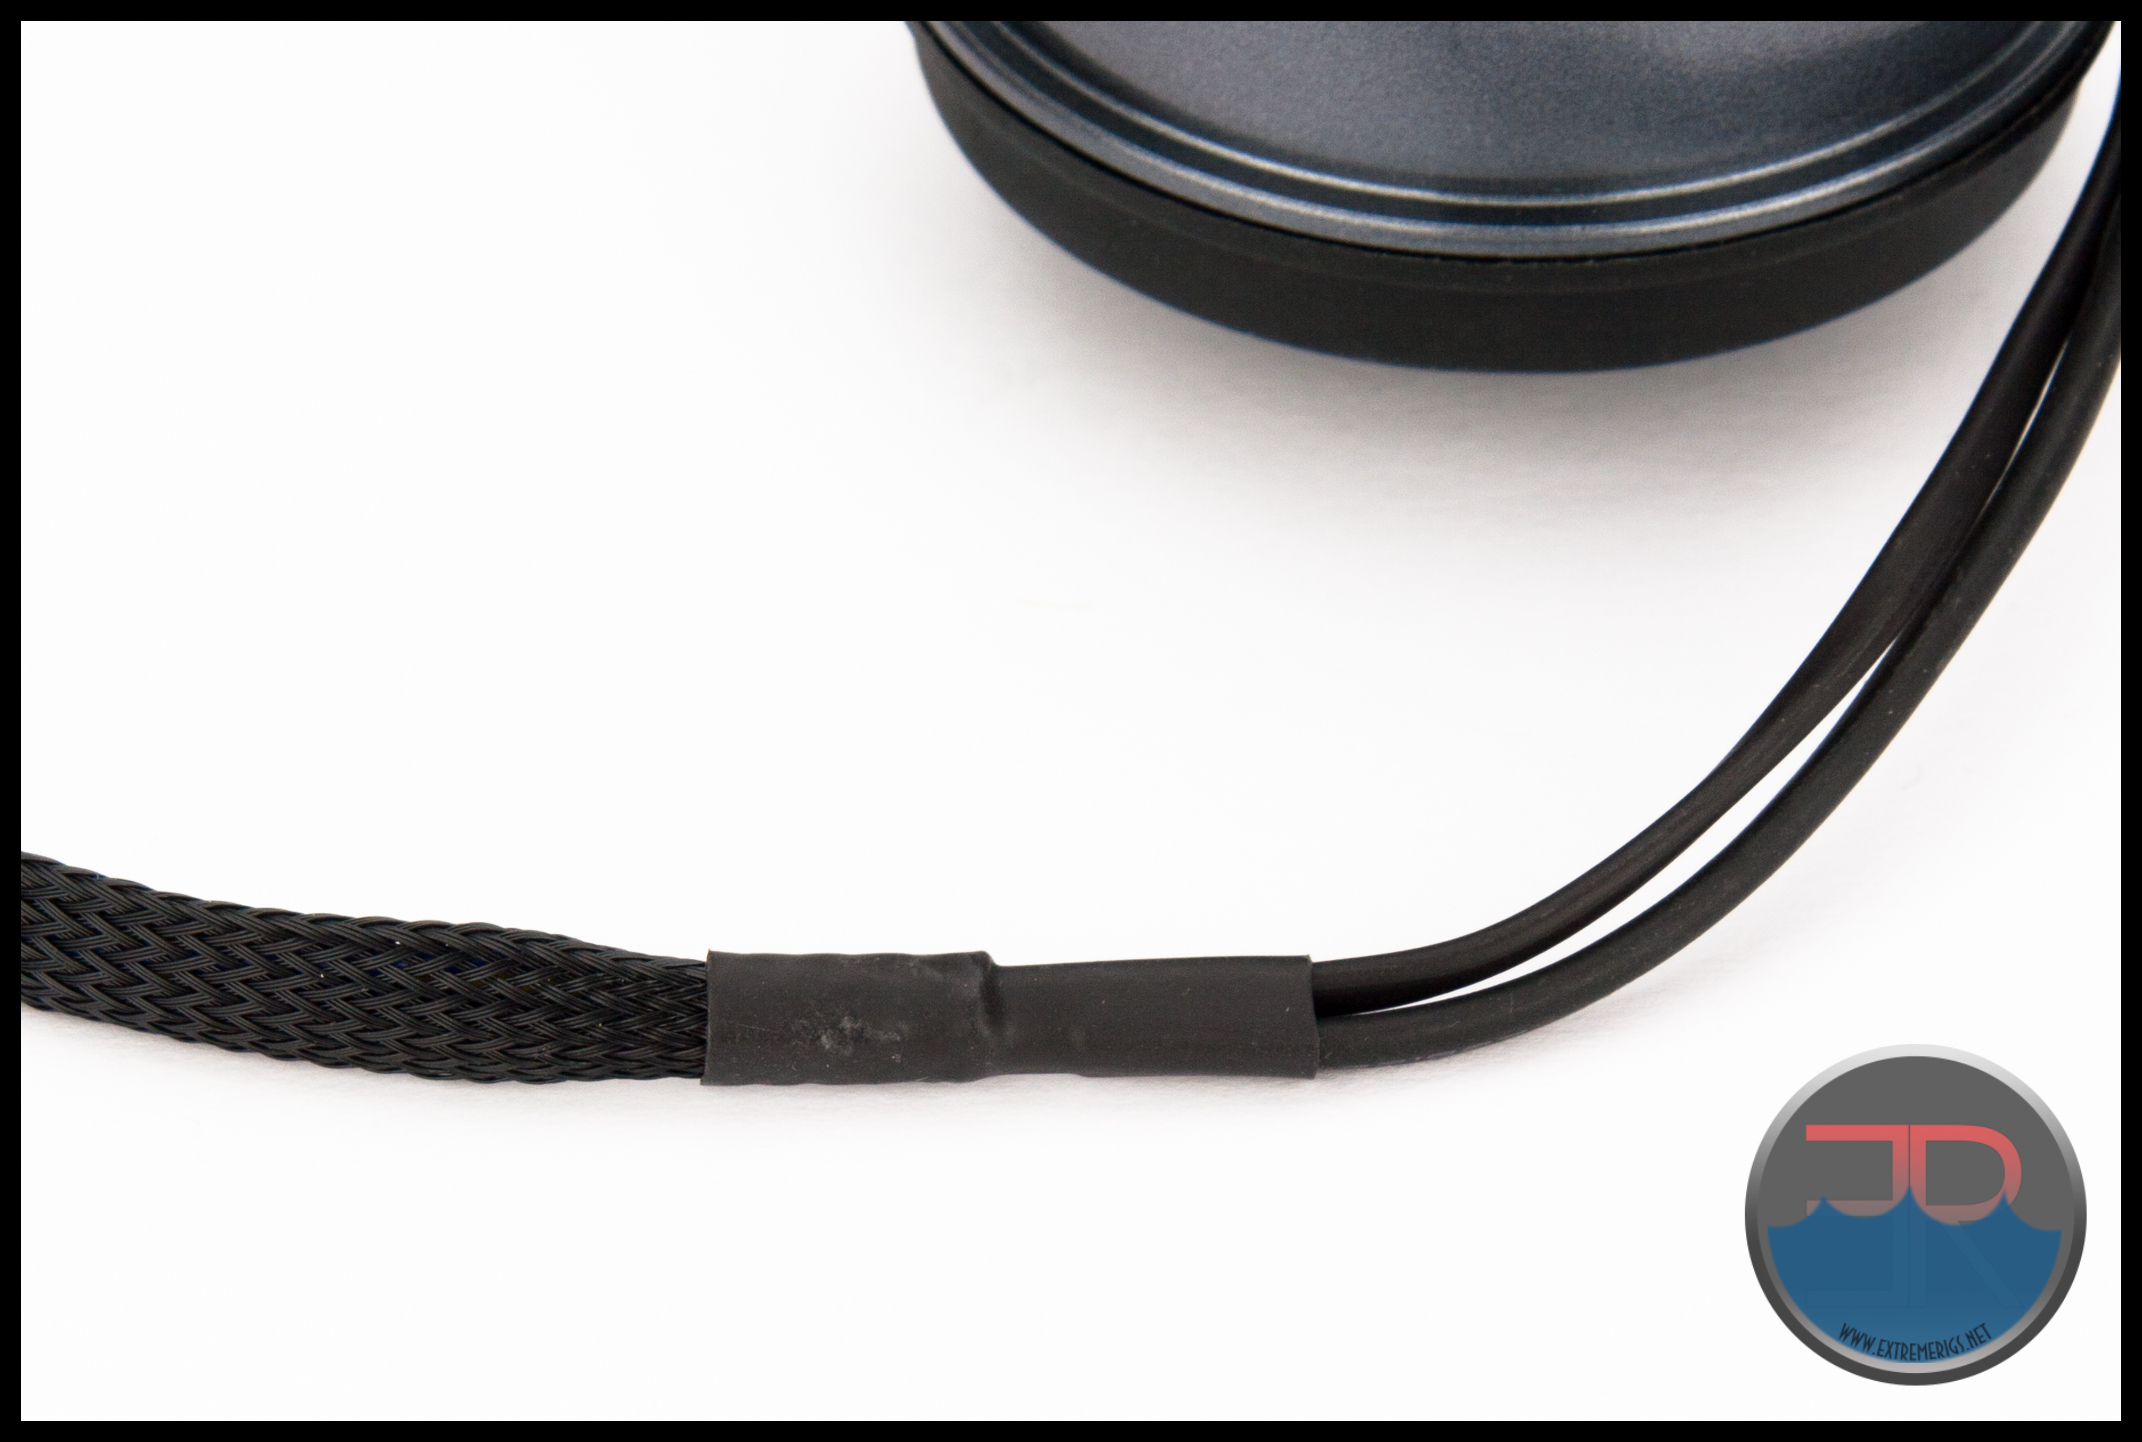
The total length of usable wiring is ~50cm from pump cover to the connectors, of which ~30cm of black sleeving has been fitted on the pump side before the power wires and control/monitor wires split to separate connectors.
 The sleeving has not been pulled tight before the shrink was fitted, resulting in a loose looking sleeve which is less than perfect, but at least it is sleeved.
After the sleeving ends and wire groups split, each group of wires has black heat shrink fitted over the wires which is certainly much more easy on the eyes than exposed colored wires. While far from perfect Alphacool have made an effort with the wires and we expect most purchasers will be happy enough to not bother doing their own custom sleeving.
 At the end of the wires are 3 connectors. A “4 pin Molex” connector is used for the power input for the pump, and both 3 and 4 pin fan connectors are present.
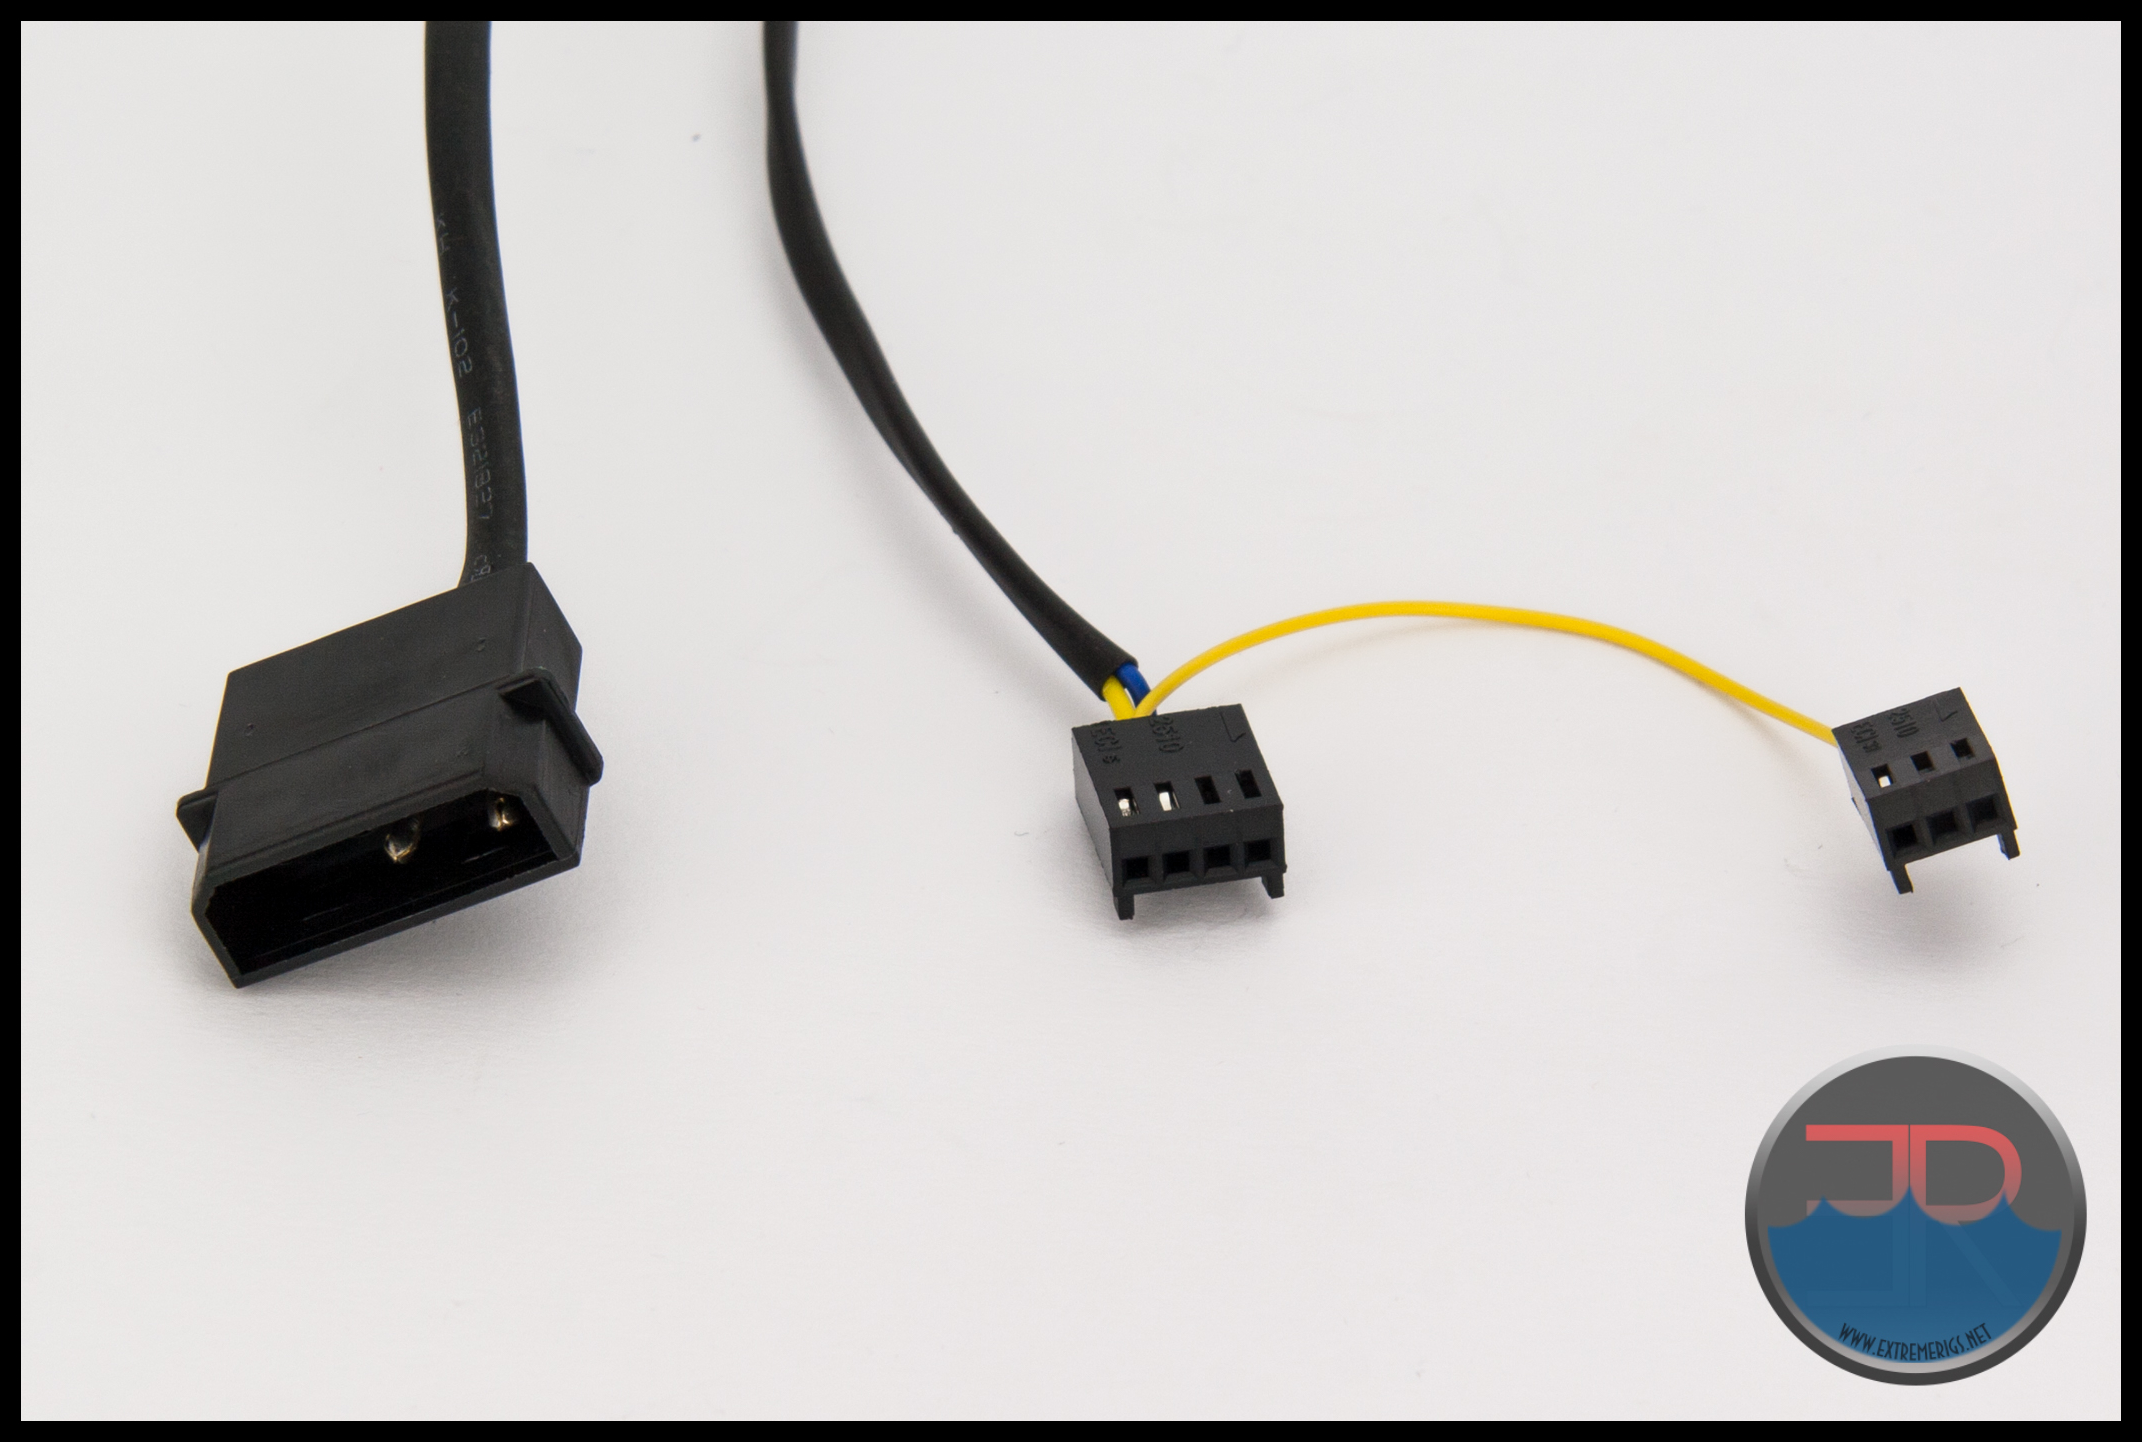 The 4 pin fan connector has the wires for PWM Control (blue wire) and RPM signal (yellow wires). The 4 pin RPM wire has another yellow wire crimped to the RPM pin which goes to a 3 pin fan connector.
We assume this “extra” 3 pin connector is for sending an RPM signal to a fan controller for rpm readout while the 4pin is connected to the motherboard header for both PWM and RPM functions OR the other way around. Whatever the reason it seems an afterthought as evidenced by the blue PWM wire being longer due to the second RPM wire being added and the short wire to the 3 pin was not heat shrinked like the others.

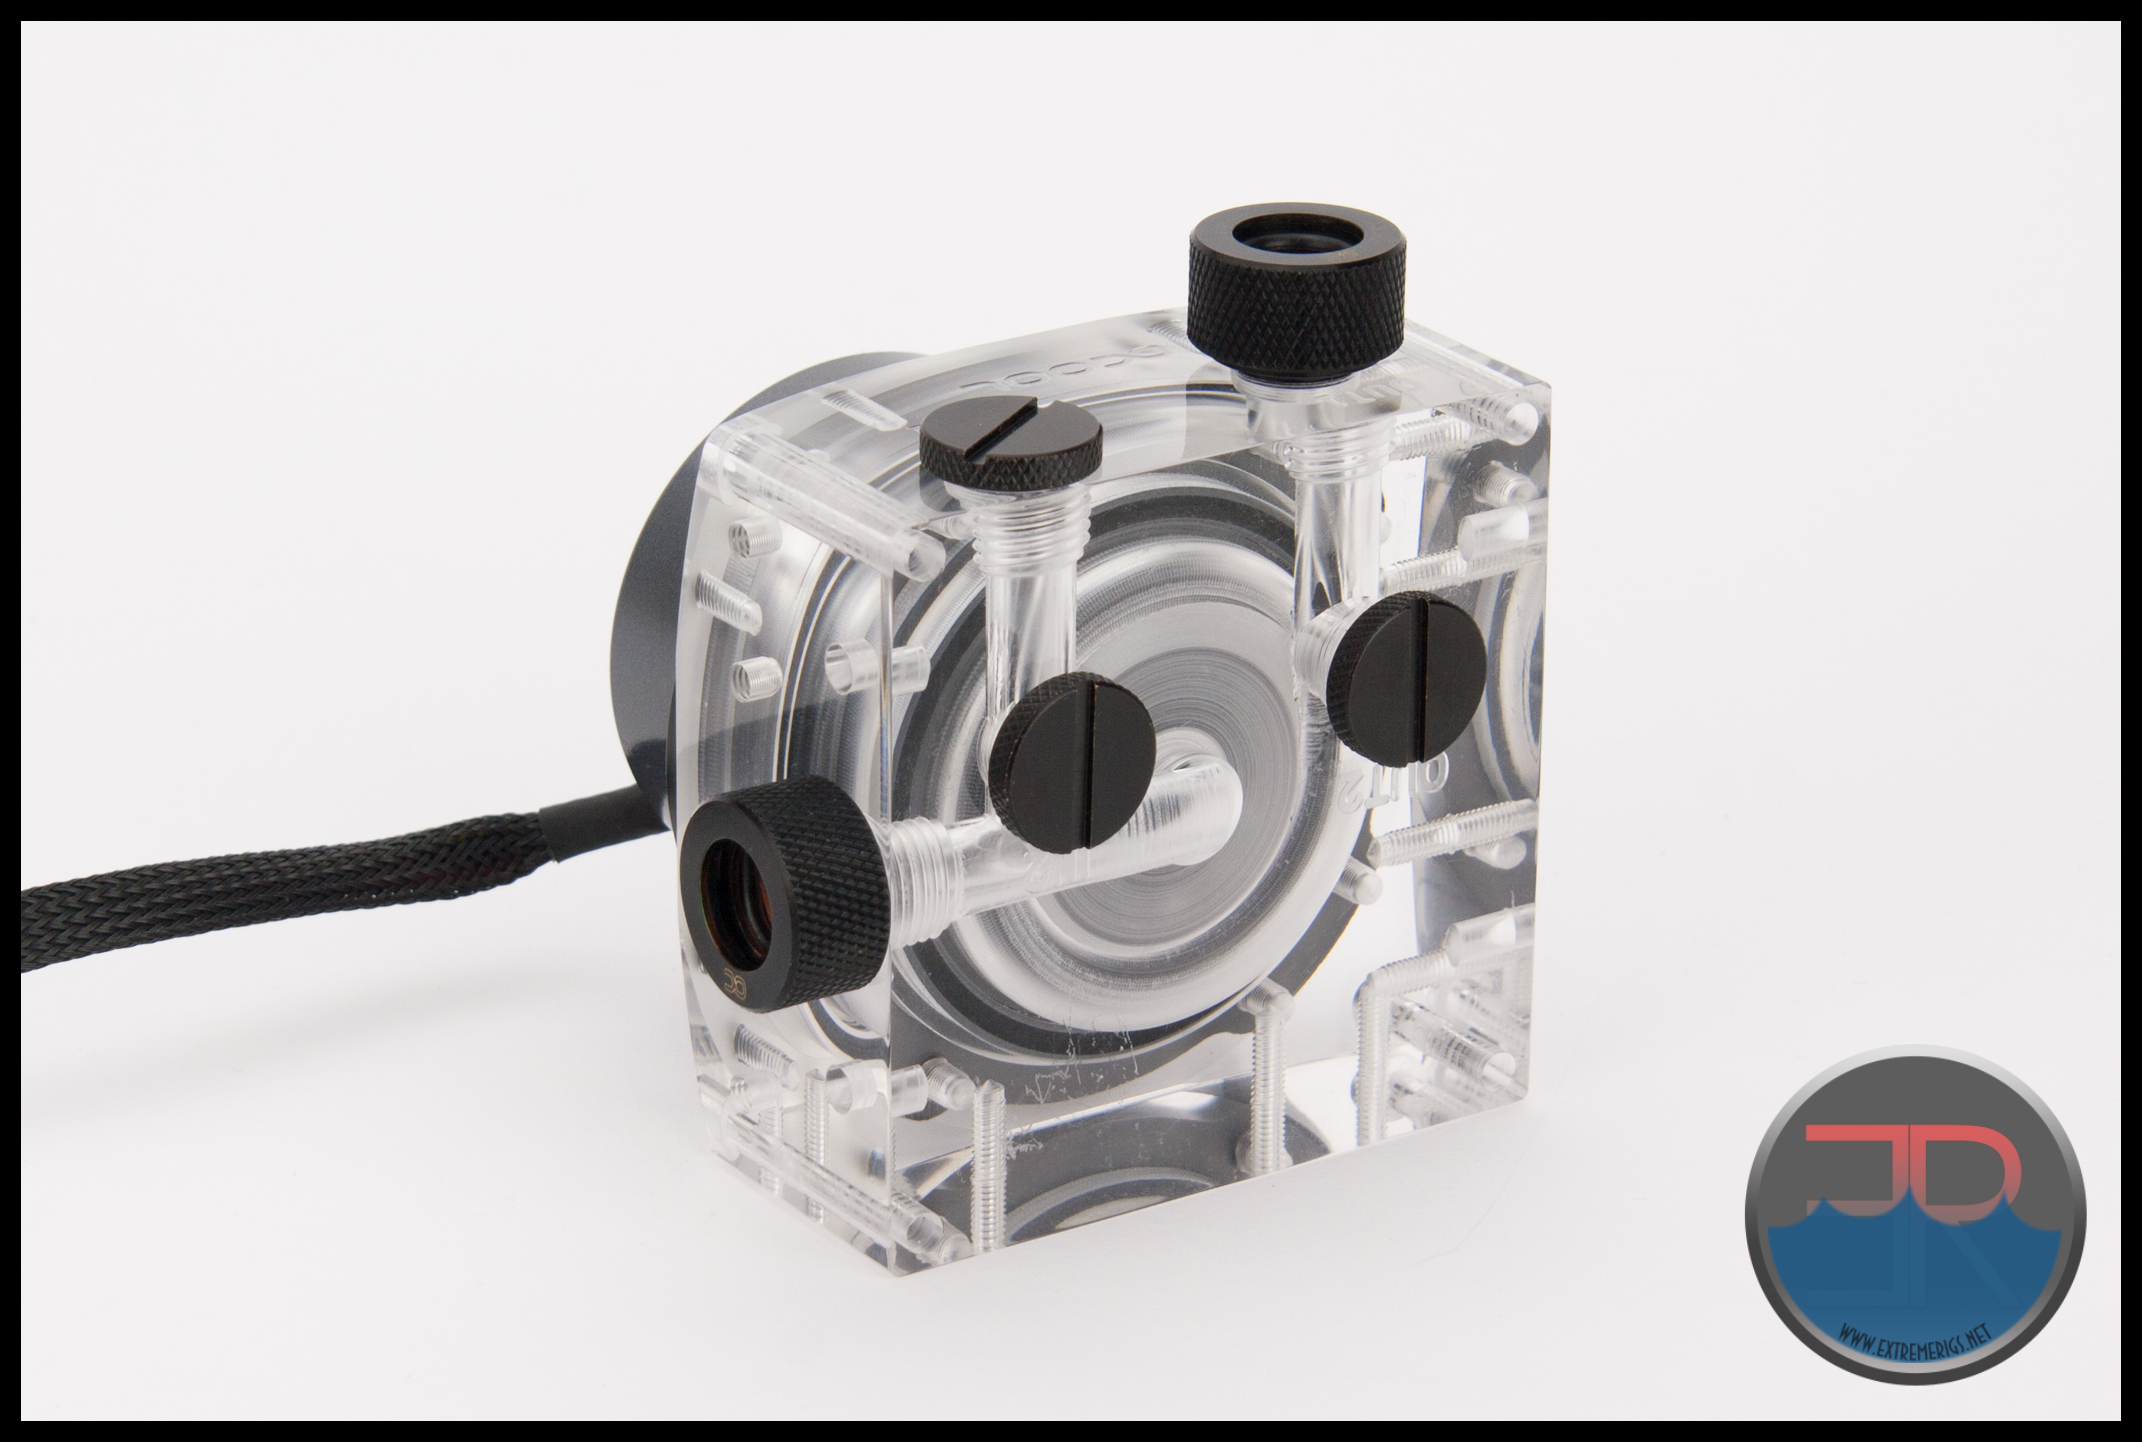
Impeller
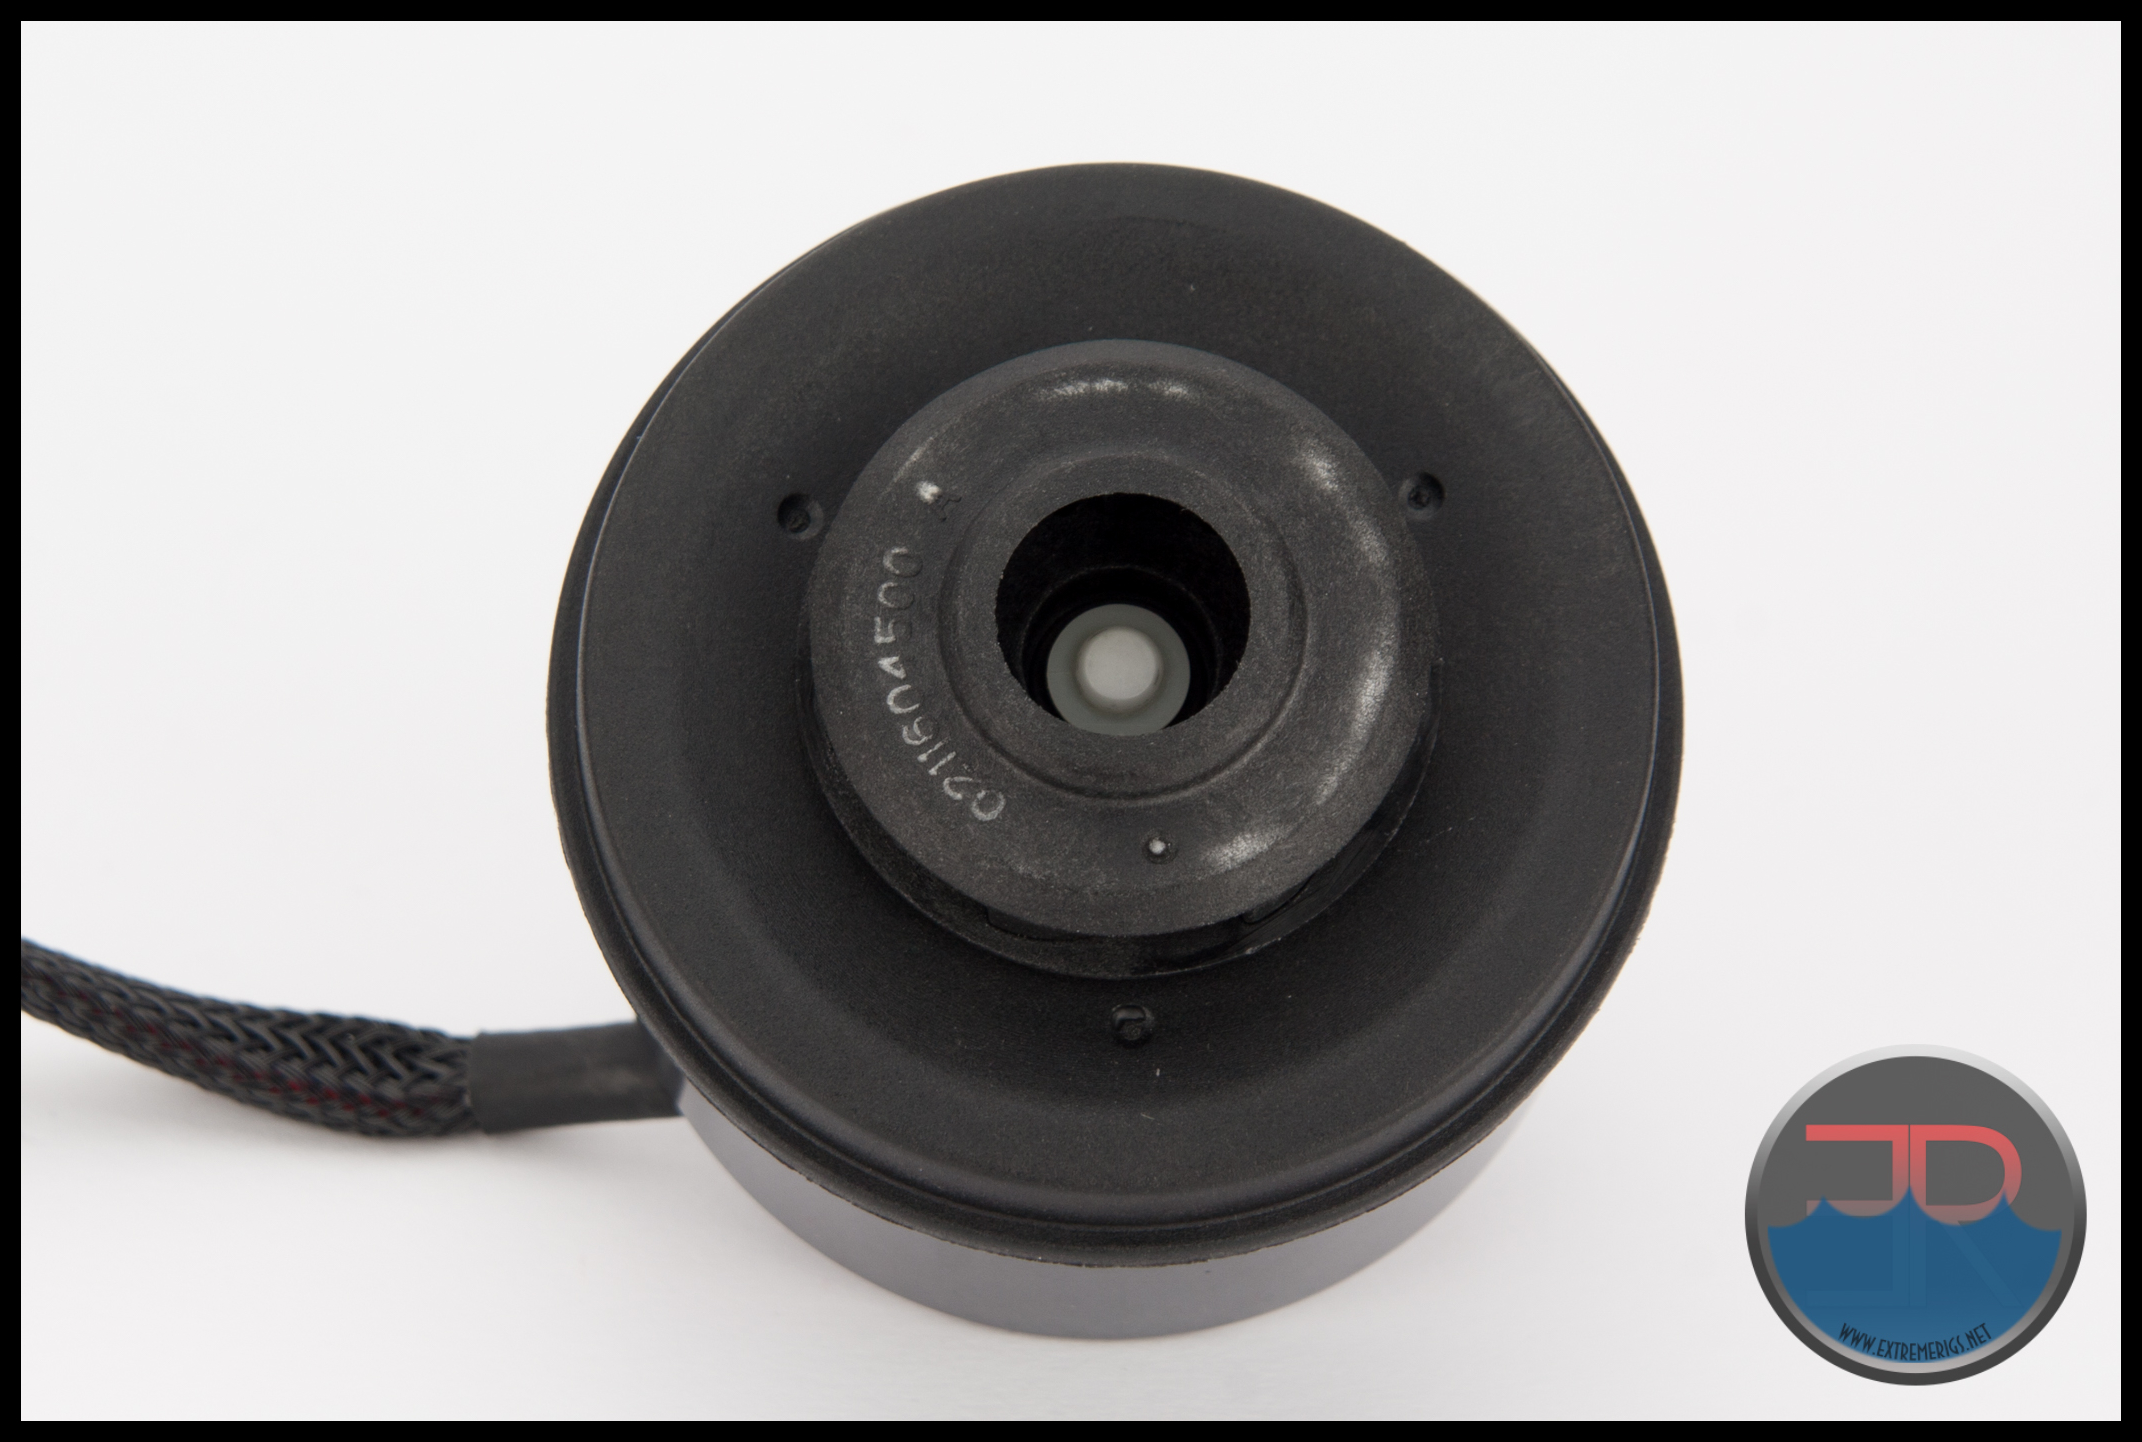
On the outside the VPP755 impeller looks very similar to that of the D5.
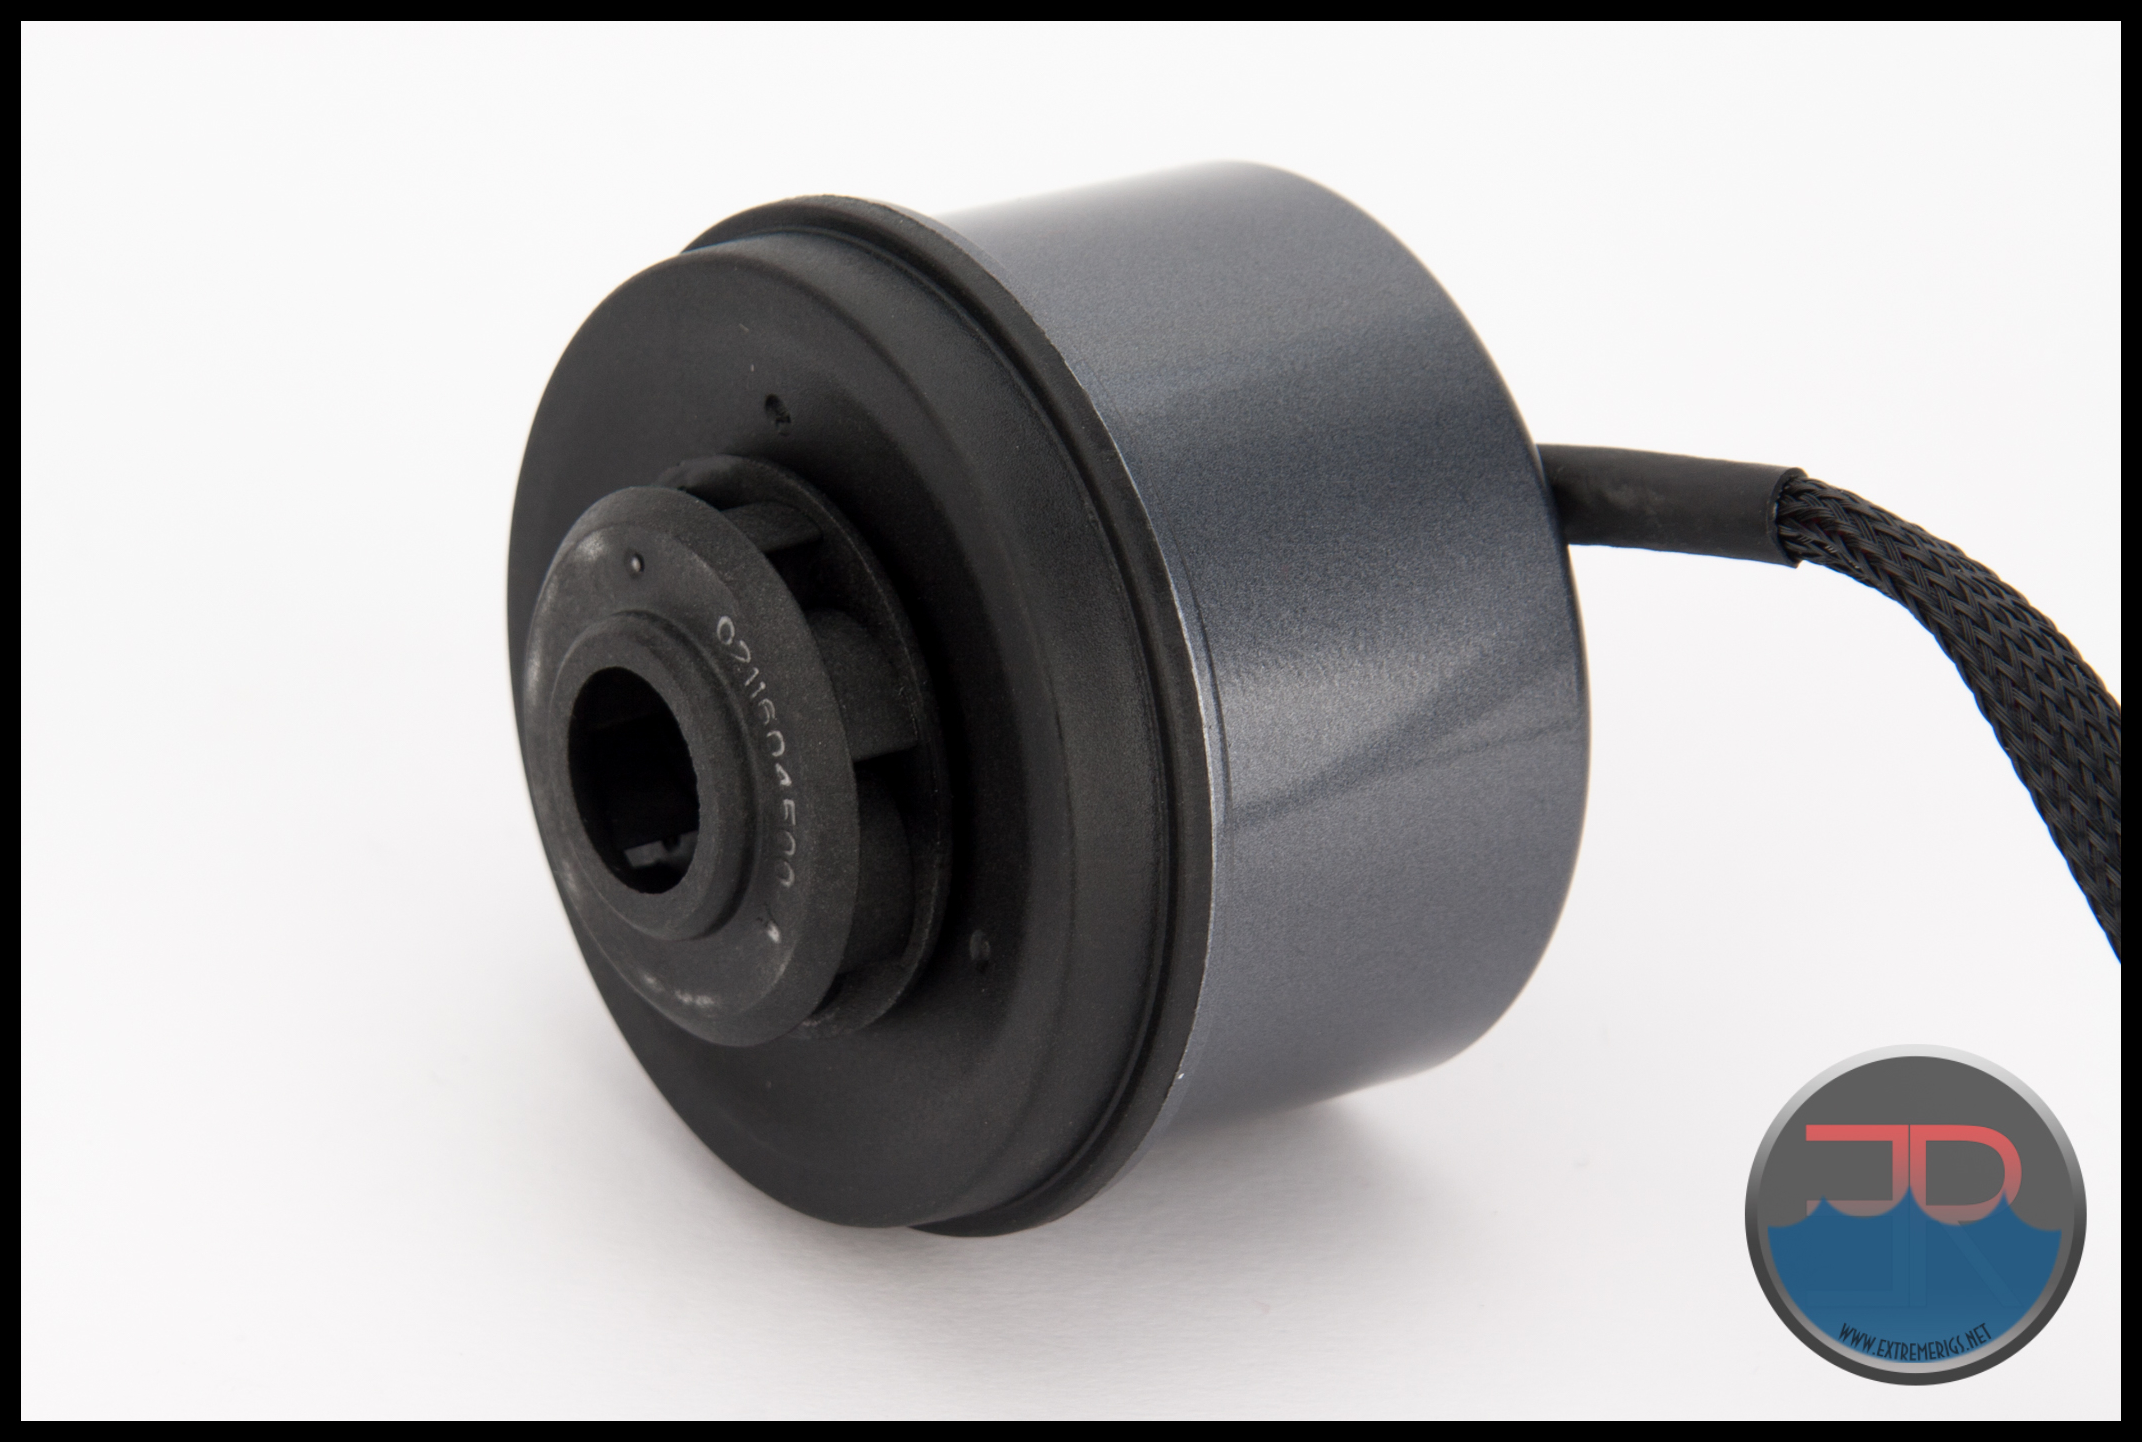
 BUT….when we look into it we start to notice the differences. First of all there is that white washer which acts as a retainer for the impeller and keeps it almost fixed in position, although there is still a short amount of free play in the stroke.
 Once that locking washer is removed the impeller can be slid off the shaft and the major difference between the D5 and VPP755 impellers can be seen. In the following image note the retaining washer is back on the shaft and there are two additional washers now in view. Do not lose either of these because one goes at the base of the shaft (before the impeller is put on) and the other is fitted at the top of the impeller (just before the white retaining clip washer).
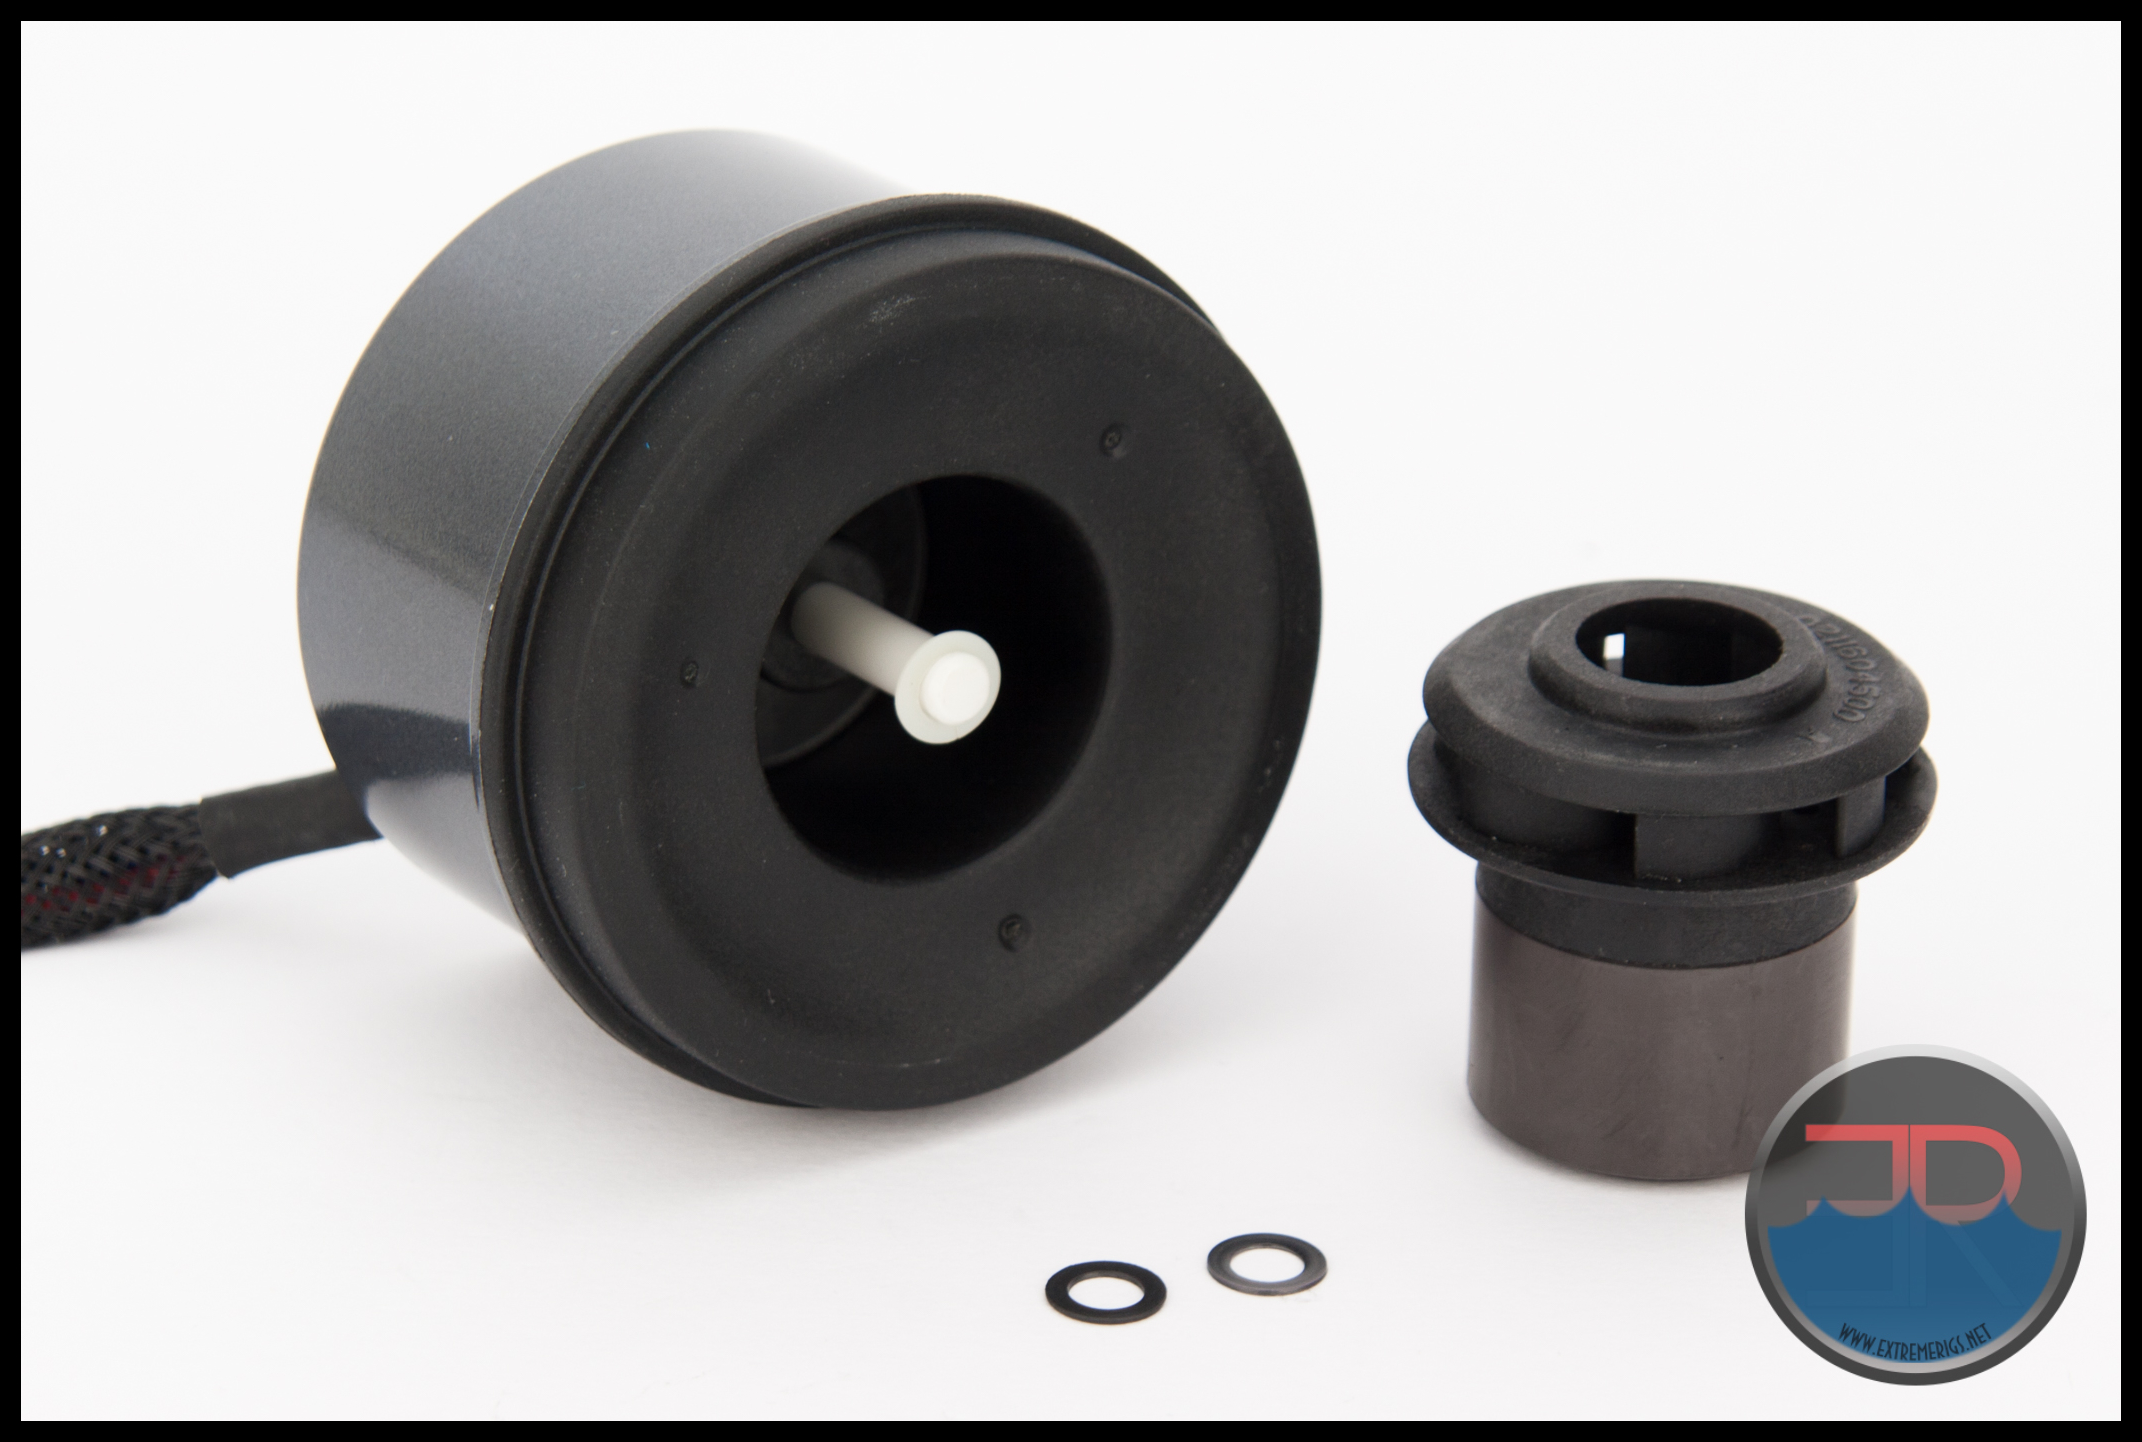 The VPP755 impeller shaft appears to be ceramic, but it is one of those fragile parts you don’t want to mess too much with, so I didn’t fully investigate the shaft for fear of breaking it.
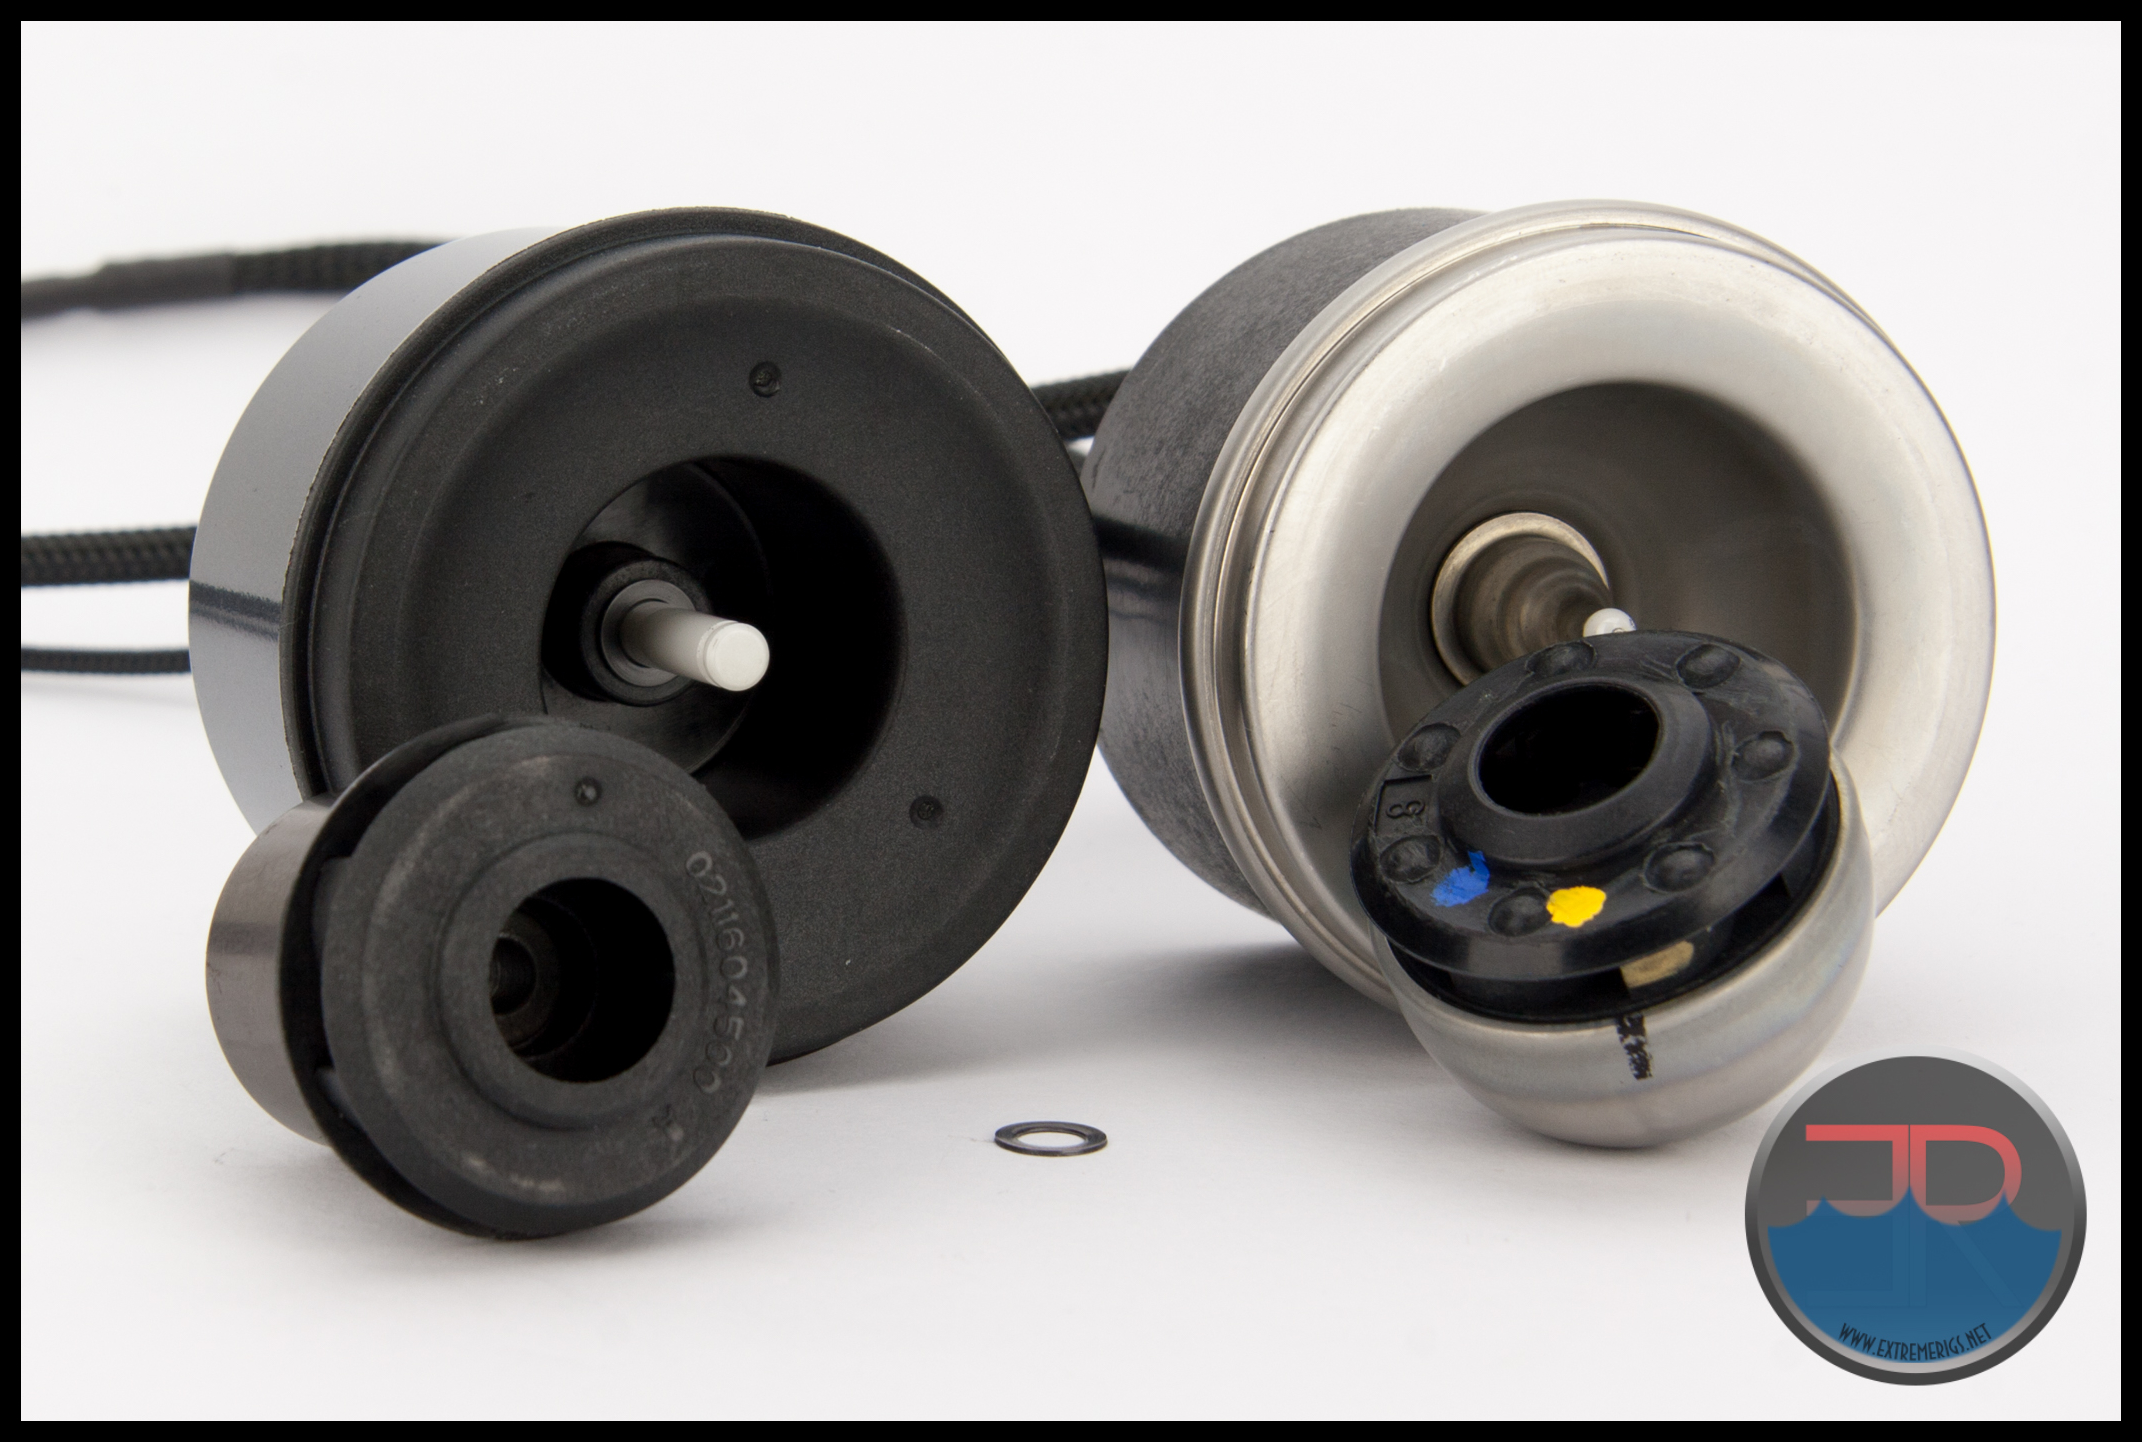
The VPP755 clearly has a cylindrical shaped impeller and matching housing while the D5 has a cone shaped one.
Pump Top Installation
I am not going to go into detail here about fitting the VPP755 to the Eisdecke D5 Pump Top, as I did a step by step install for the Esidecke review. Using that installation guide and the seal provided with the VPP755 we had no problems and it was leak free on each of the 5 times we mated the 2 products together.
 In the following image note the supplied o-ring is placed in position where it would be for assembly, do not try to fit the o-ring onto the shoulder.
D5 Top Compatibility
There are a couple more subtle differences between the VPP755 and a D5 and as we found out, these last two differences could mean that the VPP755 is in fact NOT compatible with other D5 tops.
It may be worth noting that the VPP755 is slightly shorter in overall length than a D5, although this will not not affect pump top compatibility. That ~8mm could make all the difference between fitting or not in tight spaces, so we see this as an advantage in the VPP755’s favor.
 However there are two other measurements which could make a difference when fitting the VPP755 to a pump top from another manufacturer.
Firstly the height of the shoulder of the VPP755 is ~1mm longer on the VPP755. On some pump tops this is where the o-ring seal must be placed, and with the lengthened shoulder the seal may not make contact between pump and top, therefore not creating a seal.
 I did try to measure the difference, but I was not confident with the result to say for certain the exact measurements and therefore the difference between the VPP755 and the D5. Here was how I attempted to measure (D5 in the image). The best I can offer is to say that the VPP755 shoulder height is more than that of a D5 which could effect the ability to seal when fitting to a D5 top other than the Eisdecke D5.
 Similarly, it appears as though the impeller height protruding above the shoulder is slightly longer on the VPP755. An actual measurement was impossible to take, so again you will have to have faith when I say it is slightly longer. So what does a slightly longer impeller mean anyway? Well if the impeller is touching the the volute (inside of the pump top) because it is too long the pump is unlikely to spin up, or at the very least be dragging against it resulting in lower rpm and therefore weaker pump output while risking the pump circuitry overheating – not ideal.
So is Alphacool’s statement that the VPP755 pump is “compatible to D5 mounting places” accurate? Unfortunately for the end user it is not. The shoulder height and impeller length differences means that some other manufactures D5 tops will not be compatible with the VPP755 pump. We set out to find which are compatible and which are not and our findings are that tops which need the o-ring fitting onto the shoulder are less likely to be compatible, but that was not always the case.
Unfortunately we don’t have every top ever made on hand for a complete compatibility list, but below are the tops that we physically tried to fit the VPP755 to. If a seal was thought to be made then a wet test was conducted. Hopefully we can update this list in the future as more tops become available.
Compatible Pump Tops for VPP755 pump.
Alphacool Eisdecke D5 Top – wet test pass, pump vertical and horizontal.
Barrow D5 Top – wet test pass, pump vertical.
Bitspower D5 Mod Top V2 – wet test pass, pump horizontal.
Bitspower D5 Mod Top “S” Model – wet test pass, pump vertical.
EK-XTOP Revo D5 – wet test pass, pump vertical.
NON Compatible Pump Tops for VPP755 pump.
EK-D5 X-TOP CSQ – no seal contact, tried thicker o-ring and cracked the retaining collar – no wet test. Probably will work with thicker o-ring and don’t crank down “too hard” on the retaining collar screws
EK-D5 Dual TOP G1/4 CSQ – no seal contact, no attempt with alternate o-rings made.
Monsoon SAP – sealed well and wet test commenced but after running for ~2 minutes (pump vertical) noise erupted from inside the pump. Looks like contact between impeller and volute during operation, shaft kept spinning and flicked off the white retaining washer and flat washer underneath it. It is possible I did not put impeller retaining washer back on properly, but very unlikely as pump had been in operation for many hours after it was re-assembled following the photo shoot. Has run smoothly for a few hours since the “incident”.
Next up, Controlling the VPP755
![]()
Control
We firmly believe that pump speed in a “normal” PC loop is something that should be “set and forget”. Dial in the flow rate you are after OR set to the noise level you are comfortable with (hopefully both outcomes are achieved) and you’re done.
However the ability to control pump speed is very useful during the loop bleeding process. Varying the pump speed can assist in dislodging stubborn air bubbles or even larger air pockets, therefore we think that pump speed control is actually a very useful feature indeed.
With the VPP755 boasting both manual control with the adjustable dial and electronic control with PWM we were certainly interested to find out how it would work in the real world.
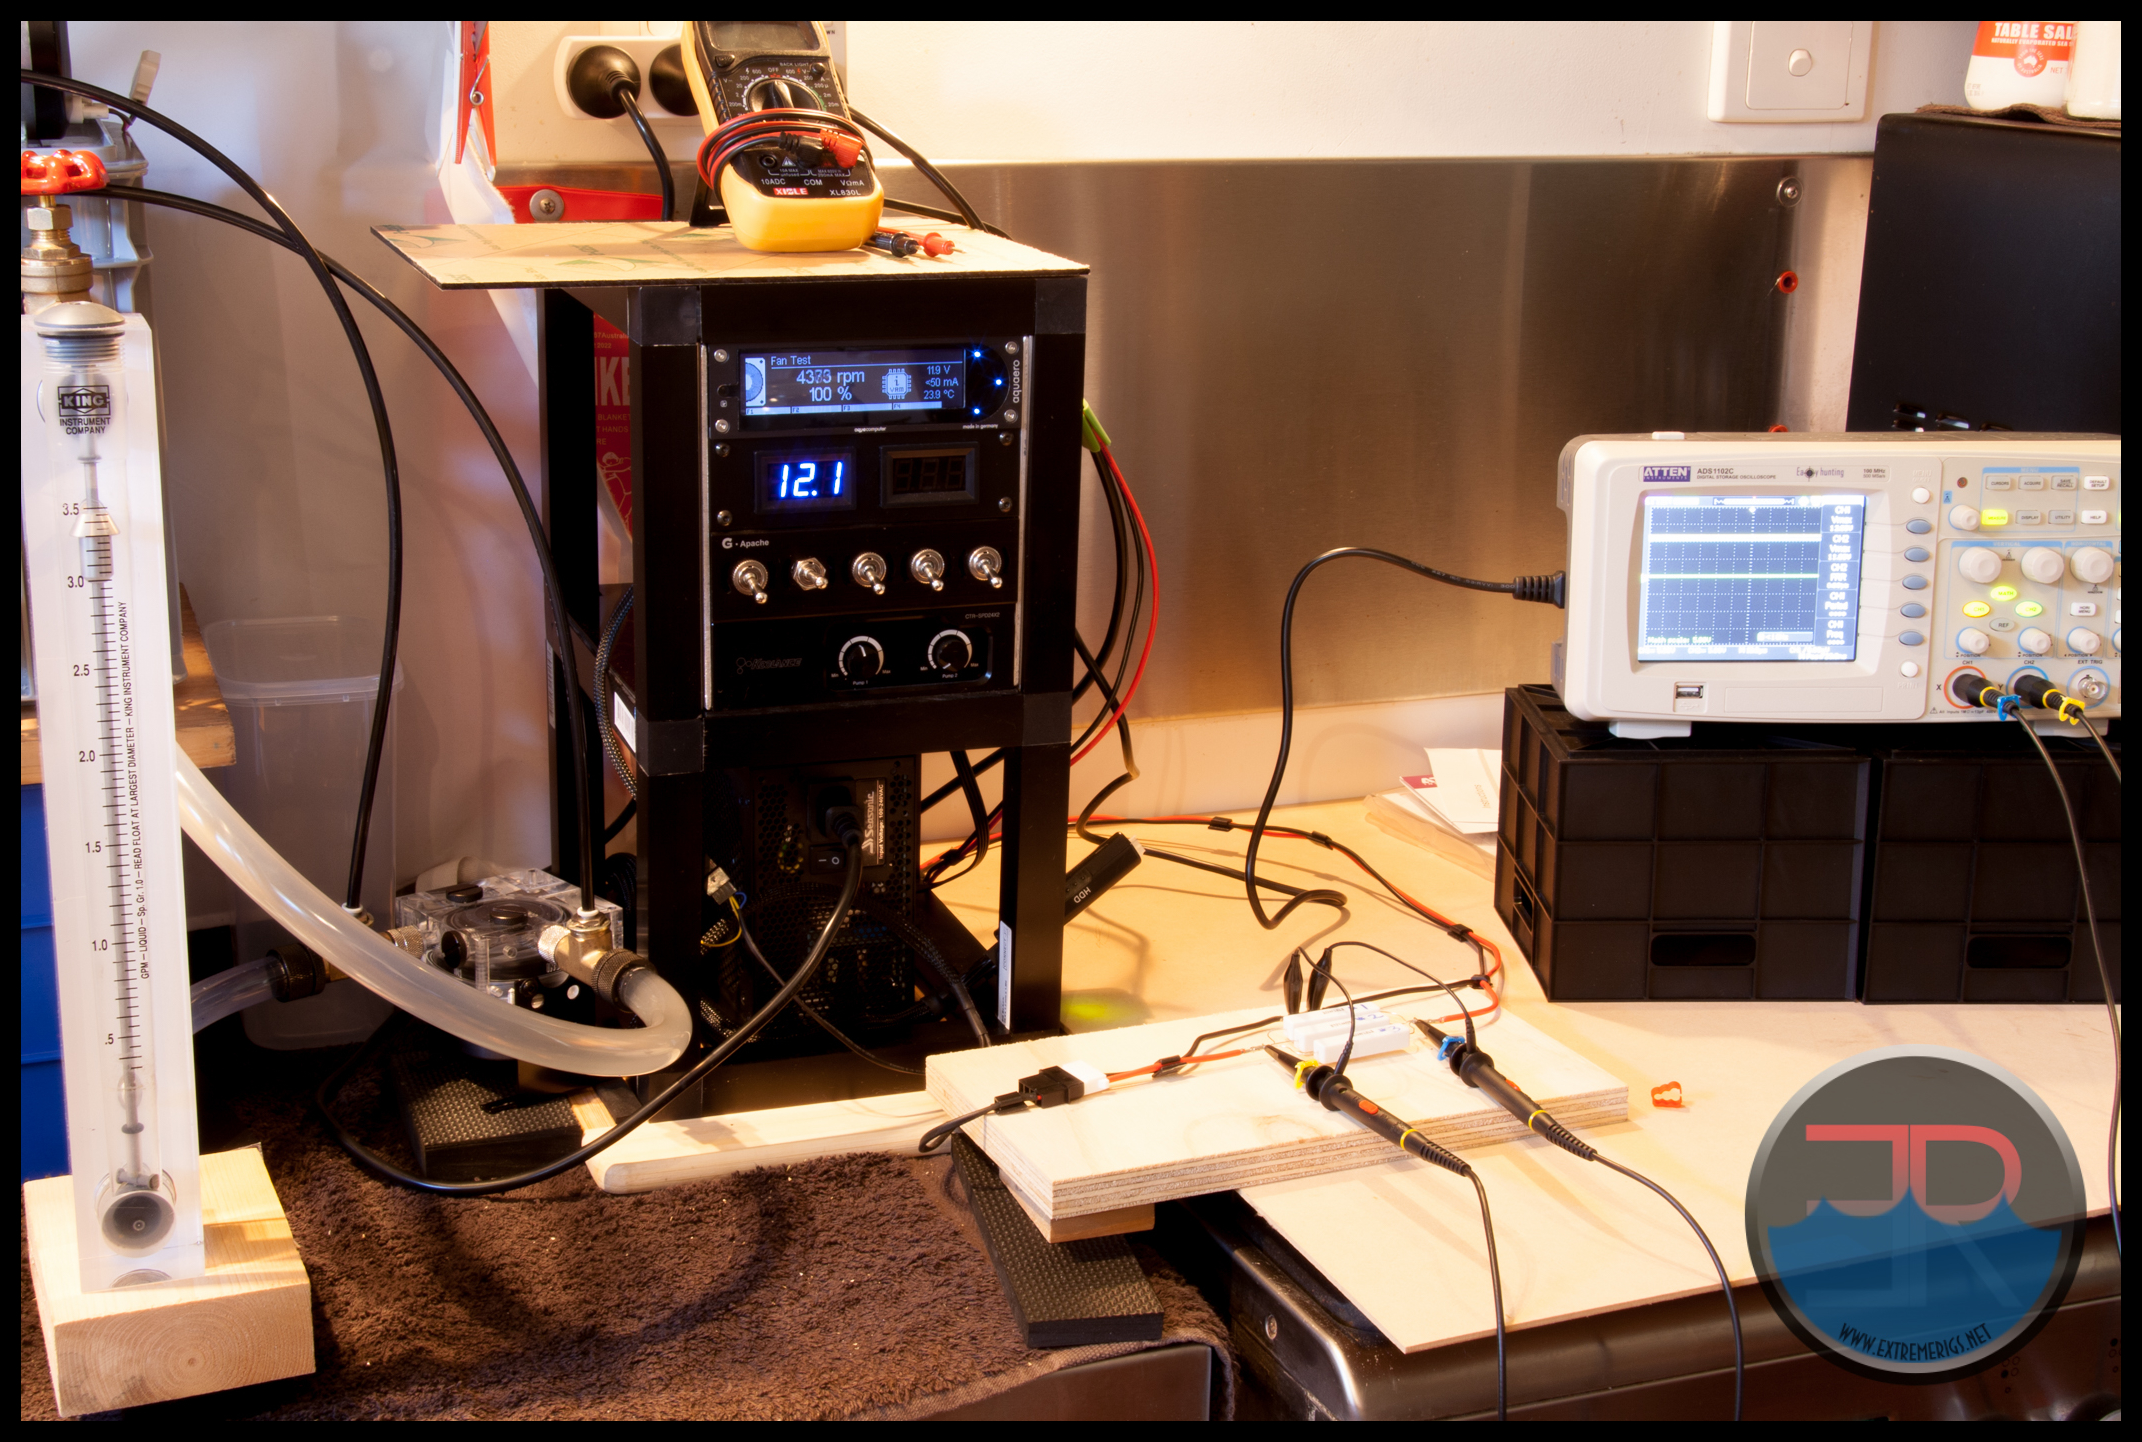
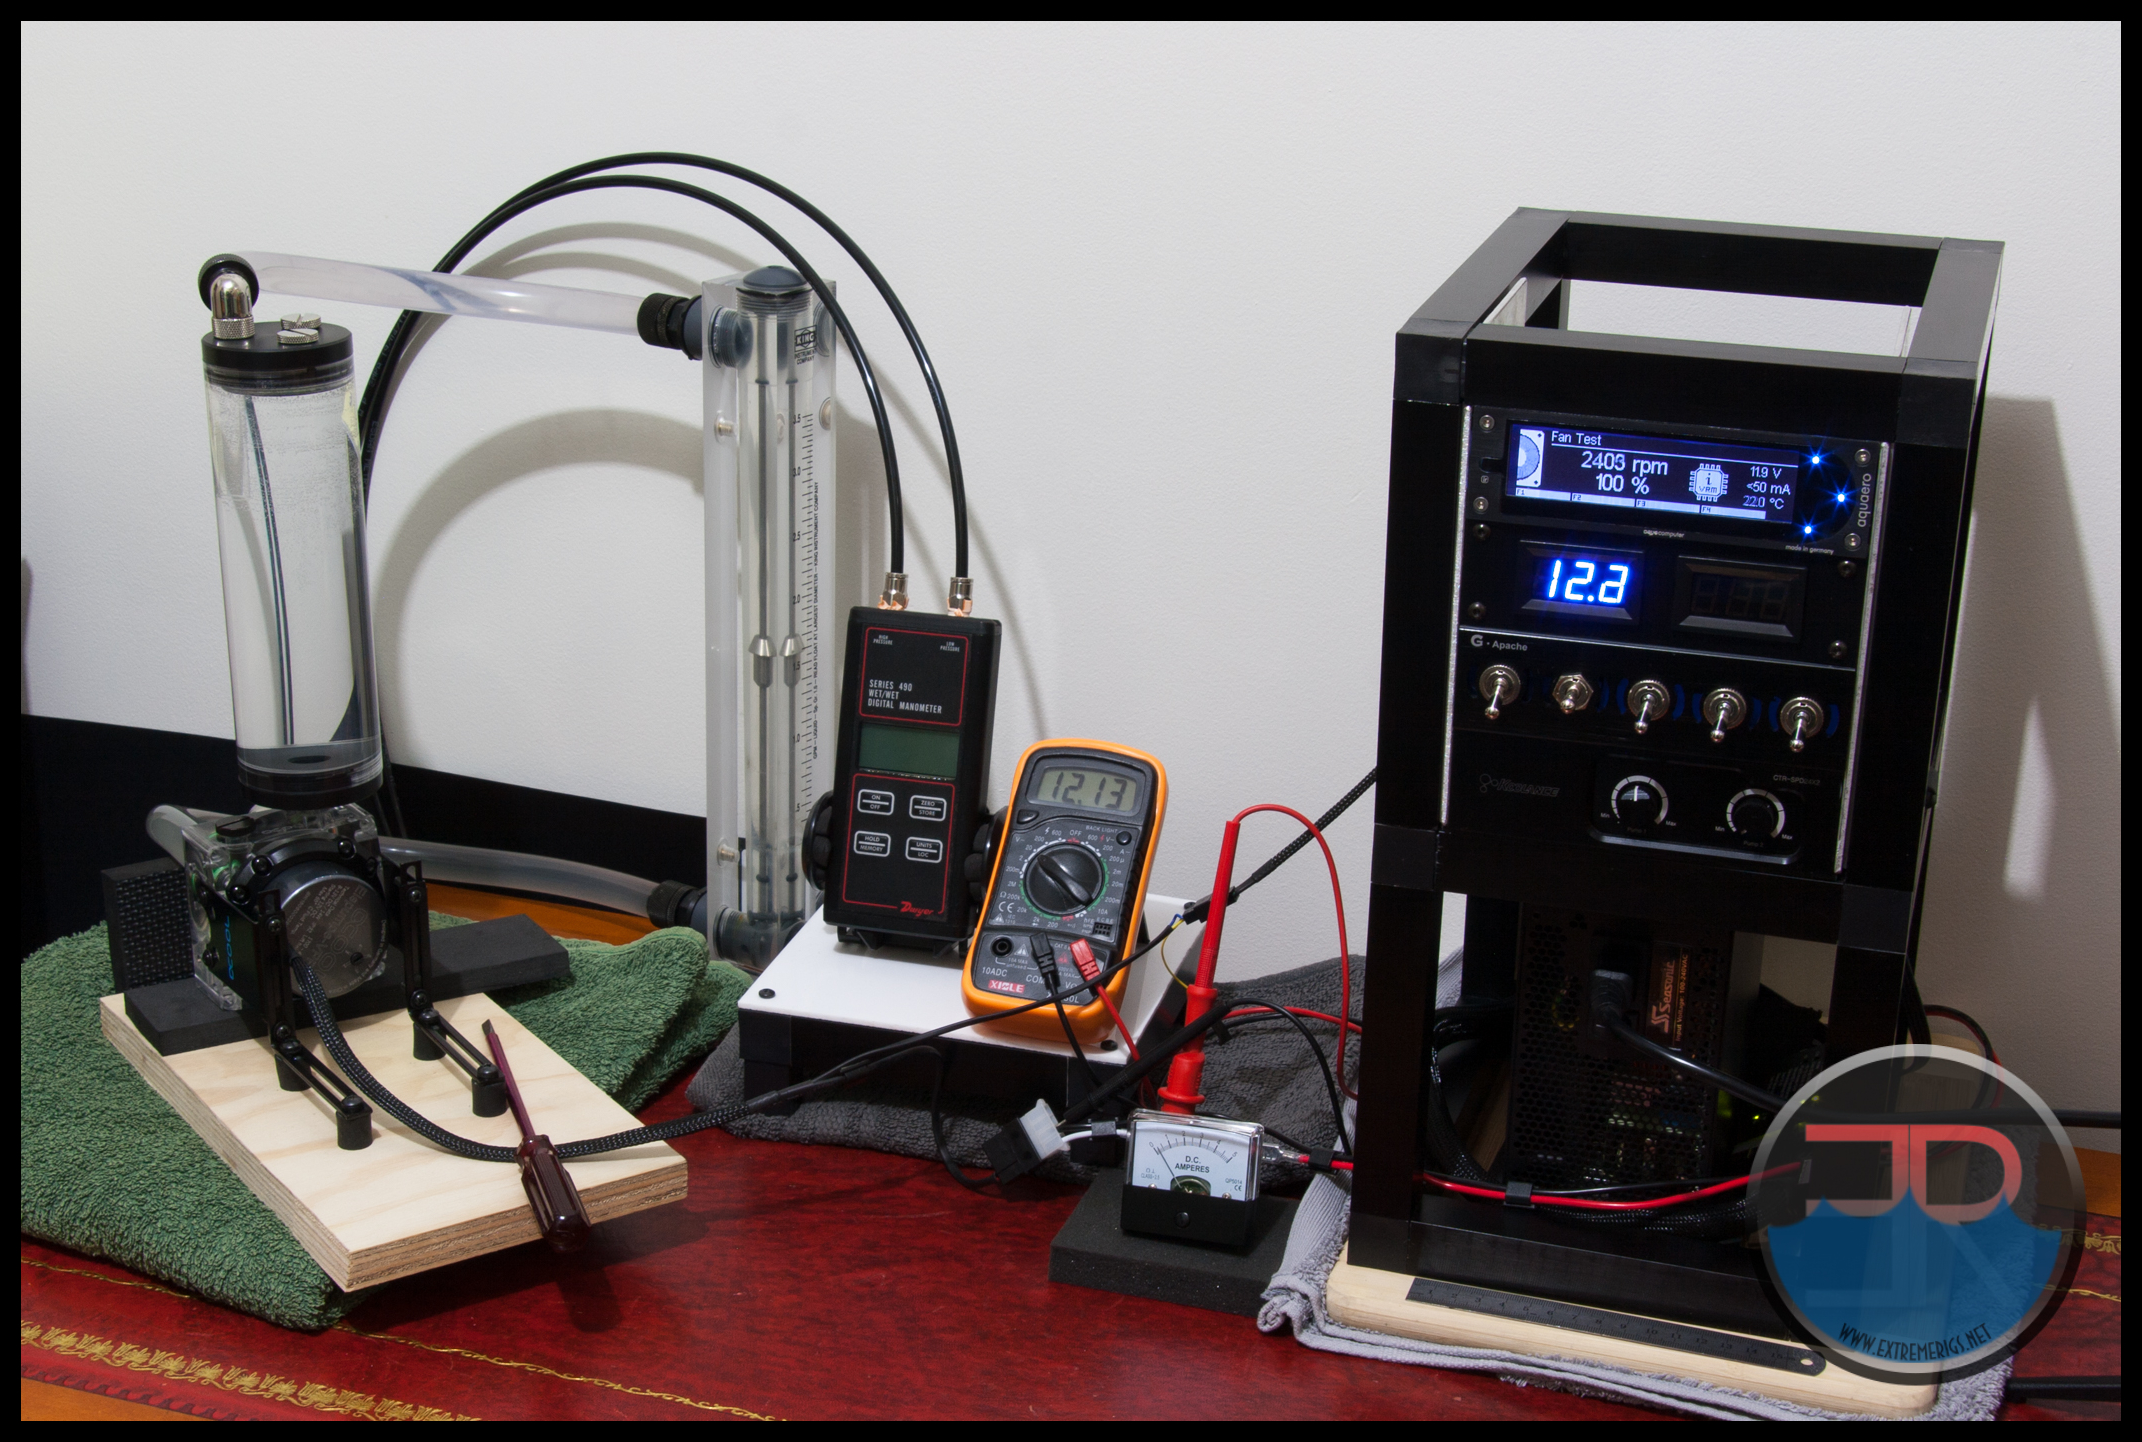
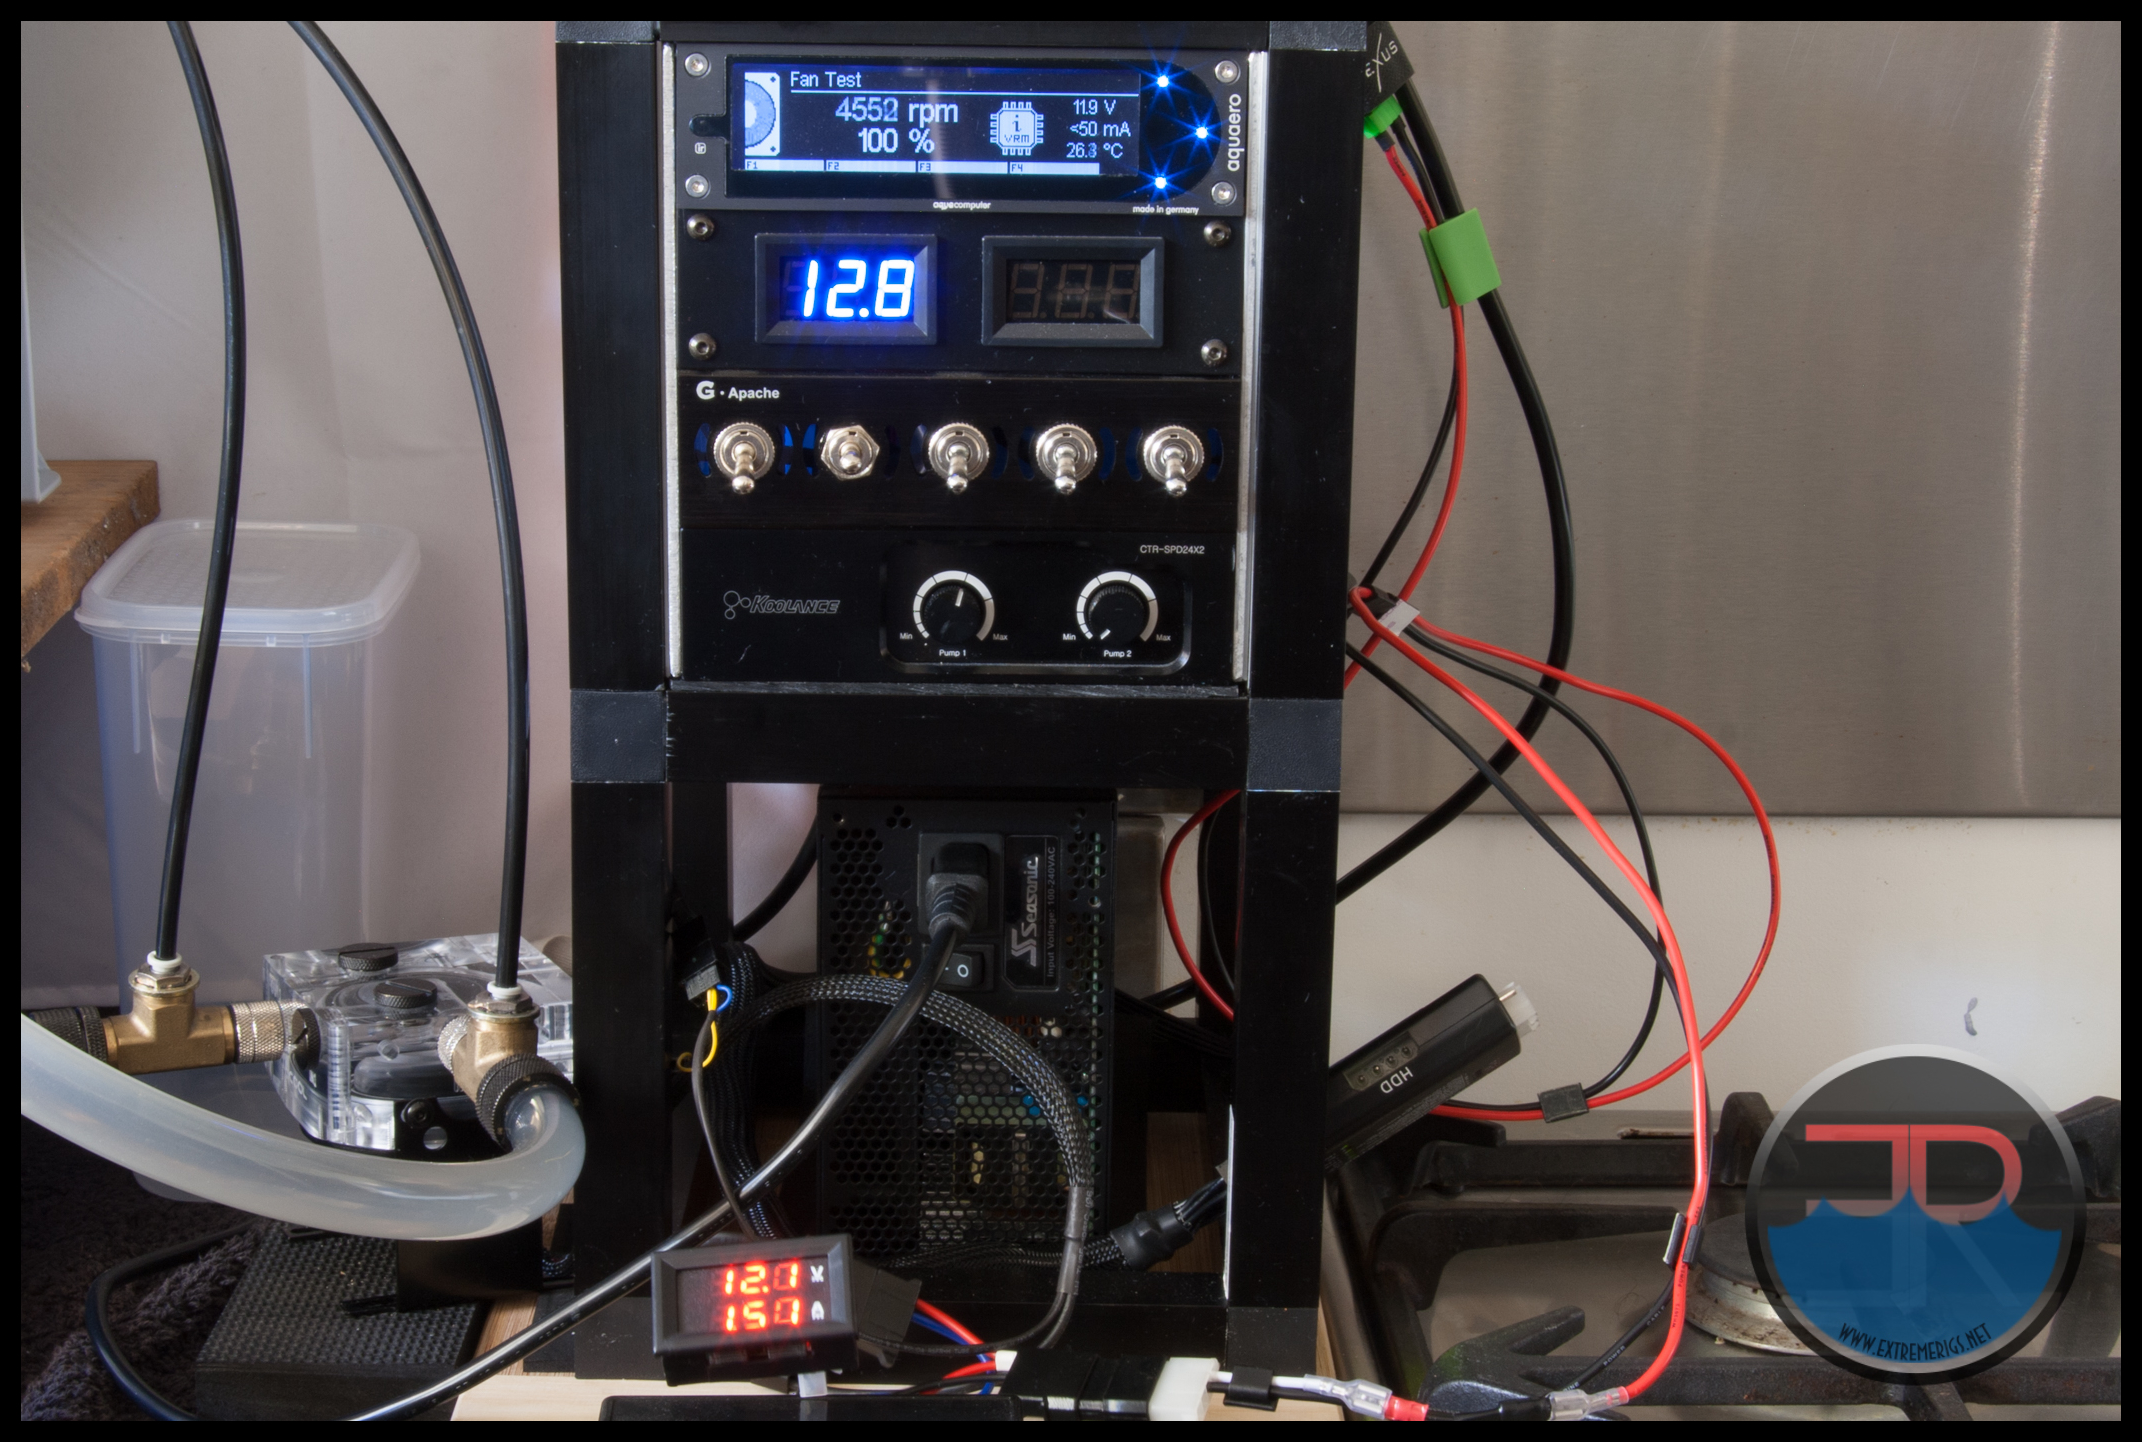
We got our first taste of the PWM controls when the VPP755 was set up on the flow/pressure test bench and from the outset we ran into what we thought at the time were control difficulties. This particular test bench utilizes an Aquaero 6 for RPM display and PWM control, and usually the pump is powered from a separate bench top PSU which has volts and amps display panels.
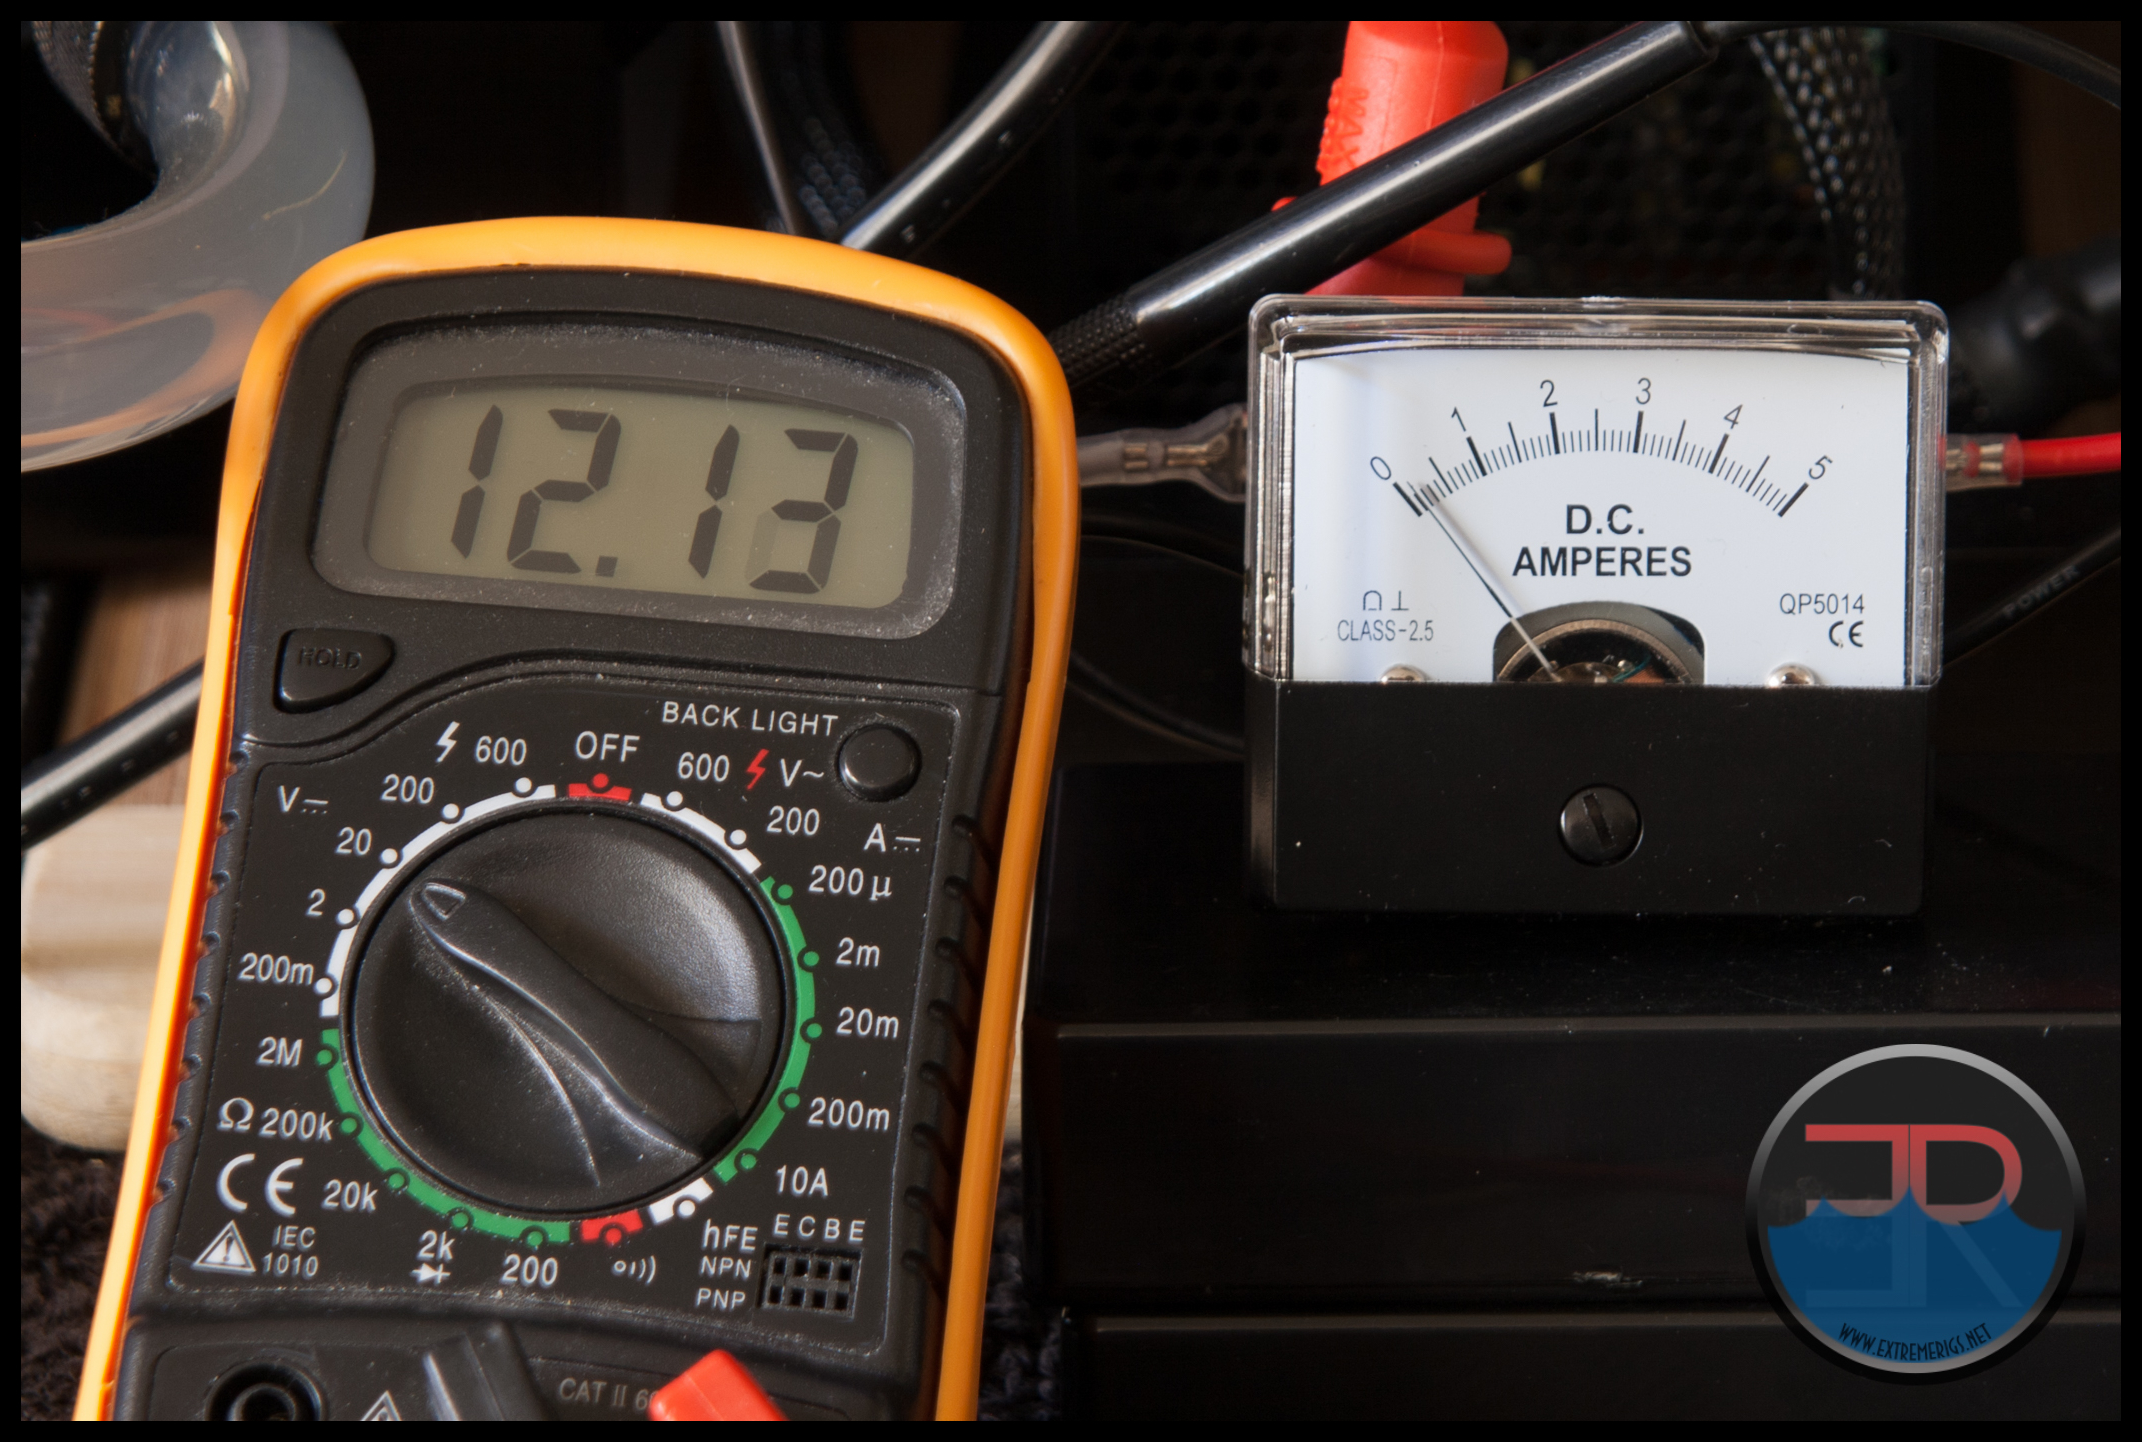
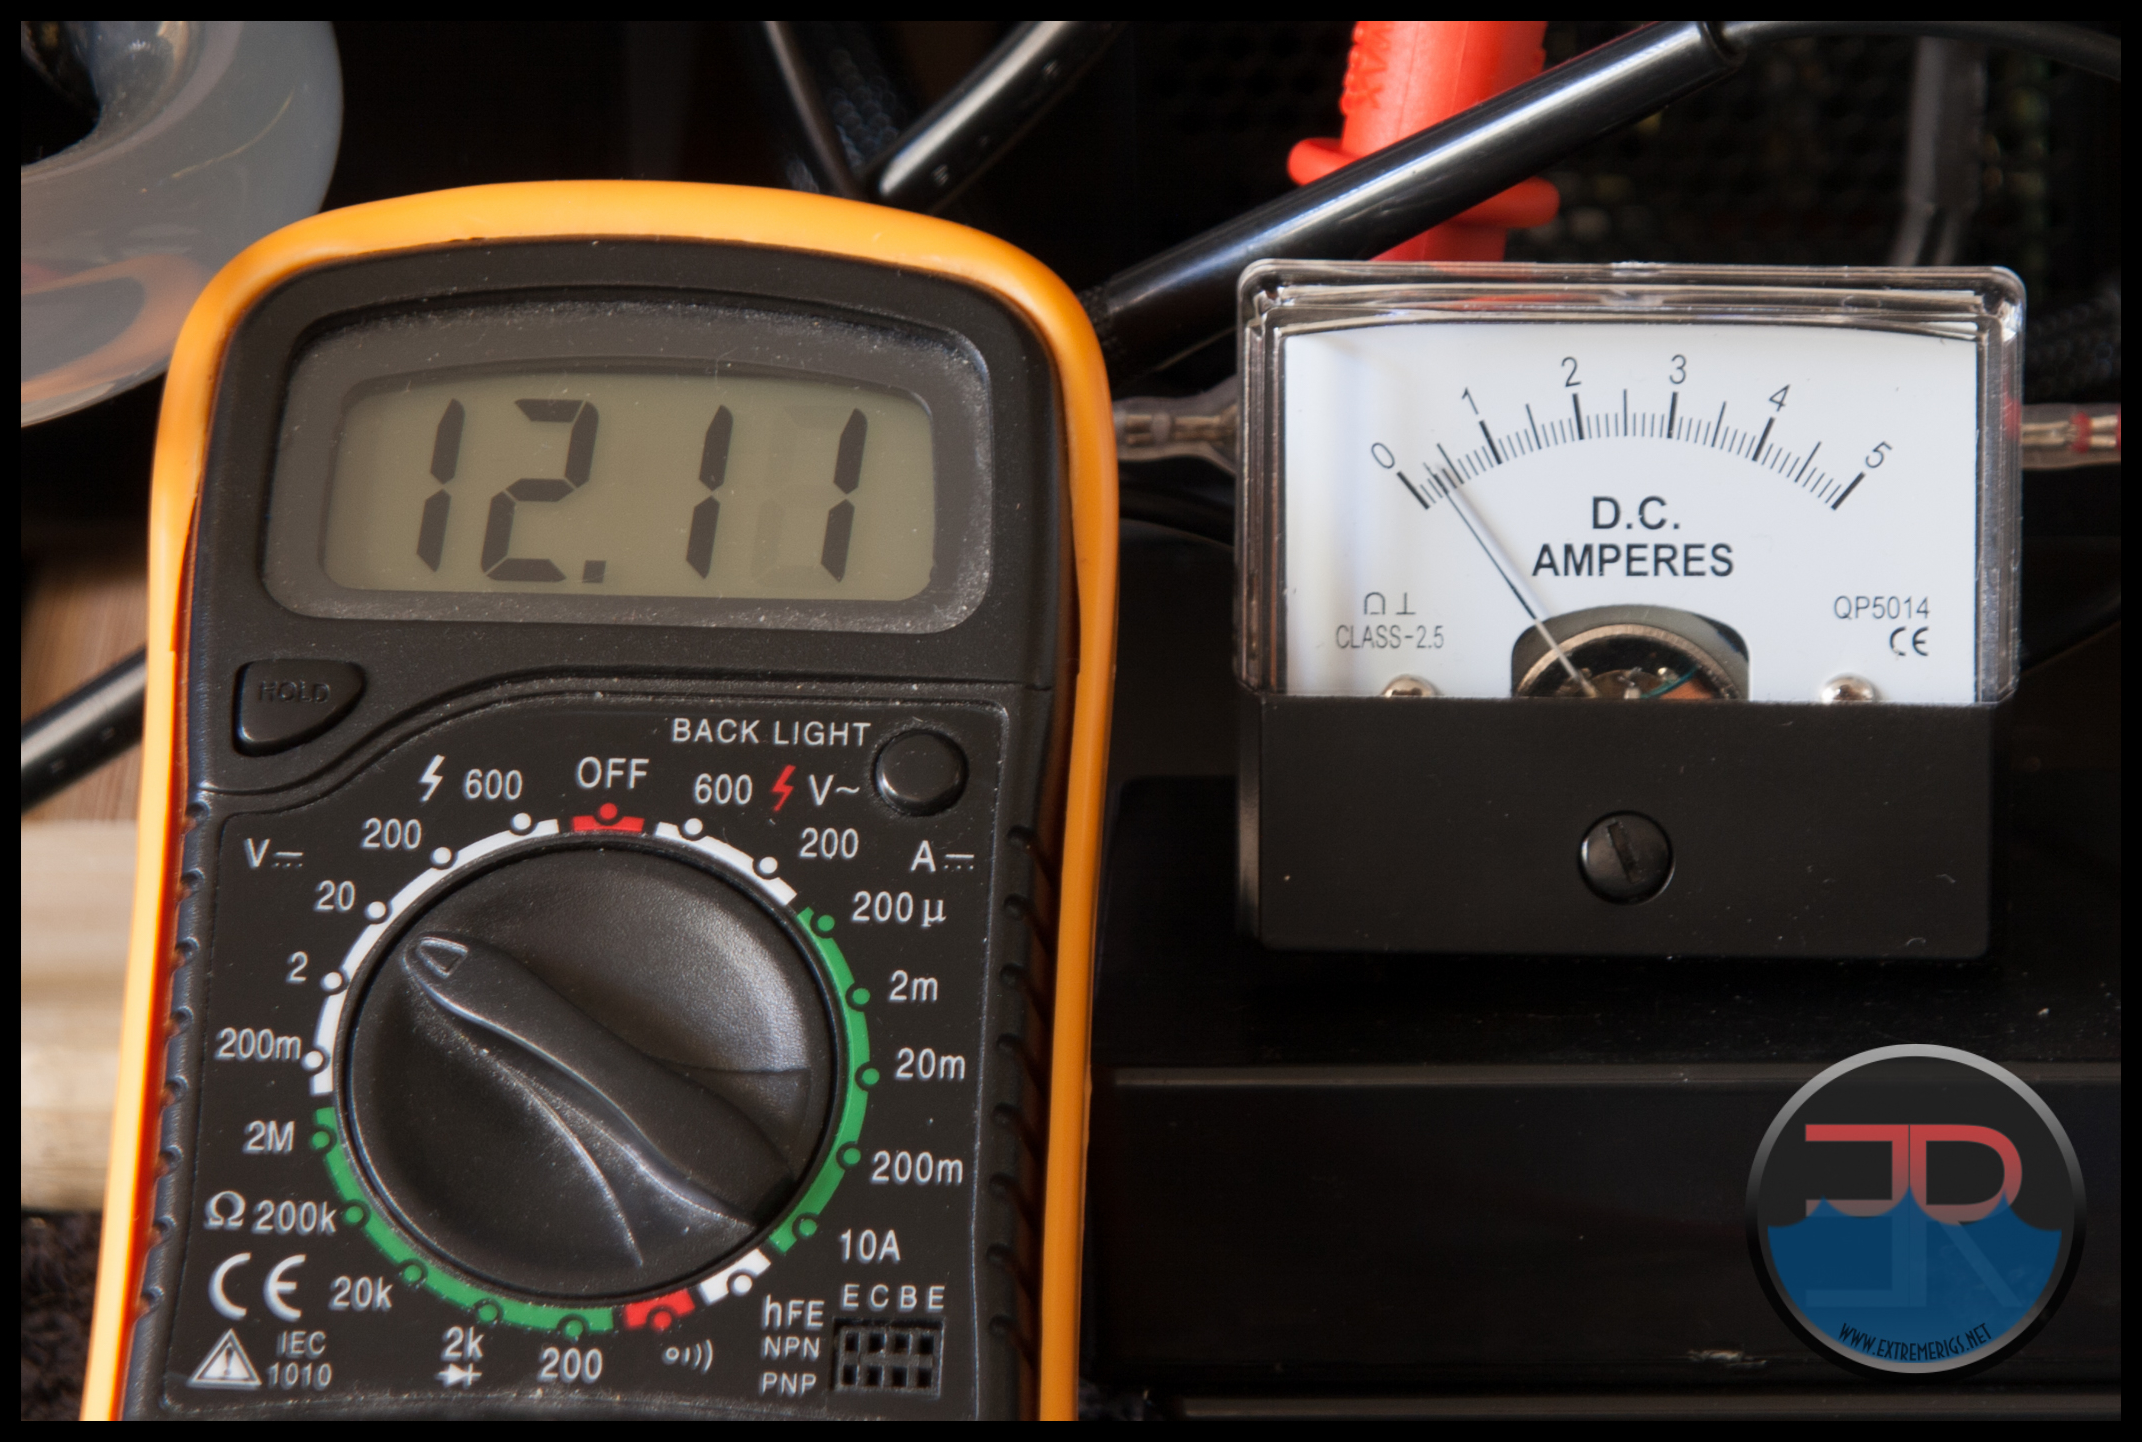
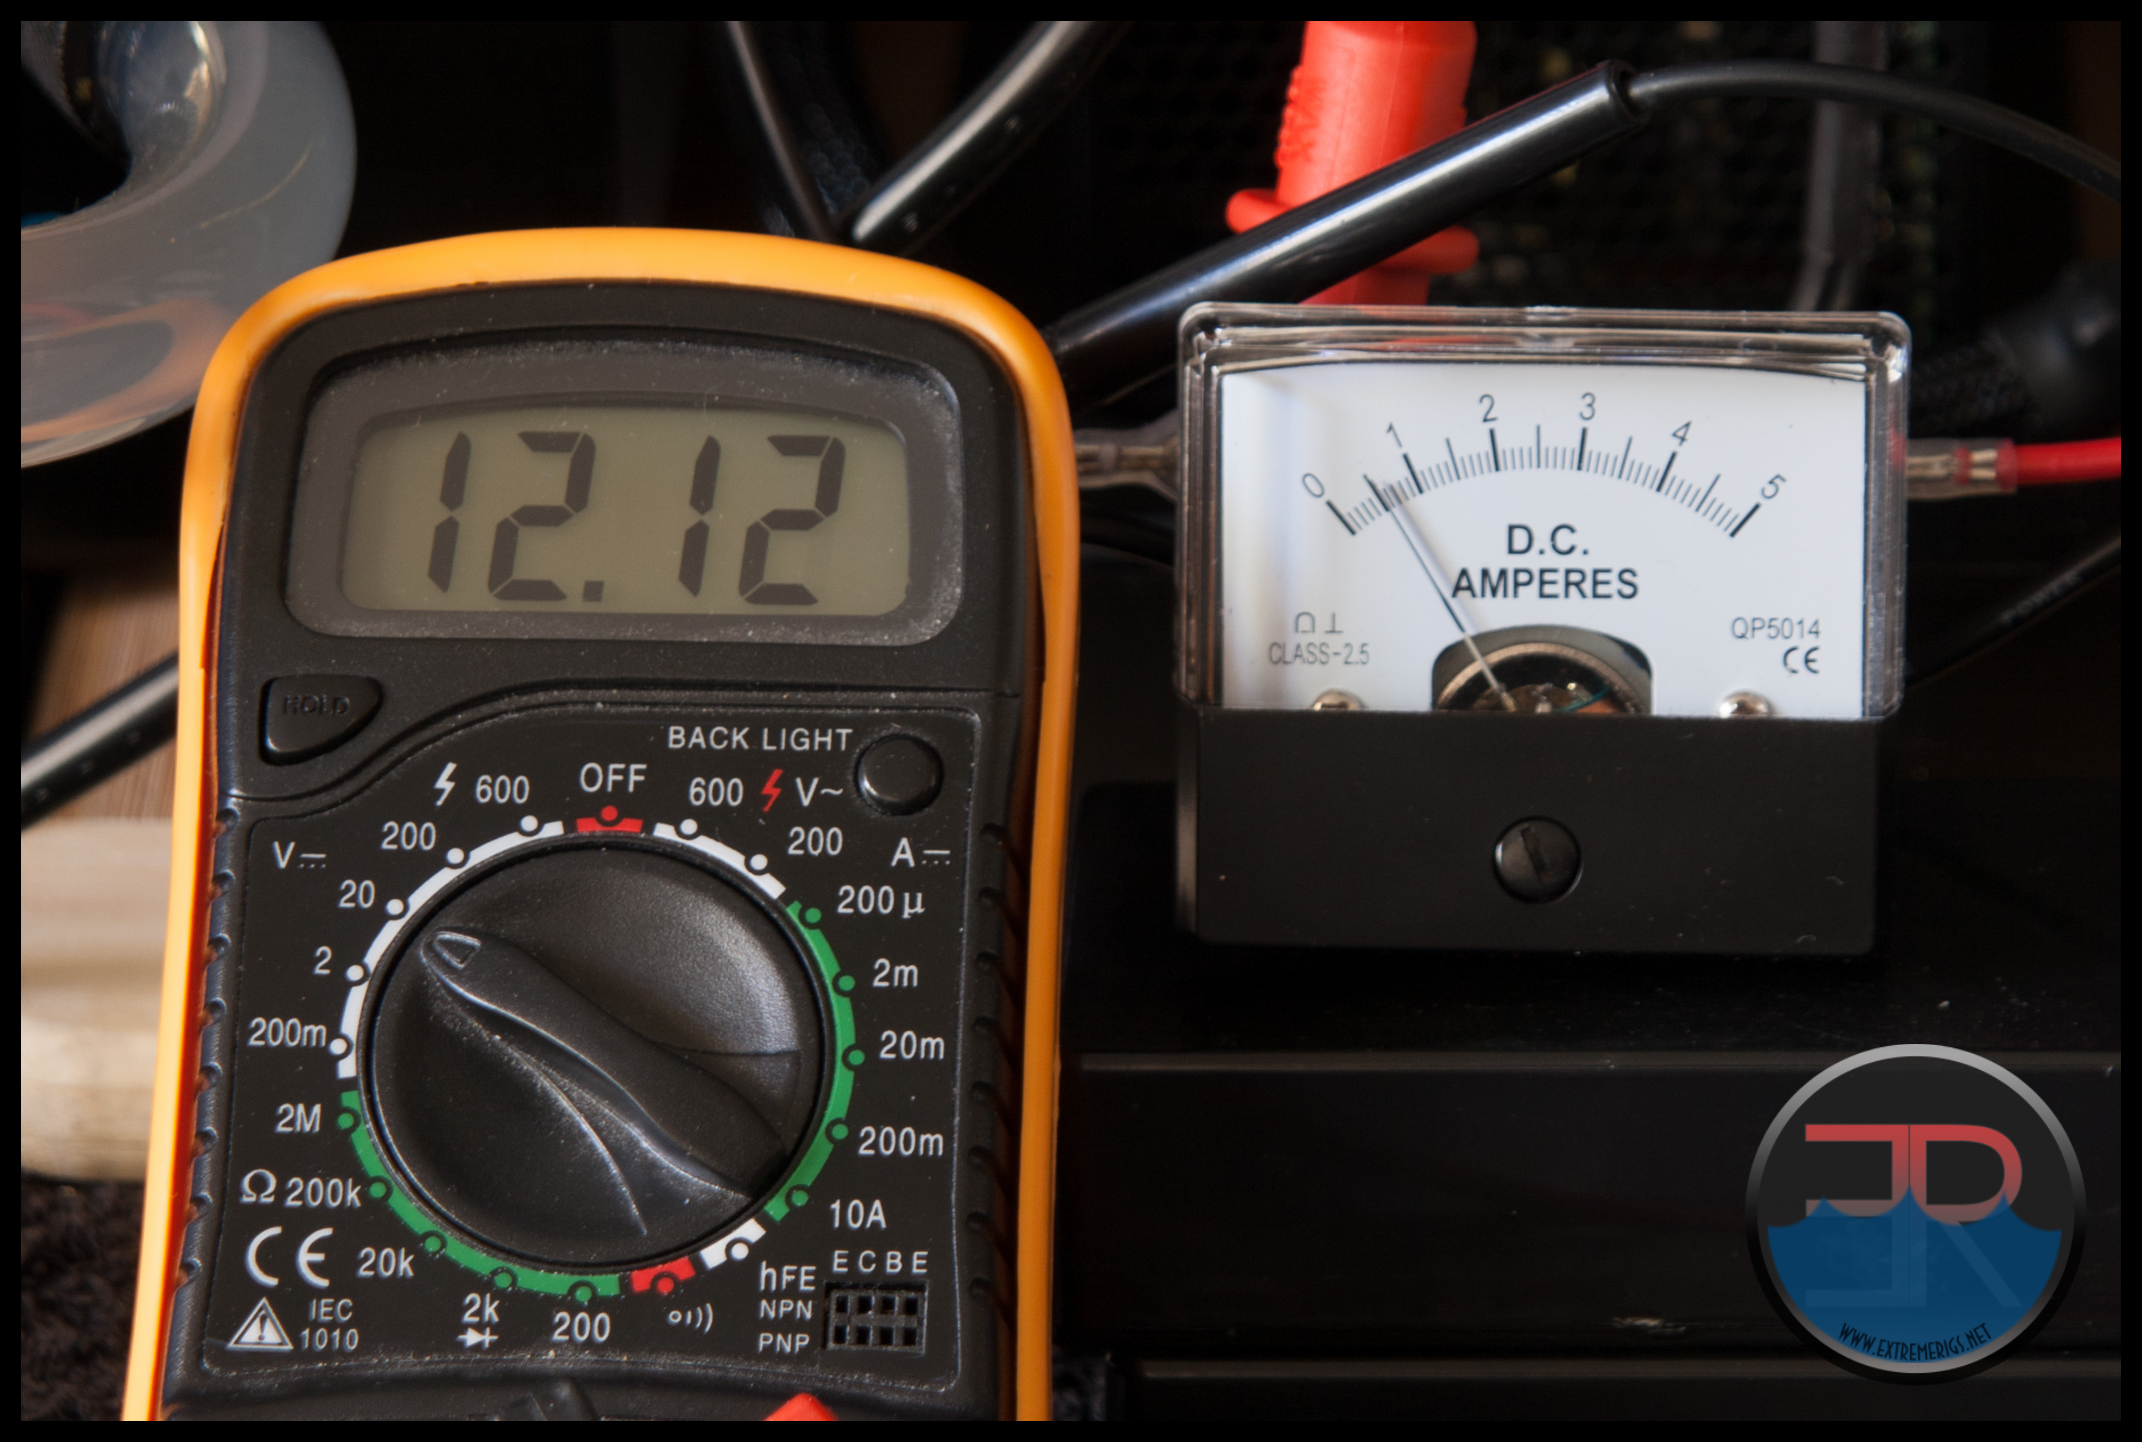
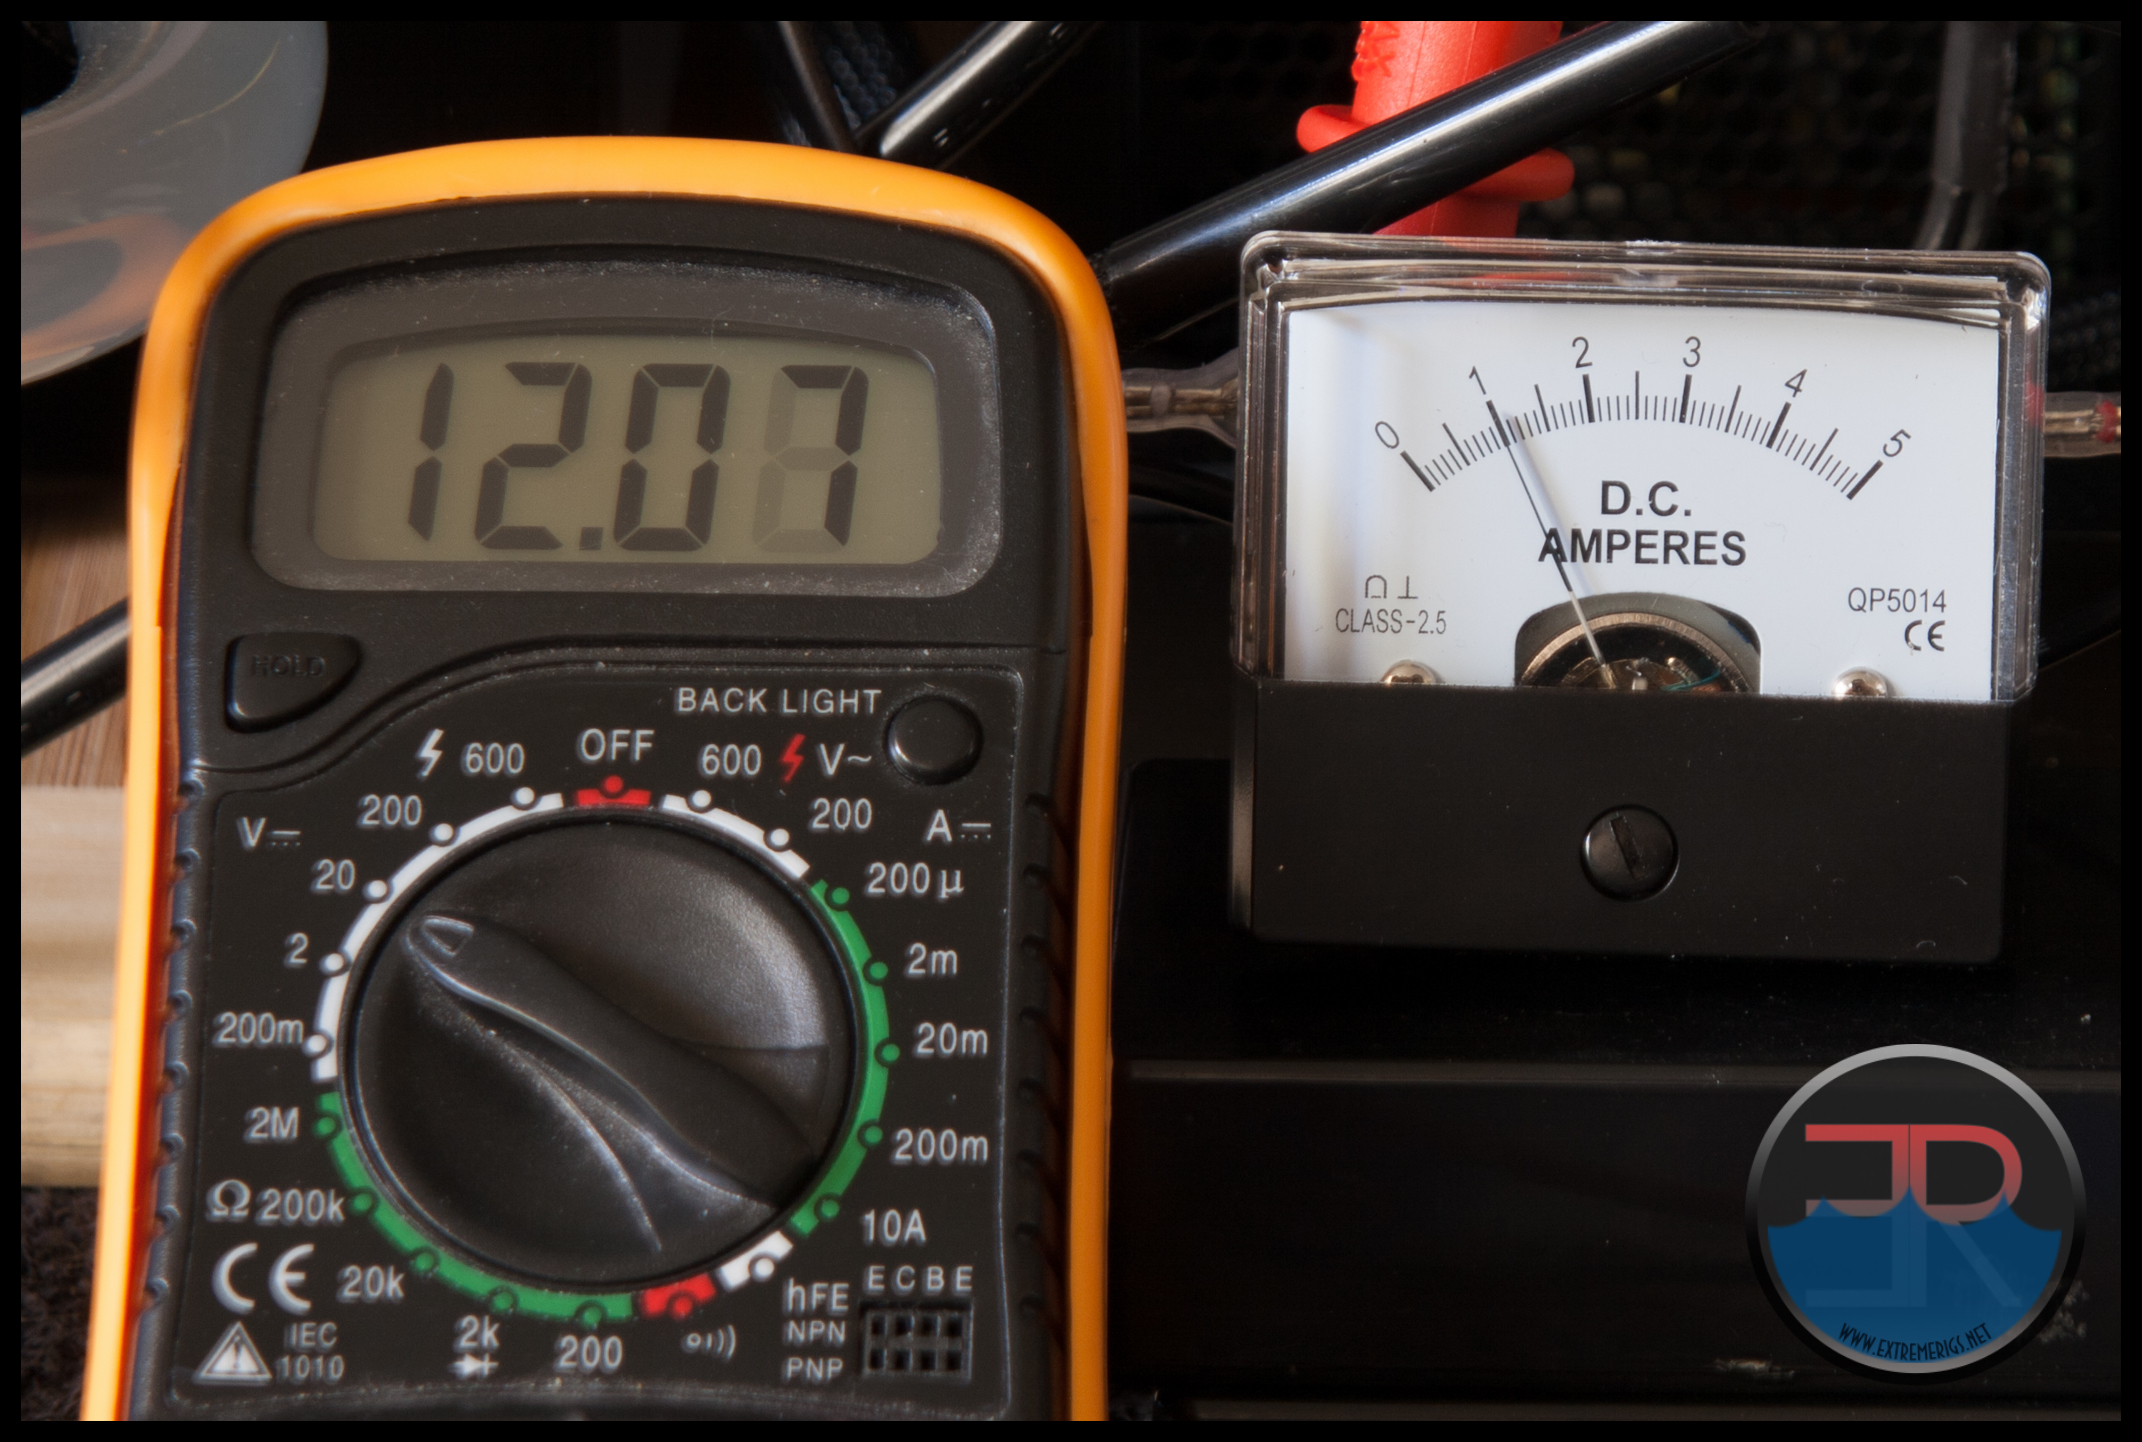
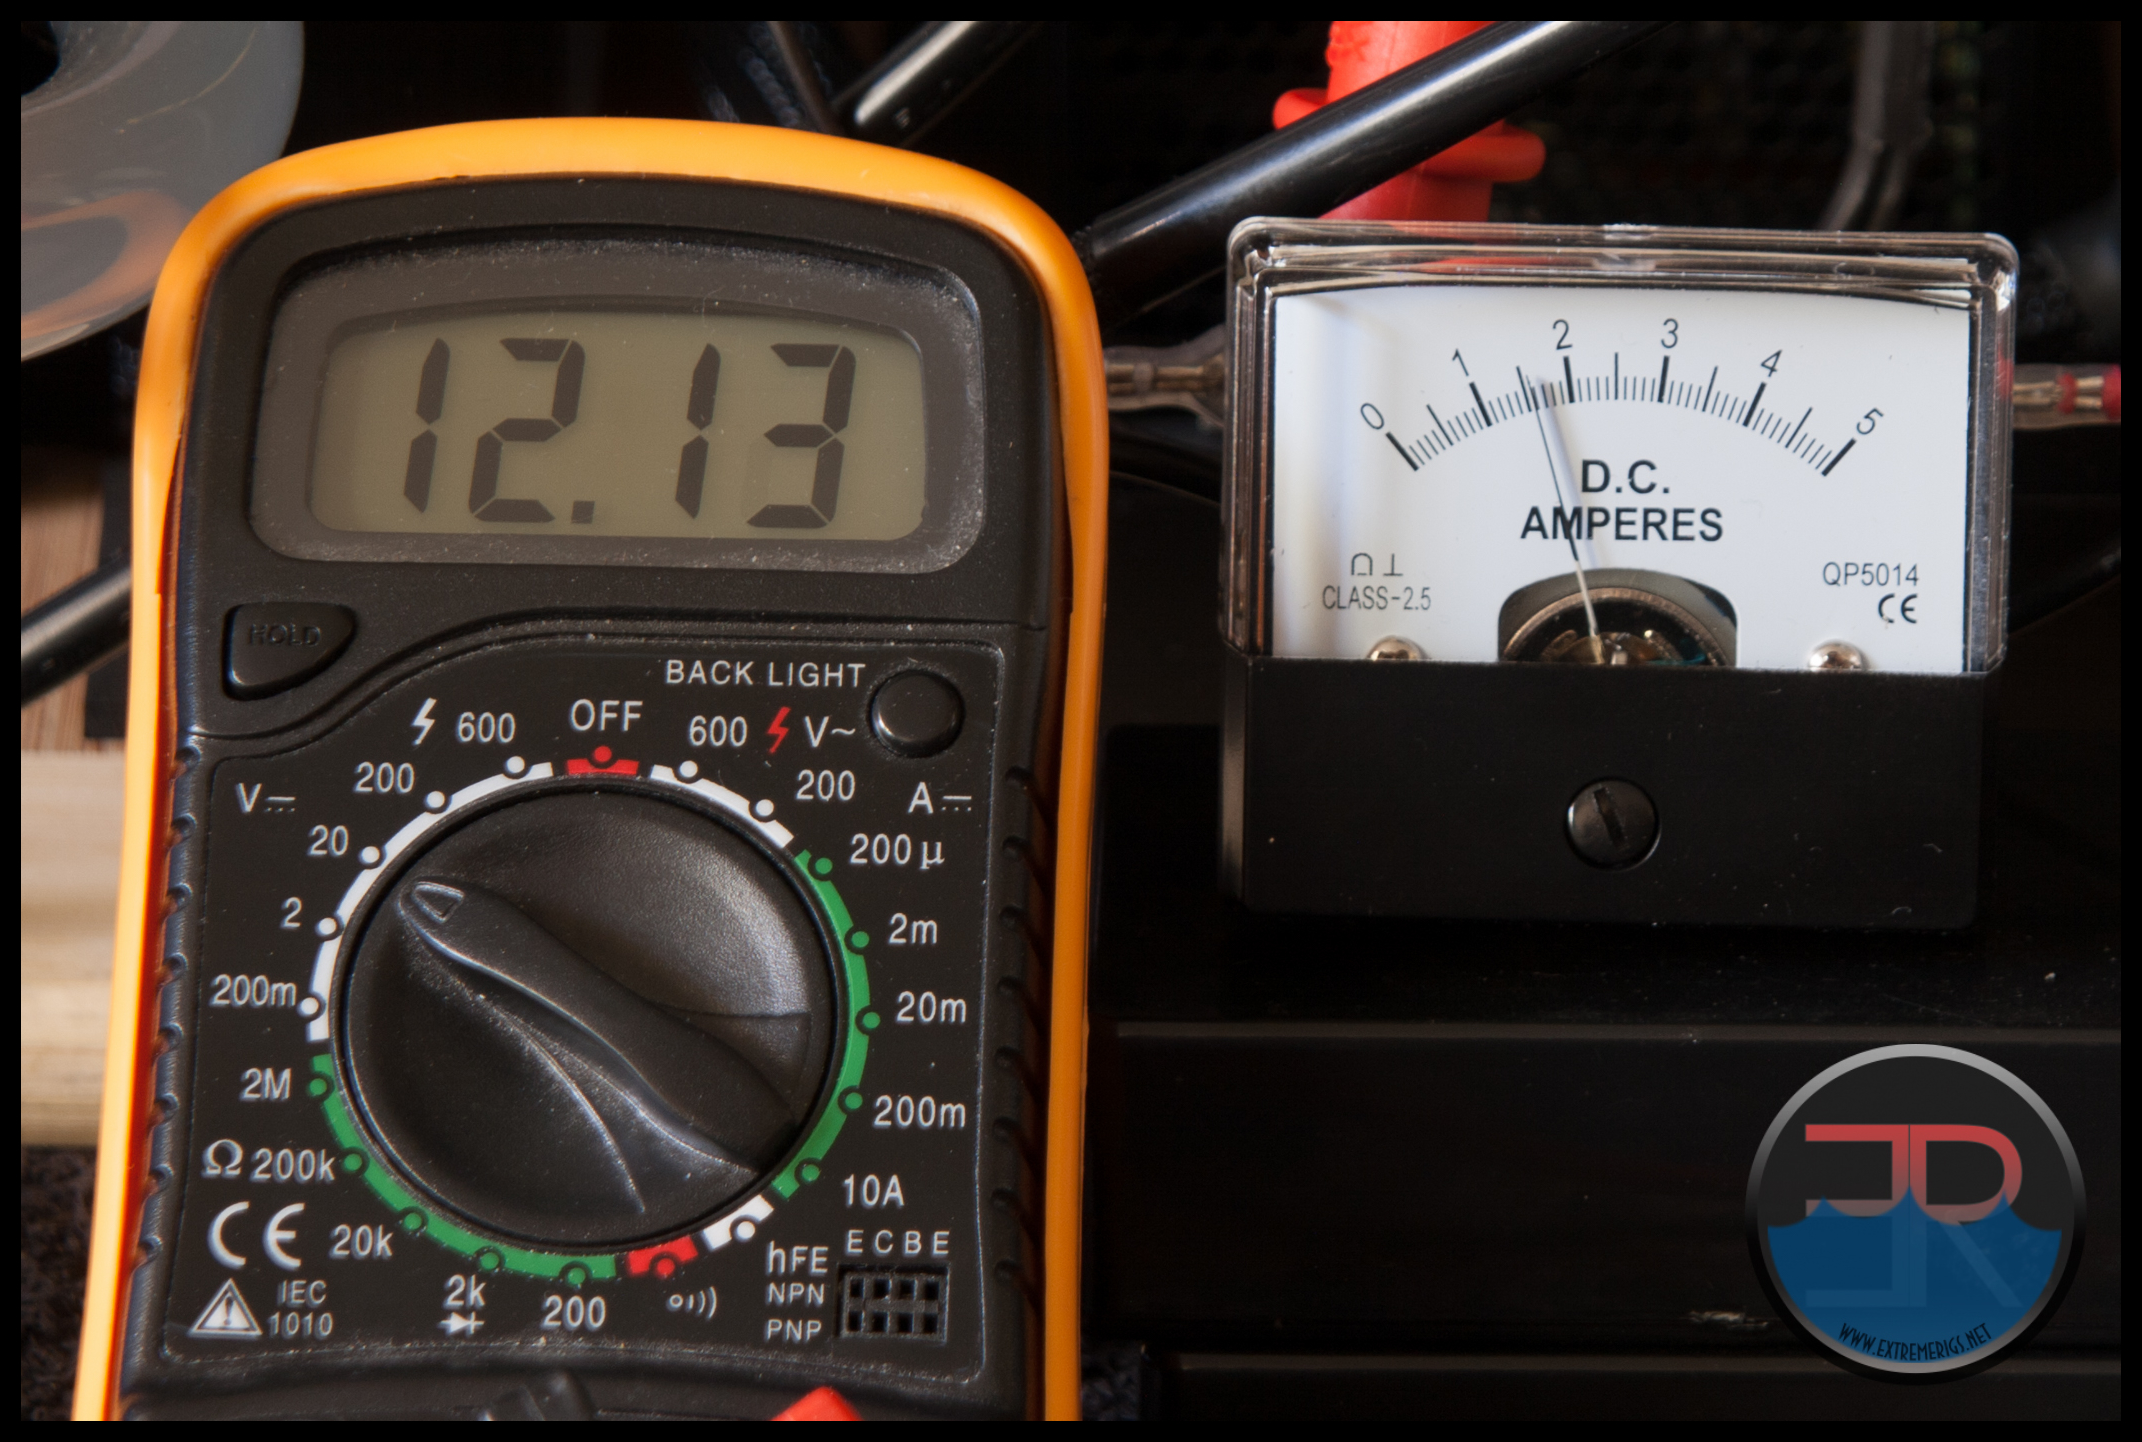
 However with the VPP755, for an unknown reason the Aquaero and the pump did not seem play nicely with the pump being powered from a different PSU. So the Aquaero power pack was put into play with no problems. A digital volts amps panel meter was placed at the pump’s power connector to limit voltage at the connector to 12.1 Volts and take current readings. Control of the supplied voltage was via the Koolance CTR-SPD24X2 Pump Controller. The inline meter was used during the testing and the results displayed on the next page use these readings for the power measurement. After the readings were taken it was suggested that the current measurement might not be reading accurately because PWM controlled pumps and fans are often use current in a duty cycled fashion in line with the PWM signal. Some meters do not measure AC current accurately. So even though our data seemed almost inline with Alphacool’s power rating we hooked up the oscilloscope in an attempt to get more accurate power measurements.
 This led us down a rabbit hole of 2 days of power testing because we simply could not get a PWM waveform from the pump’s power supply to display on the oscilloscope. We needed to be sure that the Aquaero was compatible because Alphacool had told us that the VPP755 had not yet been tested with an Aquaero and we still had some issues such as jumpy rpm readings and most frustrating was that we could only get the pump to operate at 5 different speeds. Also the fact the the pump would not start at anything less than 100% PWM was a major concern.
Out gut feeling was the the VPP755 motor was not actually a PWM driven motor but instead used the PWM signal to regulate the voltage supplied to the motor. Our testing confirmed this and after querying Alphacool about the PWM, they confirmed our tests with this excerpt from their reply “the signal is being used to set the pump to one of 5 settings that are not pulsed but instead voltage controlled“. This also confirms our findings from the Aquaero testing that the motor does indeed only have 5 operating speeds, it is not fully controllable.
So we can confirm our testing was correct and that the VPP755 uses voltage adjustment to control the speed of the motor in one of 2 ways: manual adjustment with the dial on the pump OR via a PWM signal. The VPP755 does not have true PWM motor control, even though it can be controlled via PWM and it does not have a full range of control, only 5 preset voltage adjustments. When the manual adjustment is set below the maximum setting, PWM control can be used to lower the pump speed but PWM does not over-ride the manual setting to go higher.
Part of the testing mentioned above included hooking up the VPP755 to a working system and using a motherboard PWM header to control the pump via PWM. The main reason for doing this was to verify that control via the Aquero was stable and predictable and repeatable because we did notice a few odd things when using the Aquaero for control and rpm monitoring.
A very simple loop was made for the motherboard control testing and the system’s power supply was used for the pump’s power. The motherboard is an older ASRock model with a Z68 chip-set, but as long as the 4 pin fan header being used for control has actual PWM output it’s age or chip-set does not matter. The latest version of Speed Fan was utilized to control the PWM signal to the pump and monitor the resulting RPM.
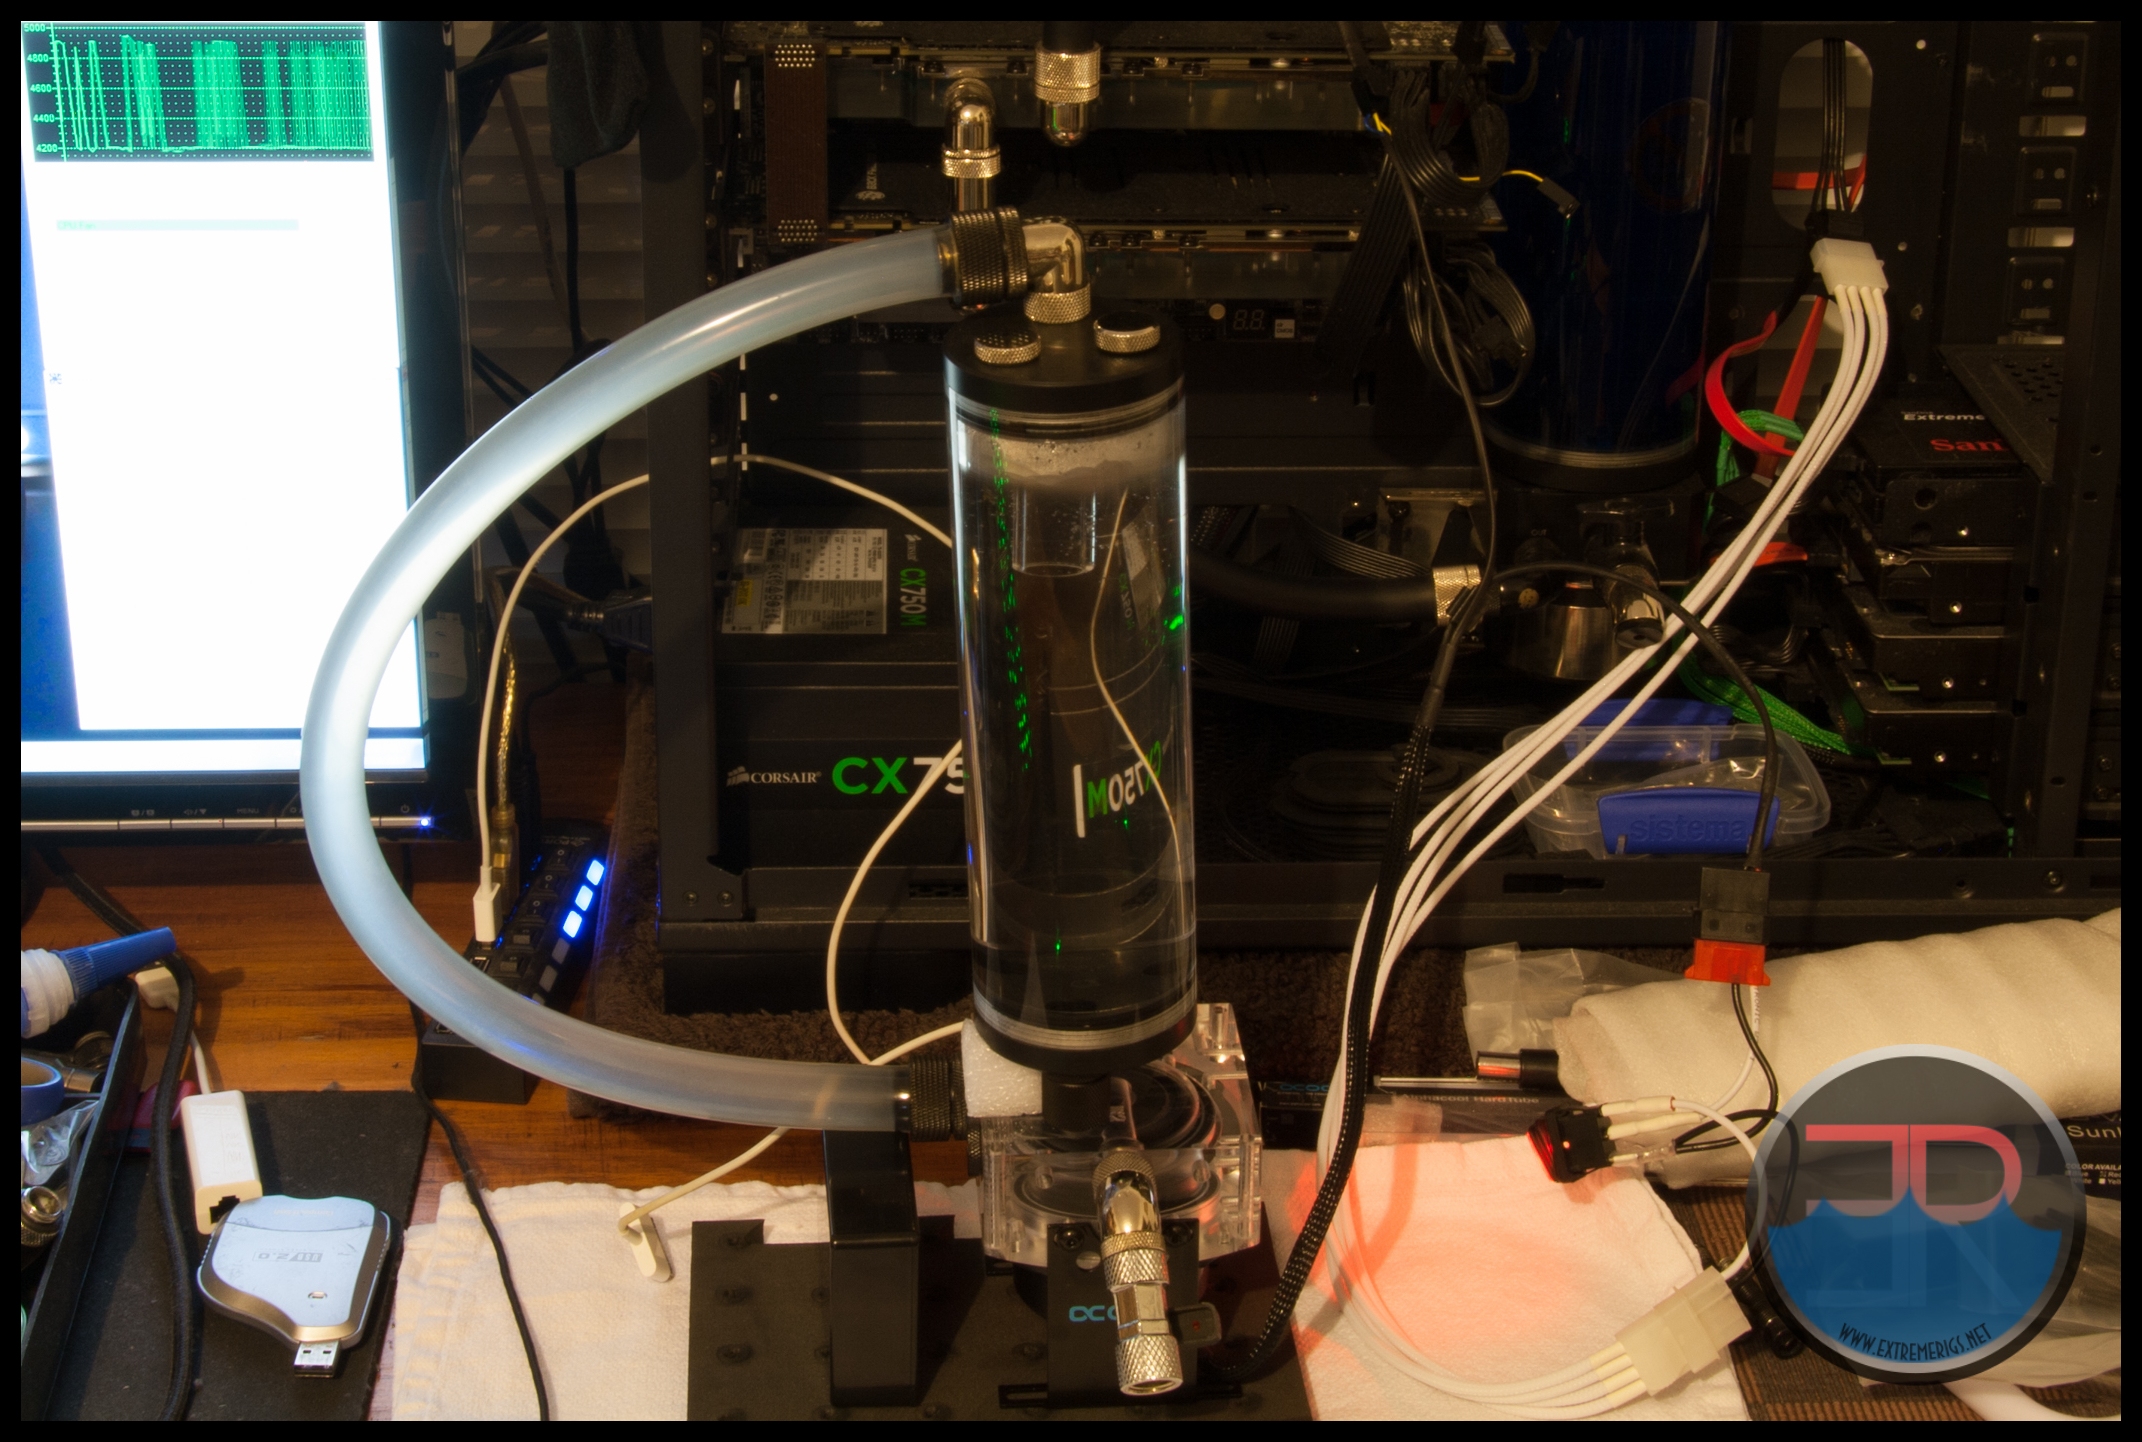 With no control over the pump’s input voltage we were left at the mercy of the Corsair power supply to feed the pump as much power as it could. Obviously it was going to be less than the 12.1 volt we were feeding it at the connector on the test bench, so we expected the maximum rpm to be lower in this test.
We’ve mentioned our concerns about the Aquaero and the VPP755 possibly not playing nicely together so the first thing to verify was if the pump could actually be successfully controlled with a PWM header and we had no issues doing this with Speed Fan.
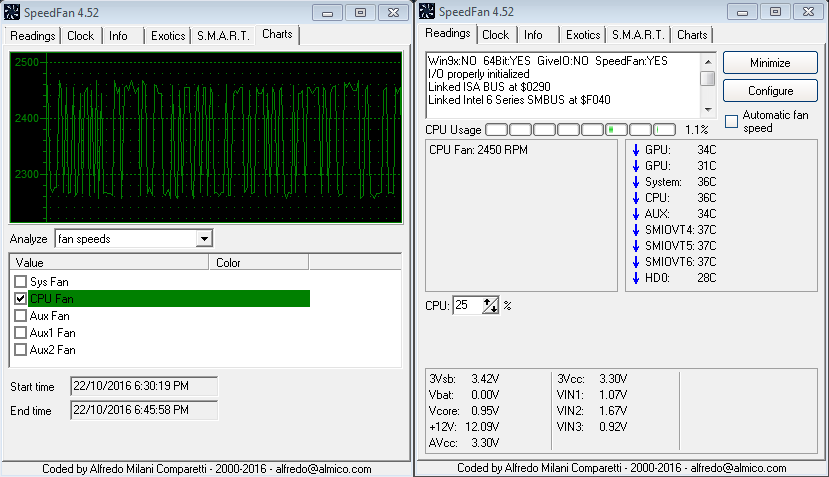
Next was to find out if there was more than the 5 Stages of output that we were getting when the VPP755 was Aquaero controlled. To do this we adjusted the PWM signal via Speed Fan until a change in pump speed triggered an RPM reading change. This test confirmed what was found when the VPP755 was Aquaero controlled, the VPP755 has just 5 speed settings and does not have a full range of control. This test also solved another concern, jumping RPM on the Aquaero.
Let’s look at some of the Speed Fan plots to help better explain what we mean by “jumping rpm” and show why the Aquaero was not displaying a stable RPM. Each PWM setting was left to run for at least 5 minutes and a repeating RPM pattern appeared every time. The difference between the Aquaero is that it updates the rpm input numerous times per second and therefore never gives a stable reading while speed fan updates about every 5 seconds so the difference in rpm is easily noticed depending at what stage of the cycle the reading was taken.
Firstly PWM set at 0% on Speed Fan which resulted in an RPM reading between ~1632 – 1739 RPM.
 From 0% to 24% the readings and plots were the same and we called this Stage 1
At 25% Stage 2 kicked in and has RPM speeds between ~2257 and 2463
 Stage 3 started at at 45% PWM and the resulting RPM ranged from ~2935 – 3276.
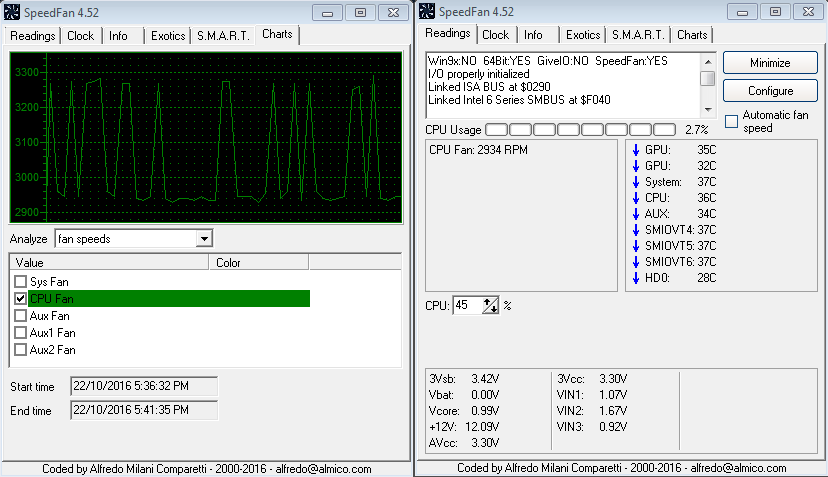 Stage 4 started at 65% with RPM between ~3658 and 4205
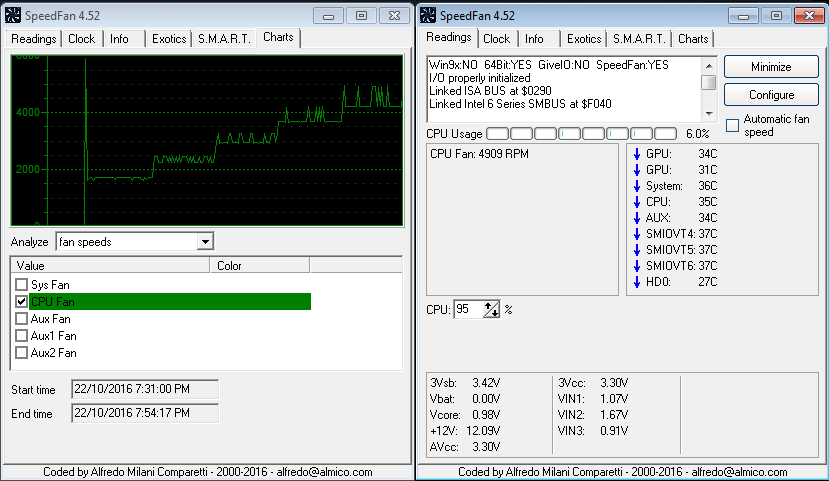
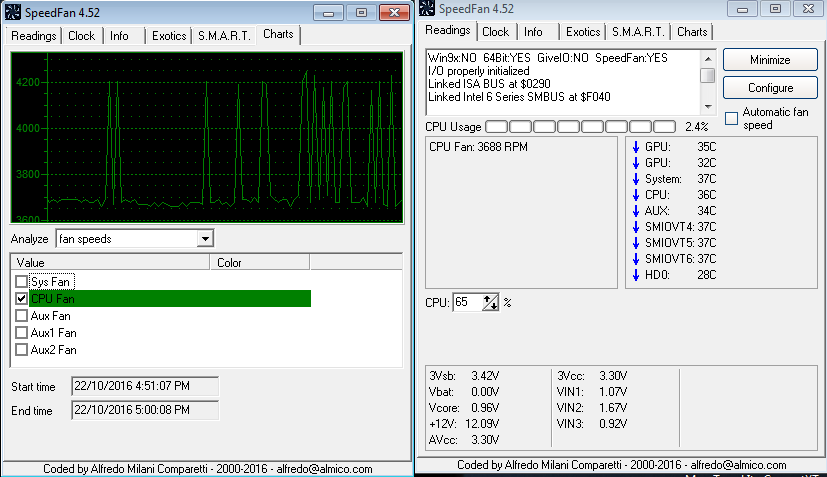 Stage 5 Starts at 85% (although the plot below is actually the 100% graph) with rpm readings between ~ 4179 and 4909. At Stage 5 it is worth noting the maximum RPM is well above the VPP755’s rating of 4500 RPM, so there is definitely a discrepancy over the rpm, either Speed Fan is interpreting the signal incorrectly or the pump rating is wrong, we suspect that 4500RPM is simply the average speed over time. Either way Speed Fan clearly shows the jumpy rpm of the VPP755 it’s not just something that is Aquaero related.
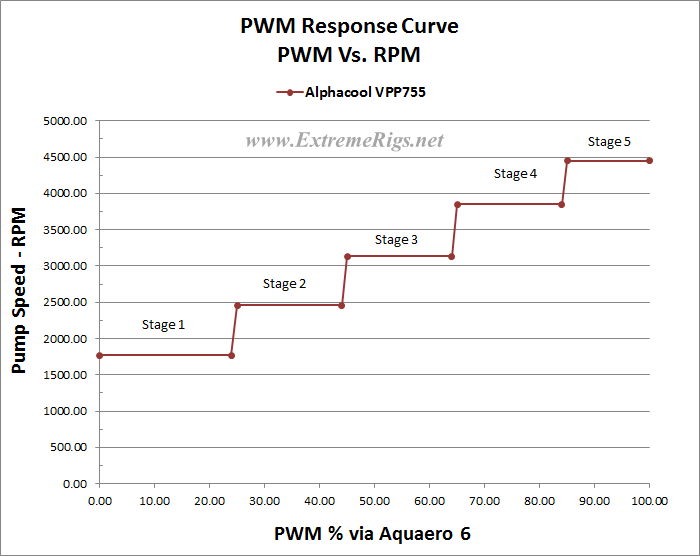
 By doing the above tests the actual PWM range for each “Stage” of the VPP755 was able to be determined:
Stage 1: 0% – 24%
Stage 2: 25% – 44%
Stage 3: 45% – 64%
Stage 4: 65%- 84%
Stage 5: 85% – 100%
Changing between stages on the Aquaero was not always cleanly achievable as sometimes the resulting rpm/flow rate/pressure would bobble up and down between 2 stages, although this was not repeatable and seemed a random occurrence. There was no bobbling with Speed Fan control and the stage changes were clear cut every time.
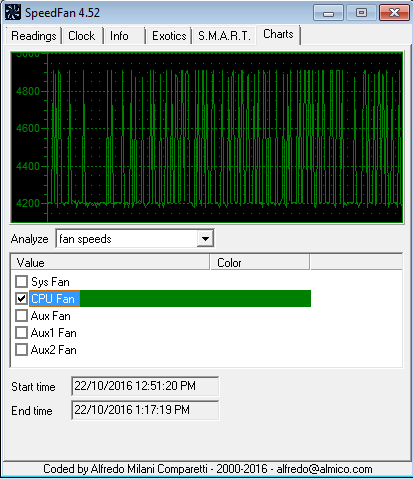
After the individual PWM/RPM readings were taken to find the trigger points for stage changes I did a run through from pump off, up through the stages using the PWM settings 15, 35, 55, 75 and 95 which are central to each stage’s trigger point.
 The five stages are clearly shown, as is the jumpy rpm which appears to gain greater high and low points as the pump speed increases.
Of special interest in the above plot is the point where the pump was turned on. Notice the high rpm spike where the pump got full power to start up with despite being set on 15% PWM via Speed Fan. This proved that the pump would start on lower PWM settings which was not the case when controlled with the Aquaero.
While hooked up to the PC I also checked control with the ASRock Bios. I suspected the pump would start up at full speed until the BIOS kicked in and adjusted the speed according to the BIOS setting that was last saved. This turned out to be exactly what happened.
Checking each of the 9 fan speed settings that the ASRock BIOS offered I was somewhat surprised that I was unable to engage each of the 5 stages of the pump. This appeared to be a BIOS issue and the VPP755 does not seem to be at fault.
BIOS Speed Levels 1, 2, 3 & 4: Pump runs at Stage 3.
BIOS Speed Levels 5,6 & 7: Pump runs at Stage 4.
BIOS Speed Levels 8 & 9: Pump runs at Stage 5.
We can not confirm that the an Aquaero controlled VPP755 will start at less than 100% PWM, however given the start-up spike to full rpm witnessed with the Speed Fan graph, and that the pump ran at full speed until motherboard BIOS kicked in, it is a reasonable conclusion to make that the VPP755 will run at full speed when the system is turned on until the Aquaero boots and takes control, lowering the PWM to whatever it was set at previously.
Manual Control
After all that PWM testing we finally got to the manual adjuster dial on the bottom of the VPP755. Had we done this first we probably would have been just as confused as we were when PWM control was first tried.
The adjuster dial controls the motor speed so the resulting output is the same 5 stages as we found with the PWM control. Full adjustment is not possible, only the 5 stages with 4 trigger points that vary the pump speed as the dial is turned up or down.
A scale of 1 – 5 is provided as a guide for setting the pump speed with 1 as the lowest and 5 as the highest. A flat blade screwdriver (or similar) is needed to turn the dial to the required setting. Turn the dial so the part of the slot left in tact is facing the number on the scale you want to set. The dial movement feels good with just the right amount of resistance so it feels like you are turning something to make an adjustment.
Stage 1 is selected by having the dial set between 1 and ~1.9 on the manual control dial.
 Stage 2 is triggered at ~1.9 on the dial and runs through to about 2.7
 The Stage 3 trigger is at ~2.7 and runs to ~3.3 on the dial indicator.
 The Stage 4 trigger is at ~3.3 and runs to ~4.1
 Stage 5 is triggered at ~4.1 on the dial and runs through to 5 which is the speed scale maximum.
 You can control the pump speed via PWM with the manual dial in any position, but you can only control the pump stage between the minimum and the current manual stage setting.
For example if you have the manual dial set on ~4, Stage 4 pump speed would be active, now you can PWM control the pump speed up and down anywhere form stage 1 to stage 4, but stage 5 could never be activated because the manual dial has the over-riding limitation to speed control.
This final plot has been derived from the sound testing data and displays the “approximate” RPM for PWM setting. i.e the PWM response curve.
We certainly ended up testing more than we expected to for controlling the VPP755. After everything we did, we feel confident in saying that the VPP755 is a voltage controlled pump that has both manual control and electronic control via PWM. We were expecting the VPP755 to be a true PWM pump but that is not the case. More disappointing to us was that the implemented control system limits the pump to 5 stages of pump speed. The idea of dual control was exciting but the implementation on the VPP755 leaves us feeling it could have been done better. Maybe this will improve in a future revision.
Something of interest which I discovered after all the testing was complete and this review was submitted for publishing, was that there is a way to get almost full control of the pump speed. It does however rely on being able to vary the voltage being supplied to the pump, and does not depend on the pumps own control system. I only tried this with the pump set on Stage 5, but I assume it would also work when set on lower stages.
Starting with 12.1 Volts on Stage 5, I slowly started to lower the voltage to the pump and low and behold the pump speed decreased as I did so. I have no idea why I didn’t previously try this, but I was pleasantly surprised that I did. Better late then never as the saying goes. The bench was not properly set up to fully investigate this last minute finding as I was only “wet testing” a couple of pump tops from other manufacturers. I suspect with a Koolance pump controller or Aqua Computer Power Adjust Ultra (possibly even a fan controller that has sufficient current capacity) you would be able to dial in just about any pump speed you wanted when used in combination with the 5 stages of internal control. I had given up on the idea of using the VPP755 on one of the Extreme Rigs test benches, but it now seems likely the VPP755 will be put into service. I’ll endevour to update the review with a more complete report on this, along with some readings from different Stages, Volts and the resulting pump speeds.
And after having said all that, we question how important is the control system anyway when a pump is a “set and forget” component. Still the testing had to be done.
Let’s see how the VPP755 pump performs.
![]()
Performance Testing – Output
A good evaluation of a pump’s performance at the enthusiast level involves combining the results from two different tests: pump output and pump noise. With these two sets of data one can see how much noise can be expected to achieve a certain flow rate or pressure. Additionally the combined data set can be compared to other pumps with have been tested in the same manner, preferably with the same test equipment on the same test benches. The problem we had here was that the VPP755 could not be set to match existing data sets of flow rate or pressure due to the control limitations it has with the 5 Stages of pump output. We’ll get to how the data matching was overcome when we get to sound testing.
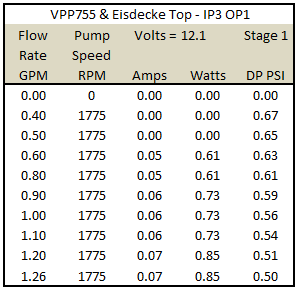
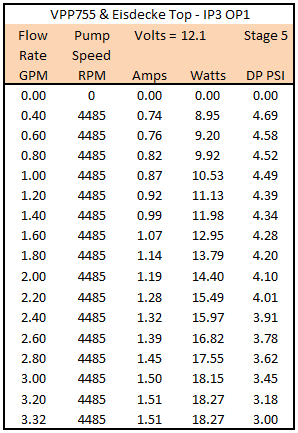
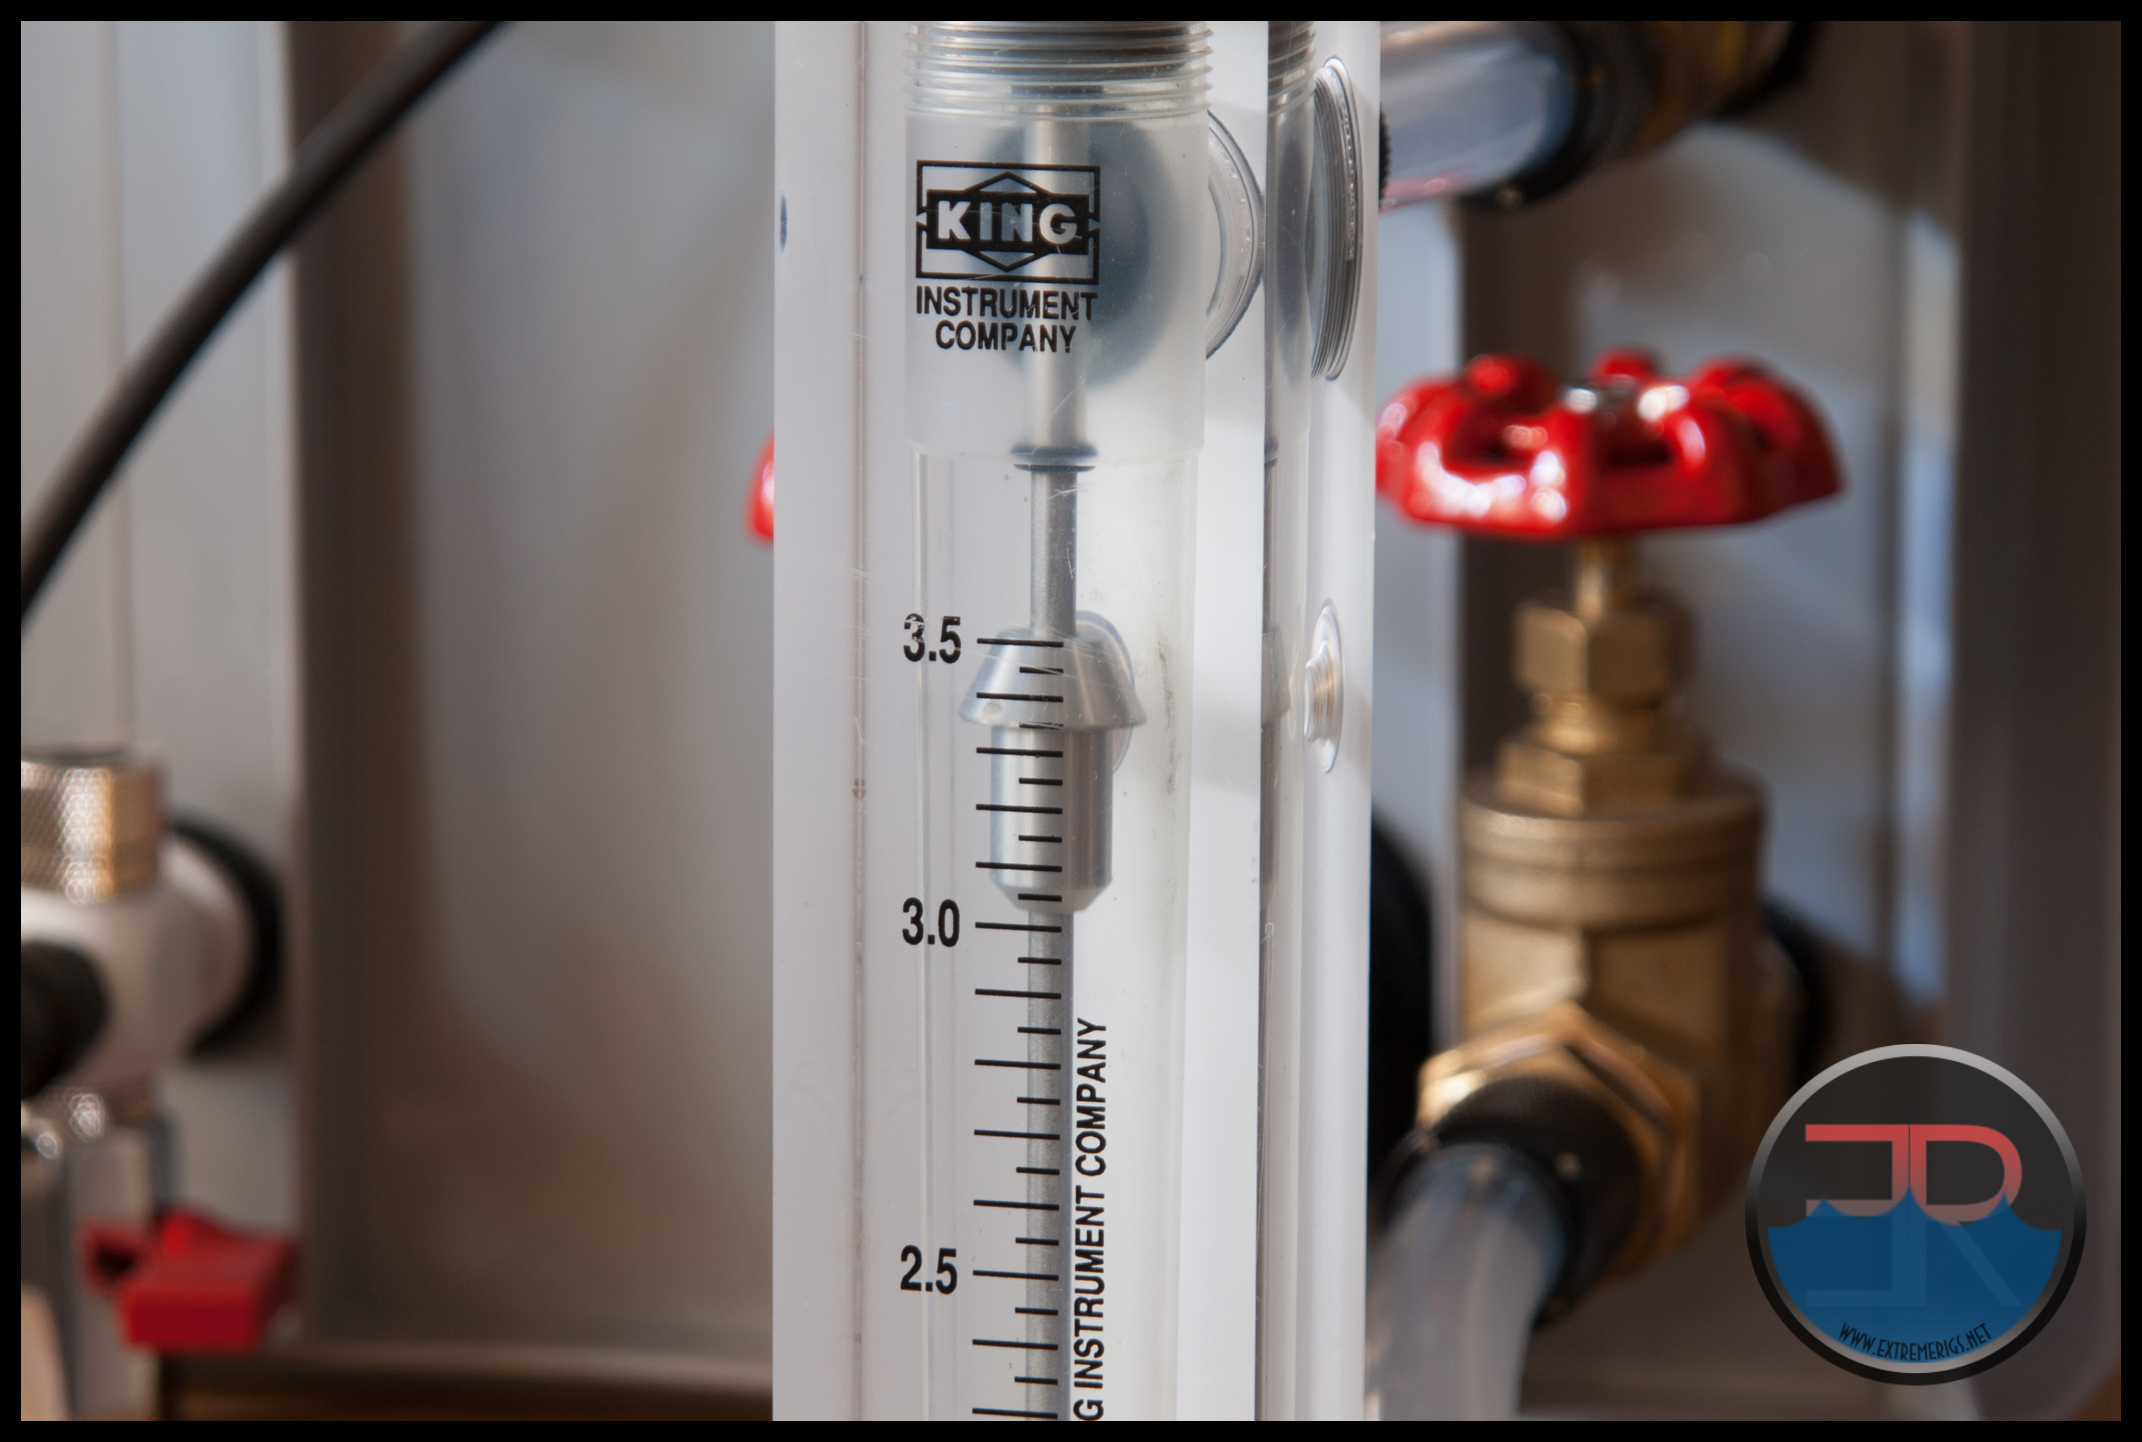
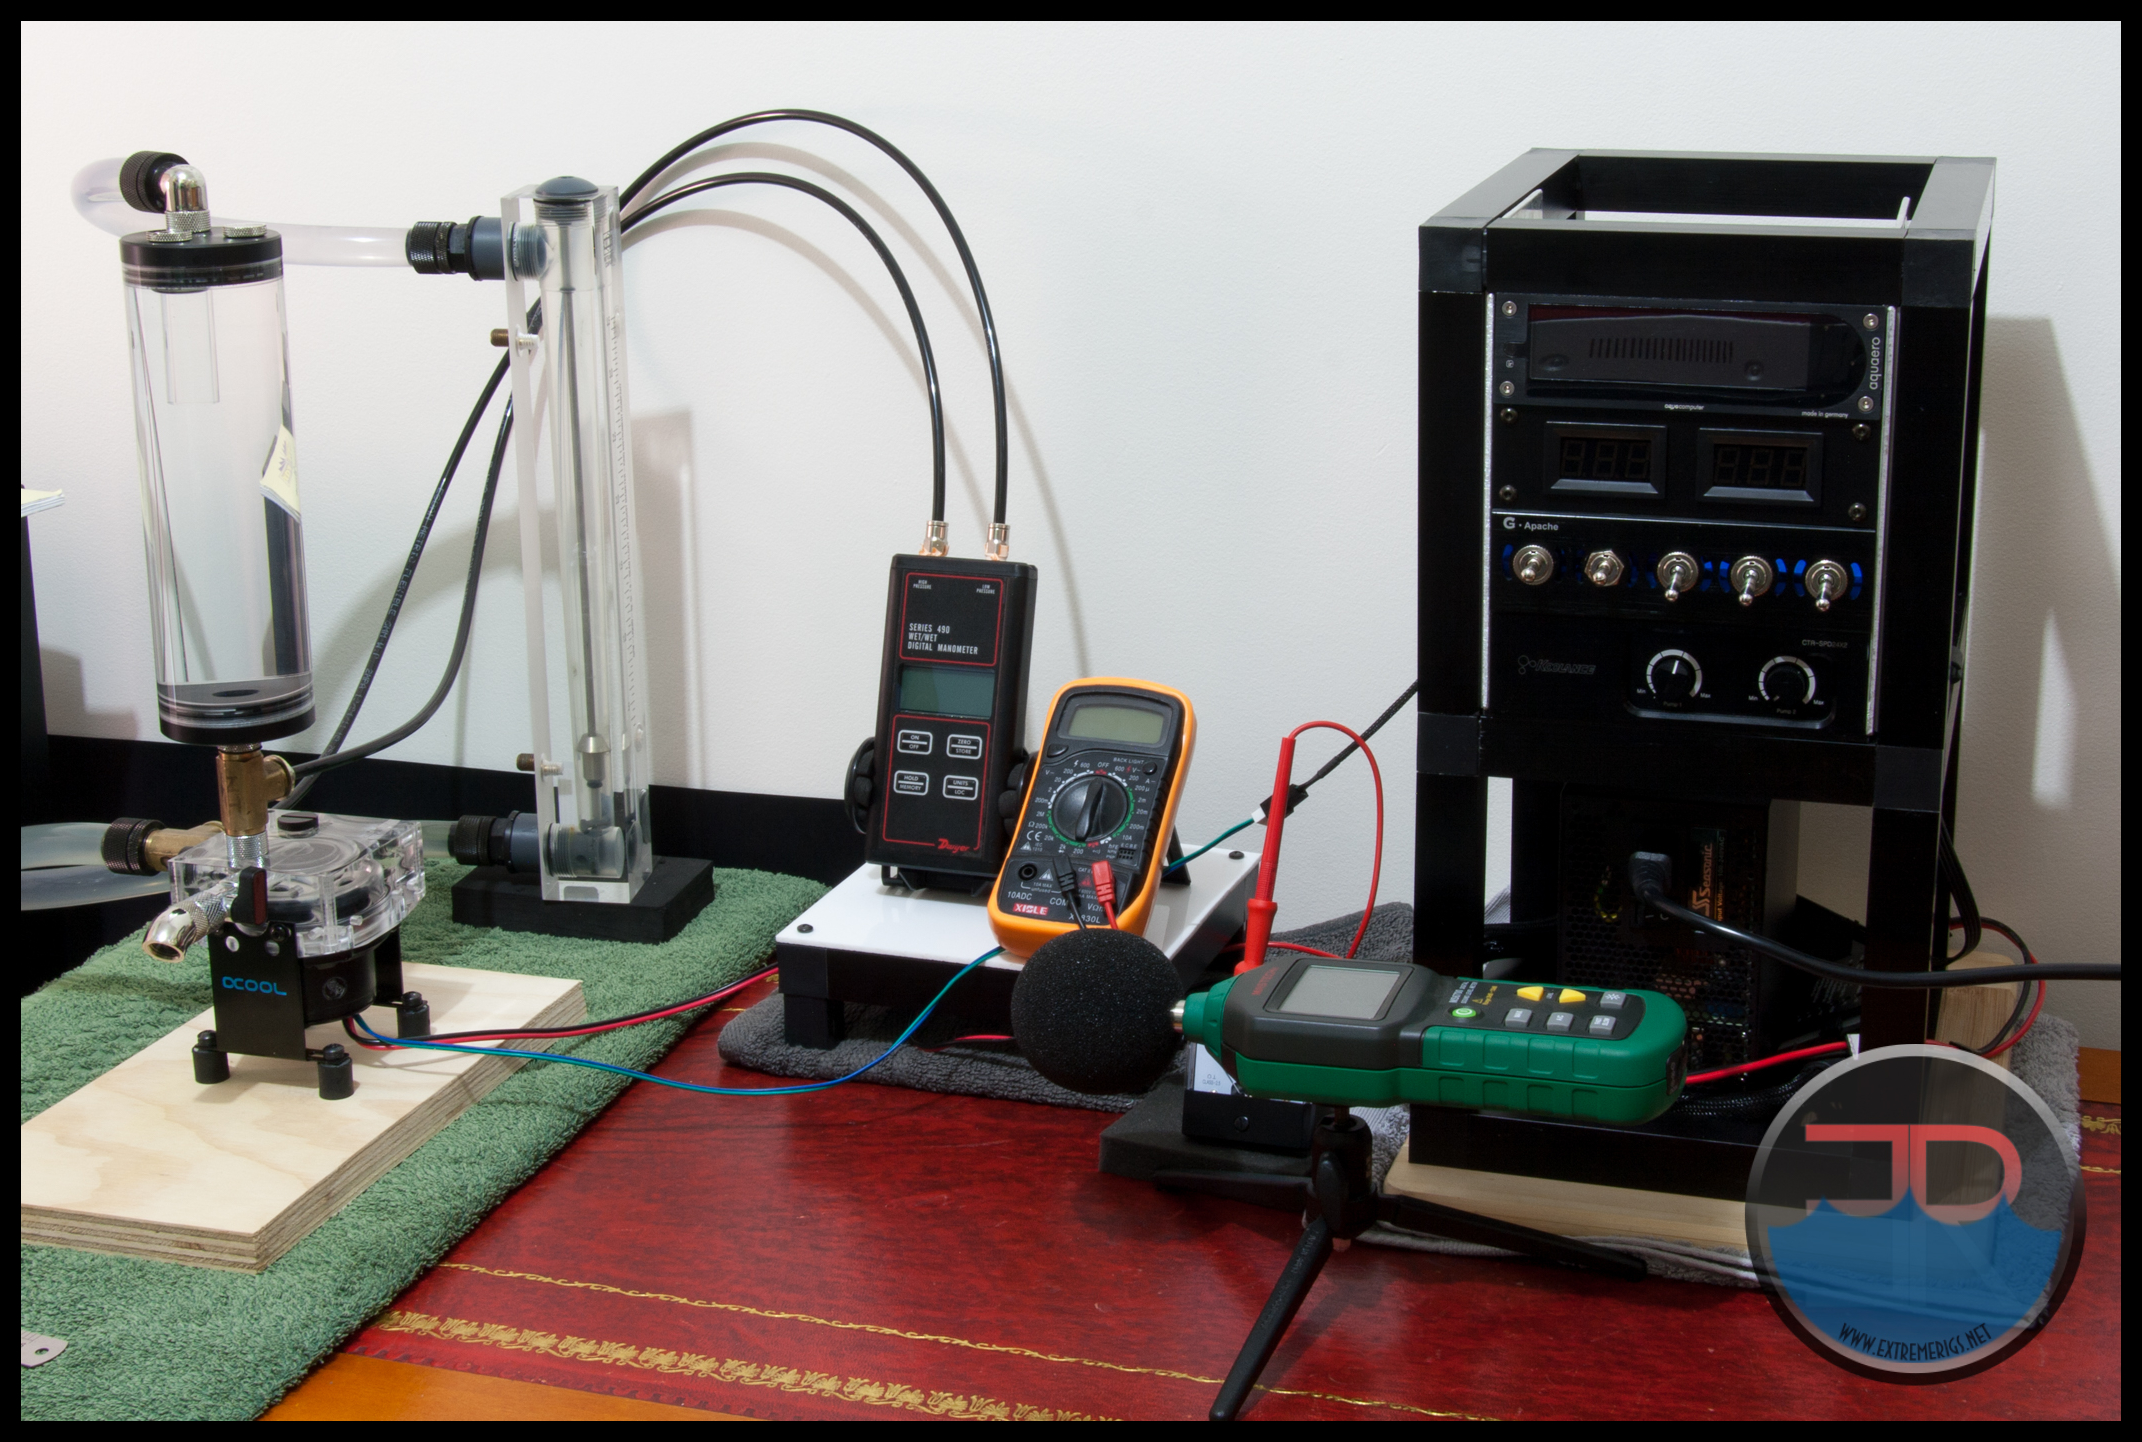
For the Pump Output Performance my usual restriction bench was used with the addition of the inline volt/amp meter to compensate for the voltage variations caused by the VPP755 voltage regulation. At each stage the power at the pump connector was set to ~12.1V. Essentially this test measures the flow rate and pressure output of the pump. To test the pump we use a flow meter and a differential manometer and vary restriction by adjusting a brass gate valve. We adjust the gate valve to give different flow points and measure the pressure “gain” across the pump using the differential manometer. To better understand how to read these plots check out this guide.
 The data recorded was taken with the digital volt/amp meter as pictured above. Later an inline Current Meter and DMM were used to verify the initial readings. A small variance in amps was noticed, but we felt it was not enough for a complete re-test to be warranted.
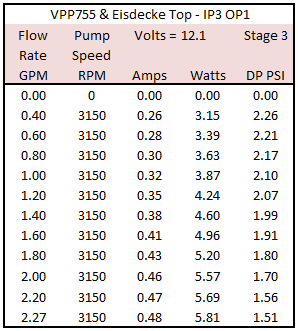
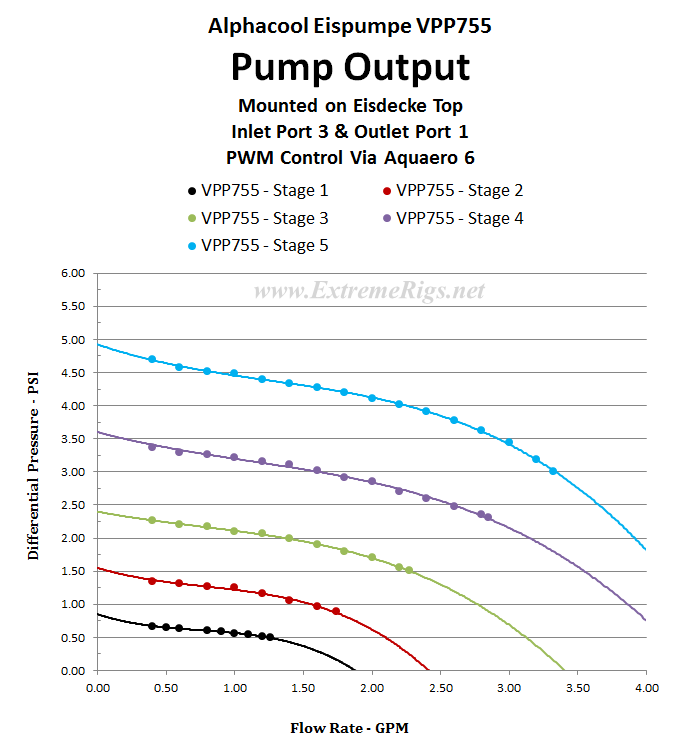
The VPP755 was mounted to the an Eisdecke D5 top and the best performing port combination (Inlet 3 & Outlet 1) was used to conduct all the flow vs. pressure tests.
Stage 1:
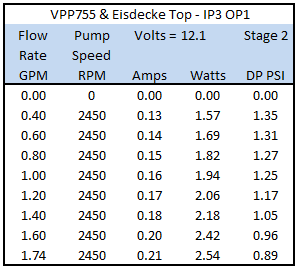
Stage 2:
Stage 3:
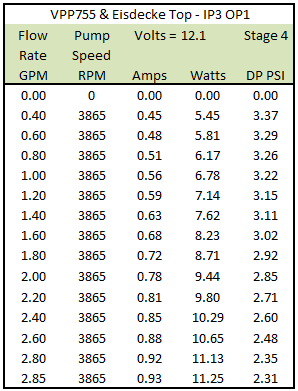
Stage 4:
Stage 5:
While we were at at we cranked the voltage up to the VPP755 max rating of 13 Volt to see what the output would be.
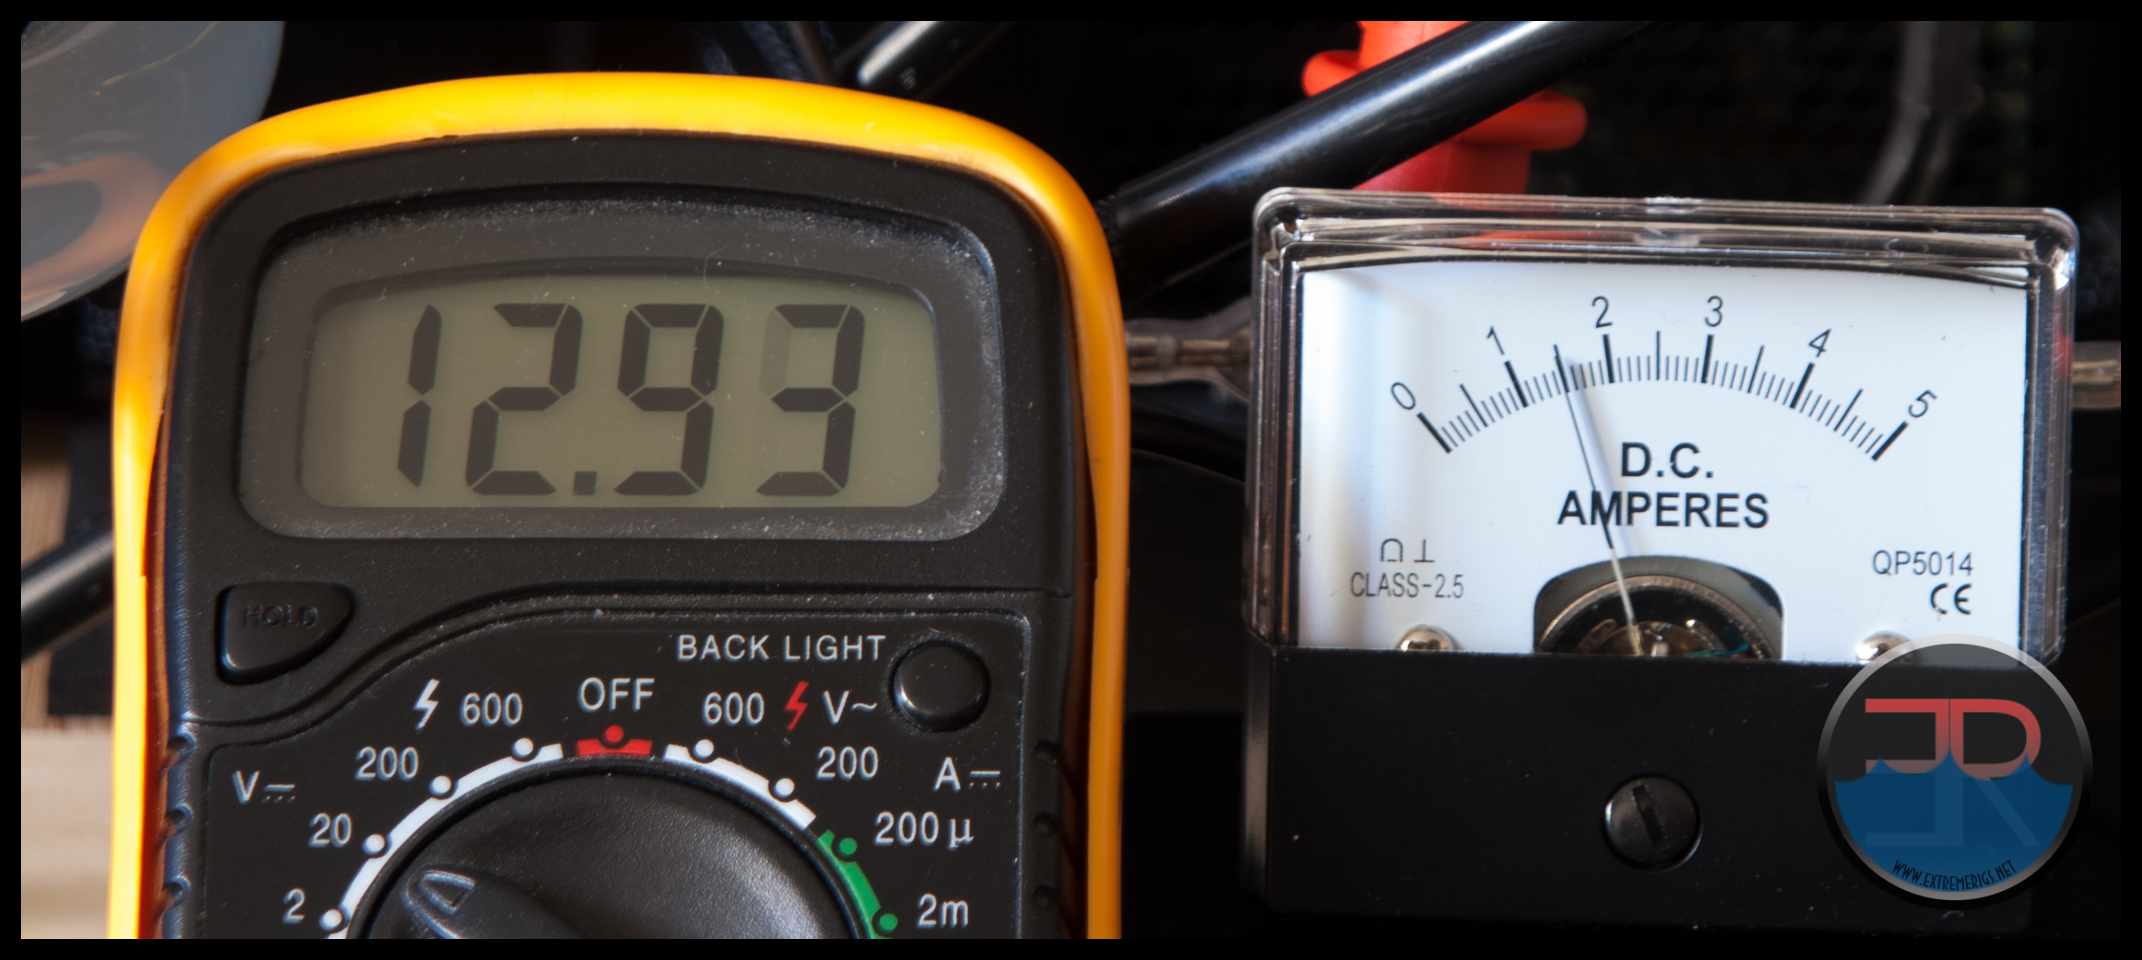 The readings for both GPM and pressure at 13V were pretty much equal to what was achieved at 12.1 Volt.
Before moving on let’s put the results for each stage onto a plot so we can see a visual interpretation of the data.
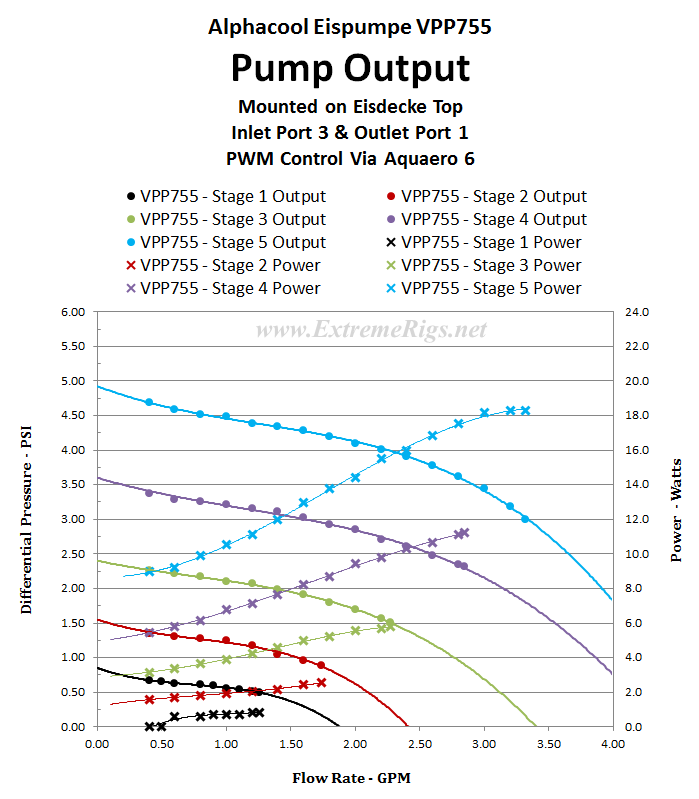
 Now let’s overlay the above plot with the power usage. With 2 different scales (vertical axis) the output and power results have no correlation to each other, but it can be handy to see the power usage at different output levels.
 Lets take a look at how the VPP755 stages compare to our usual output comparison on the D5 USB. This version of the D5 pump is an electronically controlled Vario (similar to the VPP755) which is able to have the power adjusted via Aqua Computer’s Aquasuite software.
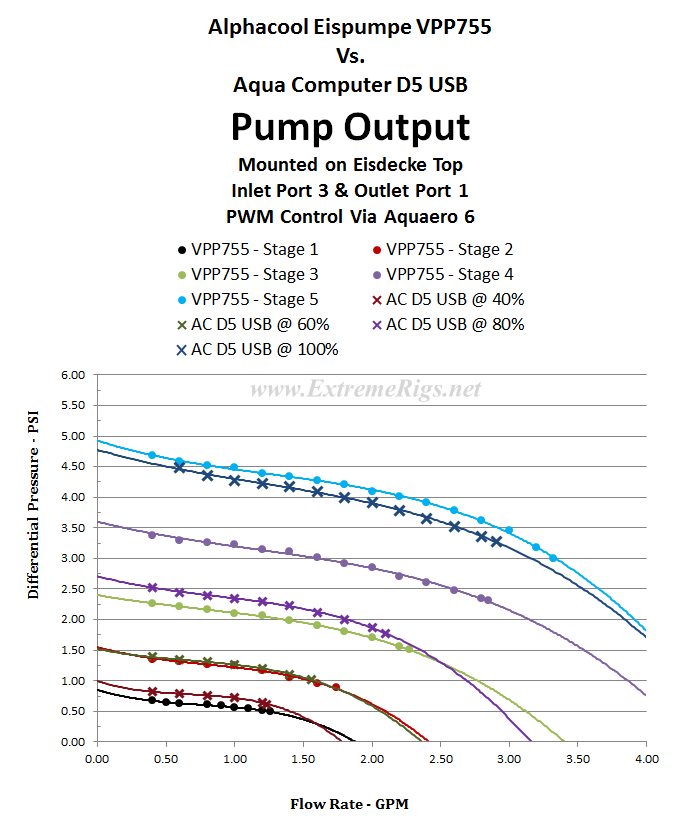
While the maximum output for each pump is the only true comparison in the above plot, it is interesting to look at the other levels.
But of course what is most interesting is that maximum comparison, where on Stage 5 the VPP755 has the performance edge over the D5 running flat out.
Round 1 goes to the newcomer, and we have to admit to being both a little surprised and quite impressed the the VPP755 has better output than the D5 and while the plots above don’t show it, the VPP755 is much more energy efficient. But how loud is it ? What’s the catch?
Next Up, Noise Levels and Power
![]()
Noise & Power Comparisons
Sound metering is not a difficult test to do. What is often difficult is to have a location where the background noise is as close to silence as possible to avoid interference with the readings you are taking. My normal bench locations (kitchen and laundry) are just not suitable, so a mini bench was set up in an isolated room and the testing done in the middle of the night to eliminate external noise interference.
 The sound meter detects a dog barking 2 blocks away so it is pretty sensitive. The noise floor achieved in the test area was a tad under 33 decibels which is pretty darn silent, and just breathing normally is detectable on the meter, so holding of breath was required for each data point recorded.
Now….in a possible oversight in the testing procedure, the data recorded was taken on a loop running virtually unrestricted. It was pointed out to me after testing was complete that the pump noise will change when under load and therefore my data may not be a true representation of the pump in “normal operation”. The next time I am testing a pump I will re-test the VPP755 at the same time and update that data into this review. For now, the data and comparisons are as already mentioned, taken from the almost unrestricted simple loop pictured above.
The VPP755 sound data on it’s own is probably meaningless unless you are familiar with how noise is measured, but we will display the results here for those who are interested. For everyone else, we also will compare the VPP755 against an Aqua Computer D5 PWM.
First off, here is the raw data for the VPP755 recorded when it was running on the Sound Bench. Perhaps a missing column is the “Stage” it is operating at, but I am pretty sure you can work out which is which.
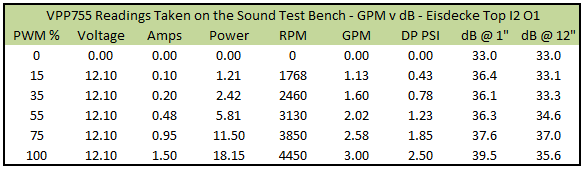 Normally we do our sound testing with the meter 12″ away from the noise source, however you may have noticed in the above table there are readings for both 1″ and 12″. The reason for this is that the D5 was noticeably louder compared to the VPP755 but the results were quite similar with the sound meter 12″ away. So both pumps were re-tested with the sound meter as close as possible (1″) which I think gave a better indication of the noise variance when plotted against each other.
Lets look firstly at just the VPP755 sound testing results before we look at comparisons. We have chosen to display Noise vs. Flow Rate, but it could have been Noise vs. PSI. We decided not to plot against RPM due to the erratic RPM readings as was discussed on the control section of the review.
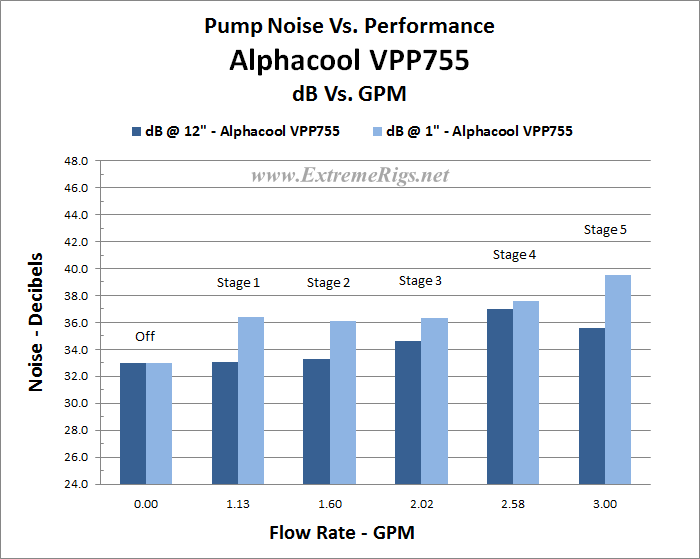 It is worth mentioning the Stage 4 reading at 12″. To the ear it did seem a bit louder, but the 1″ reading did not really show this up.
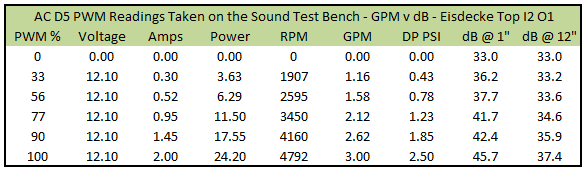
Next – how is the noise level of the VPP755 in comparison to a D5 pump? Let’s find out by plotting the data of the VPP755 against a D5 PWM and see what we get. Before that though, I will just mention that the D5 PWM pump was tested after the VPP755 and the PWM setting was tuned to match the Flow Rate (GPM) of each of the VPP755’s stages, which matched exactly the pressure also.
To help make sense of the plots below, we’ll post the D5 PWM raw data table here as well as again placing the VPP755 data table.
 First up is the 12″ readings. Here we see the VPP755’s loud stage 4 noise level being the outlier in noise performance. However at stage 5 the VPP is much quieter than the D5. Sometimes pumps and tops can have resonance issues with a setup which may or may not show up in the end user scenario. If you do see resonance we would suggest adjusting the pump speed to avoid it.
 Let’s now look at the results when the noise meter was placed just 1″ away from the pump:
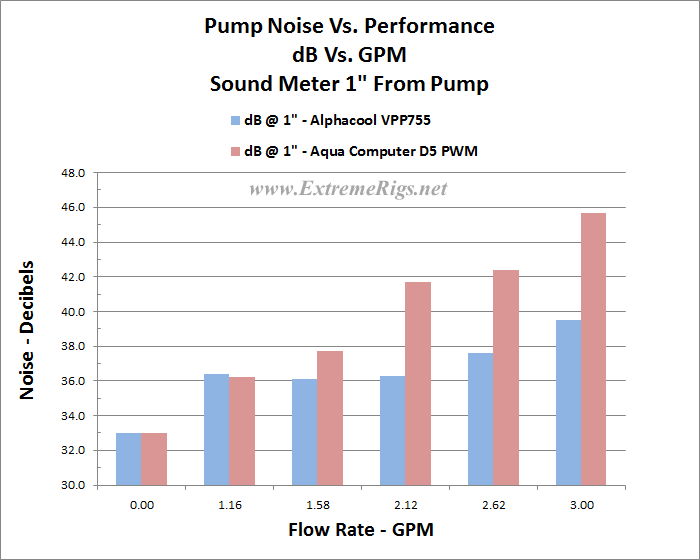 These results favor the VPP far more than the 12″ measurements. The VPP755 in fact seems far quieter than the D5 in 4 of the 5 flow rates tested at, and the other is virtually equal with each other and the ambient noise floor. It’s a pretty impressive set of results because the D5 is not a noisy pump anyway. However as the plots show the VPP755 appears much quieter for the same performance output.
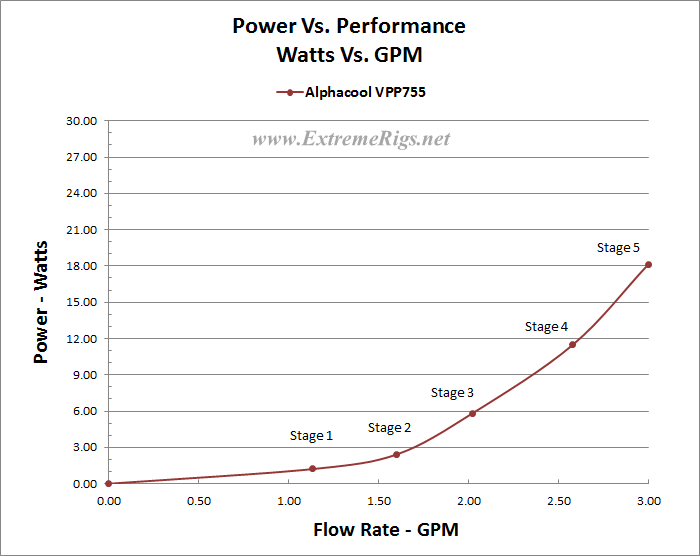
Using the data from the sound testing, we can also plot out some power usage charts.
Again lets look at the VPP755 on it’s own first in a Power for Performance chart.
 Now if we add the D5 PWM data onto the plot we clearly see that the VPP755 is using much less power than the D5 to achieve the same flow rate:
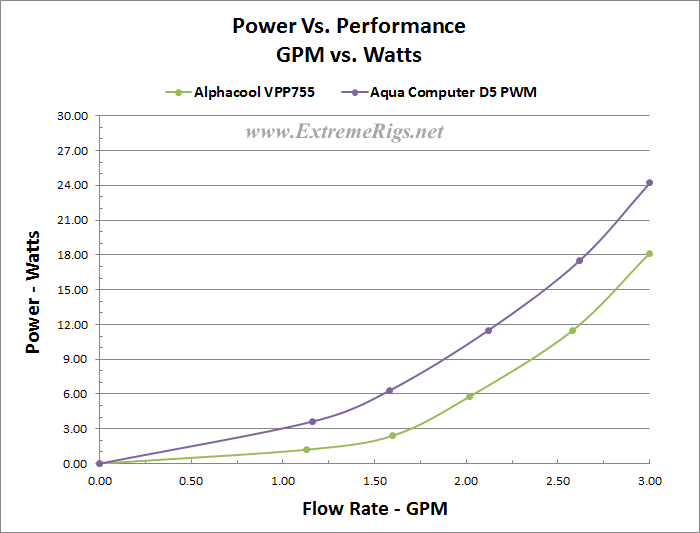 For the same output the VPP755 is clearly much more energy efficient. For the first 3 stages it uses less than half the power the D5 does to achieve the same output. The VPP wins on performance and energy efficiency which is quite astonishing. Another terrific result for the VPP755 to finish off with.
Next Up – Summary.
![]()
Summary
Summary
By designing a pump to compete in the water-cooling pump category Alphacool has taken a chance by trying to challenge the enduring dominance of the D5 and DDC series. From our time with the VPP755 we think that Alphacool are onto a winner. It certainly has a few issues with the control system, however the finish and performance are above and beyond the competition.
The presentation of the VPP755 is hands down the best on offer with a slick painted finish on the cover which has even been laser etched and the sleeved wires make a very professional and impressive looking pump.
The dual control system is a good initiative, but we feel that the implementation is a let down. Hopefully this will be improved upon in future revisions. We were hoping and expecting that the VPP755 would have a true PWM controlled motor, but instead it is voltage regulated. Discovering it has only 5 possible speed settings was rather disappointing. The rpm readings were also unstable which we can only assume is a result of poor voltage regulation. The good news is that the VPP755 sports both manual and electronic control of the pump speed, both of which worked well, although we did have a few issues when controlling the pump with an Aquaero 6.
While initial reports were that the VPP755 would be compatible with existing D5 tops from other manufacturers, we found that not to be the case. Some tops are compatible and some are not. It certainly is compatible with Alphacool’s Eisdecke D5 top and test fitting on other tops is still ongoing.
What most potential buyers are going to be looking at when eyeing a pump for their loop is which pump is the quietest or which has the best performance. The savvy buyer will even look at a combination of both at the flow rate they want to be running at. This is where the VPP755 willing be grabbing your attention and burning a message into your subconscious that “I am the One“.
The VPP755 has more available pressure at every flow rate than our favorite D5 pump.
Not only does the VPP755 have the performance advantage, it does so much more quietly than a D5 which is heralded (even by us) as the go-to quiet pump. On top of that the VPP is also more power efficient.
What the VPP755 does not have yet is a proven track record for reliability, and at this very early (pre-release) stage only time will tell how the this pump will go running 24/7 over many years.
In summary the VPP755 deals out a triple whammy – besting our favorite D5 with better performance while remaining quieter and more energy efficient to boot. However the fixed 5 level control system and fluctuating RPM was too much to overlook. The performance is definitely worthy of a Gold award, but as a complete package we felt it had to be downgraded to a silver award. If you’re in the market for a new pump, the VPP755 should be at the top of your options, with the provision that you may need to get an Alphacool Top to mate it with and you are willing to forgo full control of the motor speed.

Today, 4th November the VPP755 was listed as available to purchase from Aqua Tuning and the Alphacool web-shop (links below) although they appear to have mistakenly listed it as the older VPP655 instead of VPP755. We just received clarification about that: “That is a fault… sorry. We are working on it.”
The pricing of €69.95 is what we were expecting, but the USD price from Aqua Tuning (US) is lower than anticipated.
No sighting of it yet on Aussie or US re-seller sites.
Where to buy:

Performance PCs: Alphacool Eispumpe VPP755 $72.50 + shipping from USA
Performance PCs: Alphacool Icecap D5 Pump Top – Plexi $38.50 + shipping from USA
Performance PCs: Alphacool Icecap D5 Pump Top – Black $38.50 + shipping from USA
![]() Aqua Tuning: Alphacool Eispumpe VPP755 $72.46 USD + shipping
Aqua Tuning: Alphacool Eispumpe VPP755 $72.46 USD + shipping
Aqua Tuning: Alphacool Eisdecke D5 Pump Top Plexi $38.65 + shipping
Aqua Tuning: Alphacool Eisdecke D5 Pump Top Black $38.65 + shipping
 ModMyMods: Alphacool Eispumpe VPP755 $72.50 + shipping from USA
ModMyMods: Alphacool Icecap D5 Pump Top – Plexi $38.94 + shipping from USA
ModMyMods: Alphacool Icecap D5 Pump Top – Black $38.94 + shipping from USA
![]() Alphacool Webshop: Alphacool Eispumpe VPP755 €69.95 + shipping from Europe
Alphacool Webshop: Alphacool Eispumpe VPP755 €69.95 + shipping from Europe
Alphacool Webshop: Alphacool Eisdecke D5 Top – Plexi €36.95 + shipping from Europe
Alphacool Webshop: Alphacool Eisdecke D5 Top – Black €36.95 + shipping from Europe

![]()
![]()


“What the VPP755 does not have yet is a proven track record for reliability”
Just offer a generous warranty, standing by the product.
Yeah and to be fair to Alphacool they claim that it has the same lifetime rating. So all things look good. However I’d always take a product known to last a long time than one that doesn’t even if the latter comes with a warranty. A pump dying can cause all sorts of hassles and I like my rigs to have high uptime and be foolproof cause I don’t have time to fiddle about much 🙂
The exact reason I switched to a D5, my ST mcp50x died after 9 months.
Alphacools false promises like being a true pwm pump & full compatability with existing tops is a major turn off. I’ll consider one when I can choose my own pump top and it actually has true pwm control. Until then ill stick with my Aqua Computer D5 pump motor with PWM input and speed signal.
[…] is all Ice (“Eis”) related. We recently reviewed the Eisbrecher radiator and the Eispumpe VPP755 along with it’s Eisdecke pump top. So we have already covered a fair amount of the new product line up. Neither the Eisbrecher […]
I just received my setup for my dual loops and after putting everything together for the pump/res and testing it for anyone needing to know the Alphacool VPP755 works in the Monsoon MMRS pump/res combo albeit about 2mm short with the o-ring provided by monsoon, but all i had to do was us a extra o-ring and slid it around the D5 cover by monsoon and it fit right in the gap and covers it so you don’t even notice it. I ran it for the first time yesterday and had no leaking issues, now that’s not to say it won’t later on but preliminary testing on my part went smoothly, also it is more quiet than any other pumps i’ve tried and it seems to be a strong pump will know more after testing it more, just FYI for anyone looking to use Monsoons system. Hope this helps.
Those considering buying this may want to wait until Alphacool fixes noise issues. Tons of reports: http://www.overclock.net/t/1624192/alphacool-vpp755-noise
Will this work in a 360mm rad for a CPU and 1 GPU block?
Yes for most common cpu and gpu blocks this will be plenty.
Comments are closed.