


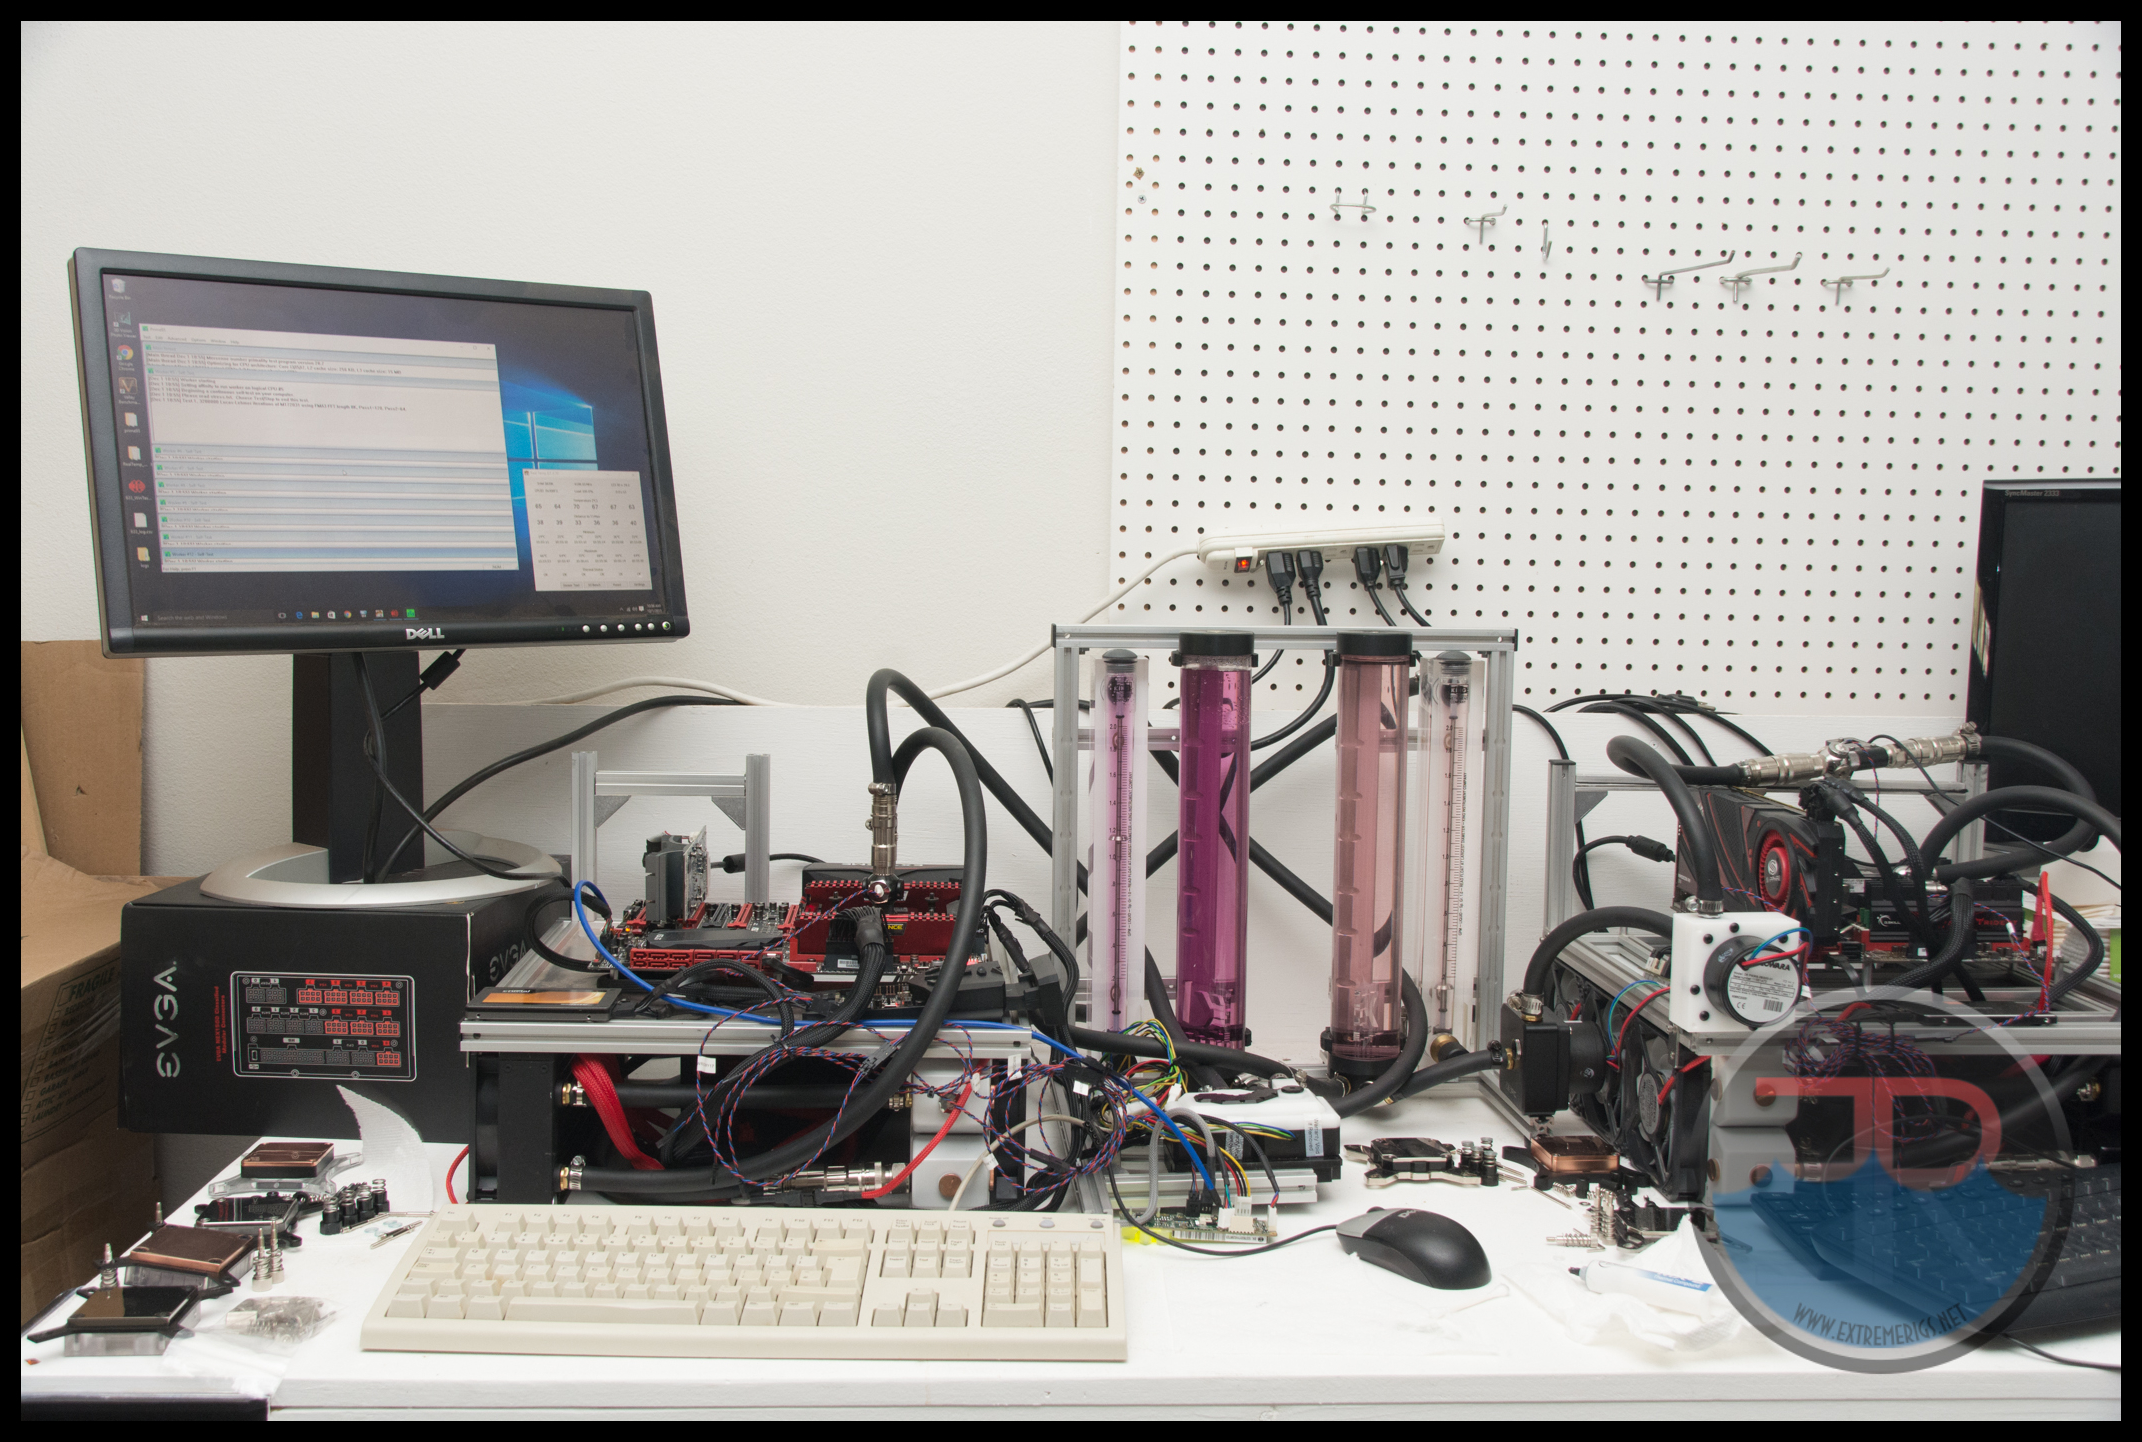
For 2015 I finally updated my old test bench! The old test bench had used a variety of motherboards for CPU and GPU water block testing since 2012, but it was time to strip down and build two in order to increase throughput. This was also a chance to upgrade various components and clean out/replace critical components. For now let’s focus on the CPU test bench and ignore the GPU test bench.
First off a big thank to various sponsors who have all donated items for the bench or for review:
- Asus for that monster Rampage V Extreme that we reviewed earlier in the year
- Swiftech for the beastly MCP35x2 pump that has been running almost none stop for 4 years
- EK for the non leeching ZMT tube, X3 400 Reservoir, PE360 Radiator
- Alphacool for the UT60 Radiator
- Spotswood for the reconfigured Testbench – yes we had enough parts to build two out of one!
- Koolance Quick Disconnects – VL3N/QD4/VL4N types
Other non sponsored components include
- King 2GPM Rotameter
- Crystalfontz CF-633 Data logger + Dallas One Wire Temperature Probes
- Intel 5820K
- Corsair Vengeance LPX 4x4GB 2800 DDR4
- NVidia GT210 passive GPU
- Crucial C300 128GB SSD
- Gentle Typhoon 1850RPM Fans
- EVGA 1300 G2 PSU
- Bitspower Brass Barbs
- Home Depot Worm Clamps
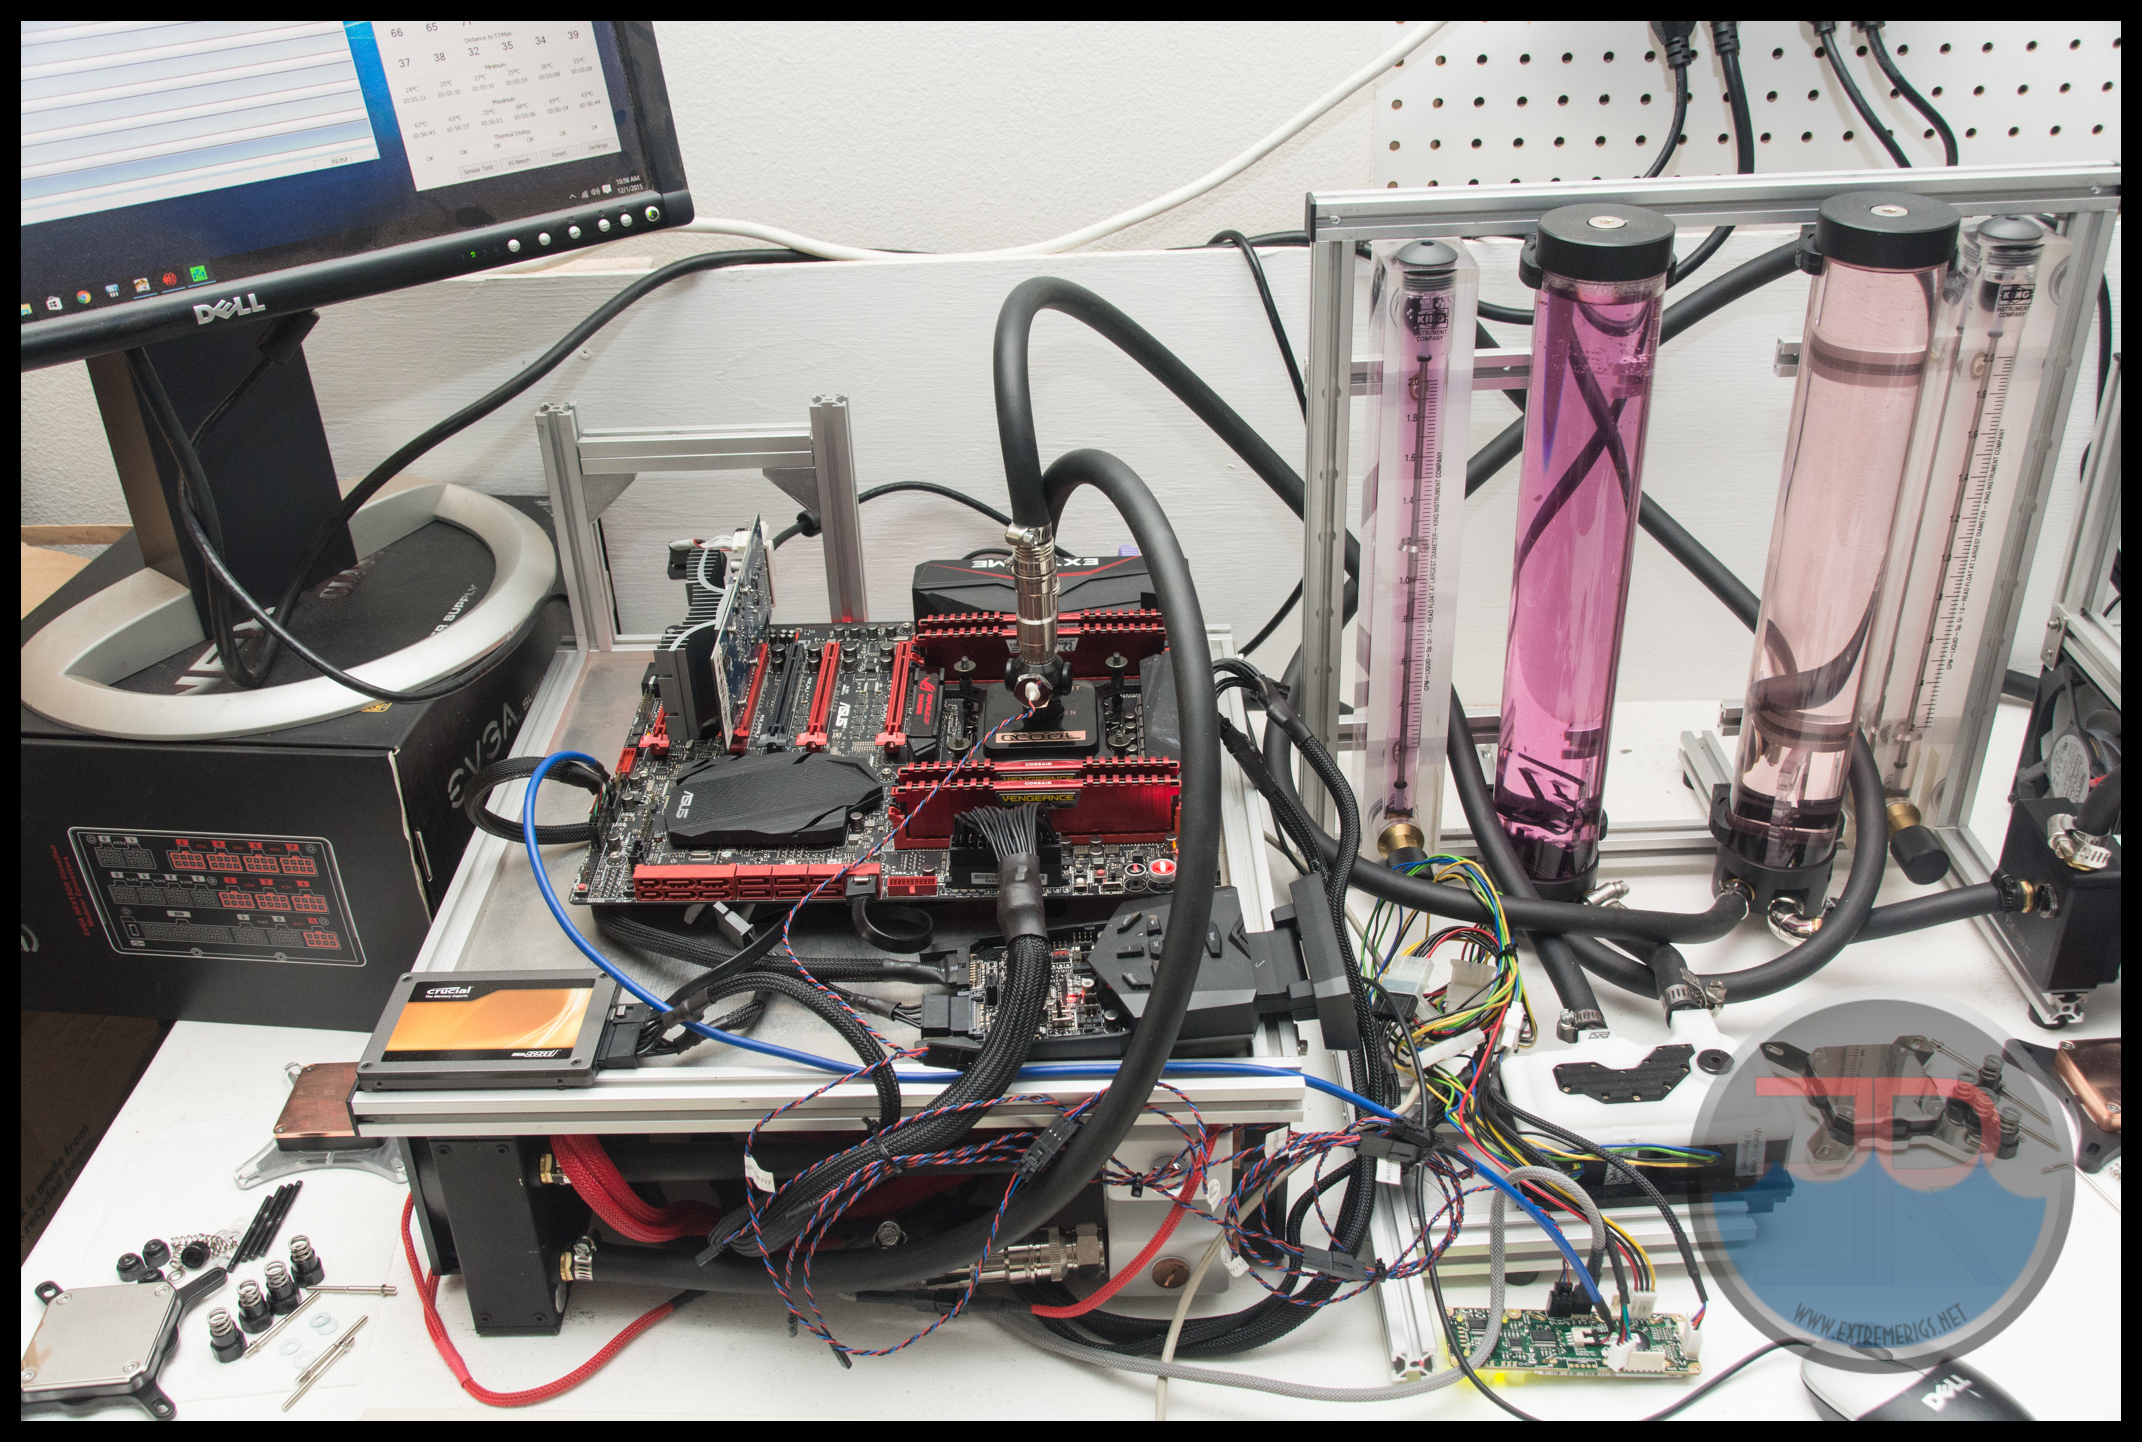
So it may look a mess of wiring. Rewiring and sleeving the MCP35x2 would help finish it off, as would cleaning up the ambient air temperature probes.
So now that we’ve addressed the test bench setup let’s talk about sensor calibration.
For CPU water block testing you have to use the internal CPU temperature sensors. This poses a problem, because unlike a specifically designed chip that only measures temperature, the CPU’s primary purpose is not to measure temperature. In other words the temperature circuit is not going to be designed to have the kind of accuracy we would like. You’ll see that in core idle temperatures – they always have quite a wide spread even though they should be fairly similar. So how do we calibrate that circuit and what do we calibrate it against? The latter question is easier to answer. In an ideal world we’d calibrate against a “known” good reference or a “known good” temperature meter. However when we look at the block performance – any good test compares the temperature against something even if it’s implied e.g. the ambient air or coolant. Normally the best thing to measure against is the coolant temperature as that is really the input to the CPU block. Measuring vs ambient air increases error and measures the system level performance rather than the block’s performance. So all that really matters to us is the coolant probe, and calibrating against that is acceptable if it’s accurate and stable enough.
The Crystalfontz unit uses digital temperature probes which are designed to only measure temperature accurately. They are not perfect, and there are far better systems if you’re willing to pay a lot more money. However it is far more accurate than uncalibrated sensors/systems such as your motherboard’s probe inputs, or an Aquaero for example.
To calibrate the system my first thought was to idle the CPU and log the temperature while turning off the fans. The coolant temperature should rise slowly. I wasn’t worried about the tube getting slippy and falling out of a fitting when the coolants got hot because I had used worm clamps to clamp the tube down firmly. So I thought I could let the coolant rise until in the vicinity of loaded cpu temperatures and I’d be able to plot an x/y scatter plot of the CPU temperature vs the coolant temperature. Unfortunately my radiators were able to passively cool the small amount of power from the idle CPU and pumps, so coolant temps maxed out at about 13C over ambient. This was a surprise as my previous attempts to passively cool CPUs had not worked out for me – perhaps because I had used a D5 which dumps far more power into a loop than a DDC style pump.
In the end I had a partial idle calibration and had to do an additional run to load the CPU in order to get data at higher temperatures. This resulted in two cases – idle & loaded – both of which needed to average to the same value regardless of ambient temperatures. Both these cases had to run for a long period of time in order to vary the ambient conditions of the testing space. Here is what the data for a loaded CPU looked like:
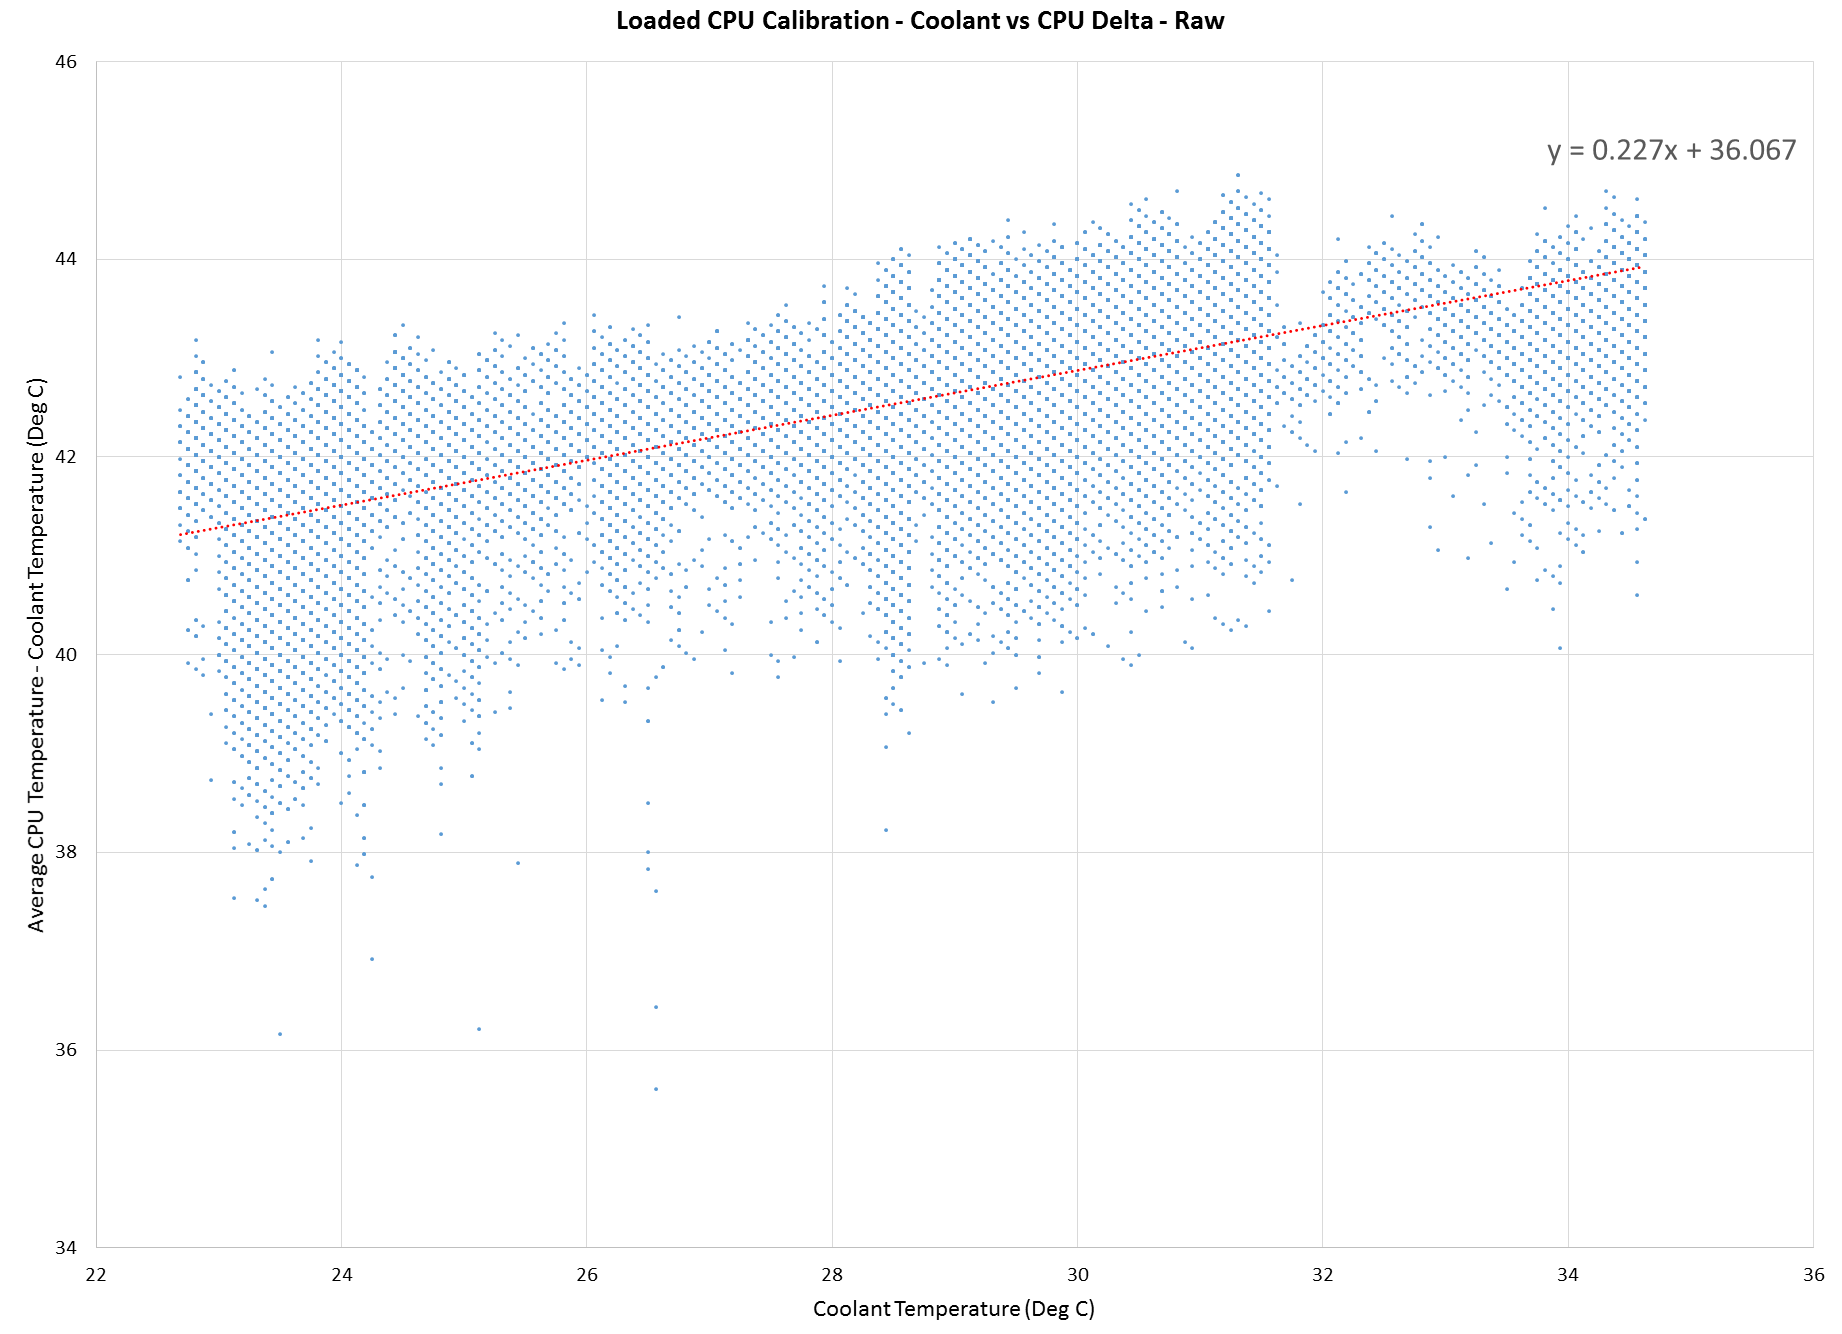
You can see that over 12 degrees of coolant temperature variation there was about 2-3C of variation in average CPU temperature when averaging all the results. After a two step calibration we can flatten this out:
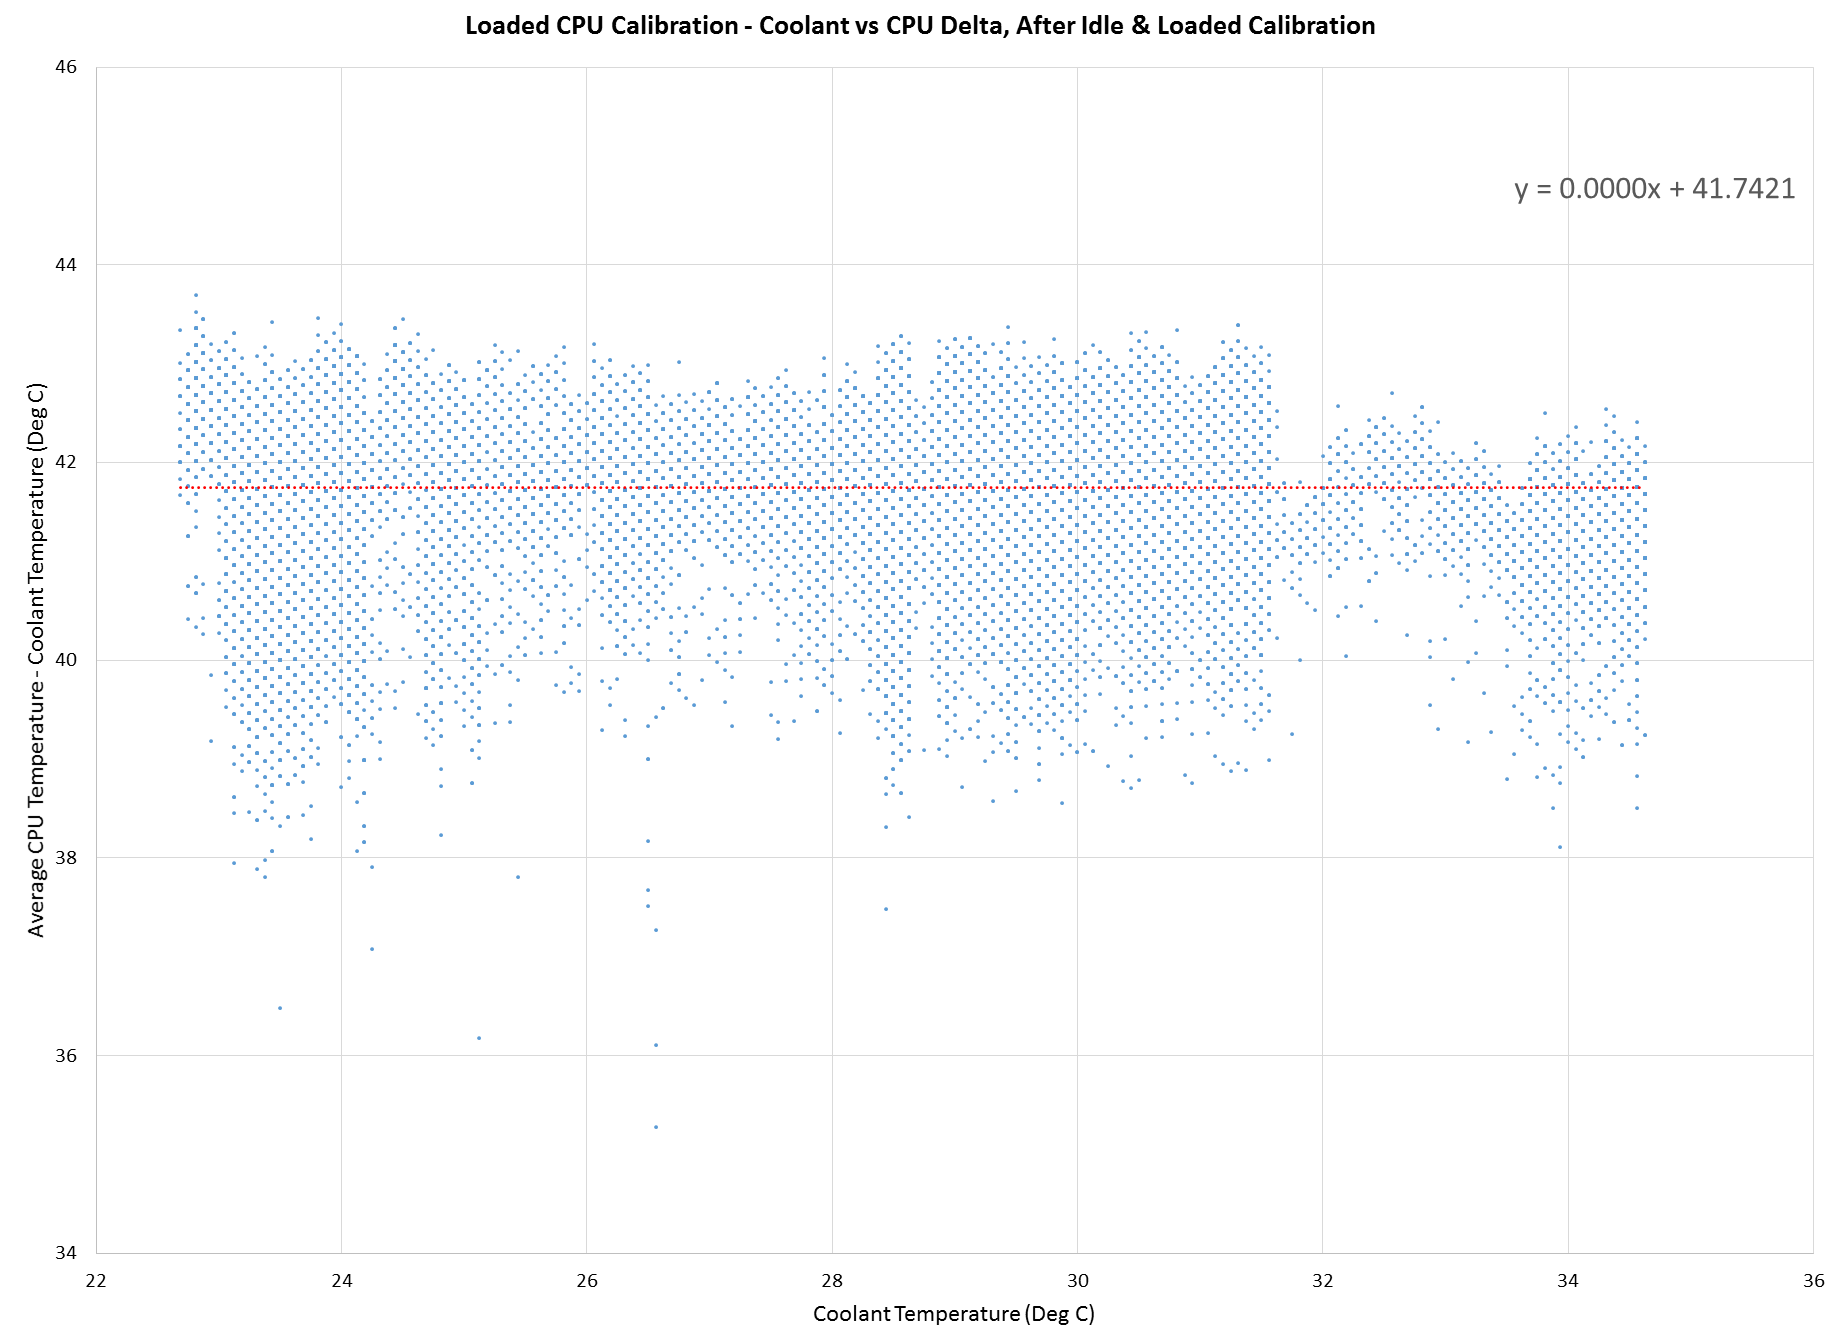
Note however that individual data points still vary significantly. This can be because loading will vary over the 3 minute prime95 cycle as well as short term effects of ambient and coolant fluctuations. Therefore we then need to decide a suitable method to process data logs to minimize error in our measurements. Averaging 12+ hours of logs for each mount of a block is not very practical.
Traditionally in previous CPU block roundups we have allowed 1 hour for burn in/warm up followed by 30 mins of data logging of the average core temperatures and coolant every second. So our first step was to take our data and process a sliding window of 10, 30, 60, 90, 120 minute lengths in order to see how long an averaging period was “enough”
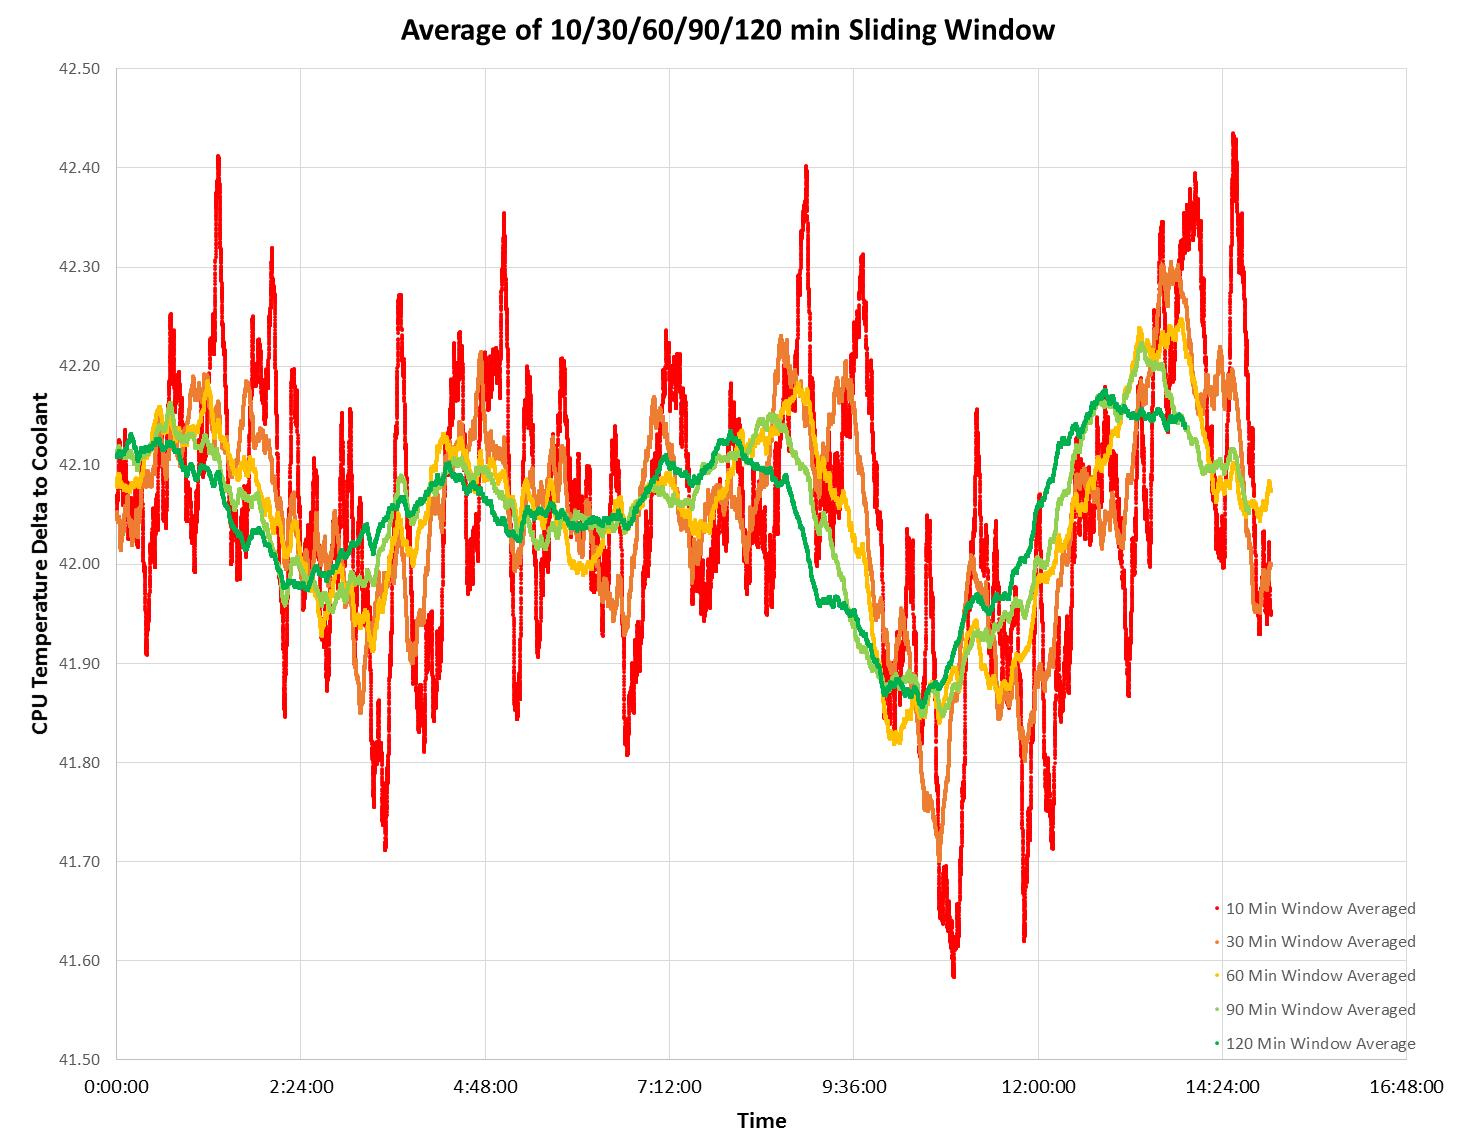
Clearly a 10 minute average is still quite noisy, and while the 30 minute average improves a lot, the end result doesn’t really look that great even after 2 hours of averaging. However one thing is clear – the low hanging fruit is gone so it was time to investigate some other methods. Just for fun we also processed the maximum core temperature in a 10 minute window. This has been used by some other sites as a favored method for easier “reviewing” and we wanted to see just how bad it was to backup our assertions that our methods were better:
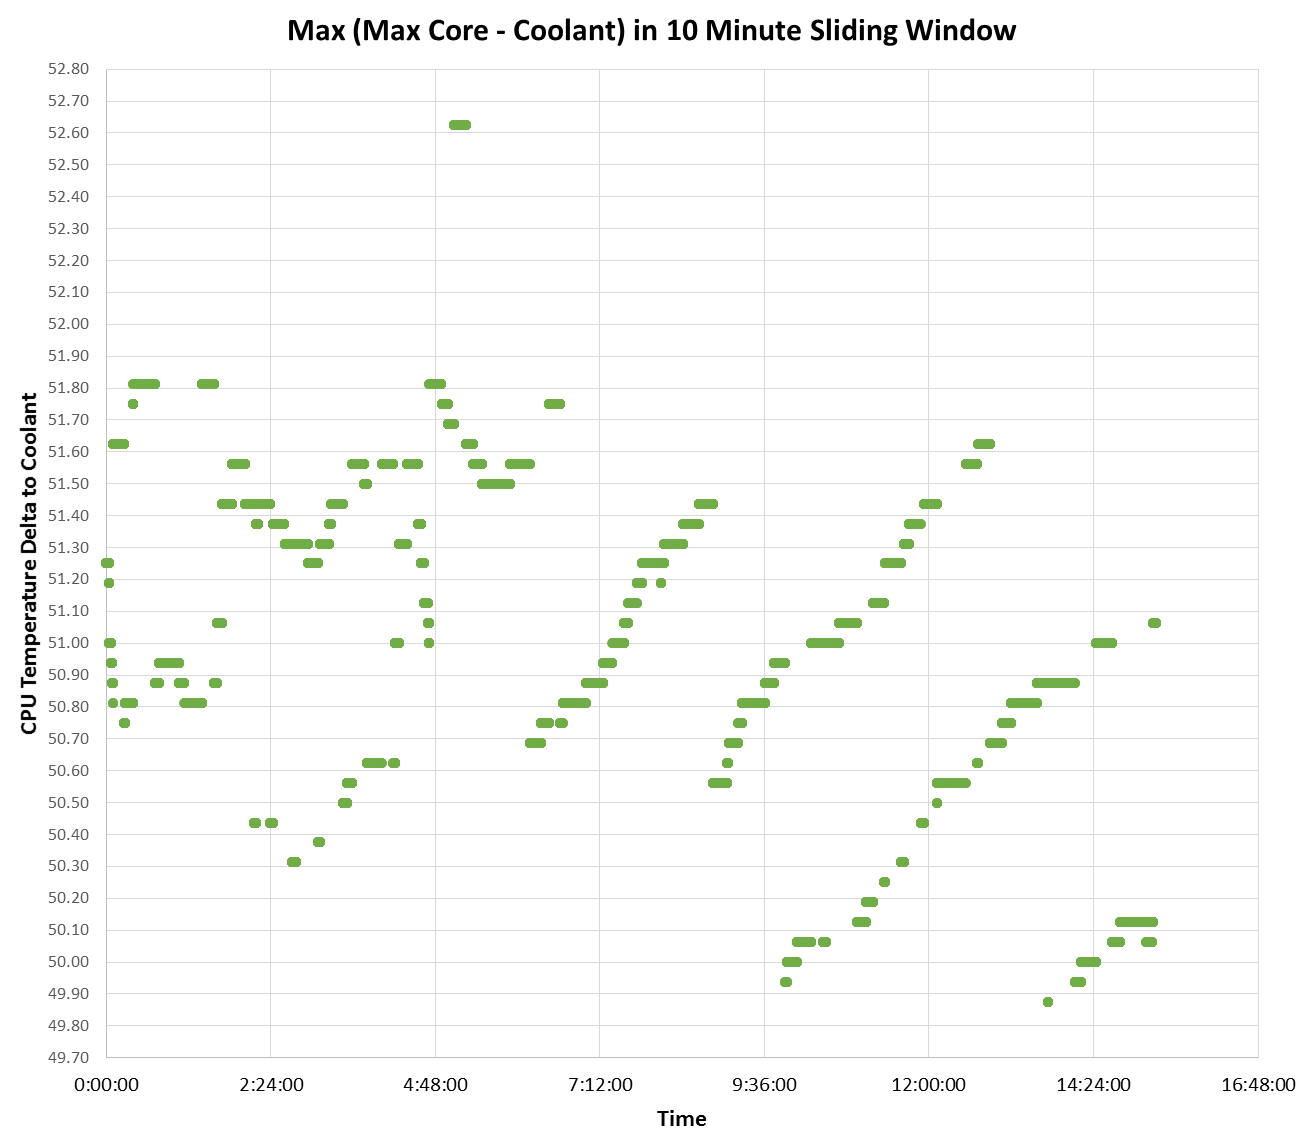
Without the averaged cores the resolution of the CPU temperature sensors and the coolant sensor is clearer. However if you look at the results spread you can easily see nearly 3 degrees of variation. This is hardly enough to pick a winner between CPU blocks that might be only a half degree apart in performance.
We also decided to measure vs ambient temperatures as we believed that this would increase error. Looking at a 60 minute average we saw error increase from +/-0.21 to +/-0.48 deg C when changing from measuring coolant temps to ambient temps. Essentially when measuring ambient air you are also including the radiator performance in your measurement and radiators are really really really really hard to test well.
The last method we considered was one that the ER team came up with when processing the radiator performance logs. In the radiator testing we found that ambient air temperatures could vary significantly and quickly as doors opened and air conditioning turned on and off. In order to combat this we logged for long periods of time but processed the data with a 15 minute sliding window. Each window had it’s standard deviation measured, and the window with the lowest standard deviation was chosen as the “best” data out of the set. This method essentially tries to isolate the most stable point in time to use for the data set.
Using this method we were able to improve the resulting error:

Note that a “best 30 average” is worse than a “best 15 average” because the 30 minute window is more likely to contain “bad” temperature spikes.
The other side effect of this data was finding out (again) just how quick to cure the MX2 TIM is. Essentially there is no cure time at all and the only short term effects are from the coolant temperature settling to it’s loaded state (about 3C delta).
So I now had a plan for testing the CPU blocks on the 5820K. I would log data for 2 hours and exclude the first 15 minutes. I would then choose the best 15 minute data set out of the full 2 hours based on it’s standard deviation. This 15 minute set is then averaged to give the result of that mount.
This means that we have improved our testing accuracy from +/- 0.3 deg C on previous cpu block testing to +/- 0.13 deg C for this 5820K based testing. This is over a 2x improvement. Bear in mind though that there is still mount to mount variation as well as block to block variation and cpu to cpu variation. So despite these improvements it is still hard to get a really accurate comparison without testing multiple samples of each block and multiple CPUs. Therefore despite our +/-0.13 deg C accuracy we are reluctant to actually claim better than +/- 0.5 deg C accuracy on our final results.
This of course means that if you’re comparing our data to any other review sites then you should know that if they aren’t using similar methods and aren’t calibrating their CPU temperature sensors and aren’t measuring their coolant temperatures then their accuracy is going to be significantly worse.
We firmly believe we have by far the most accurate testing of any review site, and to be honest possibly better than some of the manufacturers 😉


[…] CPU Test Bench 2015 and Data Processing Methods […]
[…] CPU Test Bench 2015 and Data Processing Methods […]
Comments are closed.