AquaComputer launched a new flow sensor at the start of 2012 and caused quite a stir within the very stagnant world of flow sensors. Traditional flow sensors used in PCs fell in two categories. The first were the “spinny” type: small housings containing an impeller. The impeller is rotated by the flow and the speed of rotation was measured and usually communicated to the PC via a tach wire to a fan header on a motherboard. The second method was the use of a rotameter such as the King Instruments series which relies on the coolant flow to battle gravity and raise a weighted float. The float lived in a vertical tube of increasing diameter and the height of the float indicated the flow rate. Rotameters are rarely used these days except by tester’s as they are quite accurate when large enough. Both however have their issues. The impeller type were inaccurate and prone to breaking and blocking flow. The rotameter type were costly and large. AquaComputer previously had an impeller type design but decided to go with something different this time:
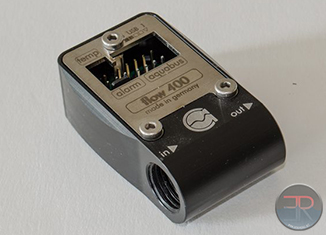
The MPS flow sensor doesn’t use an impeller, instead it takes a differential pressure measurement in a similar way to the way pitot tubes work. This means that there is nothing to slow down flow like a rotameter would, and there’s nothing to block flow like a broken impeller would. It also means it’s small:
The 400 in the name refers to the maximum flow rate range in litres per hour. There are other MPS sensors with different ranges but the 400 is best suited for most PC water cooling systems. The flow sensor comes with a USB cable and an optional “alarm” cable that can be plugged into a 3 pin fan header or it can be used to drive an indicator LED. Note that when it is plugged into a fan header that a constant RPM is shown and that it does not vary with flow rate (except when the flow stops). The USB cable connects to a motherboard USB header (make sure to plug it in the right way round). The flow sensor can also be connected to an Aquaero controller unit via the AquaBus connector (cable not supplied, although the 3 pin can be used in conjunction with the USB for the same effect) and it can also measure a standard 2 pin temperature sensor (not supplied). In addition the flow sensor also includes an internal temperature sensor. Here we see the sensor in use with the USB cable, alarm cable and external temperature sensor all plugged in to the unit:
One thing to point out is that the sensor outputs “raw” data from a pressure sensor that gets converted by a segmented calibration algorithm into a flow rate. Pre made calibration tables are supplied for 6mm ID tube, 8mm ID tube and 10mm ID tube. This means that if you want to use fatter tube like 7/16″ or 1/2″ or indeed anything that isn’t 6,8 or 10mm then you will have to calibrate the sensor yourself.
Because the sensor can measure pressure it can also be used as a fill level sensor in a reservoir, or simply as a differential pressure sensor to measure a specific component’s pressure drop (or gain in the case of a pump). This can be useful for verifying that individual parts are working as they should be and is cheaper than a professional manometer.


[…] sensors will be compatible – only the pulse style that is most common. Not the fancy new AquaComputer […]
How would you recommend calibrating this sensor suite (flow, temps) in a system? Any specific tool? Should it be re-calibrated once in a while?
I just found out that my multimeter has a type k thermal probe (no idea what that means, though). Is that enough to calibrate the internal thermal sensor of the mps?
Hah well thermal probes themselves often need to be calibrated. Since that review was written AquaComputer fixed the bug with the non linearity, so it should be a lot better now. Unless you’re really testing stuff it’s probably good enough to be honest. If it’s not it’s probably easier to buy a 10$ probe and add it in the loop instead.
Comments are closed.