


Introduction
EK CoolStream CE 420 Radiator Review
Welcome to another Extreme Rigs radiator review. This time we’ll be taking a close look at the CE 420 from EKWB which was released about a month ago.
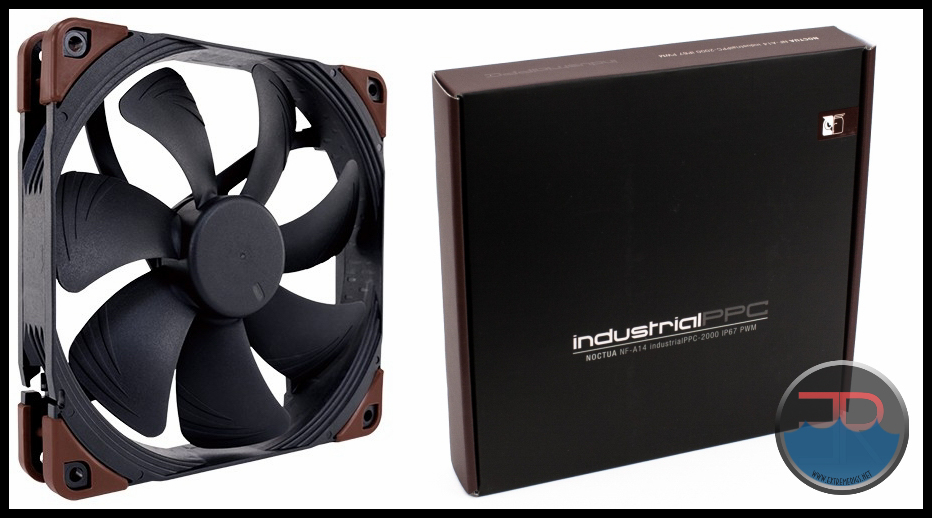
Before getting into the review we would once more like to welcome Noctua as a sponsor partner to Extreme Rigs and extend our Thanks for sending the NF-A14 IndustrialPPC-2000 IP67 PWM fans for use in the thermal test chamber. Their support really got us out of an awkward situation we found ourselves in after the 140mm fans we were using started to fail after 6 weeks of continuous use. It was difficult to throw all that data away, but we felt it best to start over with “best in class” fans than continue running fans which proved to be less than reliable.
With new fans in hand, we restarted our 140.x radiator thermal testing from scratch, and after crunching the data we have begun publishing our 140.x radiator reviews. First up was SR2 420 MP from HWLabs.
This time we have the CoolStream CE 420 from EK and it is the first of the recently released 140.x sized radiators from EK that we have run through it’s paces. Most of the data comparisons will be against the SR2 420 MP but we’ll also put in some data of other EK radiators which you might already be familiar with which might add some more performance perspective to the CE 420.
Firstly a big thanks to EKWB for providing the review sample of the CE 420.
The support offered by EK has been exemplary over the past 18 months since our radiator testing commenced and it really is greatly appreciated. Thanks Guys!
![]()
What’s in the Box?
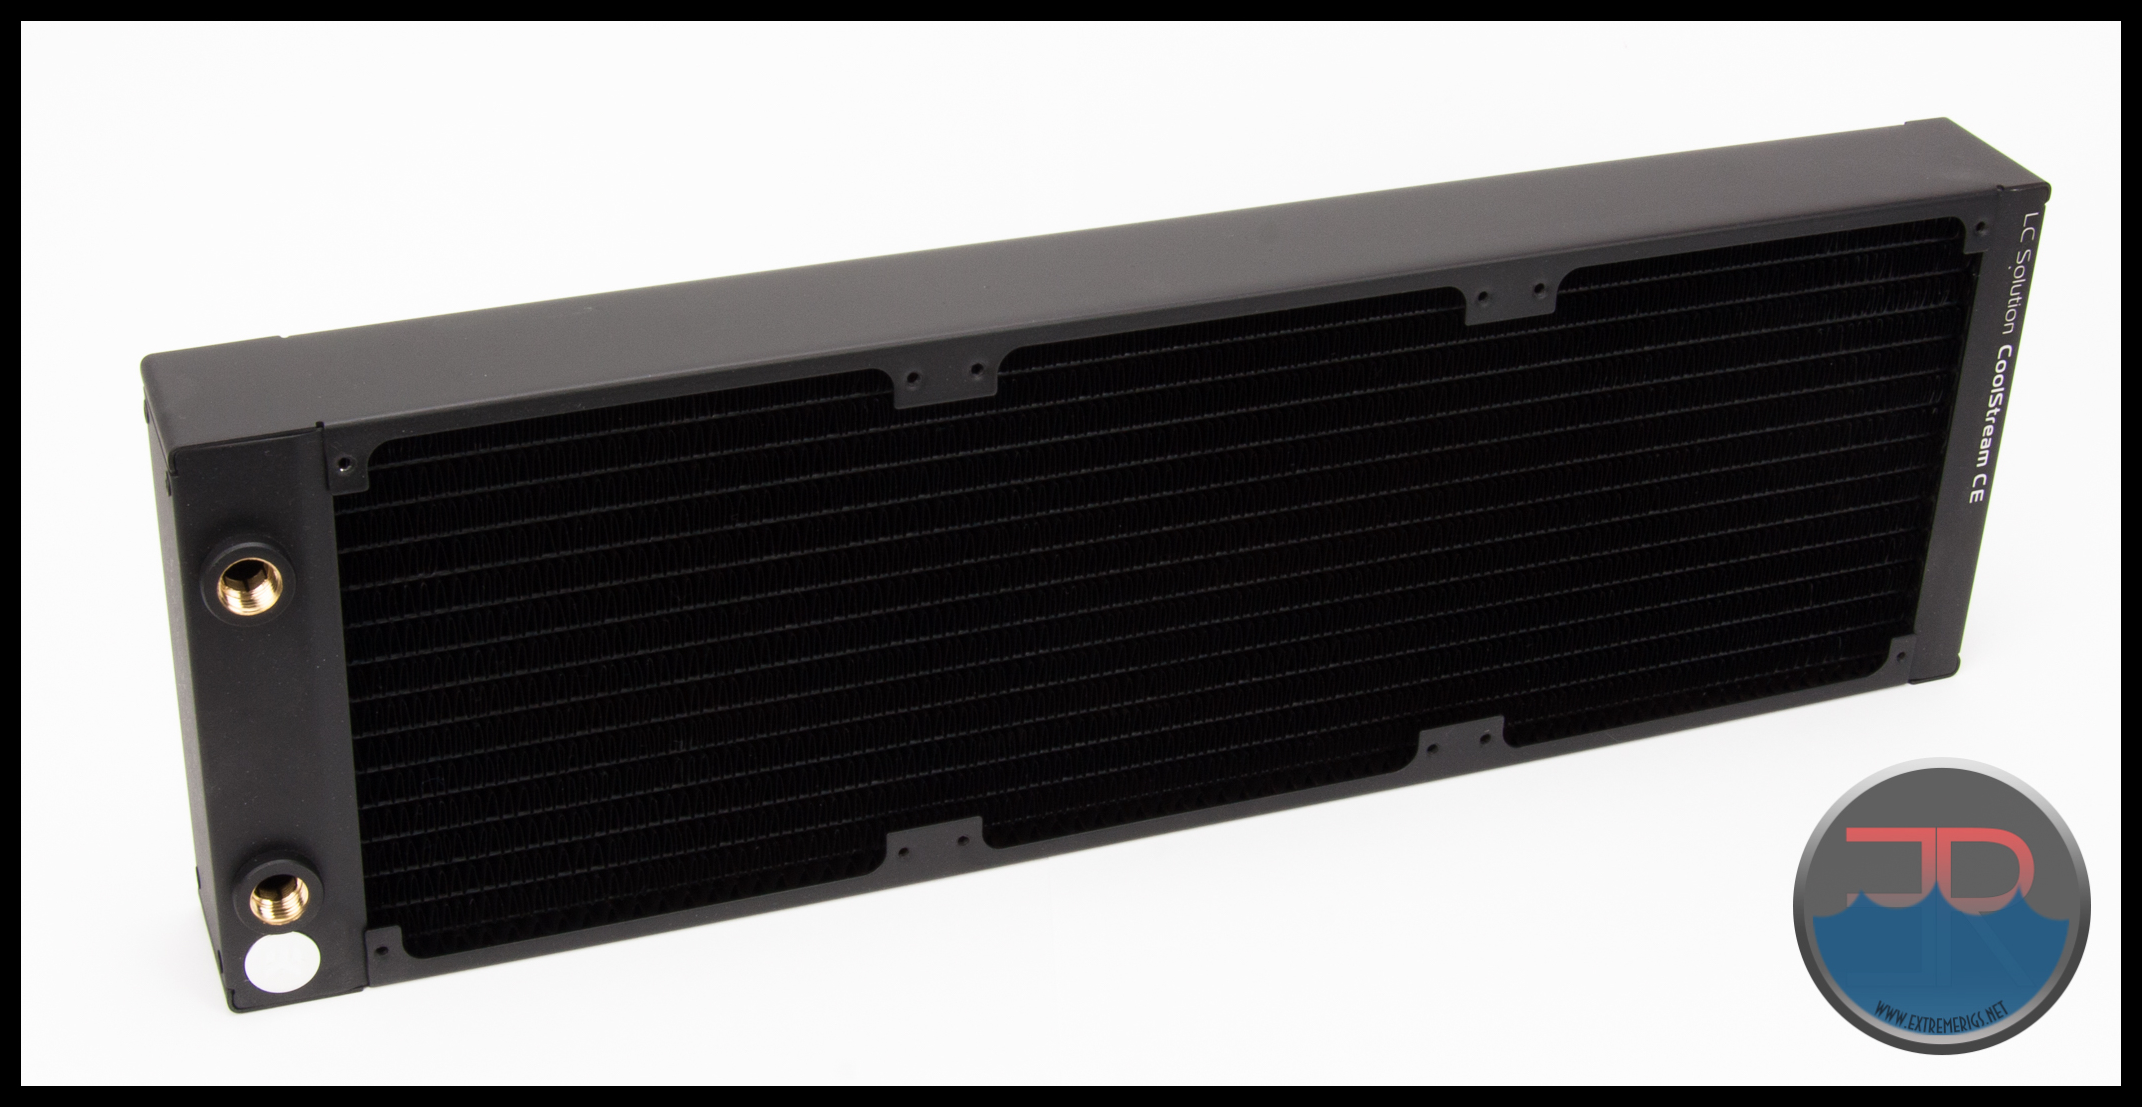
The CE 420 sample arrived in full retail packaging featuring EK’s lime green color code used for their radiators and fans.
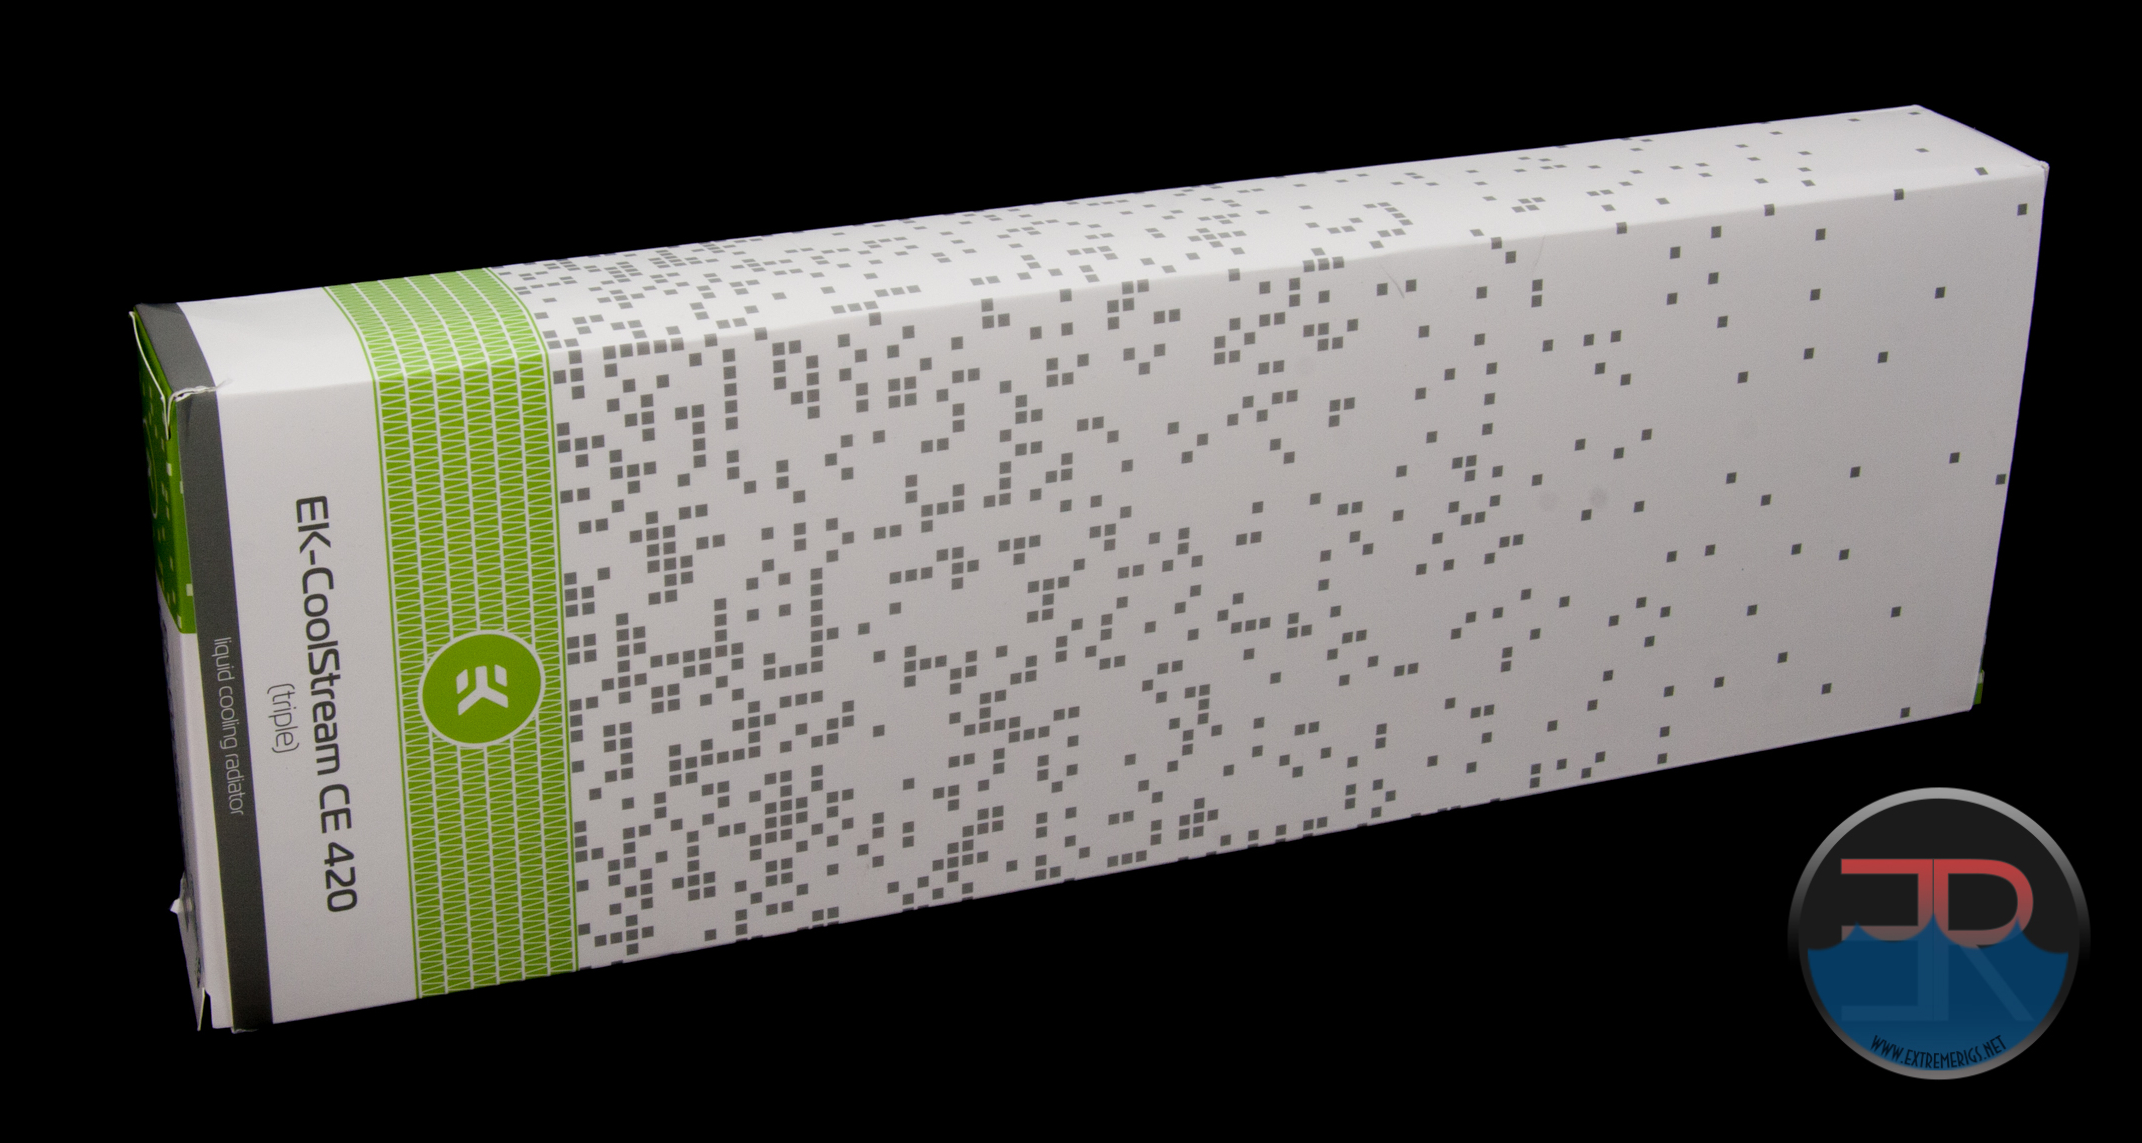 The graphics are plain and simple, but I do like the band of radiator fins
On the back, some key points and technical details are listed.
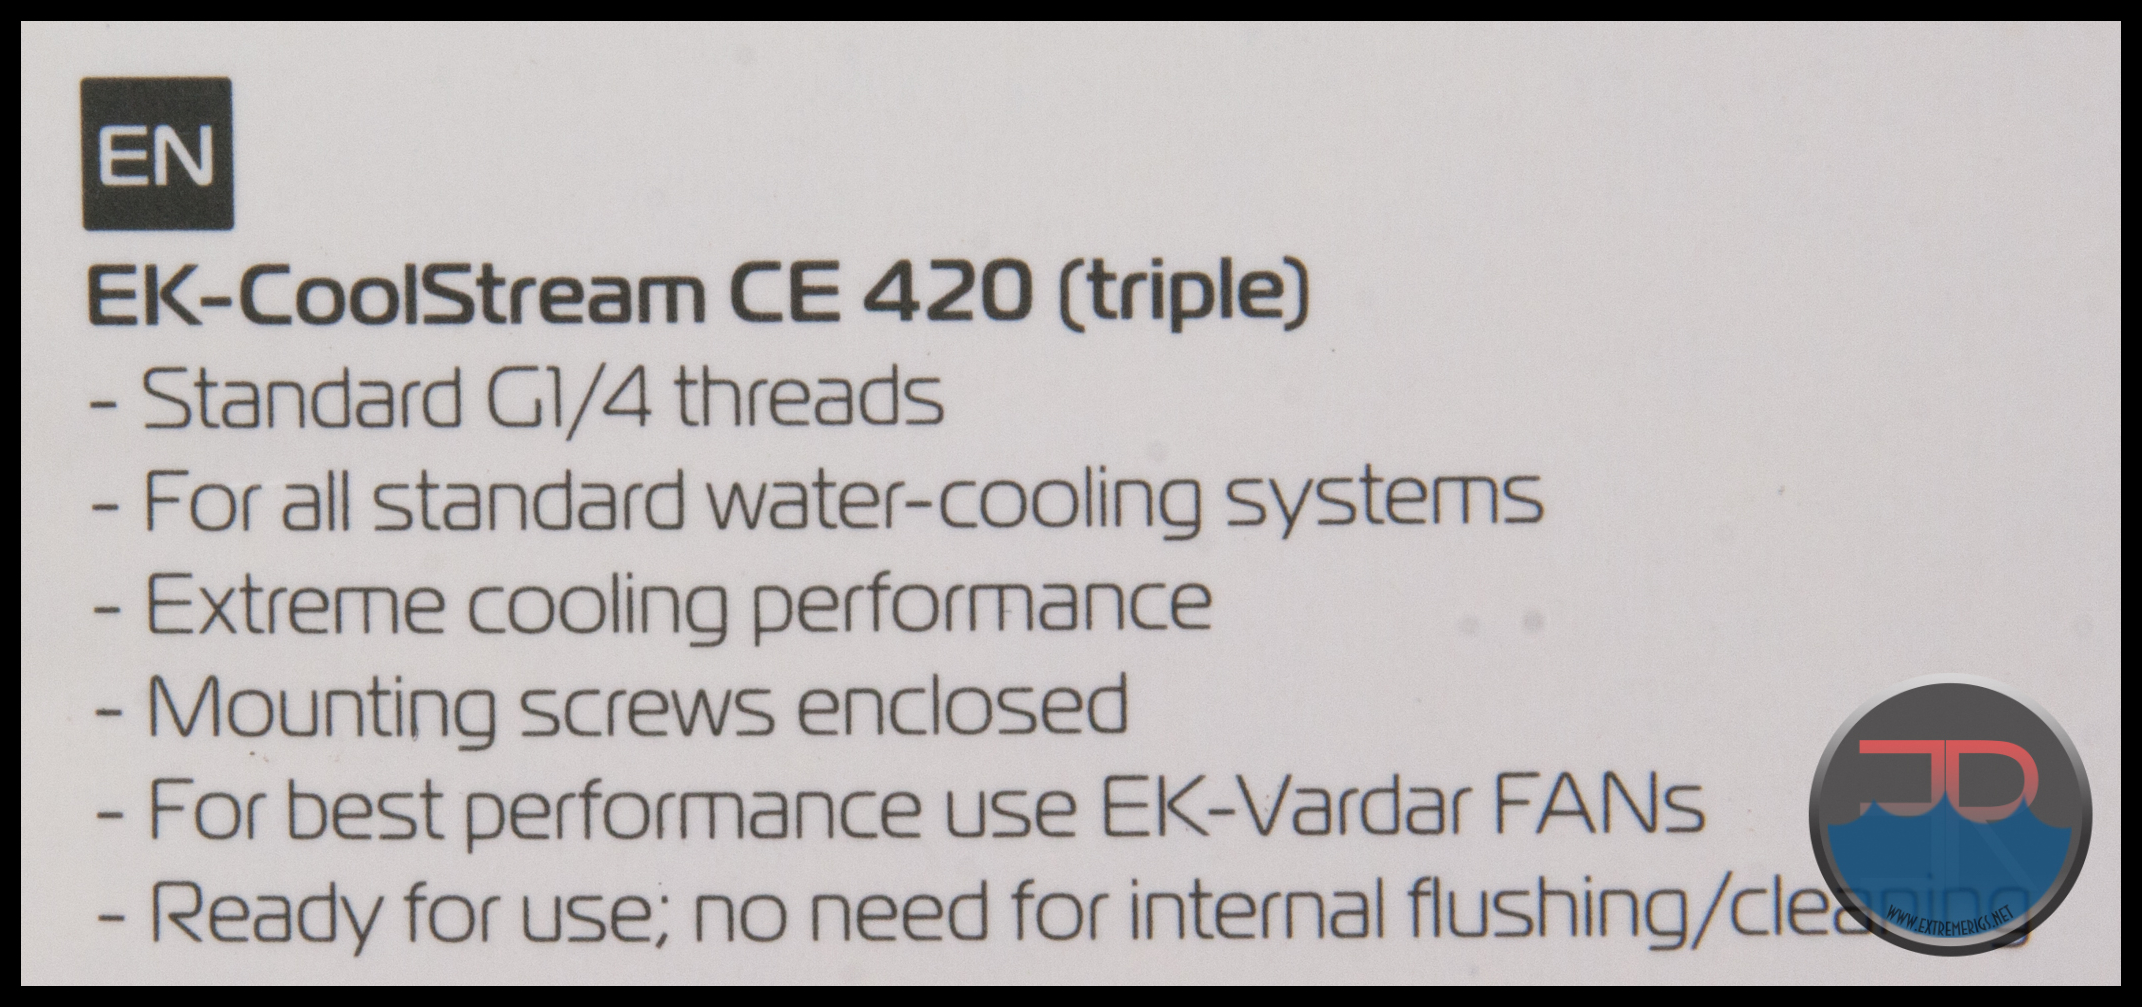 Our feelings about this “Ready for use” key point are well known to regular readers by now. Suffice it to say that end users should always flush new radiators prior to installing into their system.
Removing the outer sleeve we find a sturdy shipping box.
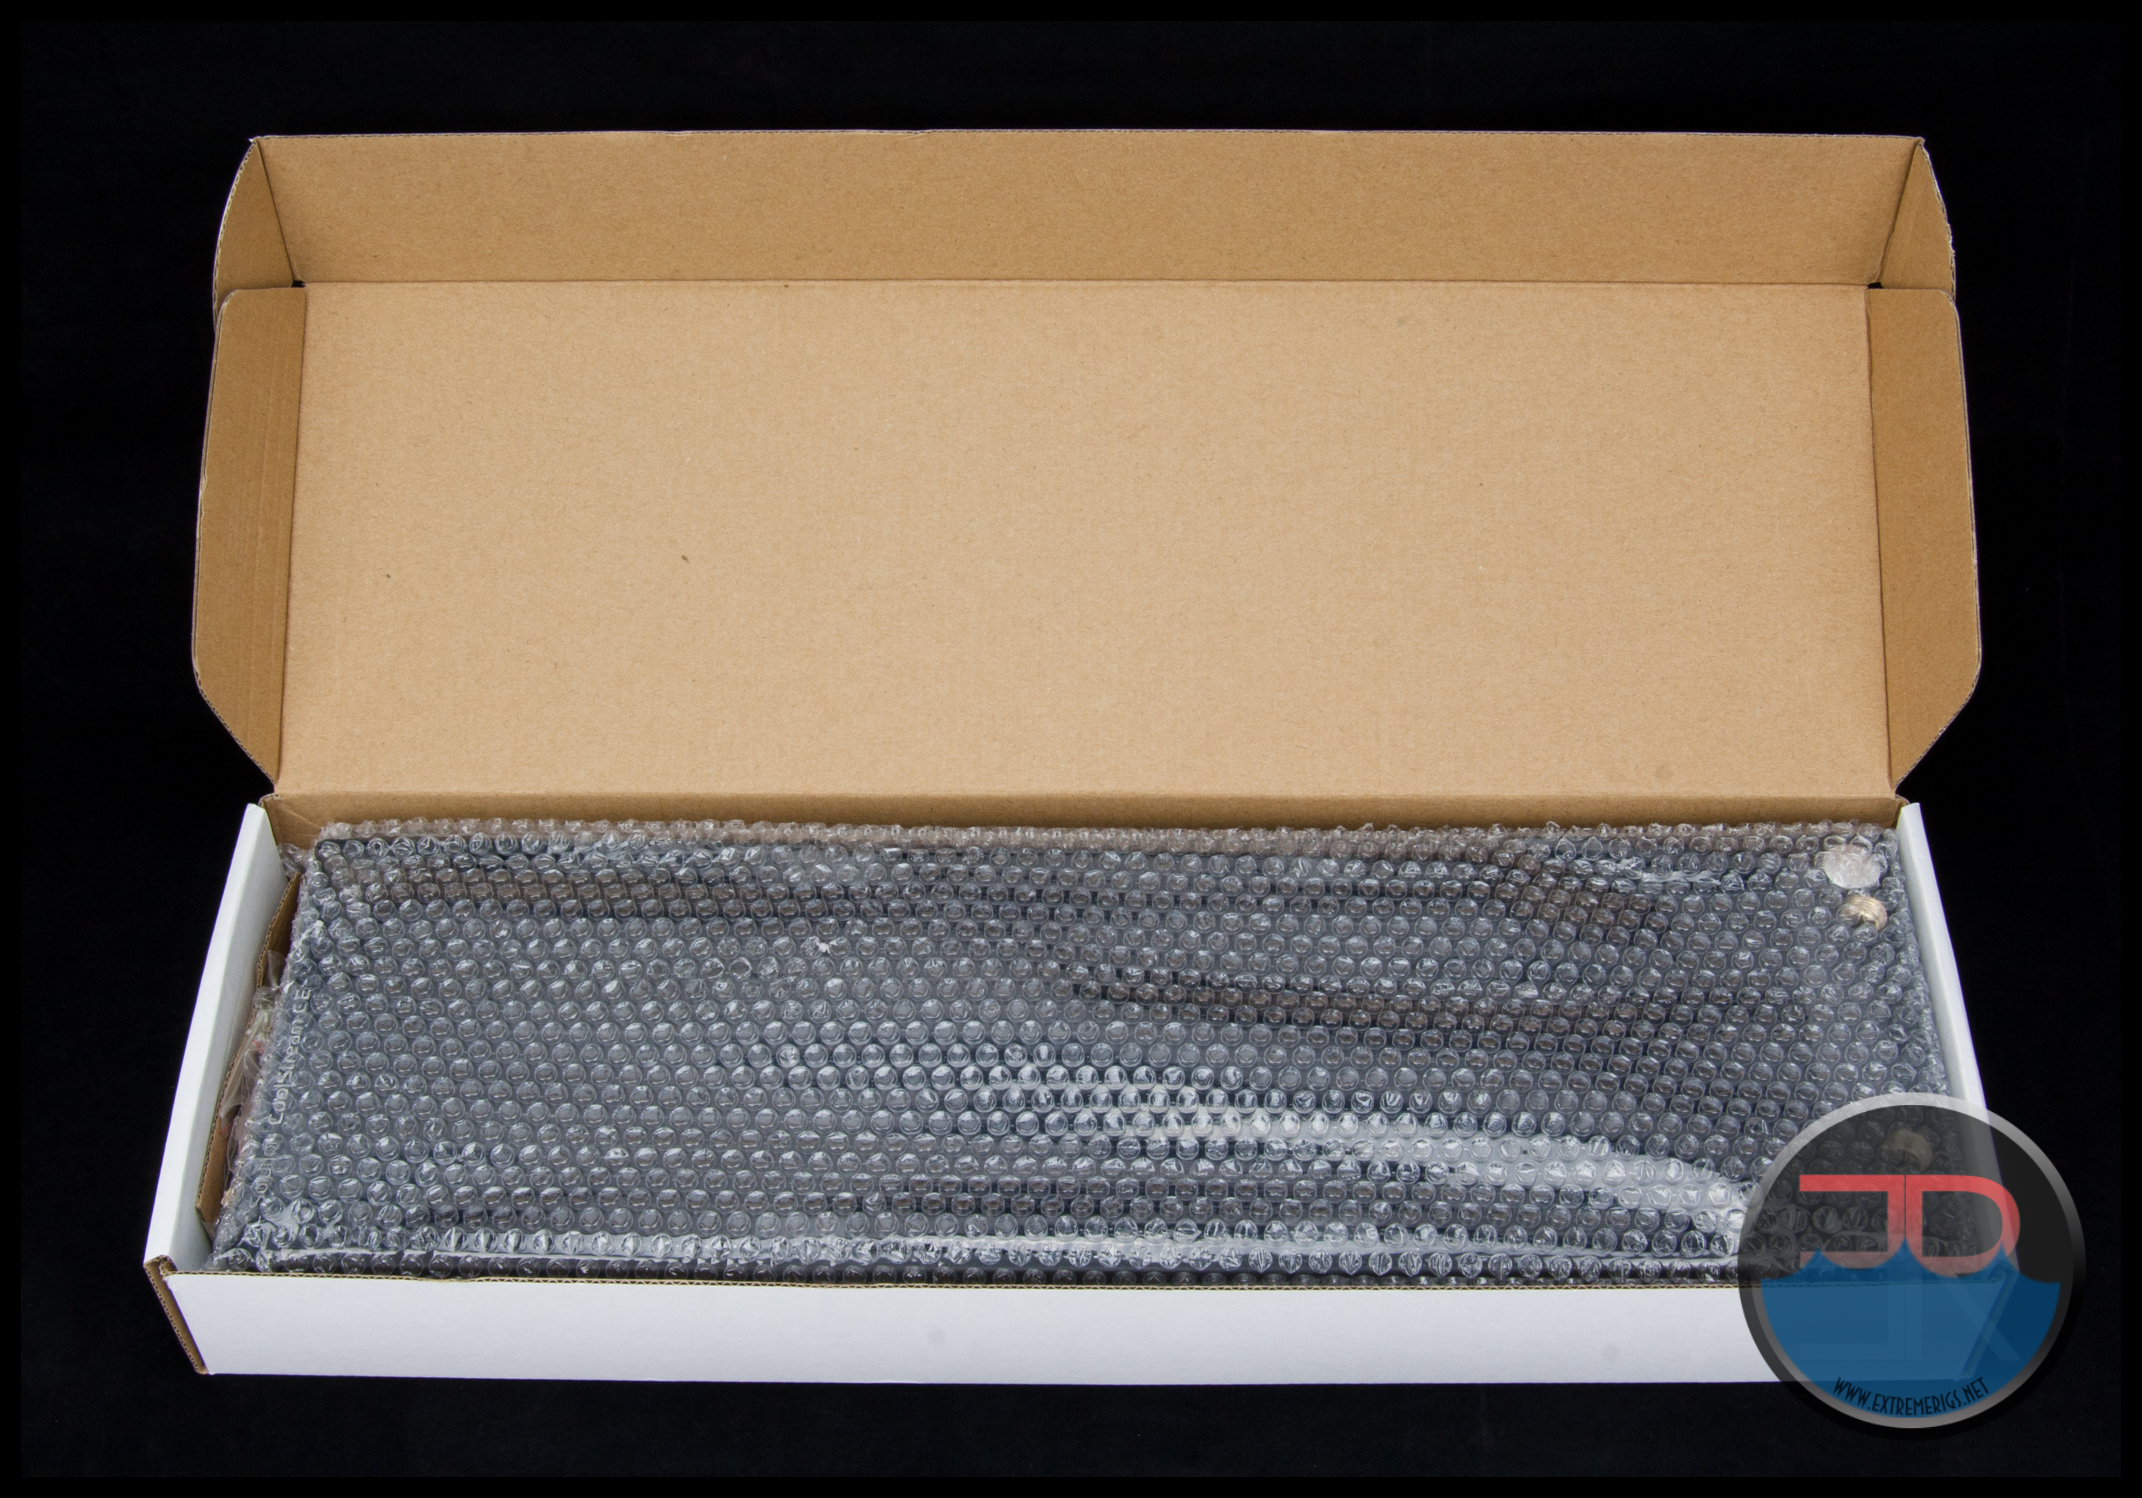 The radiator has a bubble wrap sleeve which offers some addition protection during shipping.
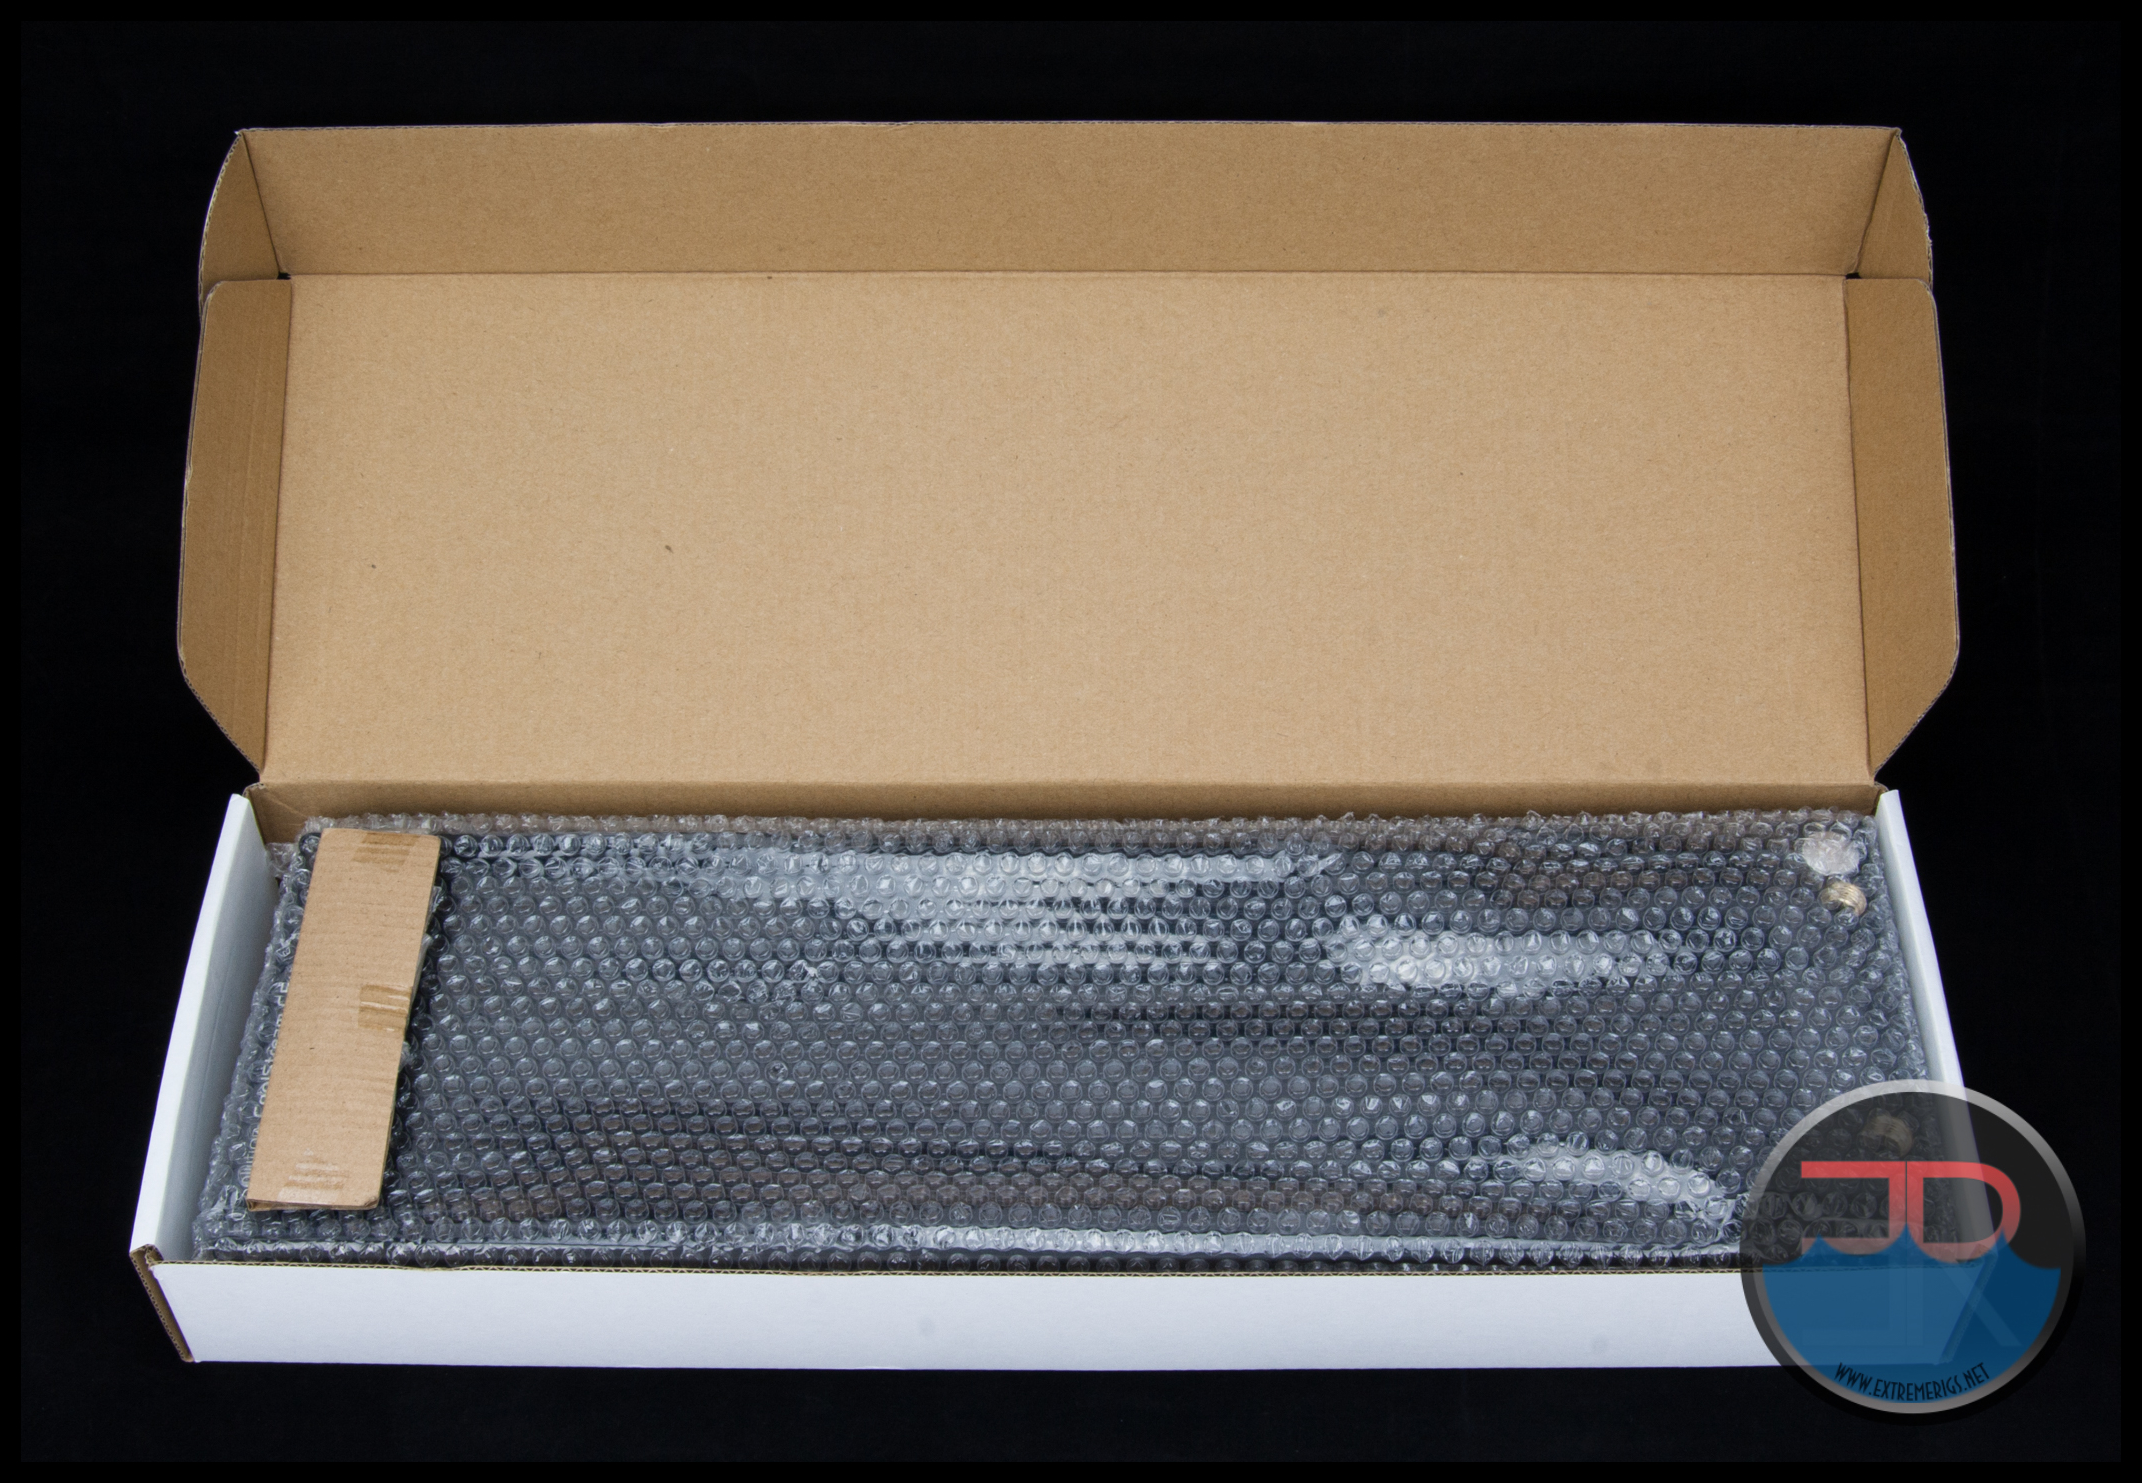 The accessories are in a piece of taped up cardboard tucked safely at one end of the box. This prevents the accessories becoming loose during transport and helps keep the fragile core from sustaining any damage. Simple yet effective.
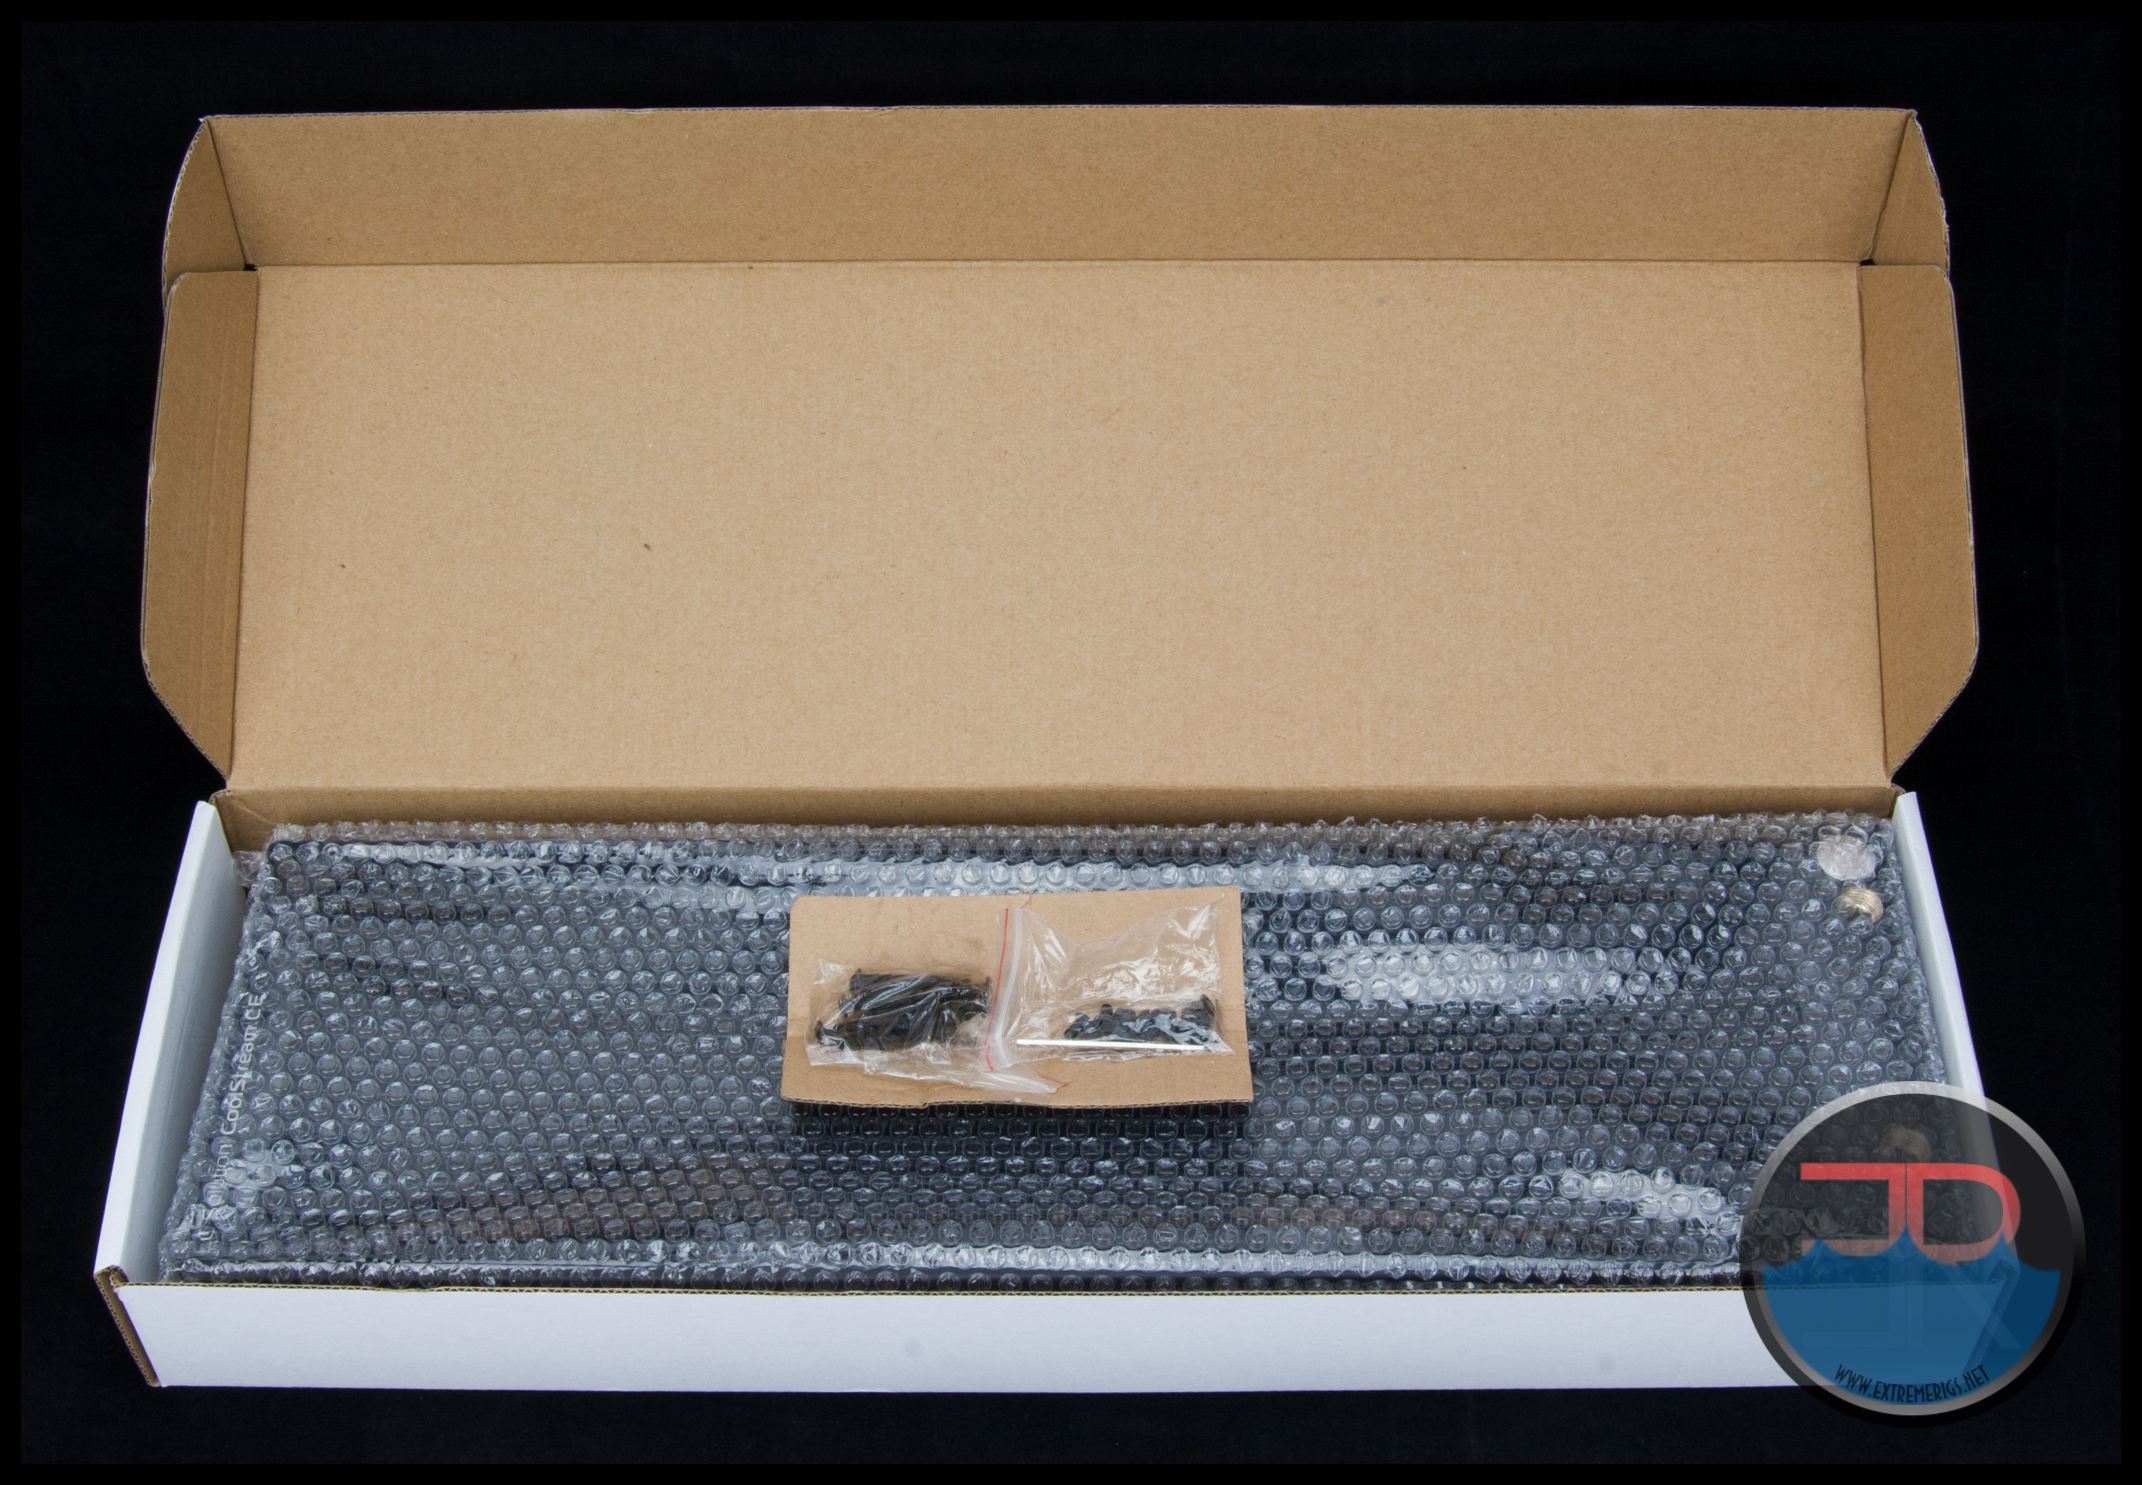
Extent of delivery as listed by EK:
Enclosed:
– EK-CoolStream CE series radiator /w two pre-installed G1/4 extenders
– Flat-head UNC 6-32 screws (l=30mm)
– Flat-head UNC 6-32 screws (l=5mm)
– Allen key 2,5mm
– Allen key 9mm
My review sample was not supplied with the 9mm allen key which is used for loosening or tightening the port extenders as we will see later.
 The following caution note is from the EK website, but was not found anywhere on or in the package in which the review sample arrived.
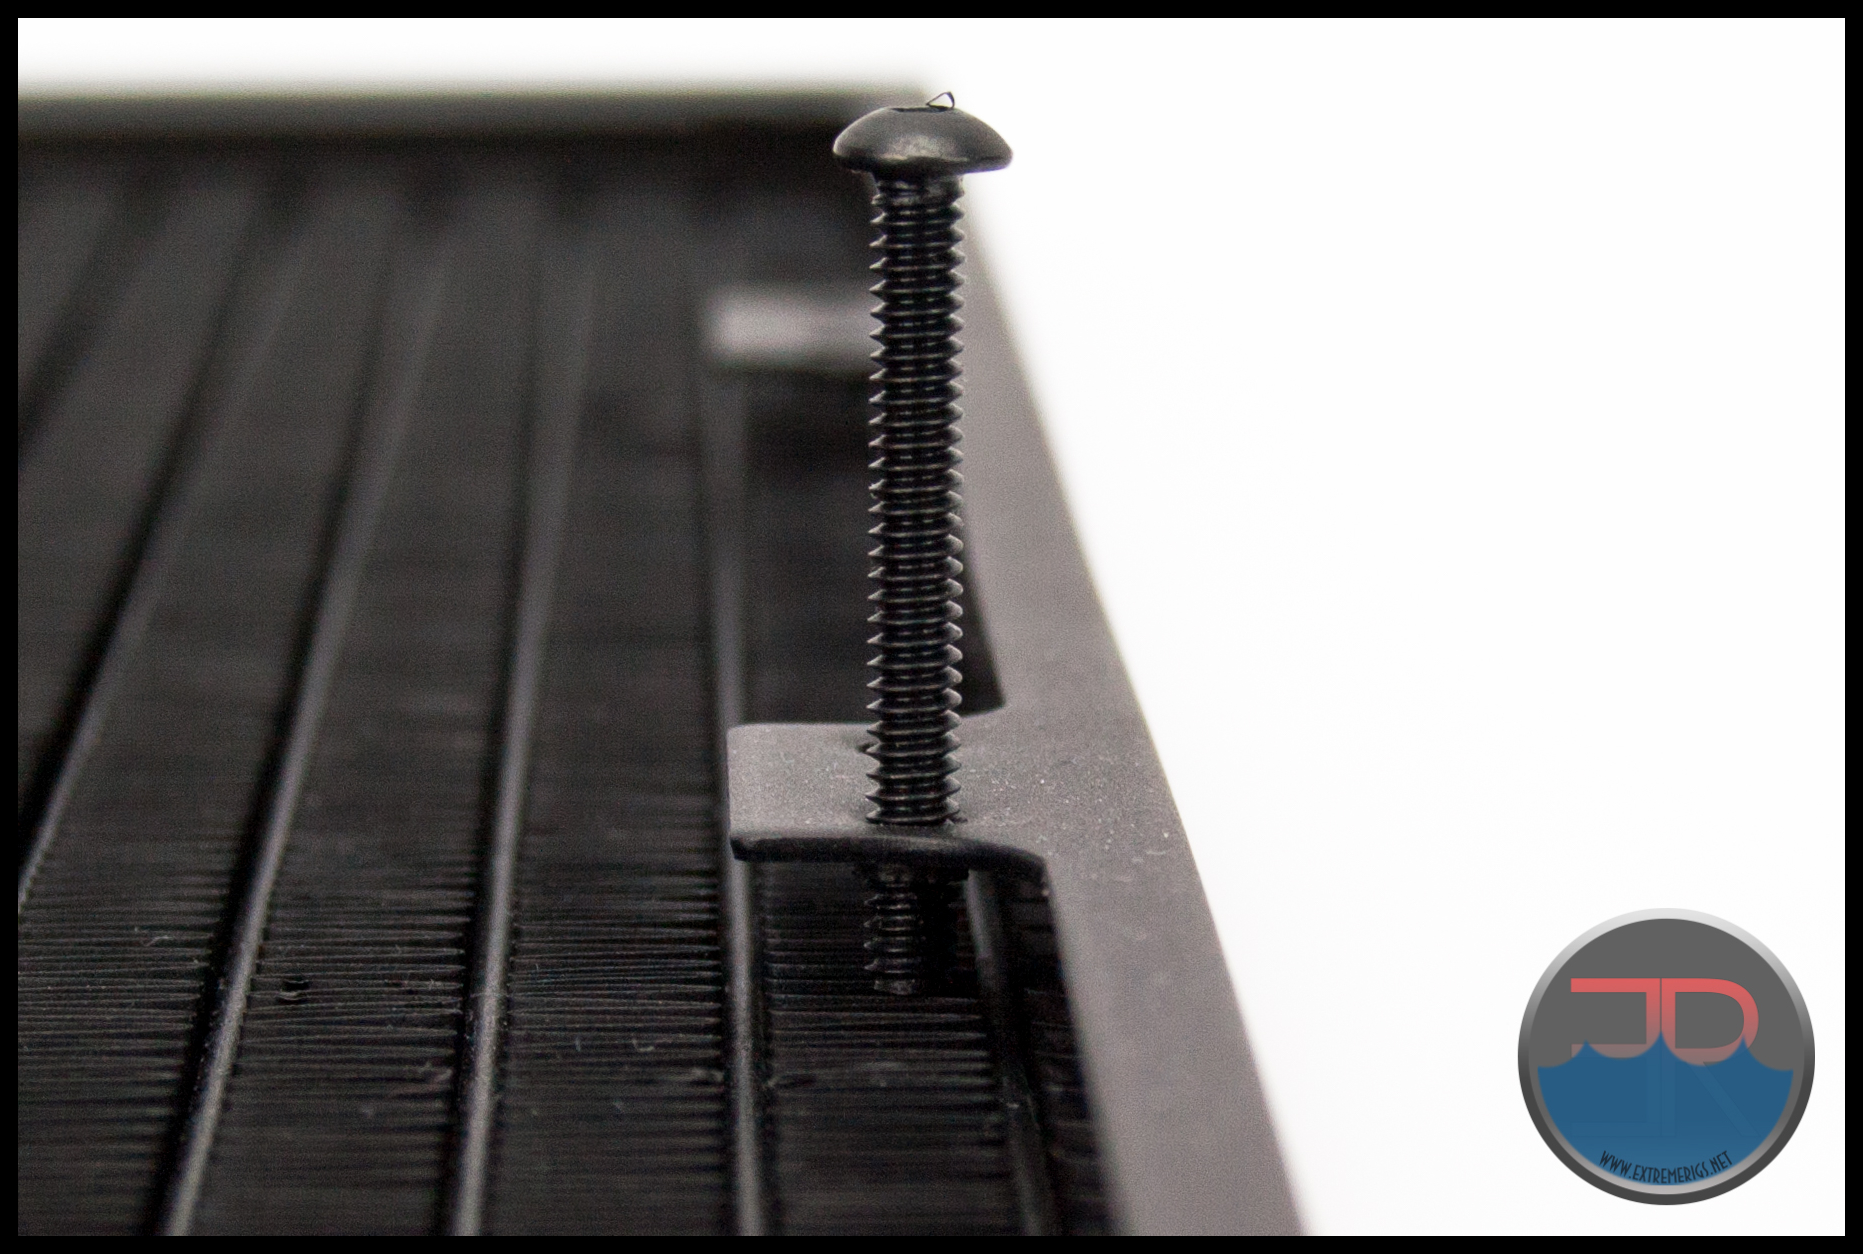
So we have been warned, choose screw lengths carefully, particularly is using a mounting bracket or vibration reducing gaskets and remember to make compensation for the amount of compression when tightening down with gaskets installed.

Onwards to technical specifications!
Technical Specifications
Technical specifications: as listed by EK.
Technical details:
Material:
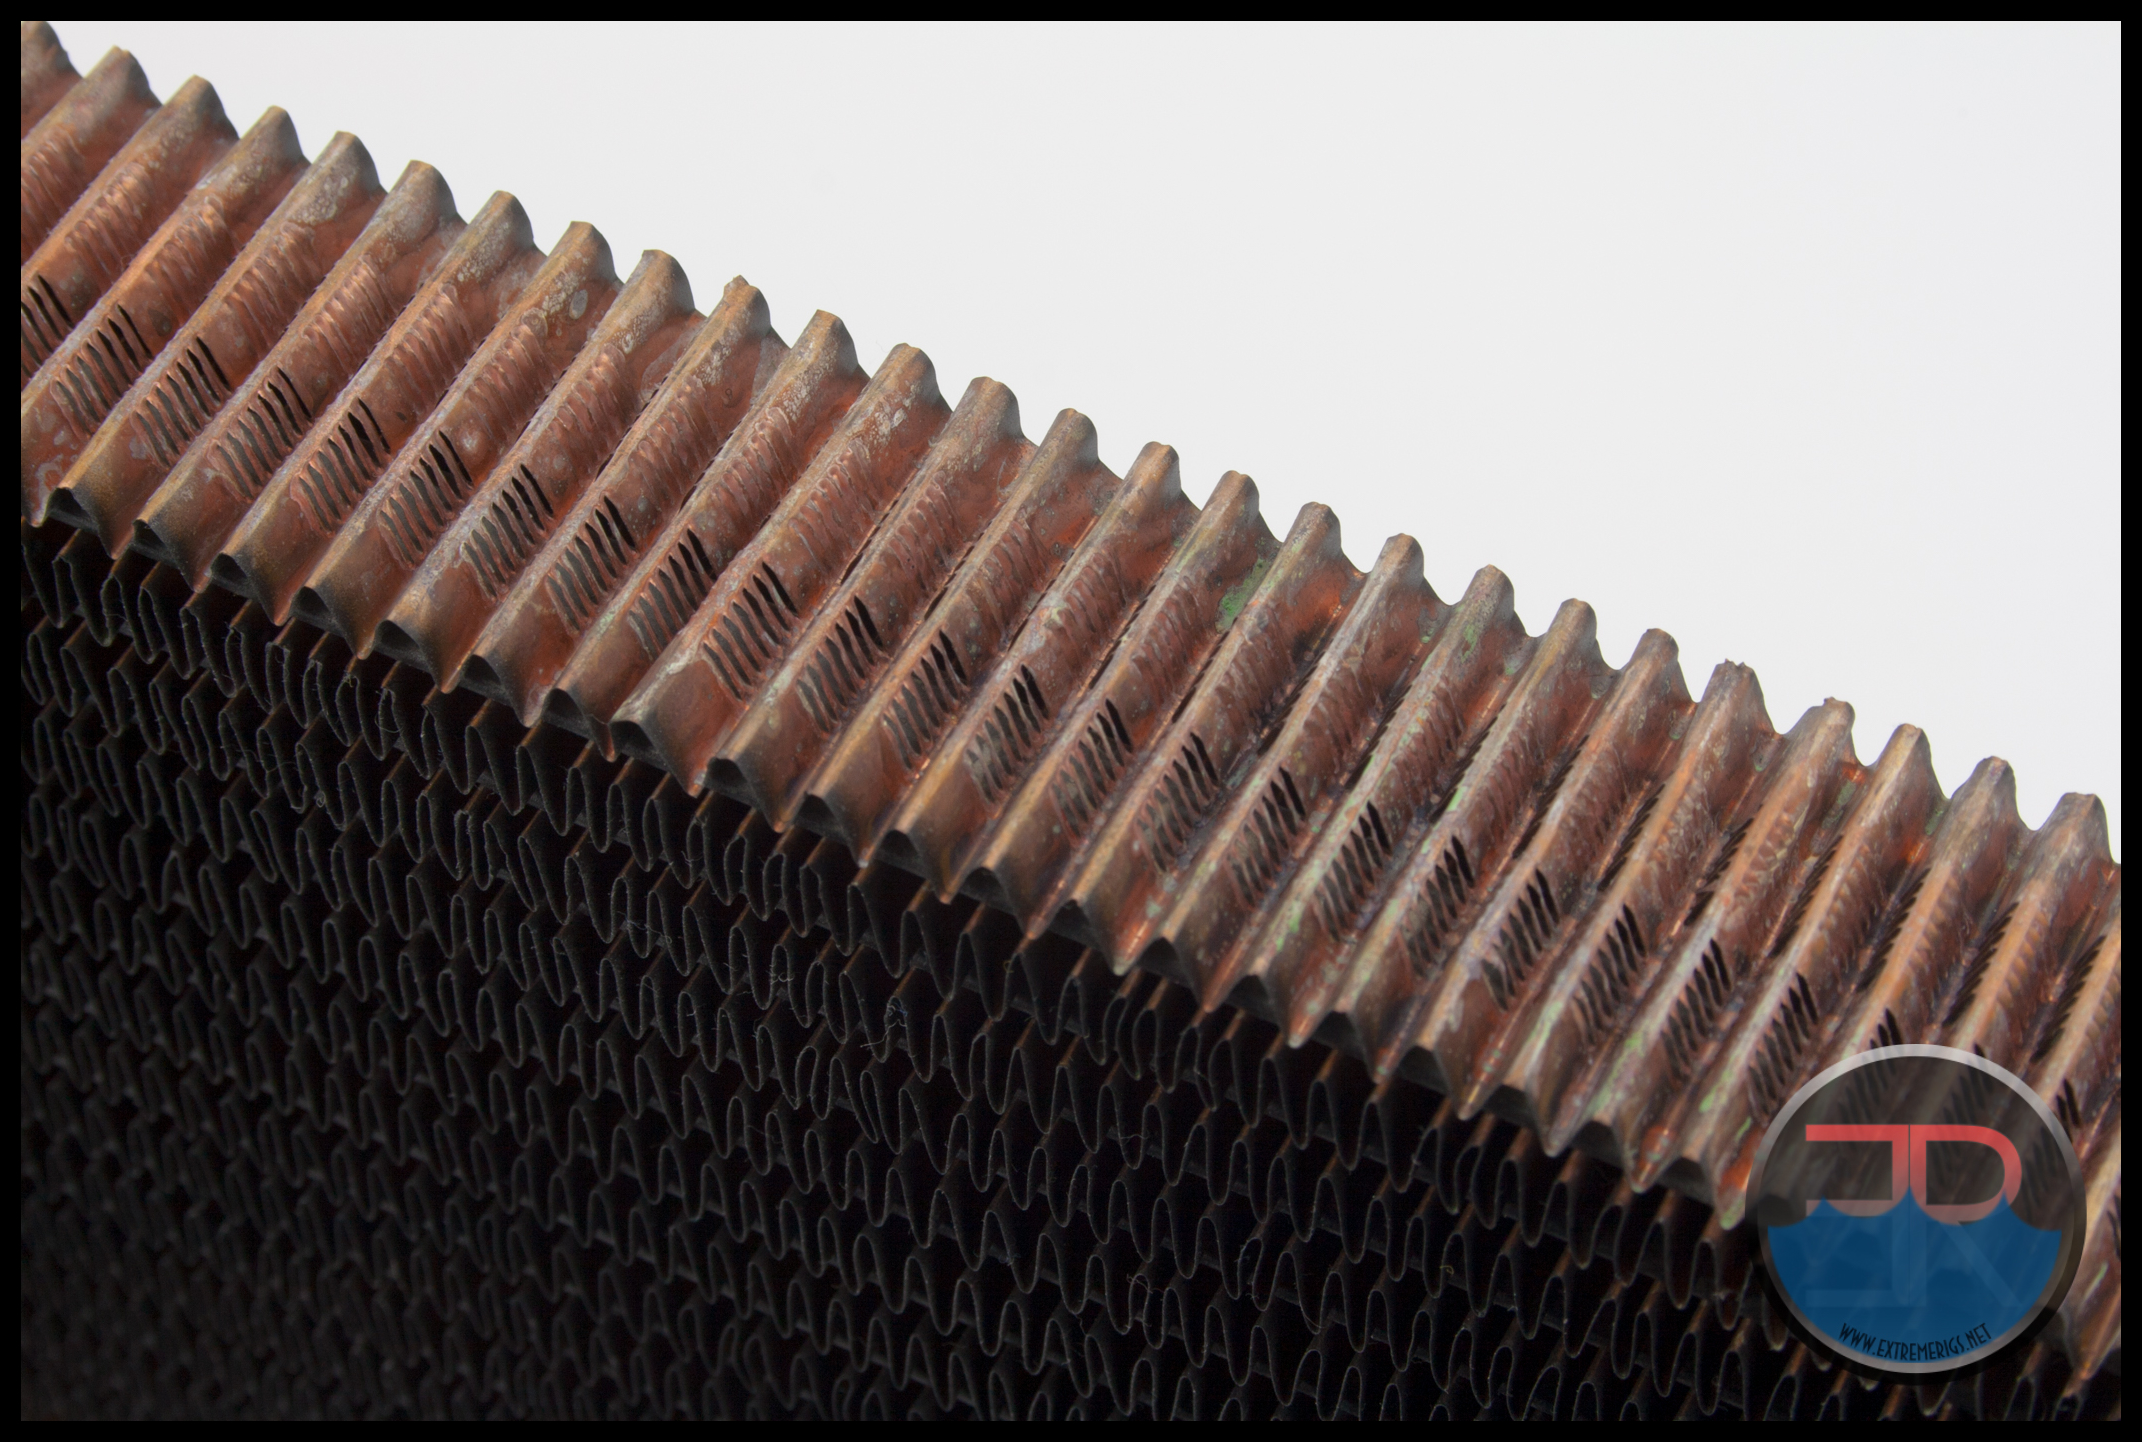
– Copper fins
– 90% copper tubing (H90)
– Brass chambers
– Aluminum/Steel housing
Dimensions: 460 x 145 x 45mm (L x W x H)
Weight: 1.59kg
Liquid Capacity: ~370mL
FPI: 16
Port threads: 2x G1/4
Fan compatibility: any standard size 140x140x25mm fan; UNC 6-32 thread tapping
Pressure tested: 1bar(g)
The following technical drawings are of the CE140.
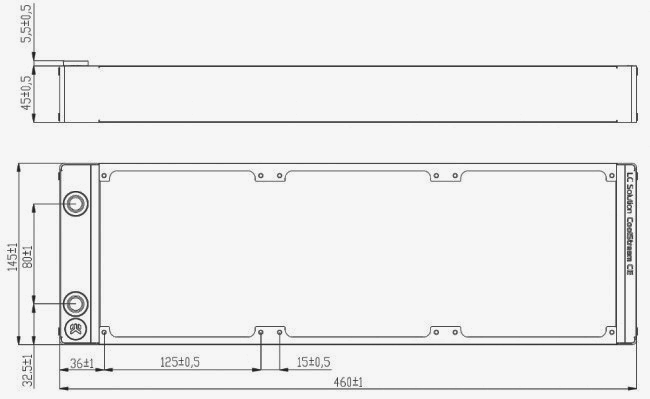
Note the top image has the extra 5.5mm (-+ .05) section which is the amount the port extenders sit proud of the casing. On the review sample this measured 5.3mm.
Dimensions Measured on the Radiator Tested:

Radiator Core Dimensions:
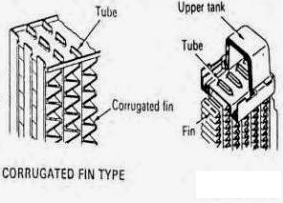
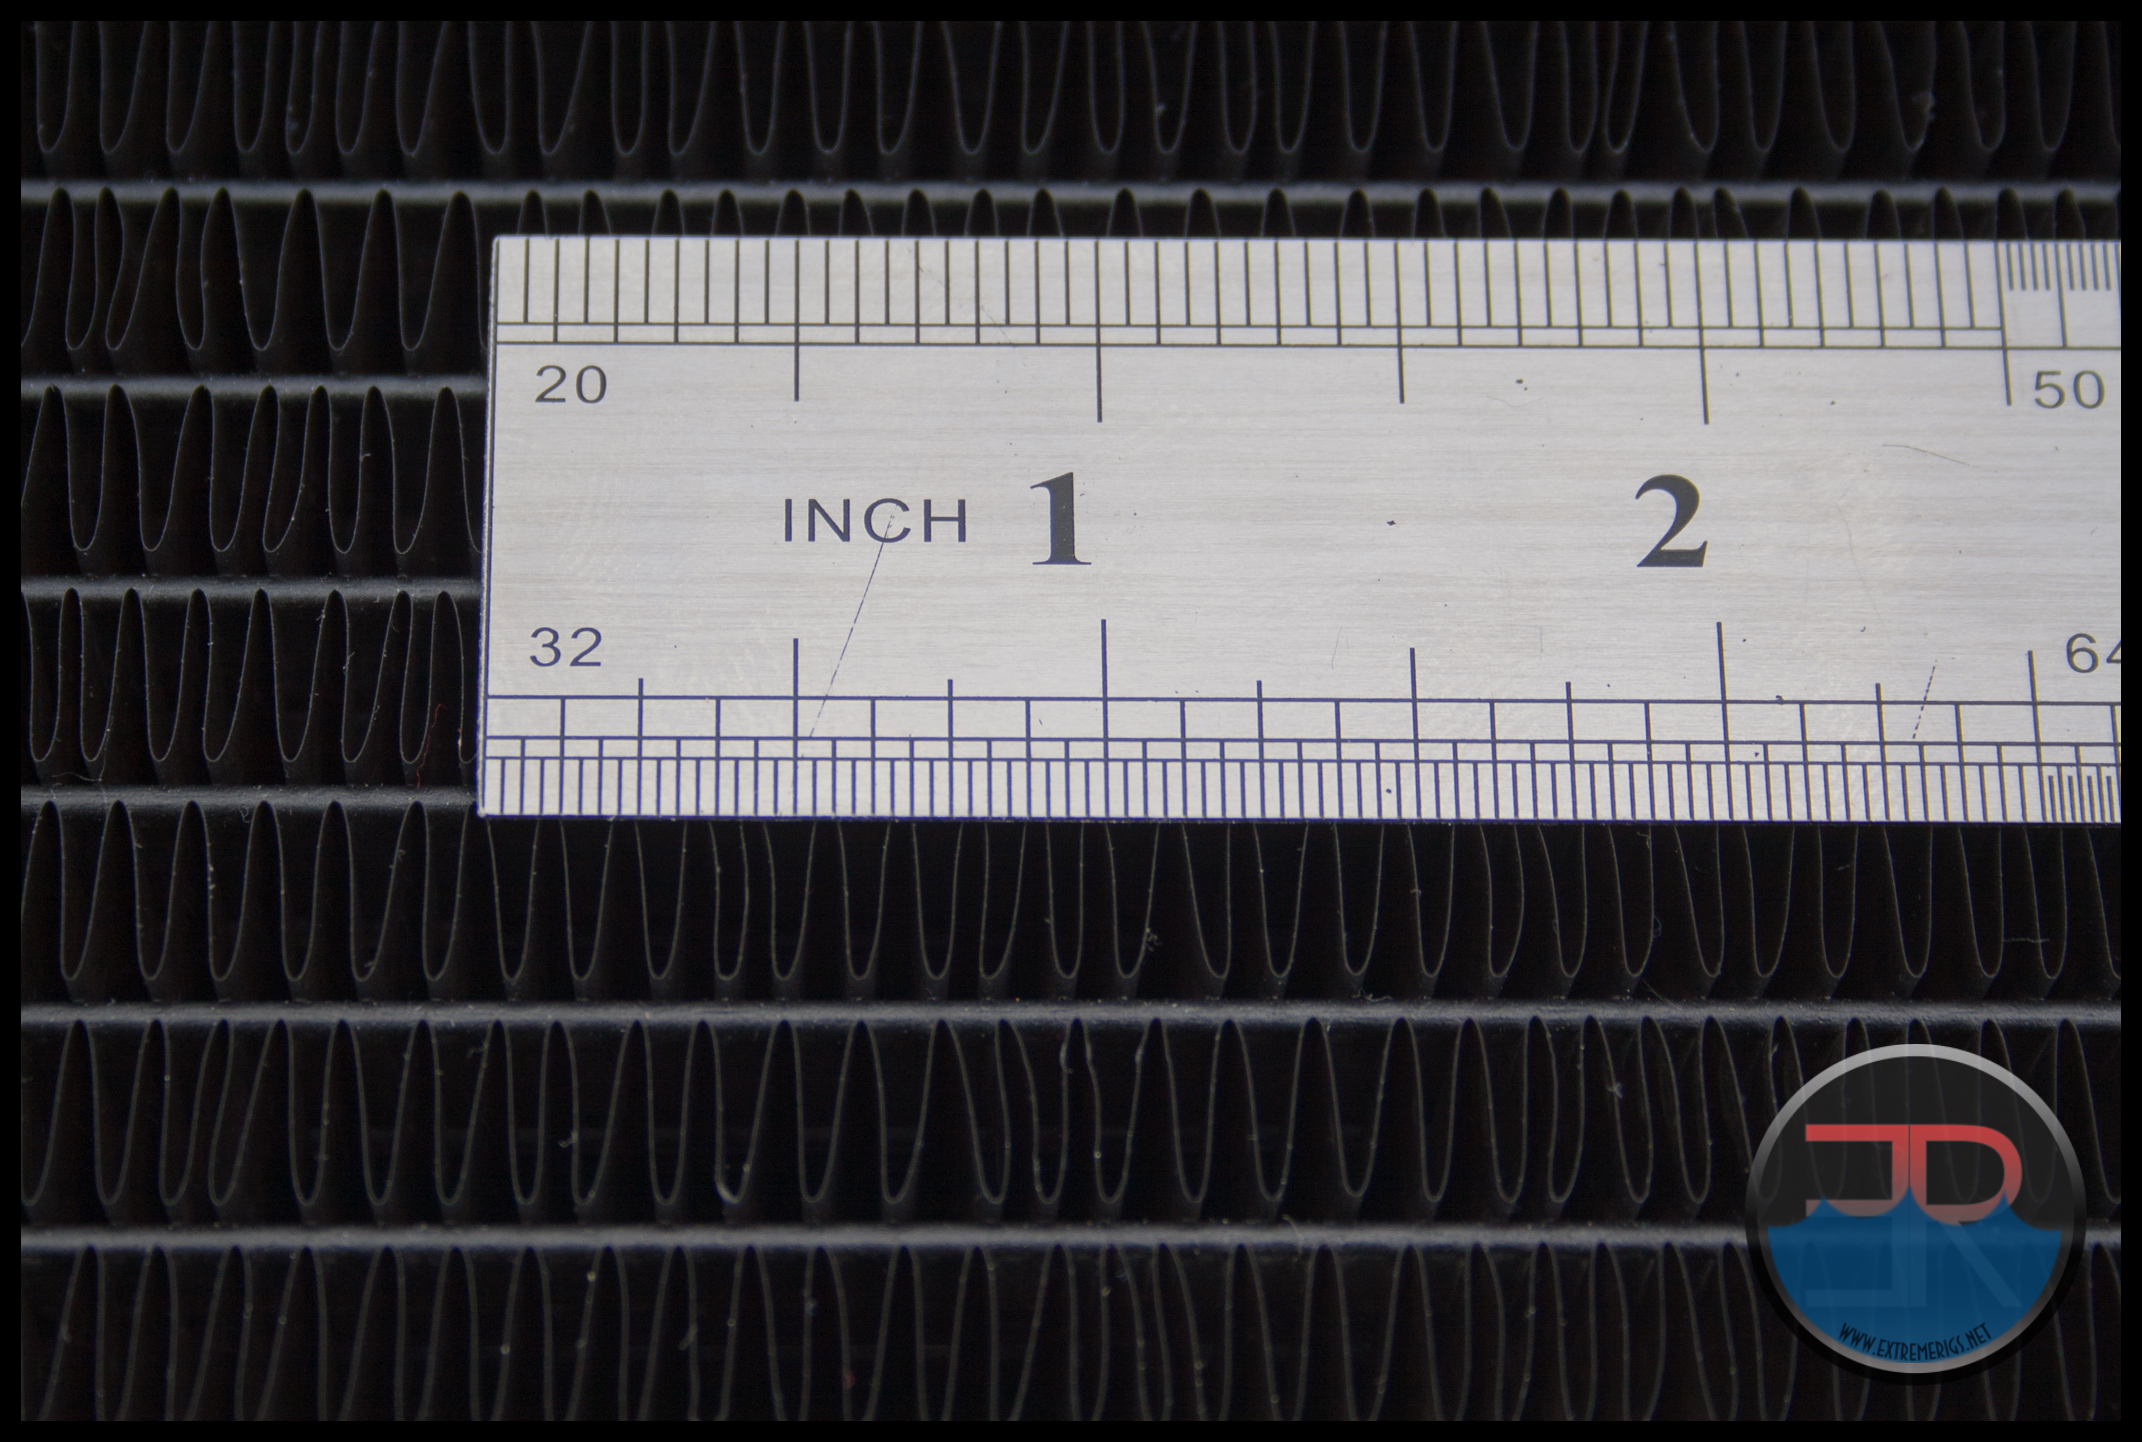
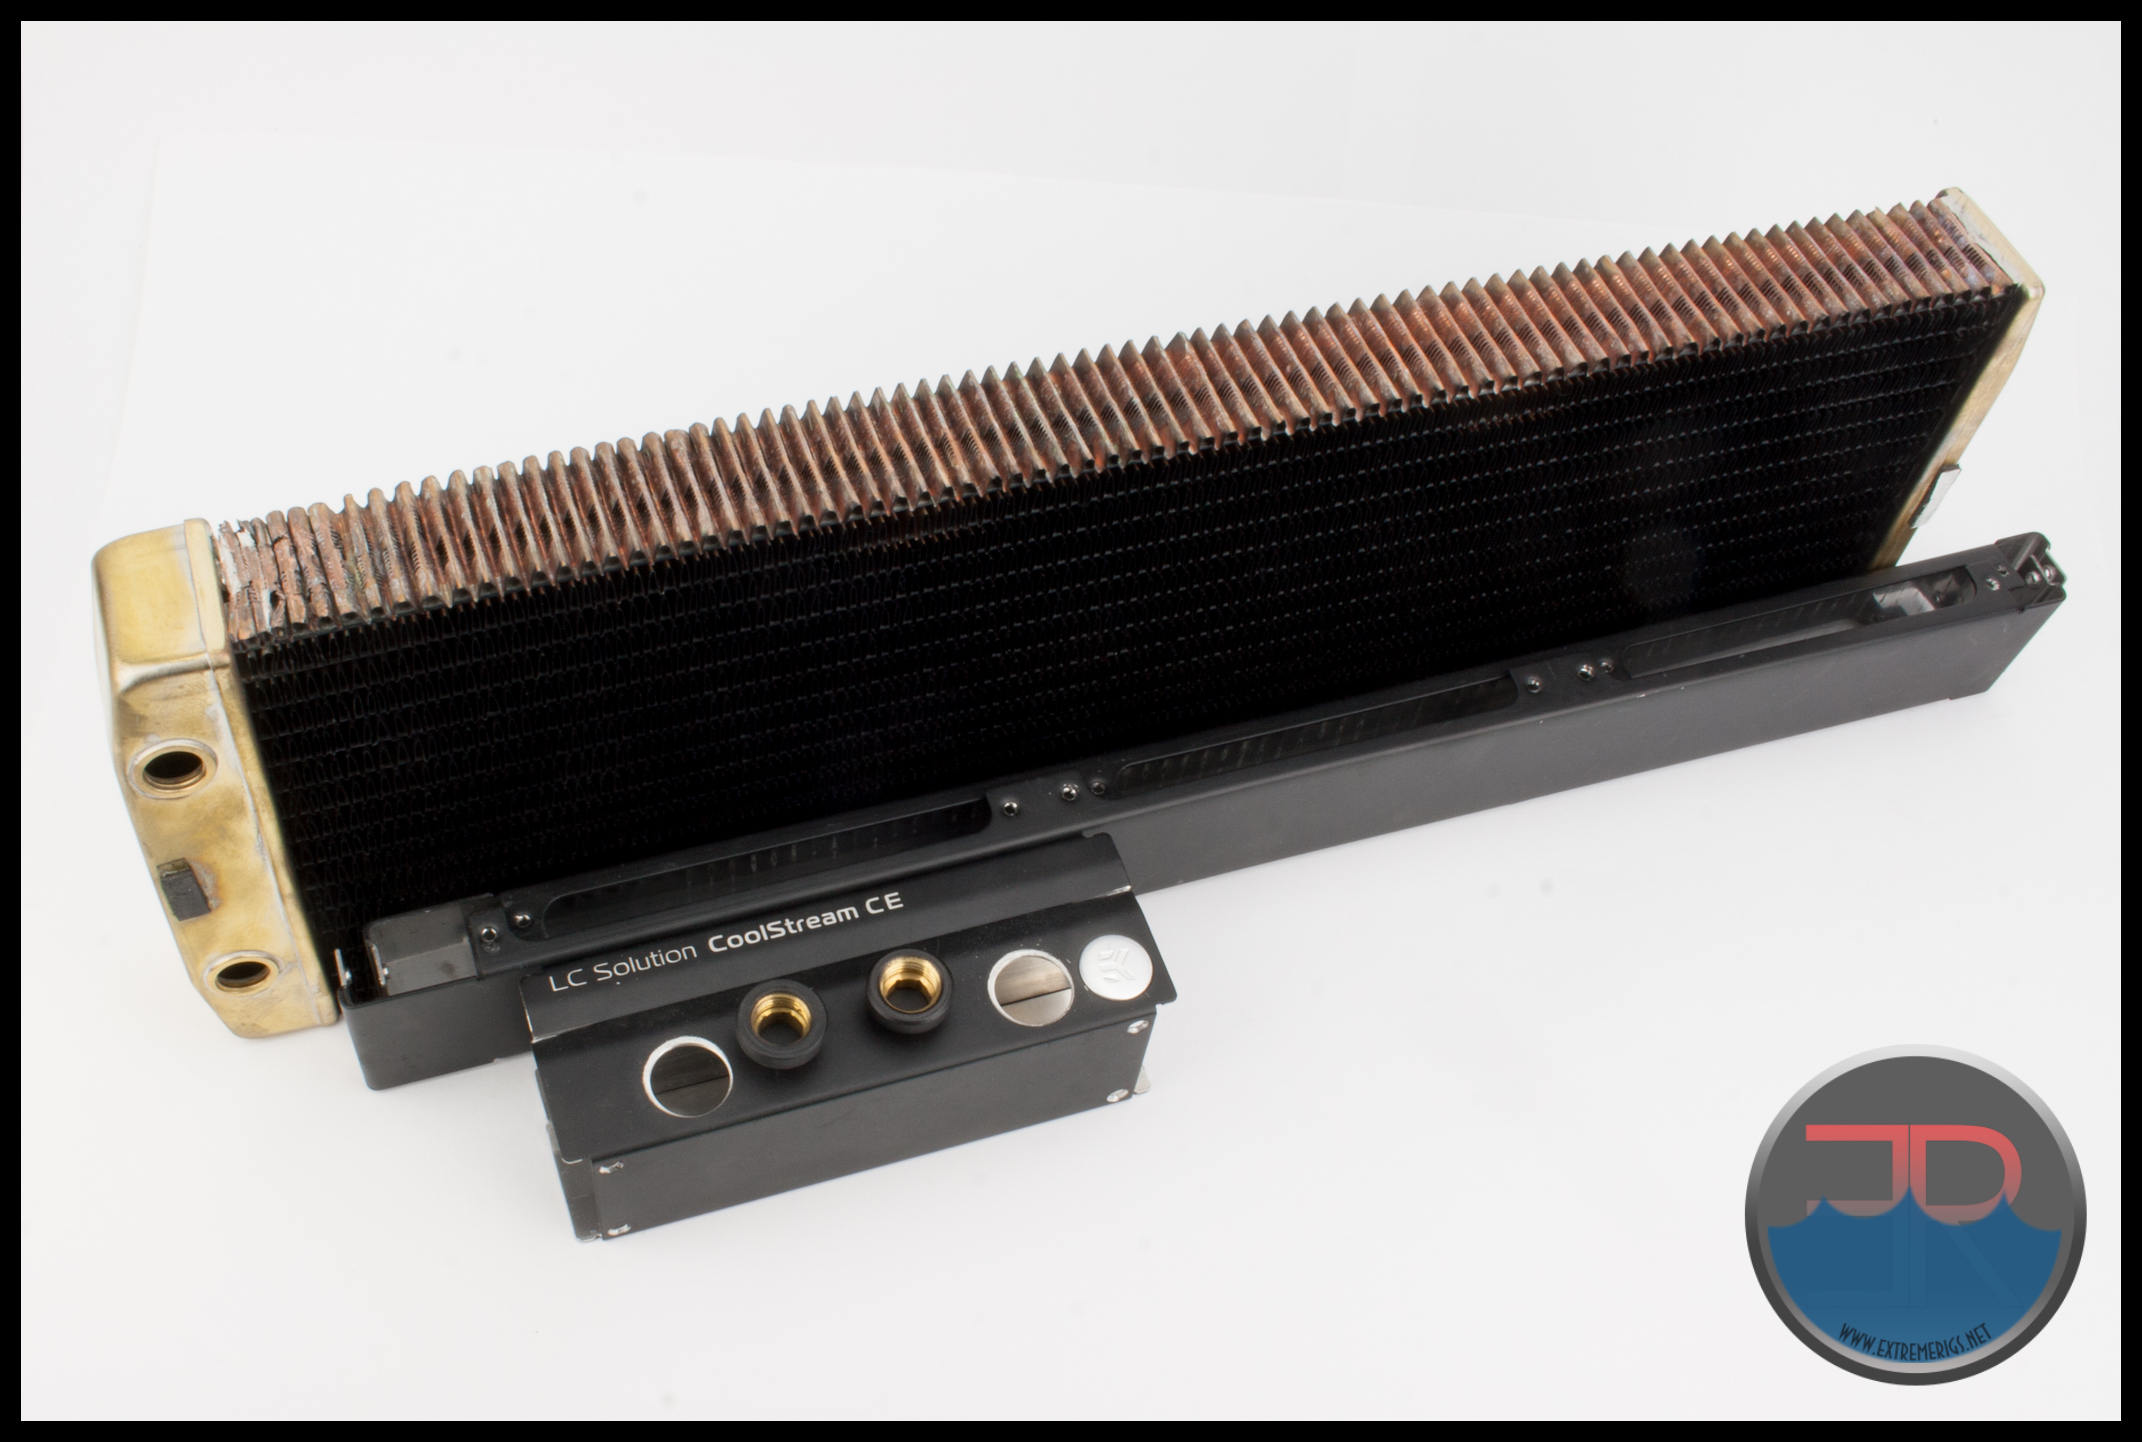
 The core is made up of 2 rows of 15 tubes arranged in the standard U-Flow configuration. The fin arrangement is made of single non louvered fins with an 18 FPI count. The high fin count and medium thickness core should equate to some excellent medium fan speed results.
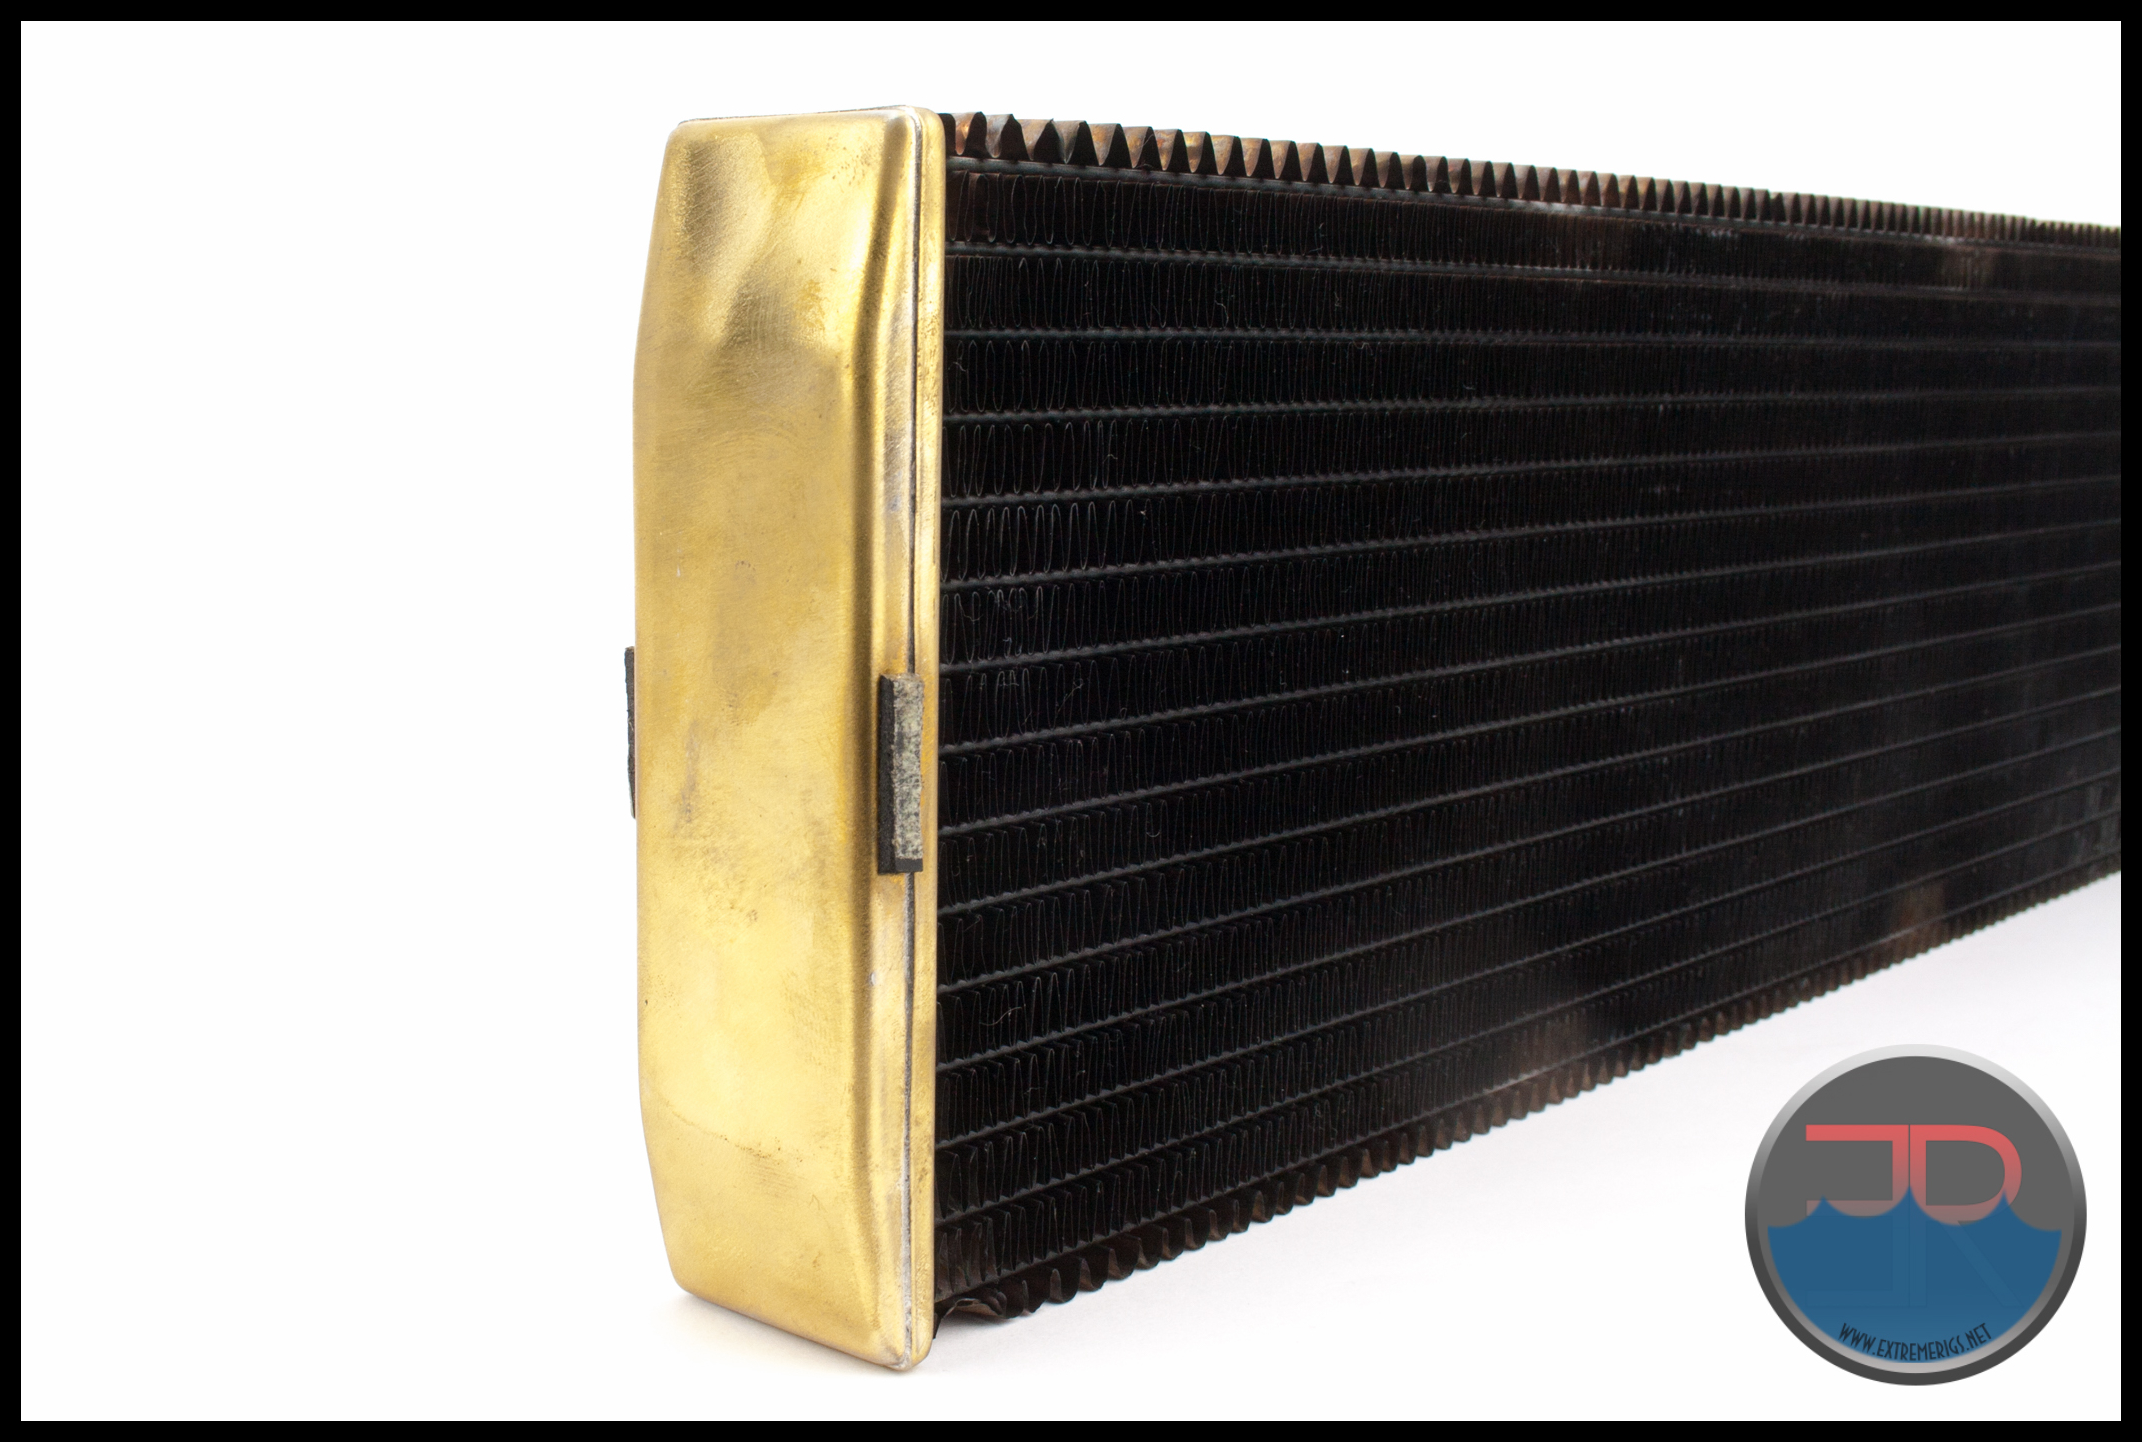
The following picture is a reference which shows a typical U-Flow coolant flow path, where the coolant travels up all the tubes on one side (left in pic) of the rad and then returns down the other side. U-Flow is most easily recognized when the port end has 2 separate tanks.
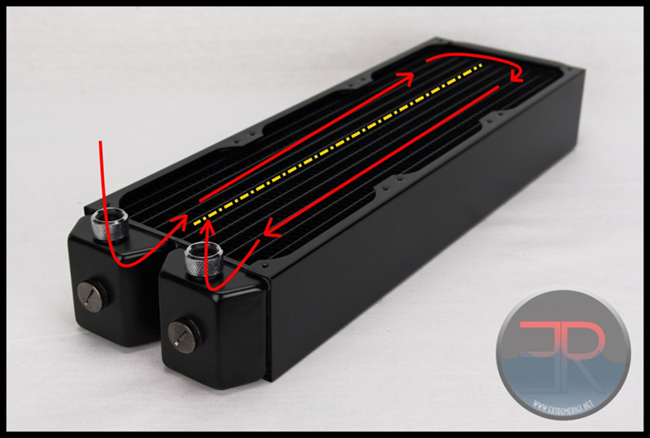
The CE 420 has a brass plate inside it’s port end tank and is covered by the external casing so is difficult to distinguish the U-Flow path without dis-assembling and closer inspection.
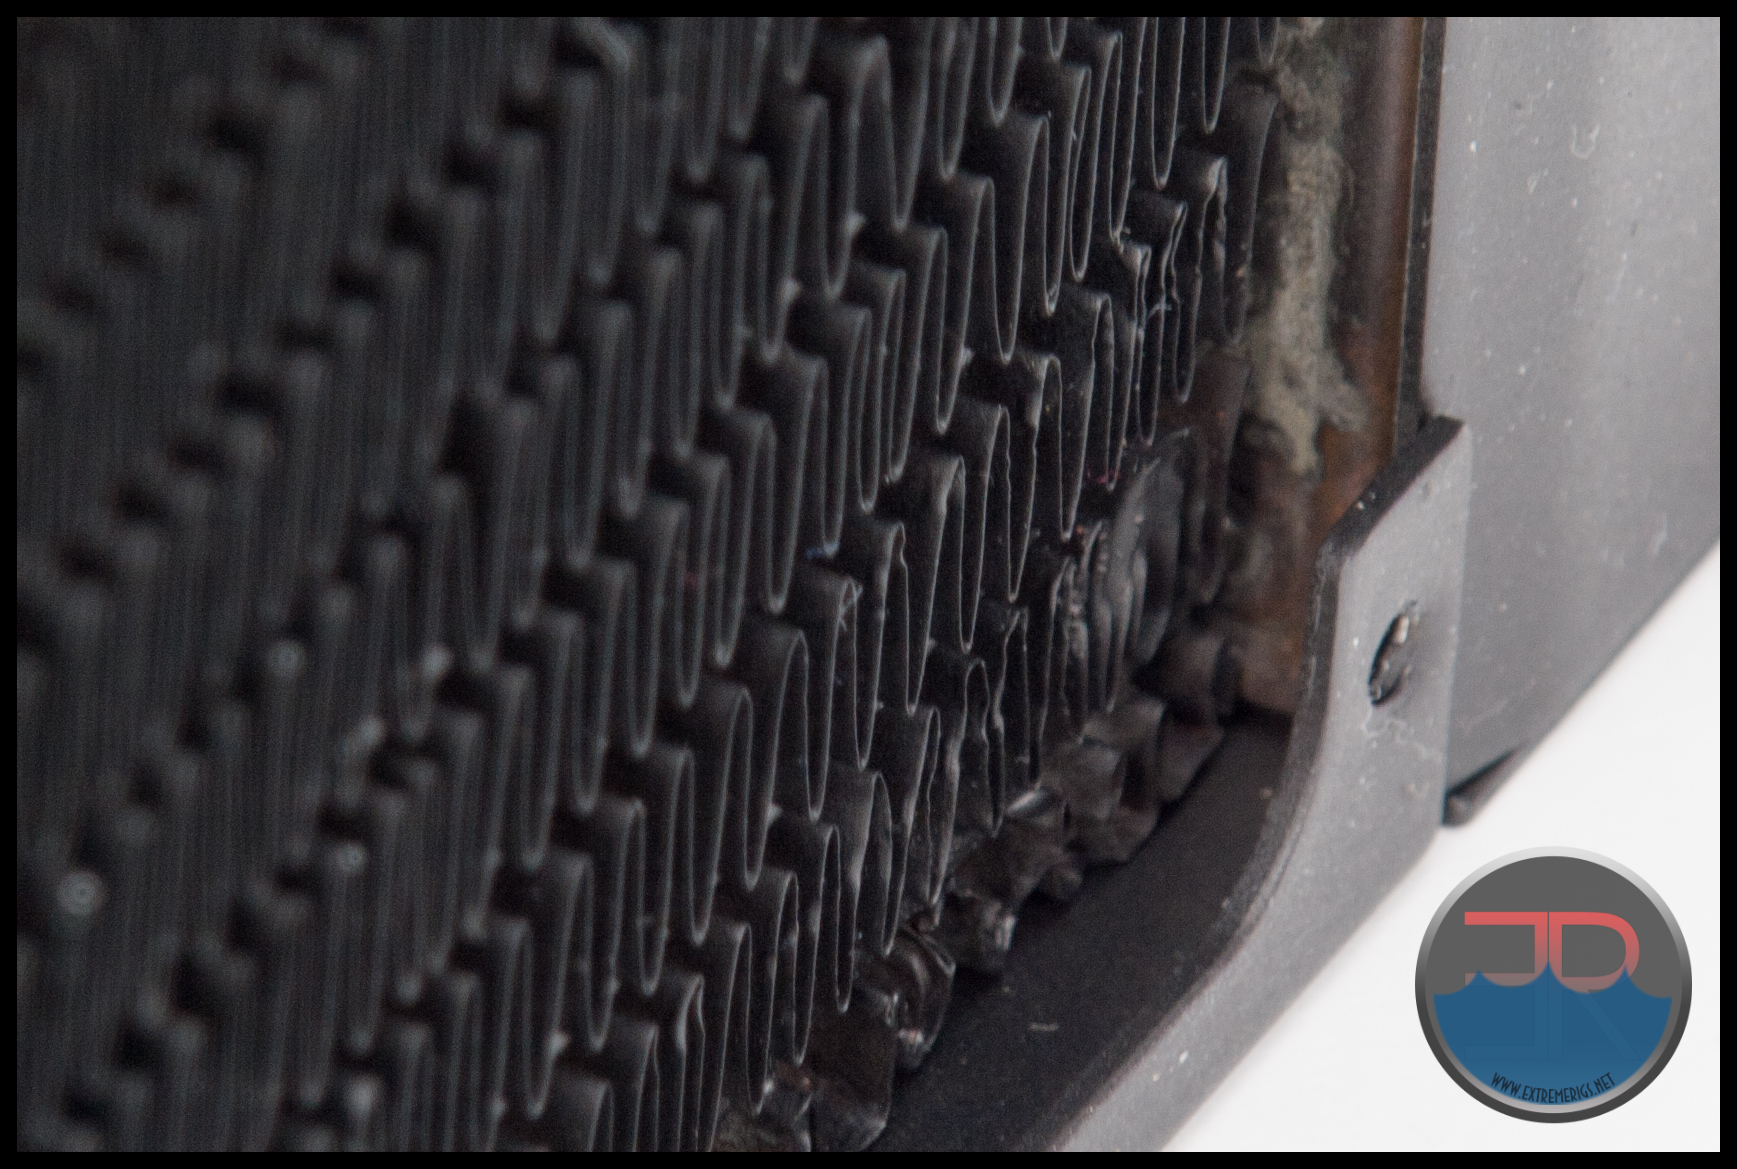
The single louvered fins are spaced extremely evenly between the tubes for such a high fin count.
Our 18 FPI count is higher than the 16FPI in the specifications provided by EK.
Previously I mention the fins being non louvered, this is true for all the fins except the outside row on each side which are louvered for some reason and have a much lower fin count.
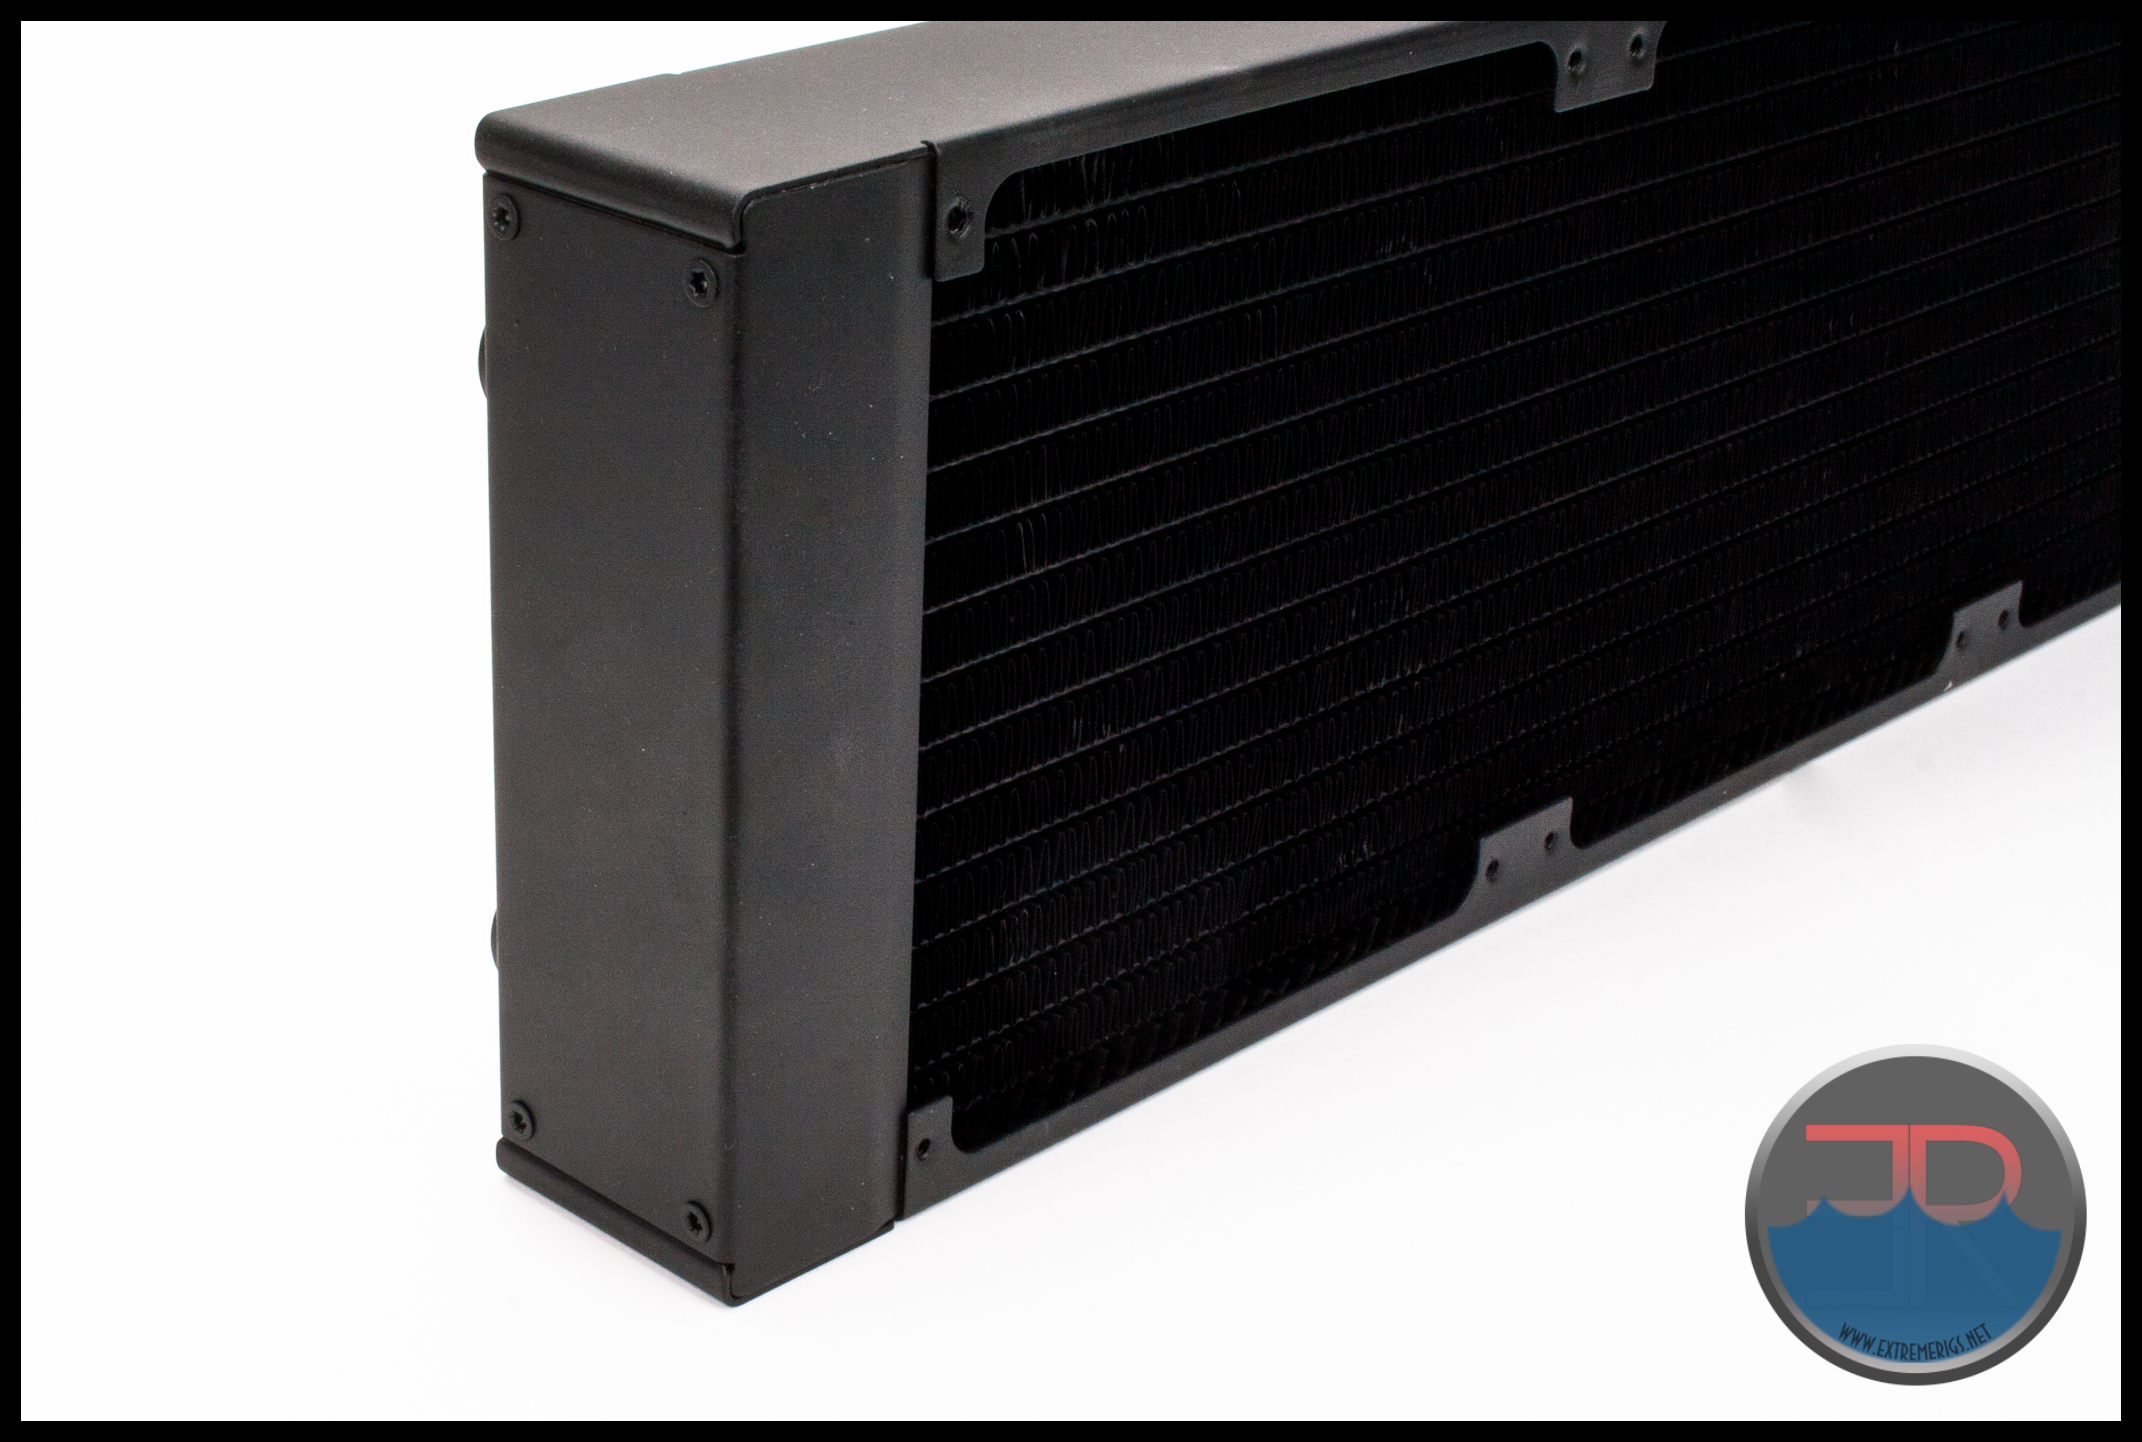
Finish and Features
The CE 420 has a Satin Black finish which looks great and is very smooth to touch. Close inspection shows the finish is actually quite bumpy. In any case the finish is excellent and looks great.
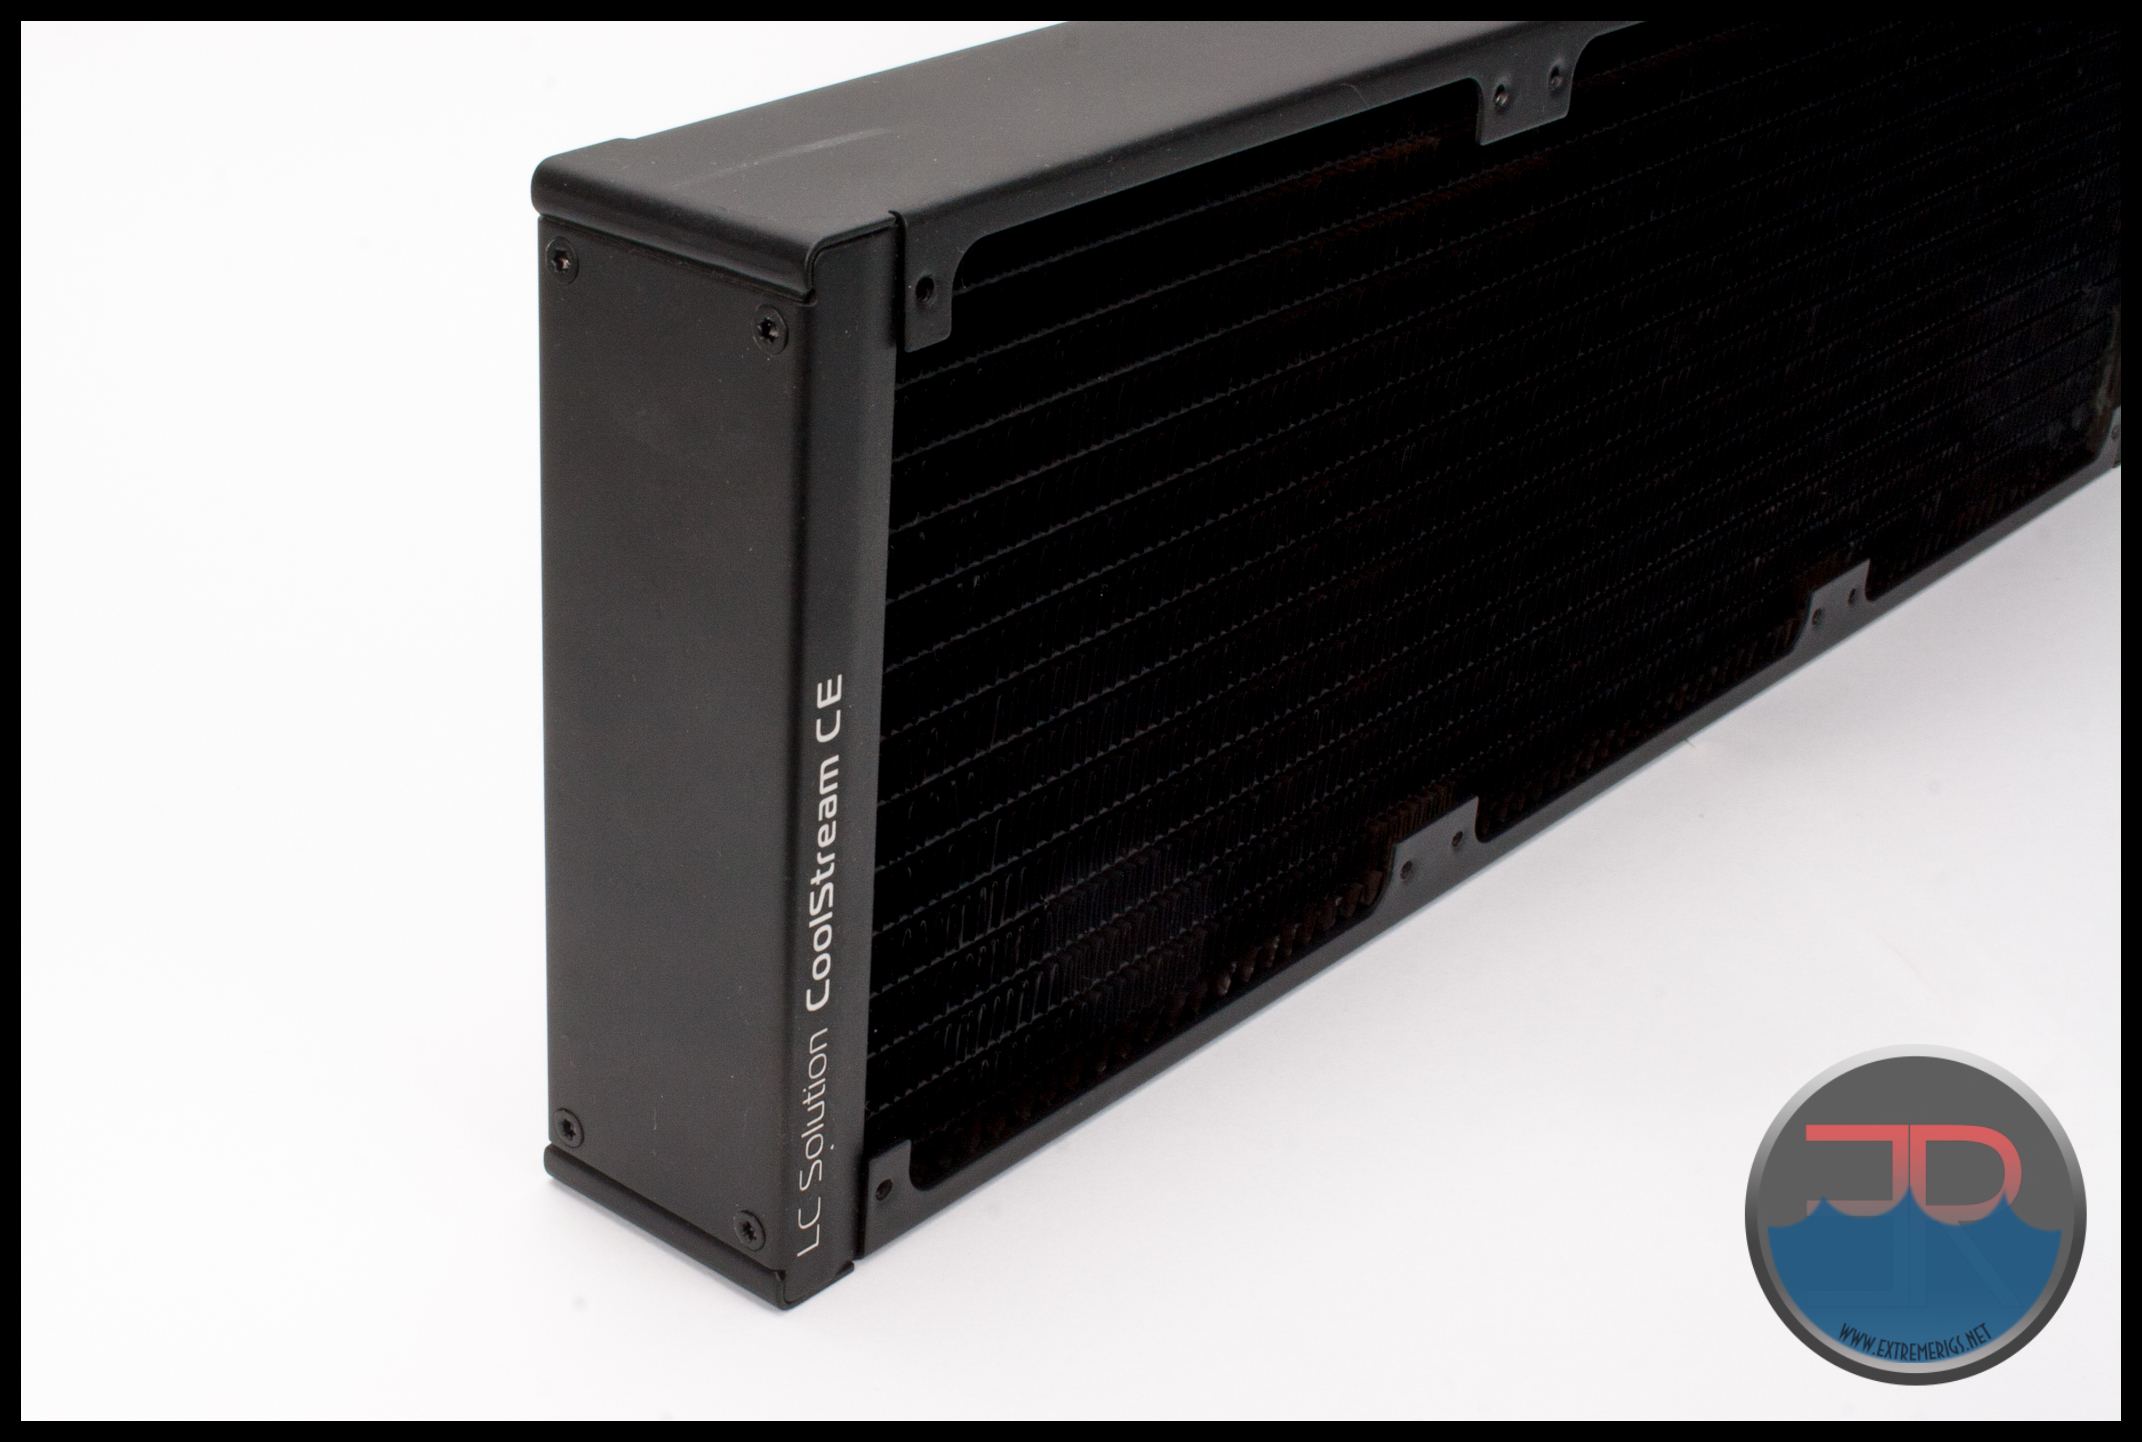
At the non-port end is the seemingly mandatory branding we find on almost all of our gear. At least it’s in an inconspicuous spot and tastefully done.
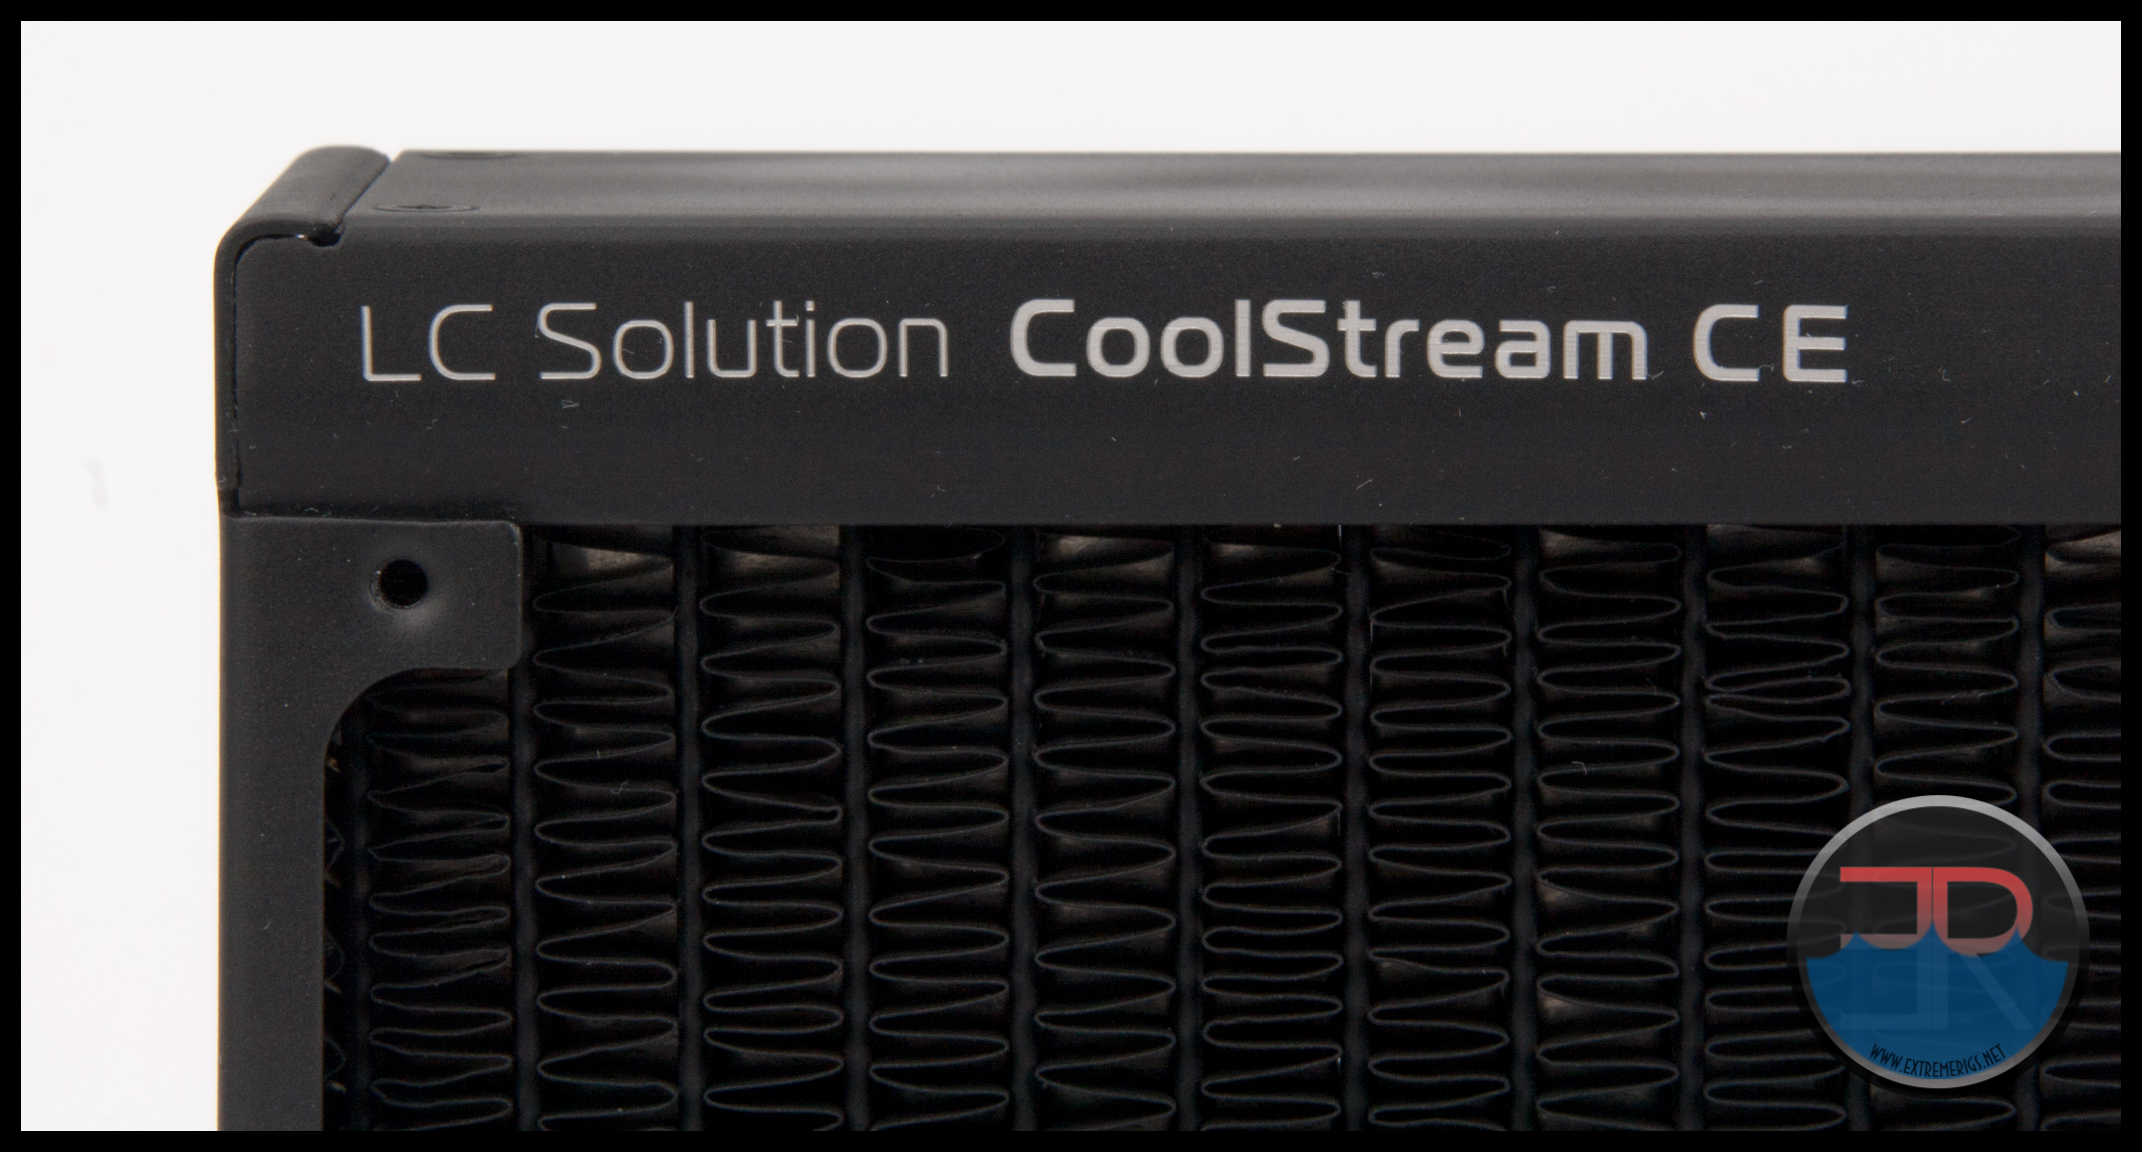
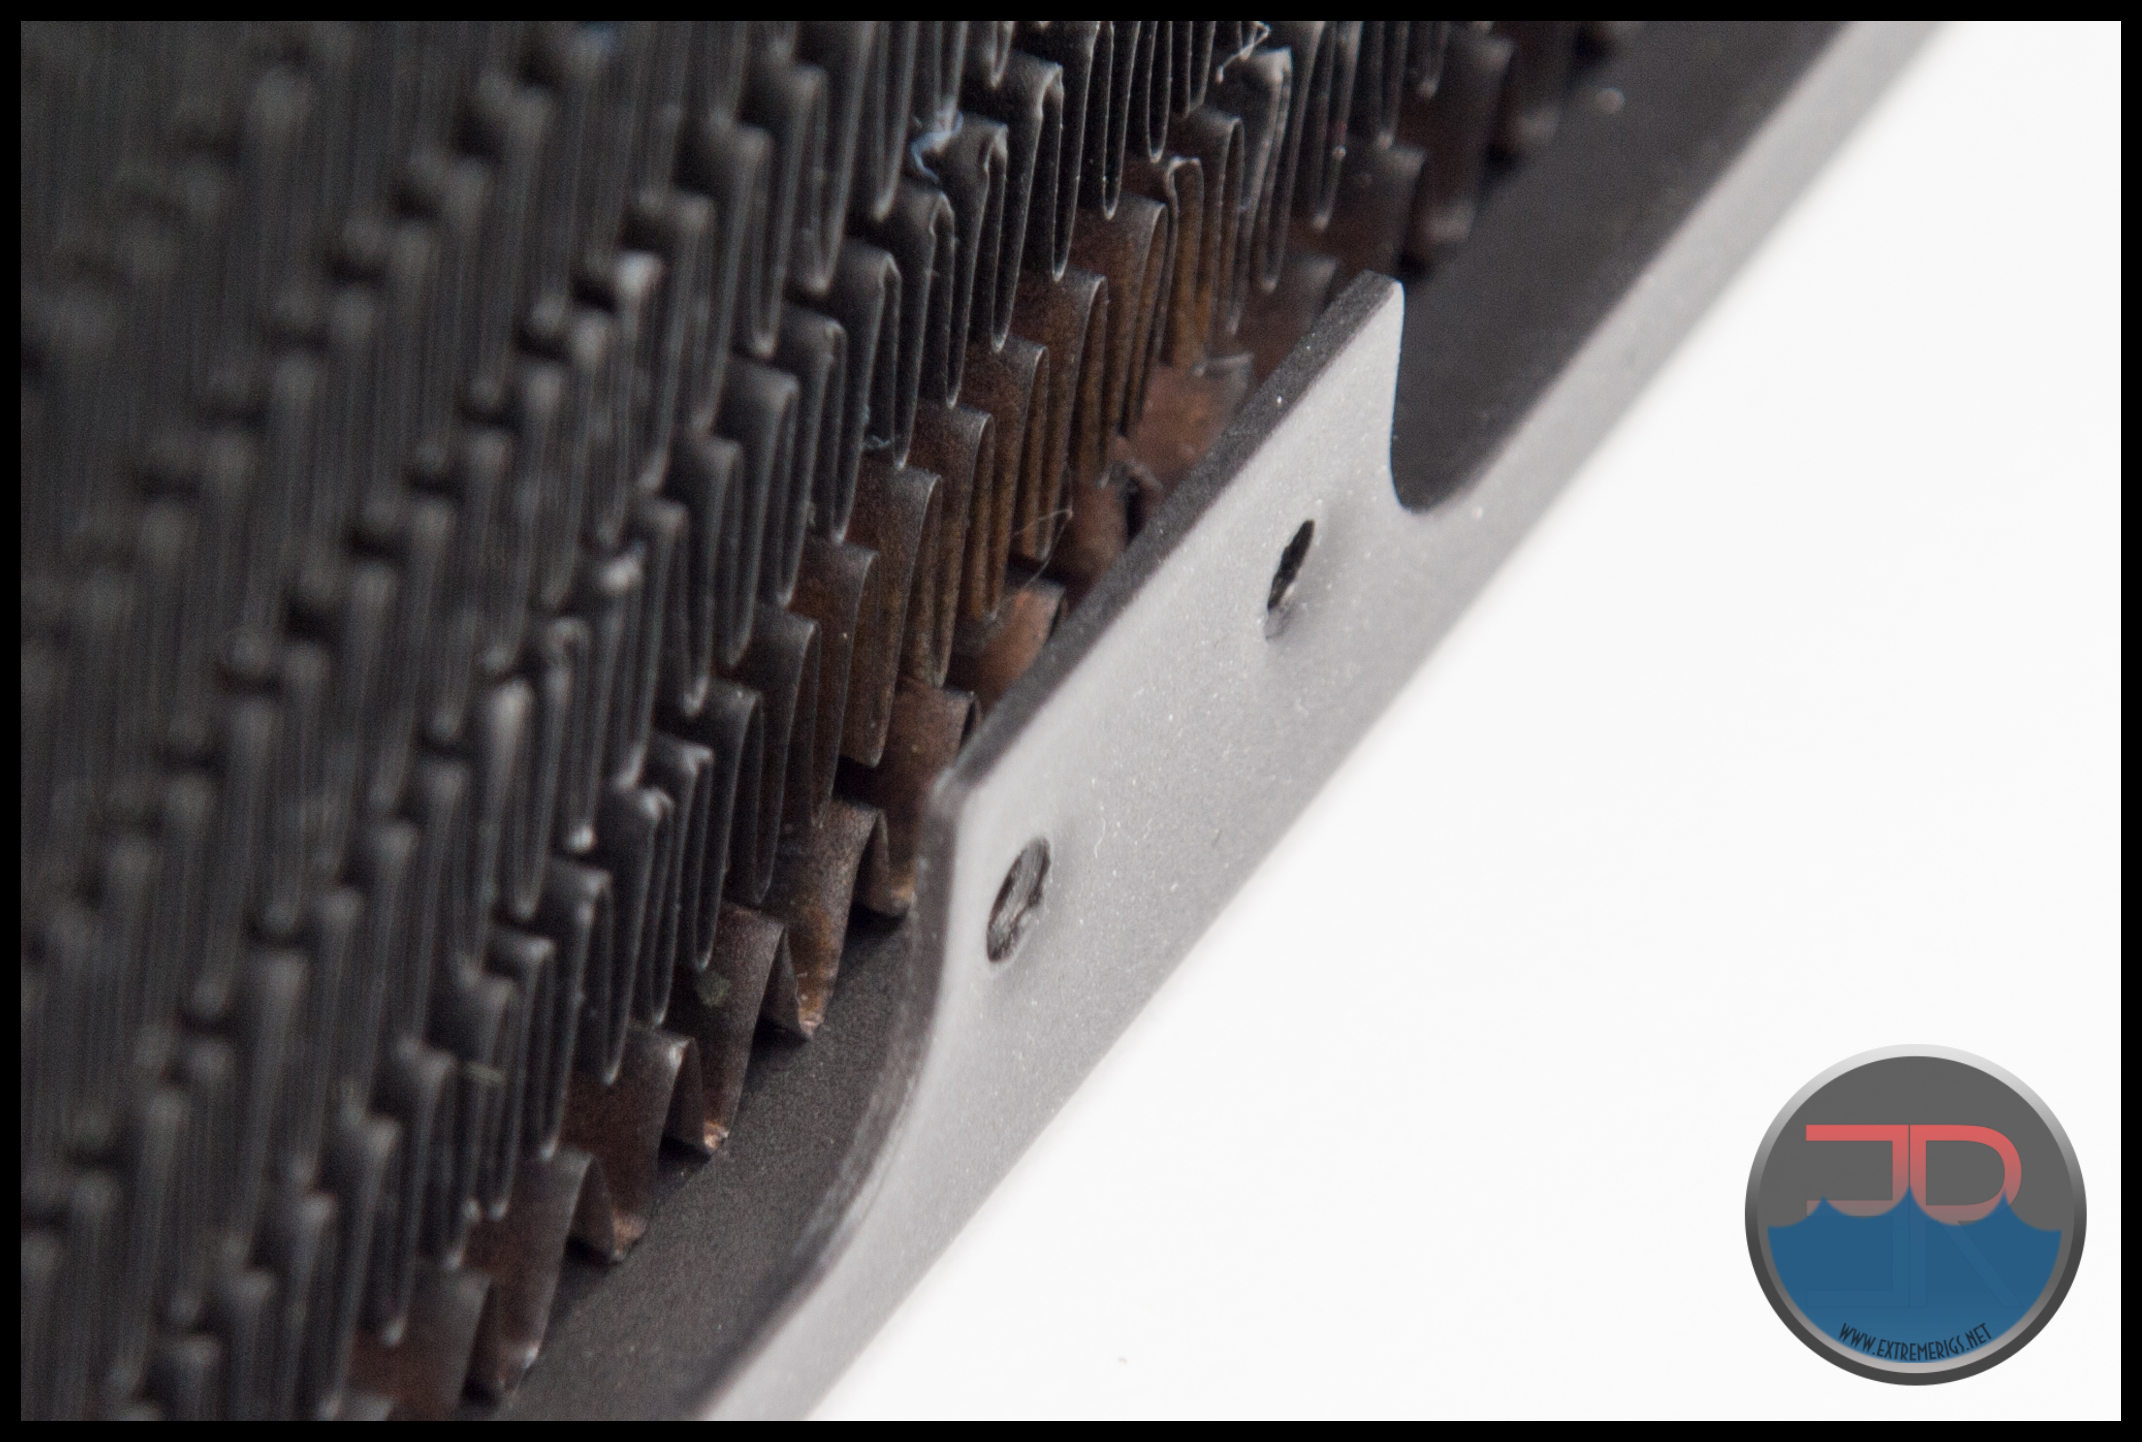
The fan mount spacing is the standard 15mm.
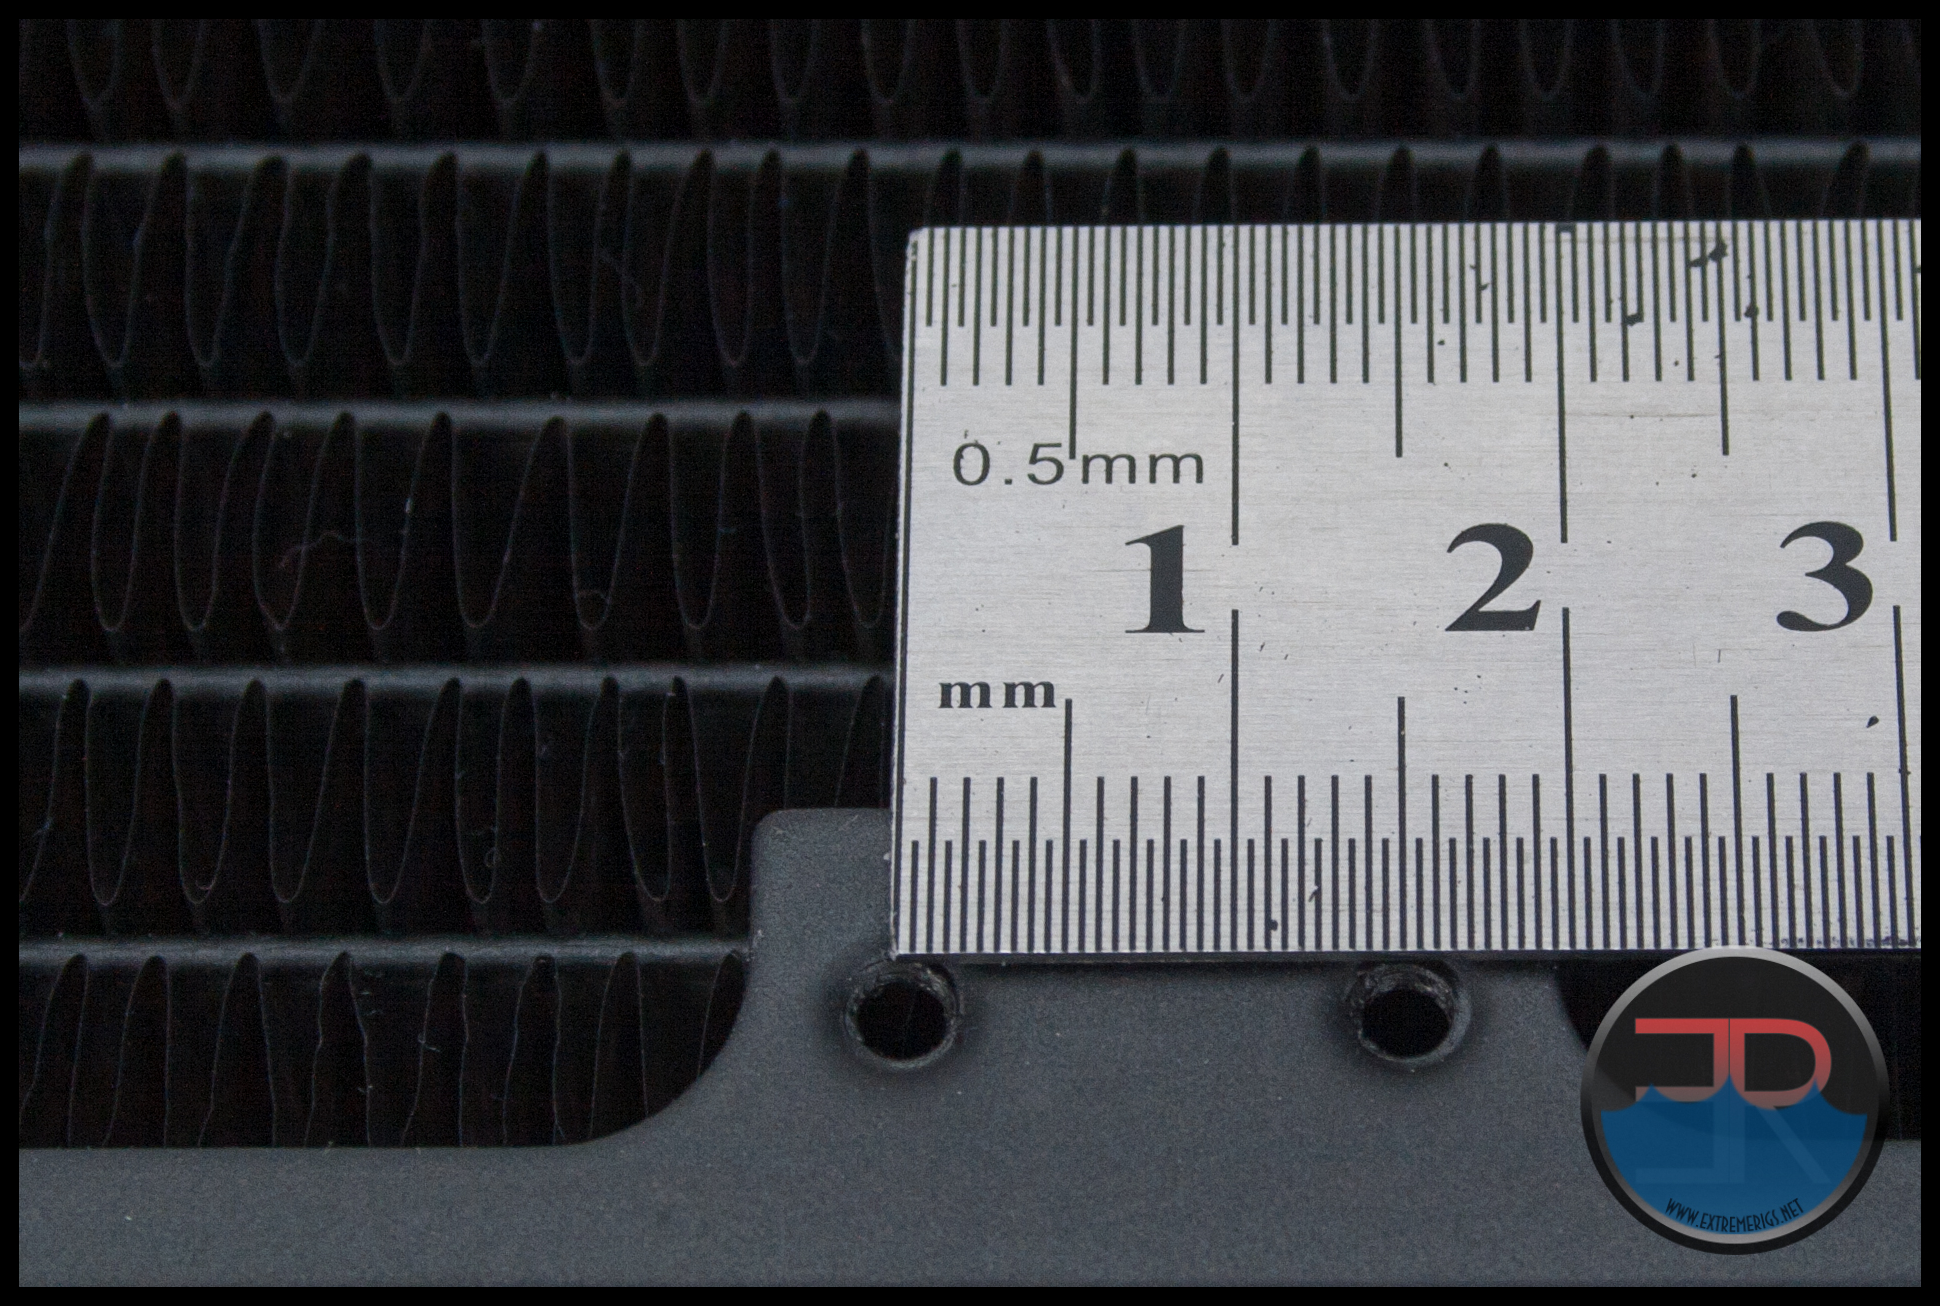
The fan mounting holes are not located directly above tubes; however they are very close so it’s unusual that EK have chose not to incorporate screw protection plates.
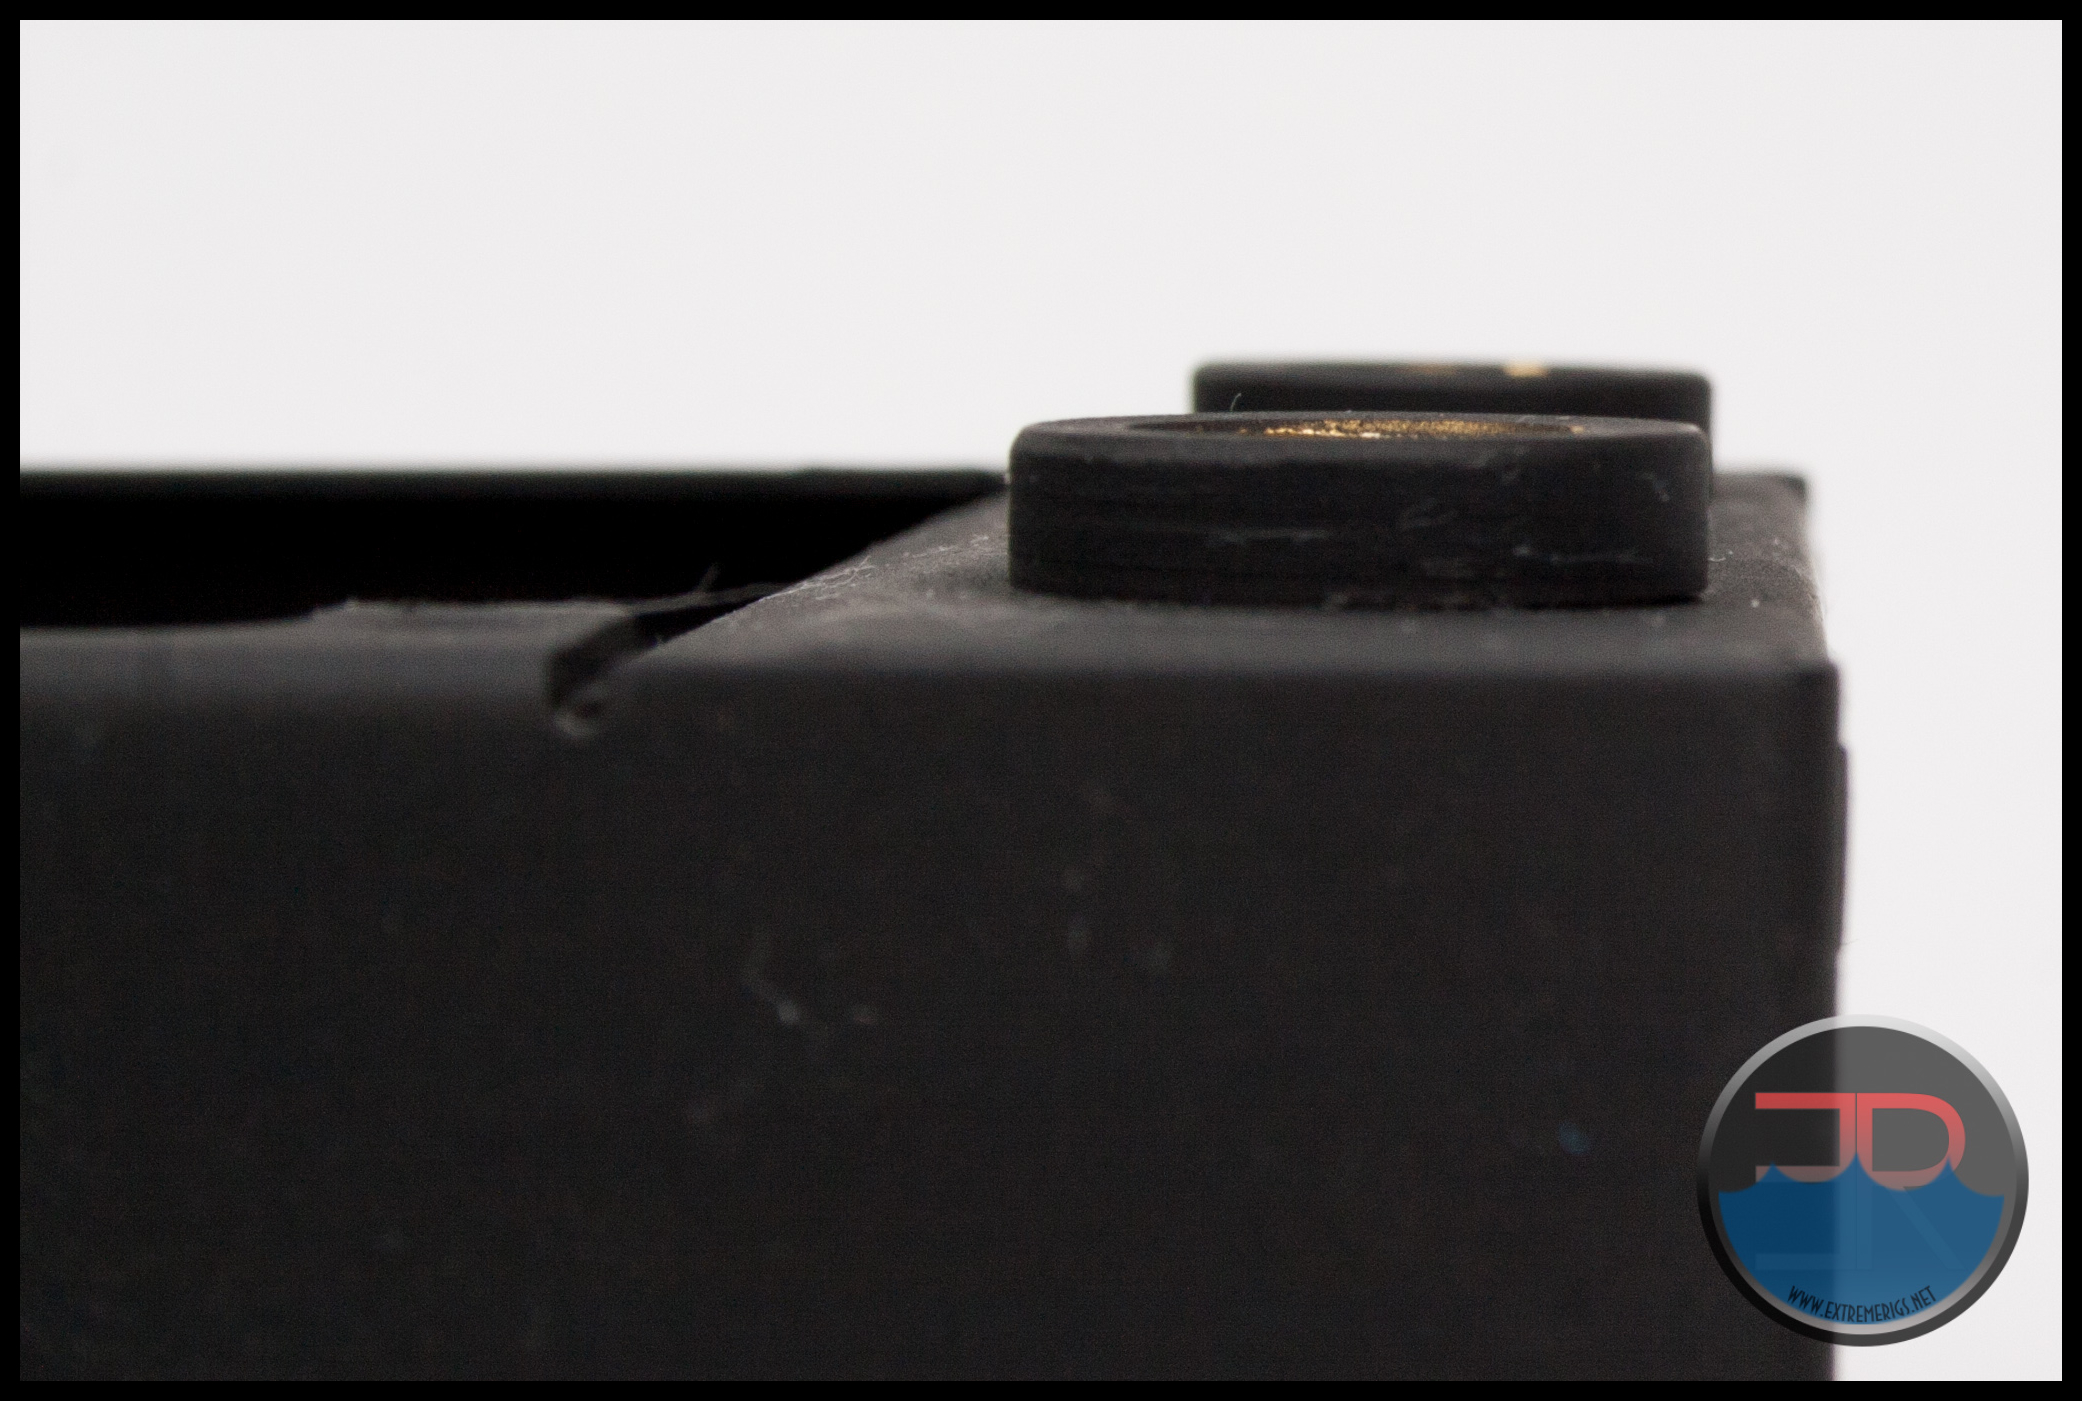
The CE 420 come equipped with just 2 ports in total, 1 inlet and 1 outlet.
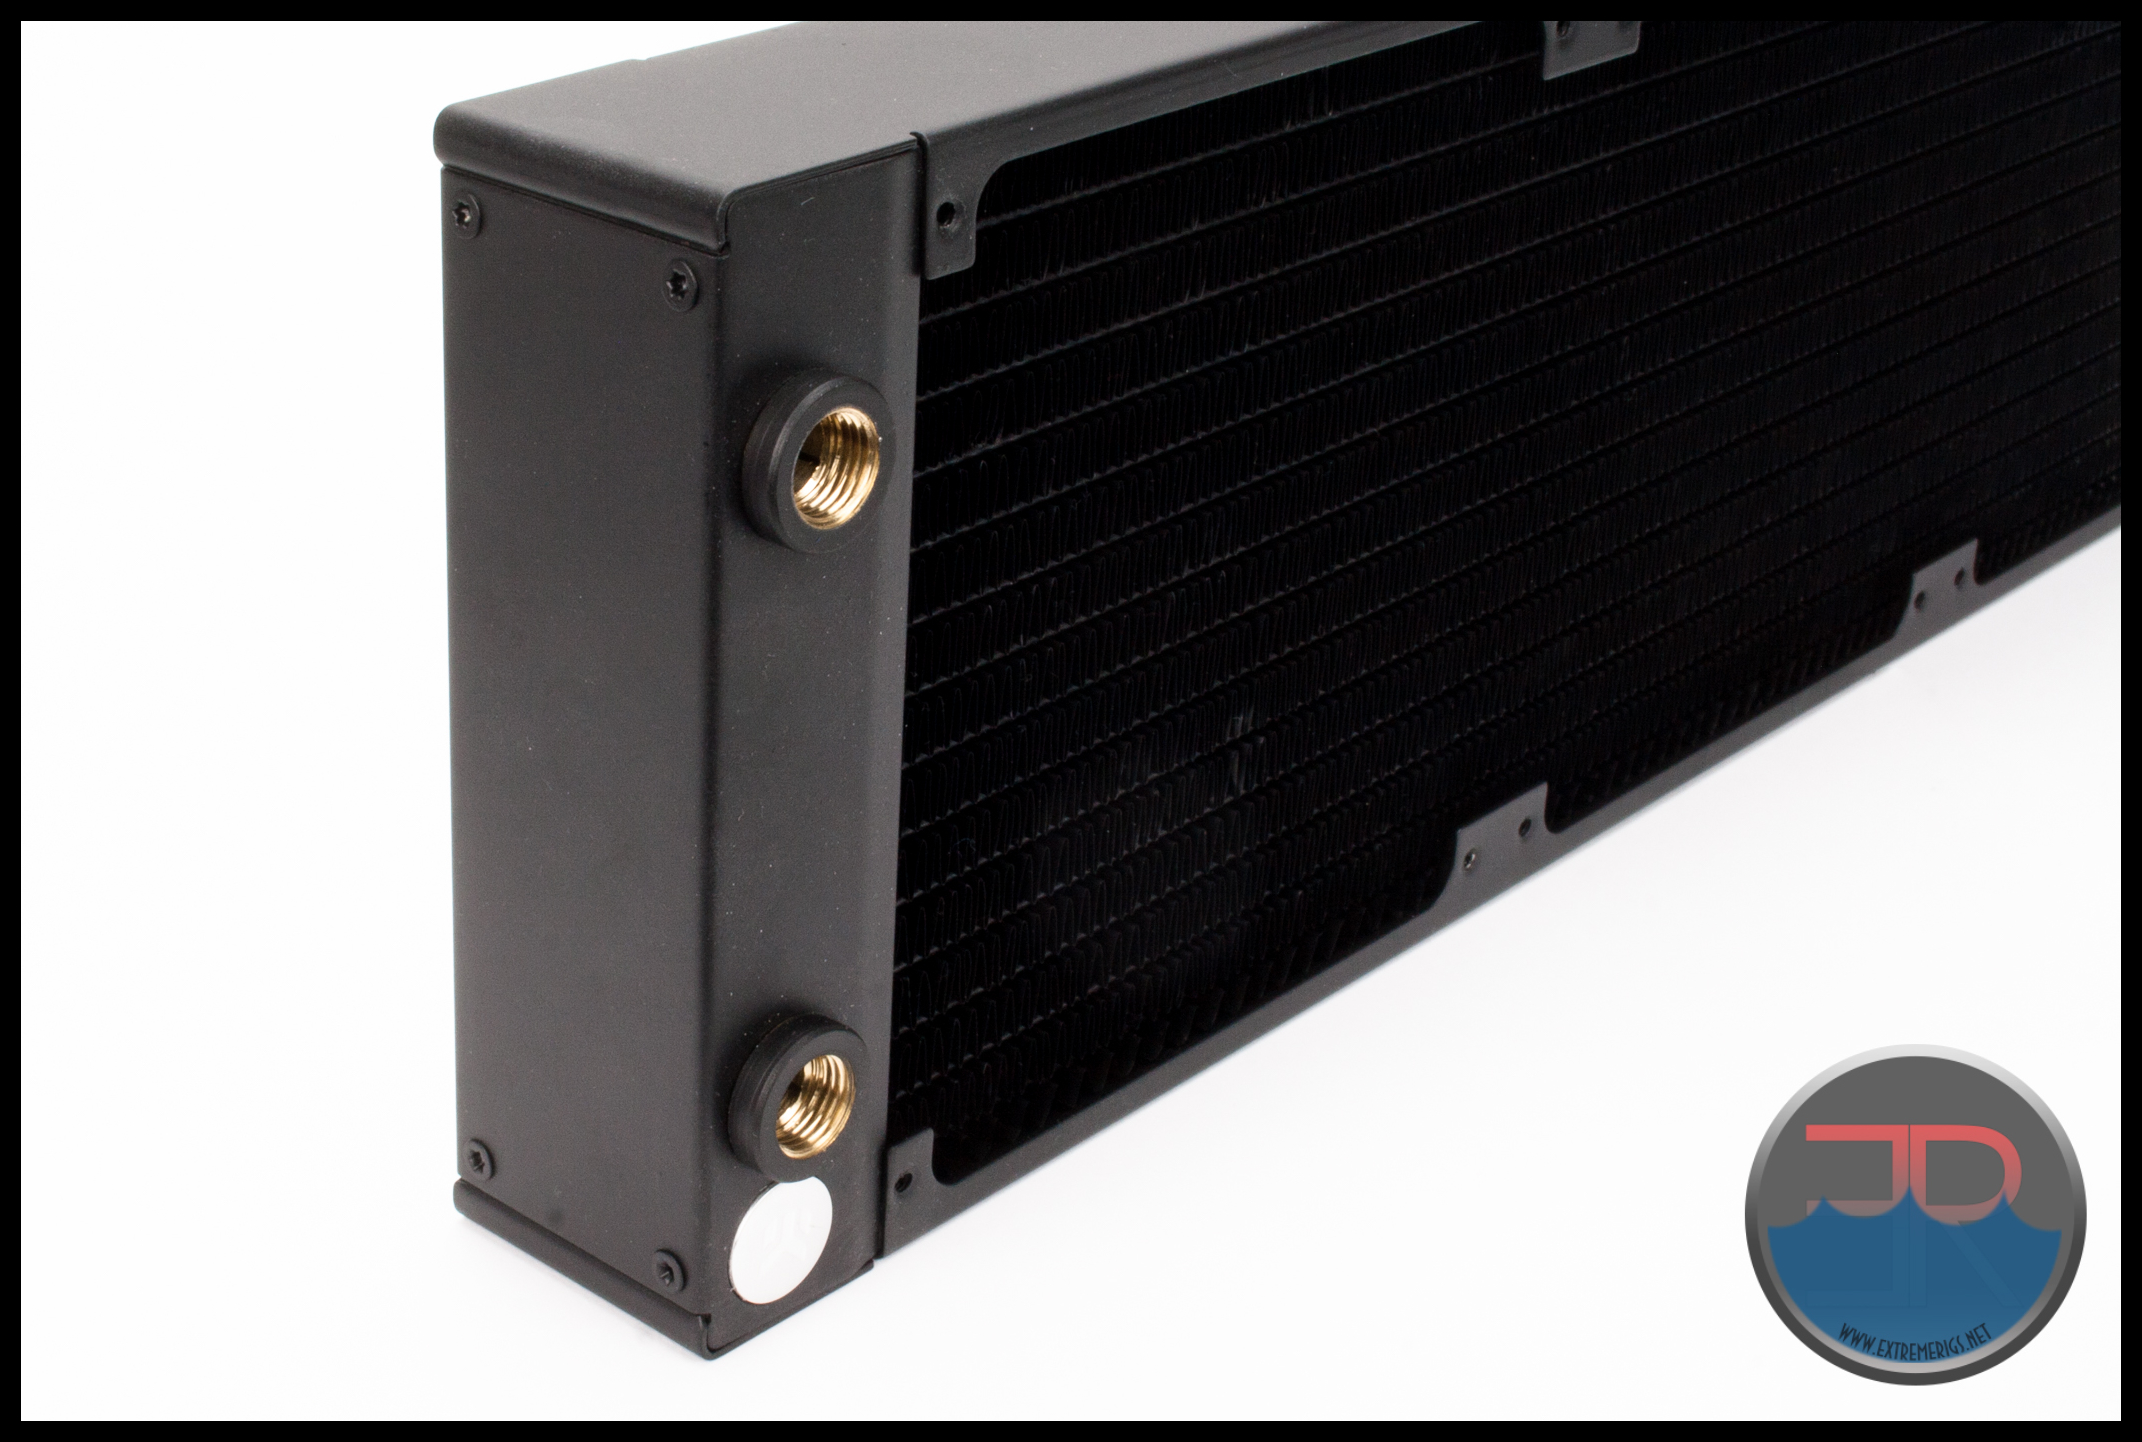 Technically these are port extenders which have the dual purpose of helping keep the core from moving around inside the casing.
 The extenders often unscrew when removing fittings, and it is the 9mm allen key (missing from the review sample) which is used to tighten them back up.
 As mentioned previously there are no alternative port options on the CE 420.
 Unfortunately there is no dedicated fill/bleeder port on the return end tank either.
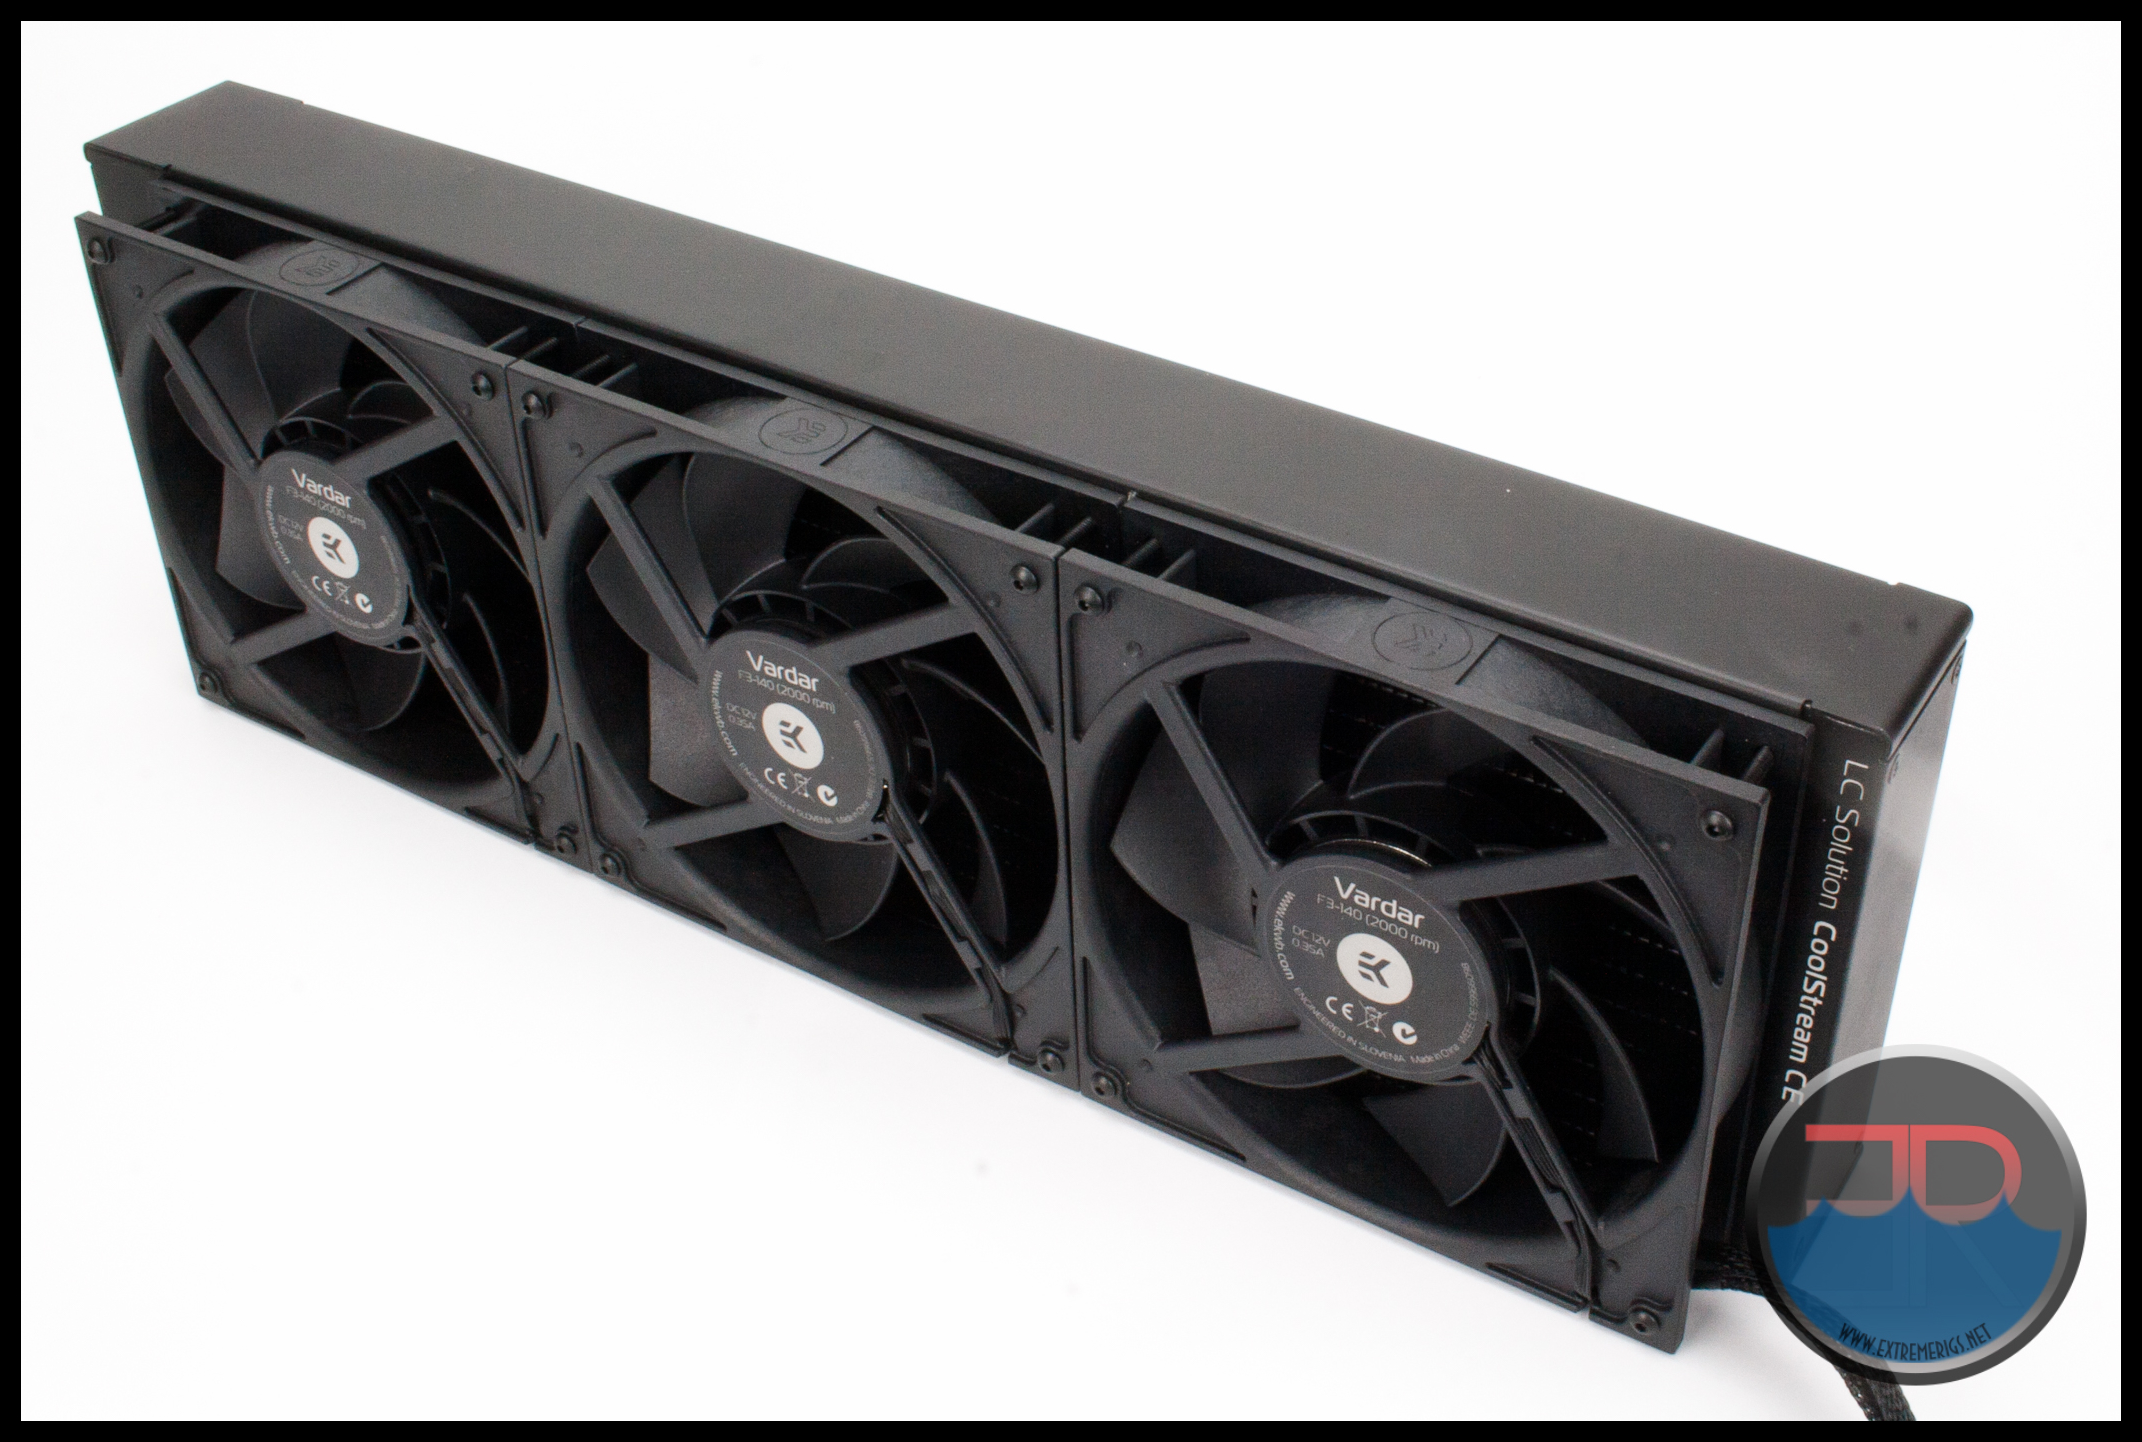
The CE 420 is looking great and ready for business.
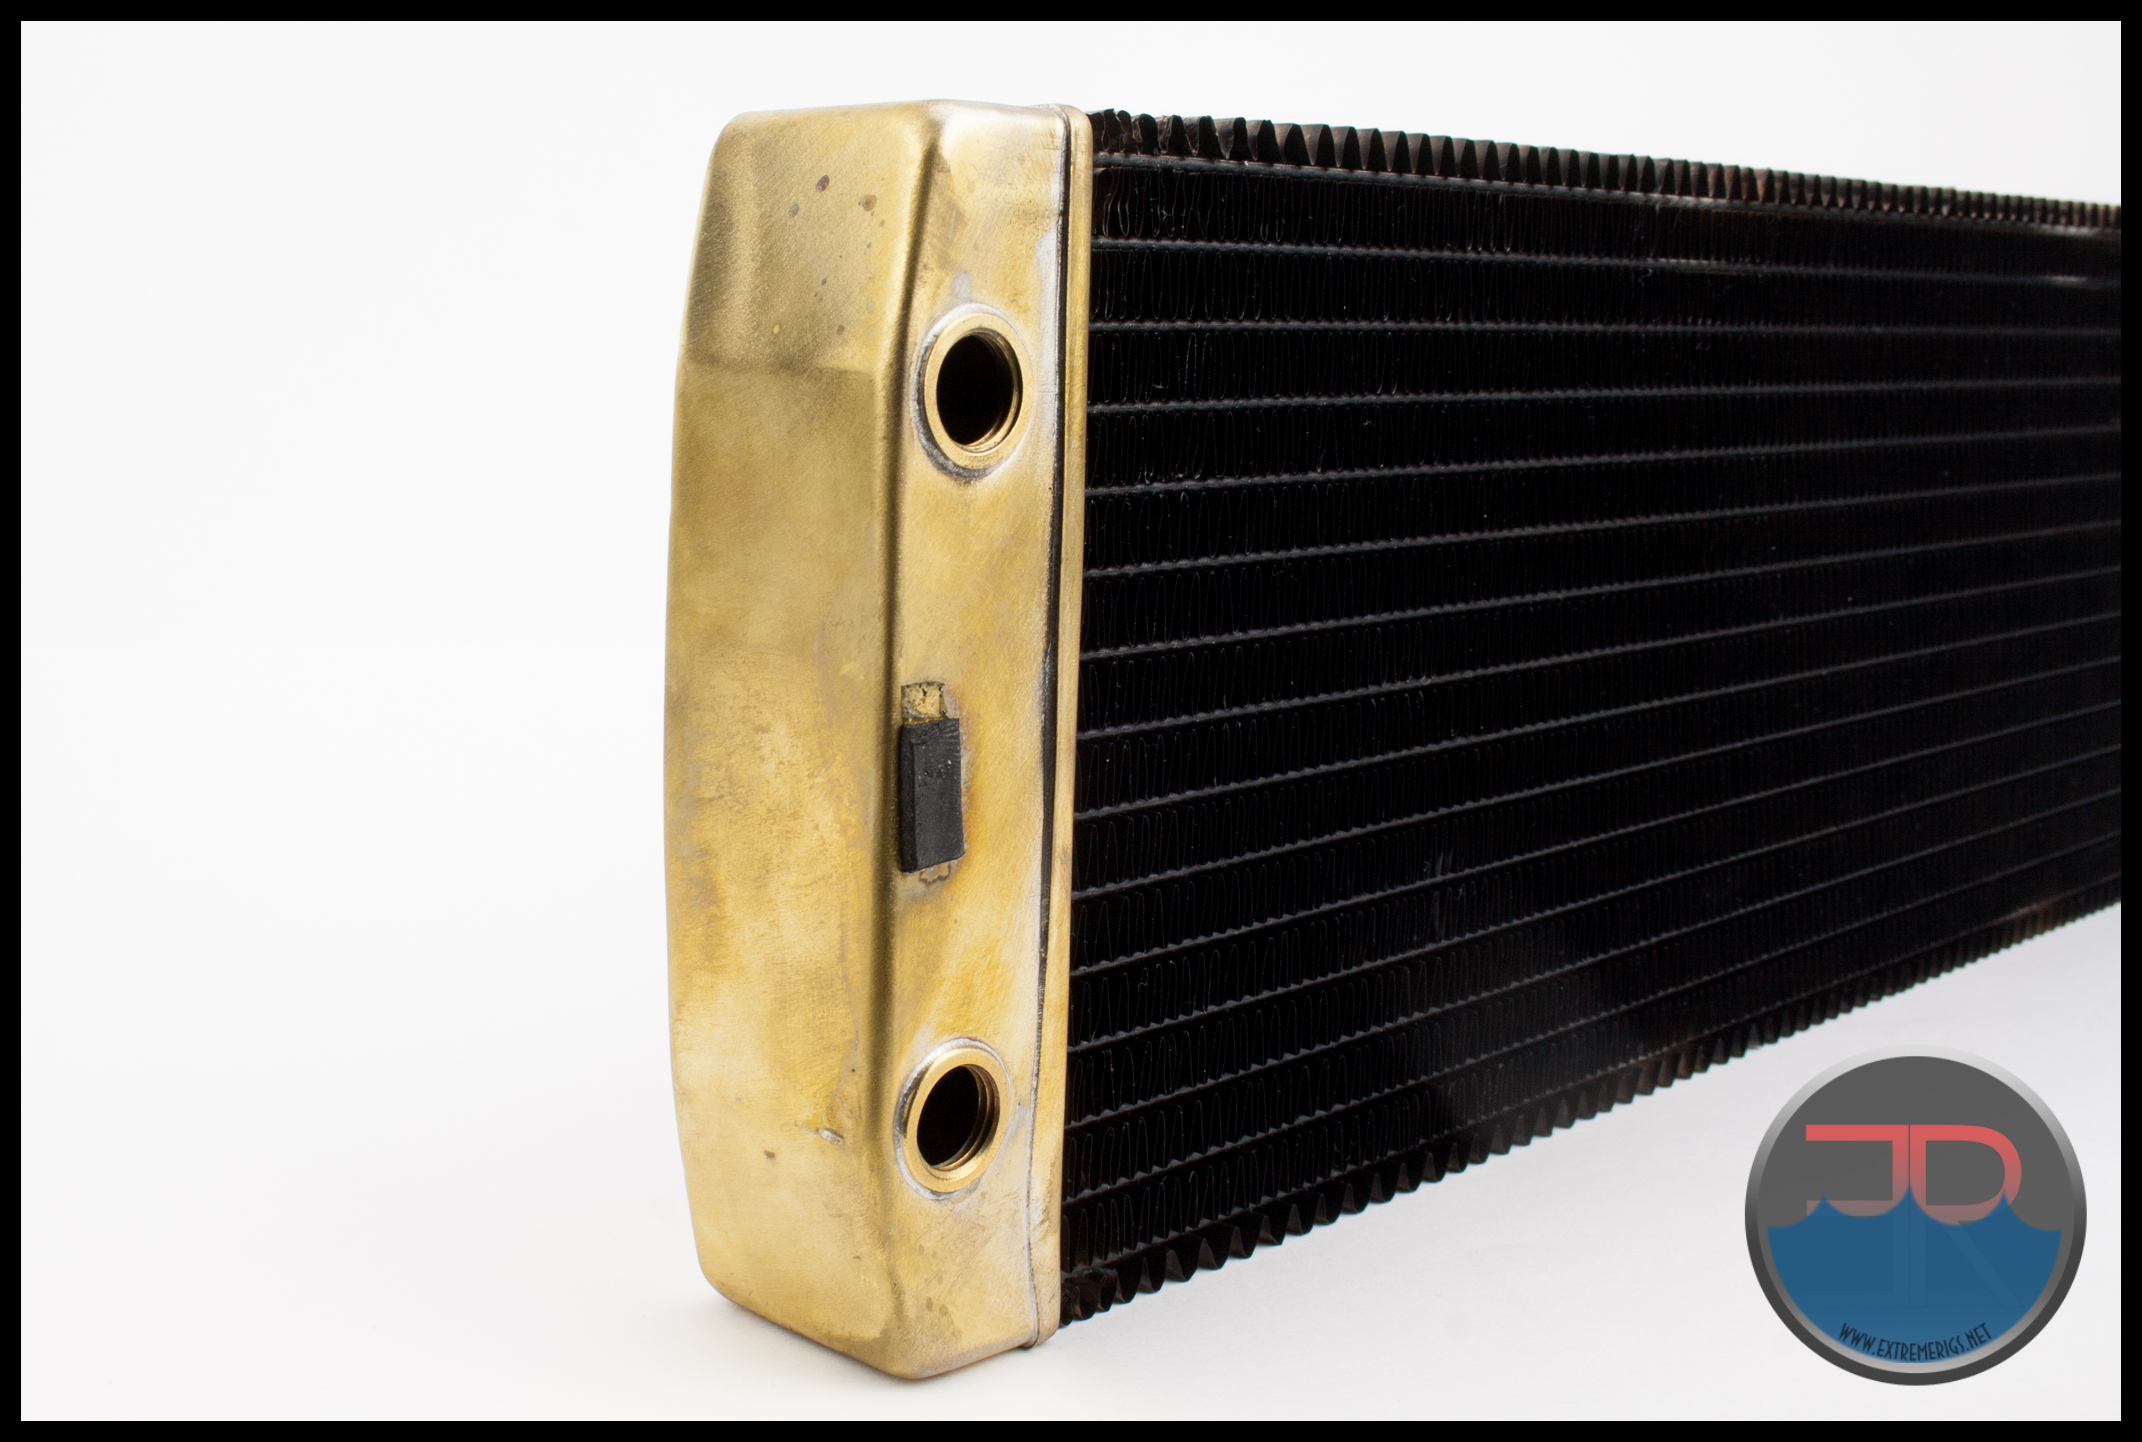
After testing was complete I dis-assembled the CE 420 for an inspection of the end tanks and was pleased to find nothing out of the ordinary.
The relative ease at which the CE 420 comes apart makes it an ideal candidate for custom paintwork of the casing panels.
So here we have a 45mm thick radiator with a high FPI count that has just 2 ports on no protection plates. The build quality and finish on the sample was excellent.
Let’s see how it performs…
Flow Rate Testing
The Data
As all the testing was performed with the exact same equipment (except the 140mm Noctua Industrial fans replace the 120mm GT fans), using the exact same methods as was used in the 360mm round-up we have decided to keep this review uncluttered by keeping our testing methodology, test set-ups and equipment used in a single location. To see exactly how the tests were carried out, details of the test set ups and equipment used, please head over to the RRU Test Setup page.
Restriction Test
It’s generally agreed that radiators are one of, if not the least restrictive components in the water cooling loop. There are some exceptions however, so this must still be verified through testing:
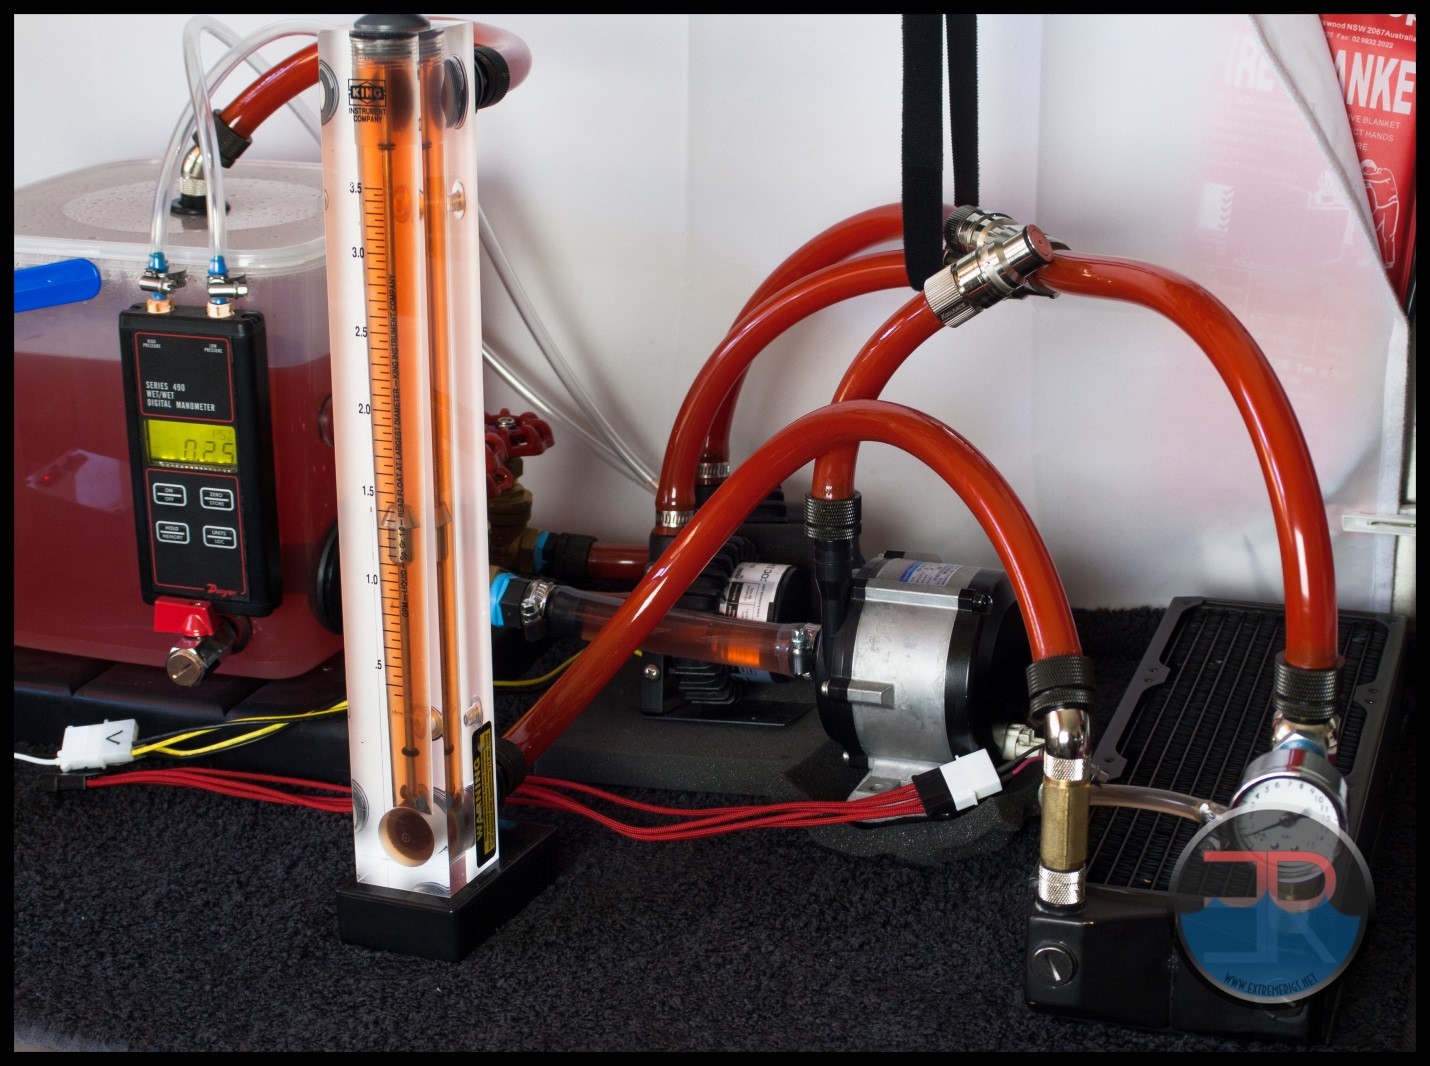 The above photo is for referencing the restriction test bench The CE 420 is not loaded so please disregard the data in the picture as it does not relate to the its test results.
Here is the raw data at the tested flow rates, displaying the measured Differential Pressure across the radiator as flow rate was increased.
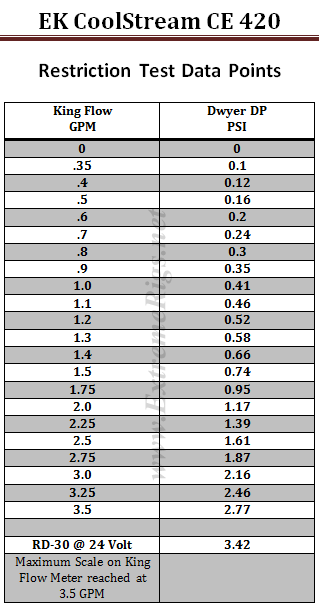 The table numbers indicate that this CE 420 is a low restriction radiator. However numbers in isolation can only tell half the story. By plotting against other components it more easily shows the whole story.
We have decided to use a HeatKiller 3.0 CPU block as the reference in this next plot for two reasons. Firstly there is no chance of the plot being cluttered by curves overlapping and secondly it gives a reference point against a fairly common loop component of average restriction.
As with all previous radiator restriction plots, I have limited the maximum flow rate displayed to 2.0 GPM as I suspect there are very few systems that operate above 2.0 GPM. For more information on how to read a restriction plot check out our guide.
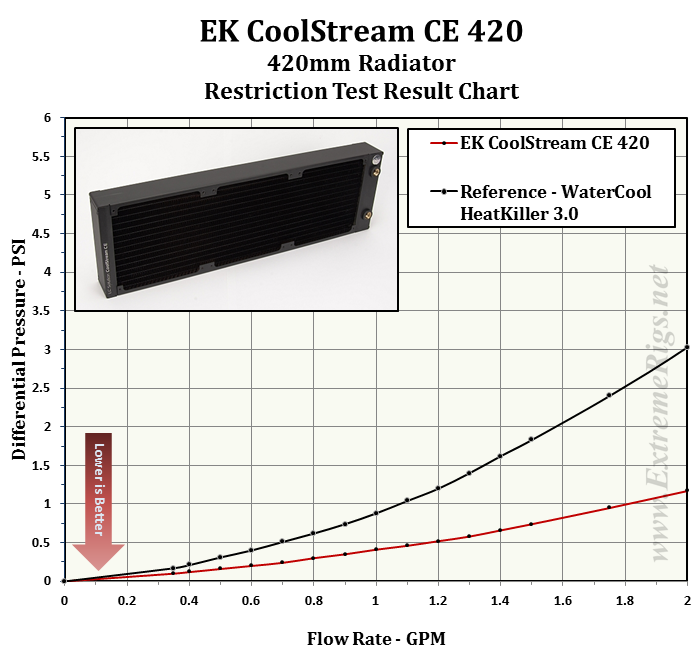 This plot indicates the CE 420 as a low restriction loop component when compared to a CPU block of average restriction, but what about other radiators?
The next three plots show the restriction level at three different flow rates compared to the other 420mm radiator that has been tested so far. We consider the chosen GPM rates to represent systems which have low, medium and high flow rates.
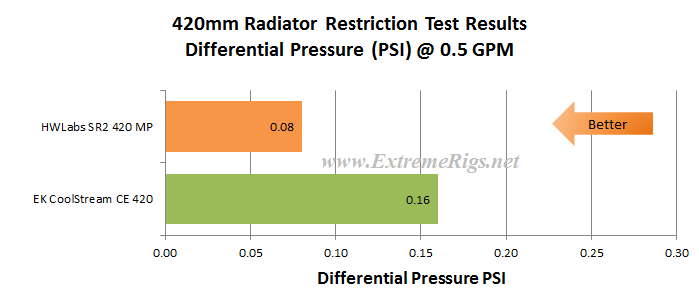

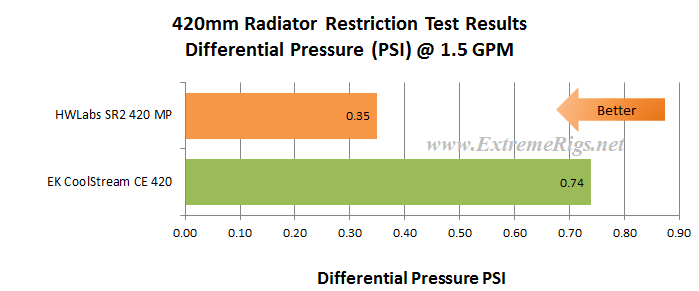 Clearly the CE 420 has the higher restriction level of the 2 rads and this is due to having one less layer of tubes combined with thinner tubes. This is not to say that the EK CE is overly restrictive, just that the SR2 is much less so.
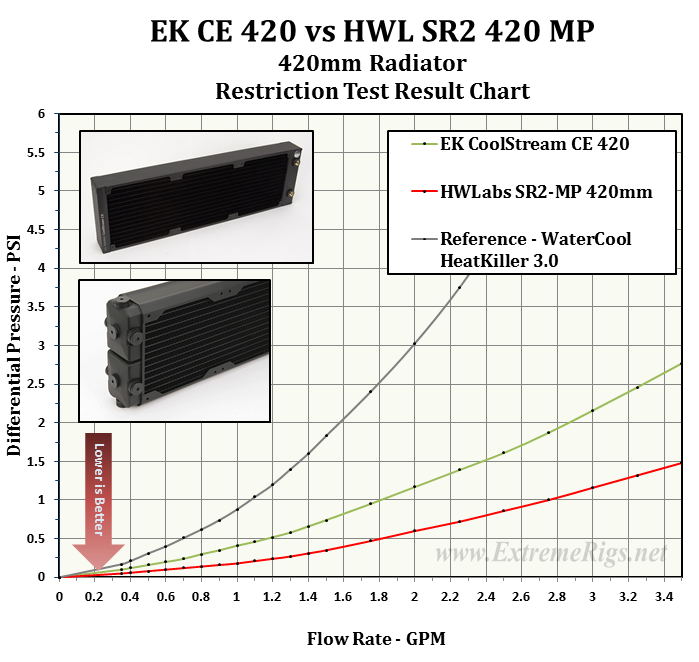
This next plot shows both 420 radiators results for the full range of the flow meter we use for testing the restriction level.
 To give a bit more perspective, lets now take a look at where the CE 420 fits in relation to all the radiators we have tested. For this plot only results for 1.0 GPM data point have been used for the comparison.
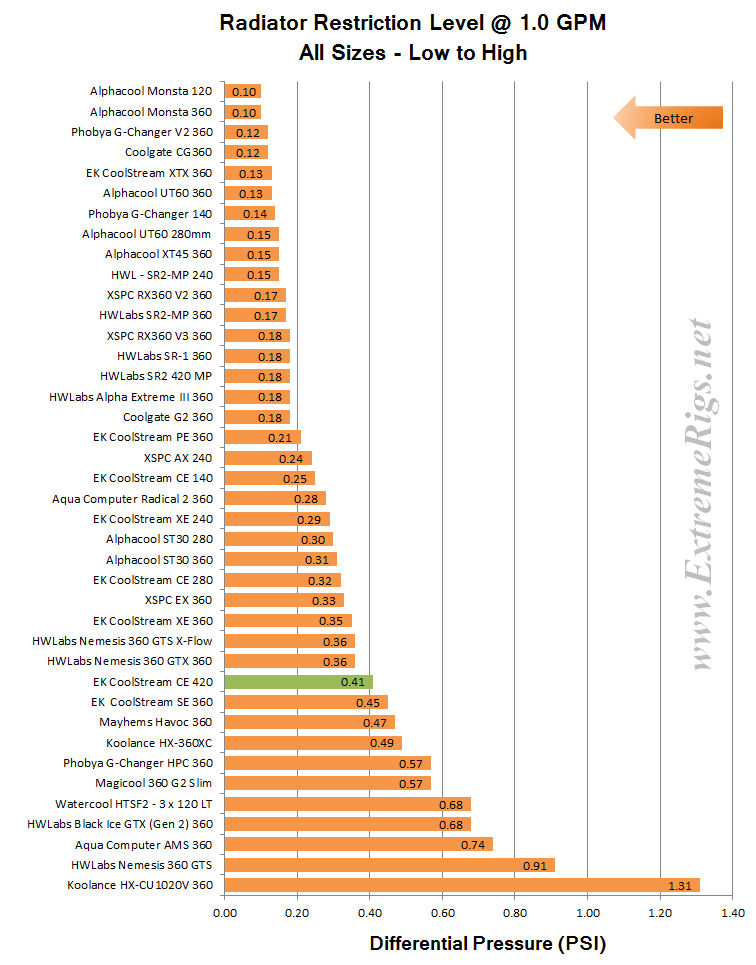 When put into context with all the radiators at 1.0 gpm, we rate the CE 420 as a medium restriction radiator.
While we are looking at restriction, it might be interesting to compare the CE 420 against some other EK radiators we have tested.

Onwards to Thermal Performance!
Thermal Testing
The Thermal Data
In a change from the 360mm thermal testing, all other radiator sizes are only going to be tested at 1.0 GPM. We proved that for 95% of the rads tested, flow rates over 1.0 GPM did not make any significant impact on the radiator performance. The decision to only test at 1.0 GPM is also because of the time required to complete this testing, and running the additional flow rates effectively doubled the required test time.
A total of 6 tests were conducted at 1.0 GPM with fan speeds of 750 rpm, 1300 rpm and 1850 rpm being run in Push Only and Push/Pull. All inclusive this testing still takes between 40 – 50 hours of logging time to get the results that are presented.
Below is the final data results gathered from at least 5 data logging runs at the flow rate and fan rpm combination. The most stable 15 minute period from each logging run was used and then averaged with the other runs to obtain the data for the table below. A total of 16 temperature sensors were used in the thermal test chamber (8 air in, 2 air out, 3 water in, 3 water out) each take a reading every second and logged via a CrystalFontz unit.
The data in the table below is the averaged results of the logging runs which has then been used to create all the plots and tables there-after.
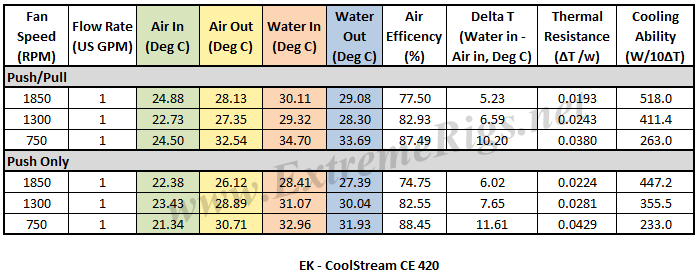
The performance metric of critical importance is the delta between the warm coolant temperature in and the cold ambient air temperature in to the radiator. Given that the system is well insulated and in equilibrium and we know the heat input to the system then we can also calculate a very important number – that is the amount of power required to raise the coolant temperature 1C (or 10C which is a more useful reference point).
Let’s take a look at the Delta T results from the tests. Note that the extrapolation of the curve is much more sensitive to error than in between the tested range.
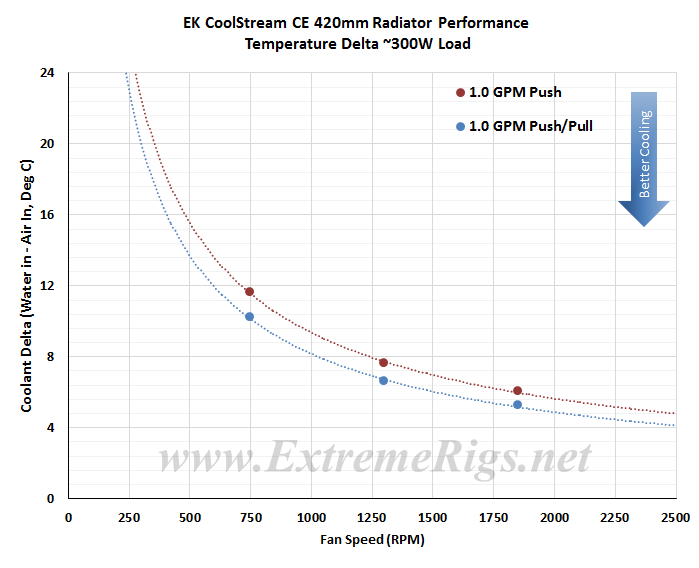 I was not too concerned about the actual delta numbers, more so the trend pattern, and as we should expect, the deltas come down significantly as the fan speed is increased.
Delta T results (as above) is not always helpful when thinking about how many radiators you would need to cool your system. Instead it’s more useful to know the delta/W, or more usefully, the inverse metric of W/delta C. The metric plotted below tells us how many watts are dissipated by the radiator when the coolant rises 10C above ambient temperatures. (W/10 Delta T):
 This same data can now be plotted on a chart so that an end user can interpolate their own fan speed. Note again that the extrapolation of the curve is much more sensitive to error than in between the tested range.
 With the CE 420’s high fin count of 18 FPI combined with it’s medium thickness core it was able to perform very efficiently in with a Push Only fan assembly. Adding a second set of fans (Push/Pull) did not greatly boost performance with increases between 11% and 14% being recorded.
Now let’s analyze that data some more…
Data Analysis
This first table shows the CE 420’s Watts/10 Delta Temp numbers in a quick glance chart format.
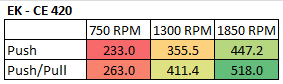
Using this data we can effectively show percentage gains/losses relative to a reference point. It’s an interesting way to show gains/losses while changing a variable.
So, let’s focus on 1300 RPM as our reference and see how much gain or loss in performance we get by changing fan speed.
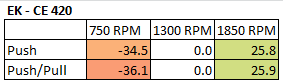
From these results we see a greater difference when lowering fan speeds than when they are increased. This indicates the core is better tuned for medium speed fans as the core is probably too dense for low speed fans to move enough air through to be as efficient.
So from the data above we have a good idea of how the CE 420 radiator performs relative to itself in Push Only and Push/Pull at various fan speed, but there is a large selection of 420mm radiator models to choose from, released from numerous manufacturers.
As we have another 420mm rad with thermal testing complete, let’s do just that by putting the CE 420 head to head with HWLab’s SR2 420 MP. It may not be the fairest comparison ever done because the EK CE 420 is thinner and has a much denser core structure but the comparisons should prove interesting.
Push Only Data vs Competition
Let’s focus on the Push Only results for now and come back to the Push/Pull data later.
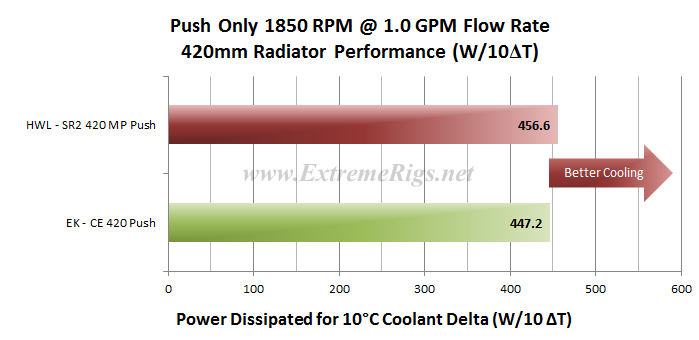
Let’s start with 750 RPM and see how the two compare.
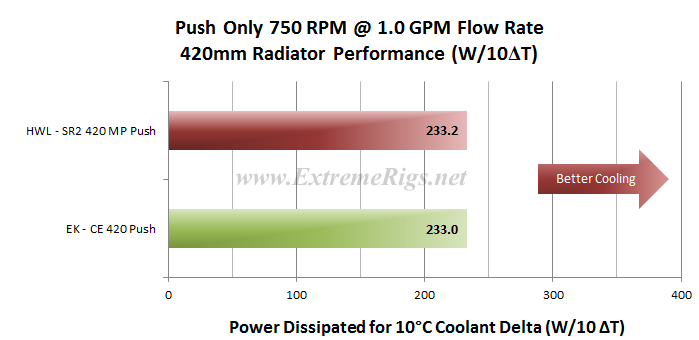
While we hesitate to make predictions, this is the data point where we expected the SR2 to have a clear advantage over the EK CE. The result here is effectively a tie as both results are within the test error margins.
Now let’s look at 1300 rpm:
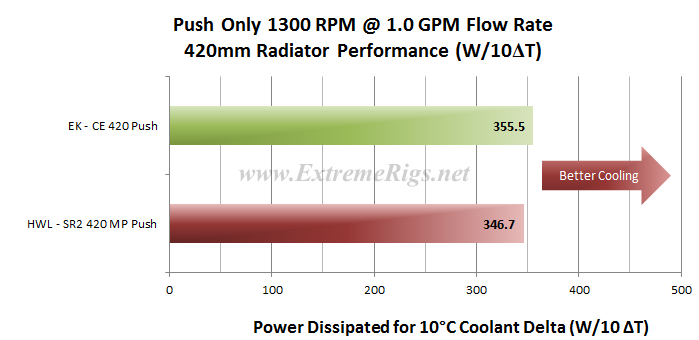
At 1300 RPM the CE 420 takes the lead by ~2.5%, just enough to call a winner.
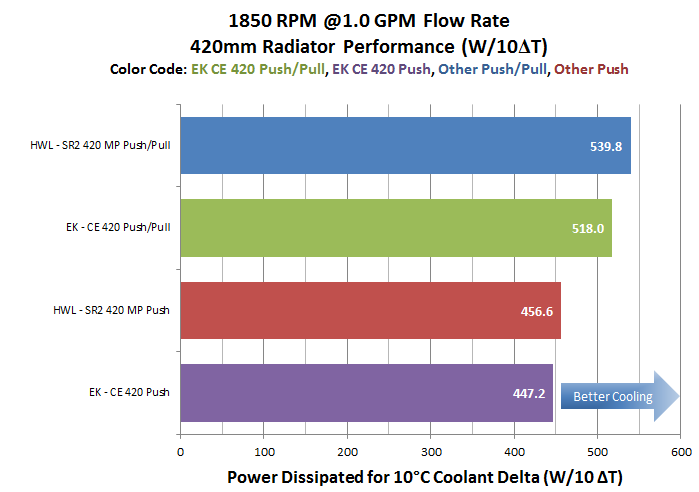
 At 1850 rpm the SR2 takes the lead again by ~2%. Its thicker core is presumably what is making the difference and why it didn’t fall further behind from the 1300 results.
This all fits nicely with our earlier assessment of the CE 420 being optimized for medium speed fans. There is no clear winner of the Push Only thermal tests as the results are all very close. perhaps the Push/Pull will see some separation between the two.
Let’s find out.
Push/Pull Data vs. Competition
Let’s now look at the Push/Pull results and see how the CE 420 compares:
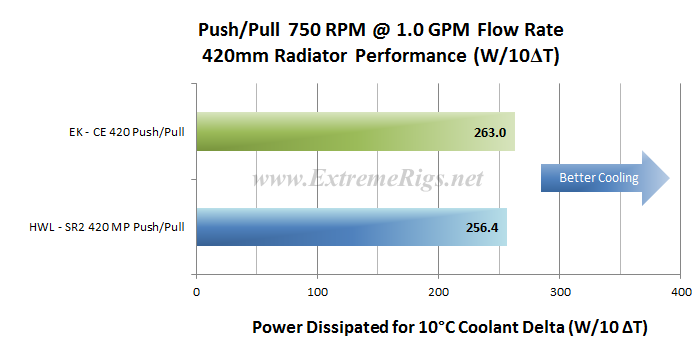 The CE 420 takes first place ~2.5% ahead of the SR2. The close results continue and the CE seems to have the advantage here with the extra air movement over it denser core.
Let’s move to 1300 rpm:
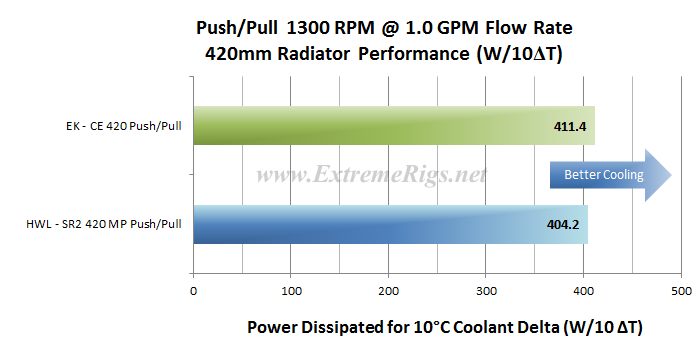
In the 1300 rpm Push/Pull category the CE 420 is still in the lead but the gap is closing slightly, now just ~2% ahead of the SR2.
Now 1850RPM:
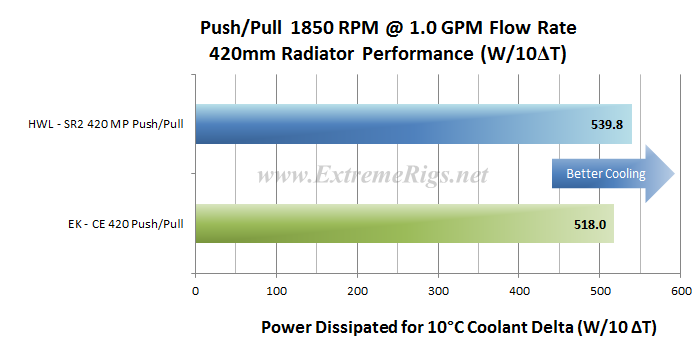
As with the Push Only result the CE 420 trails the SR2 which has the thicker core and seems to perform more efficient at the higher fan speeds than the EK CE.
Let’s also combine the Push Only and Push/Pull results at our 1.0 GPM flow rate into one plot for each fan speed tested. Sometimes these combined plots show up some points of interest, but with the results being so close for both fan assemblies, I don’t expect to find much of interest this time.
Again the 750 rpm first:
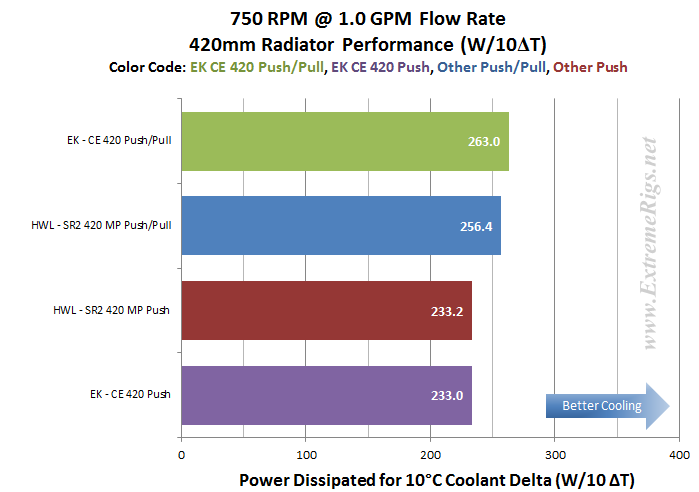
Nothing looks out of place here..
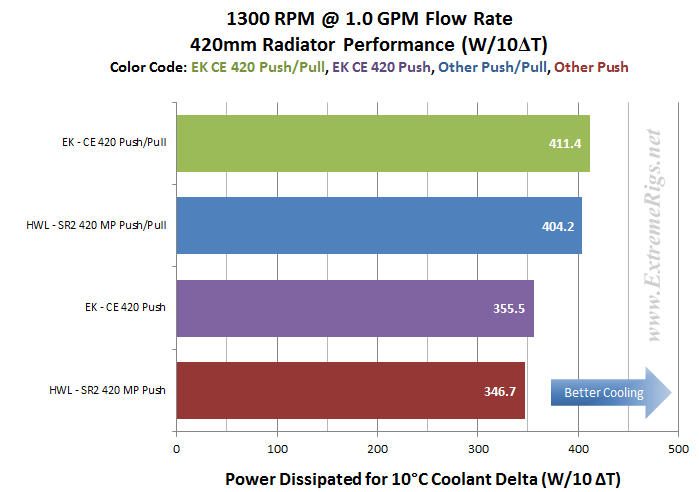
At 1300 rpm everything looks in order given the data we’ve already reviewed.
It was exactly the same with the 1850 combined.
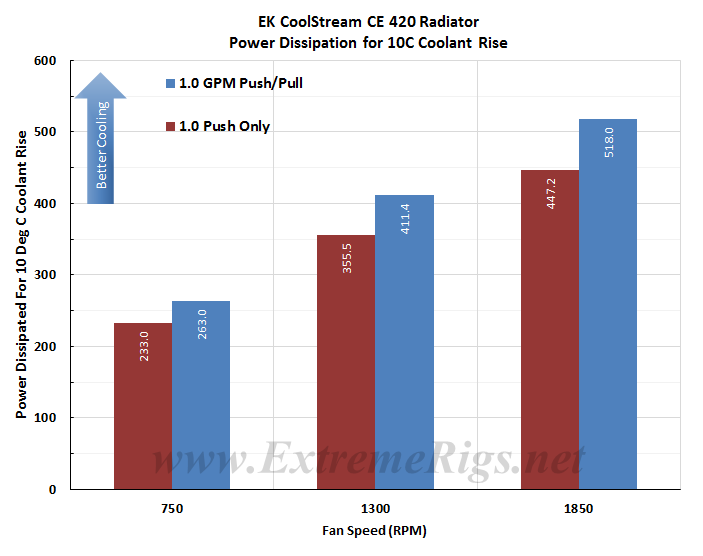
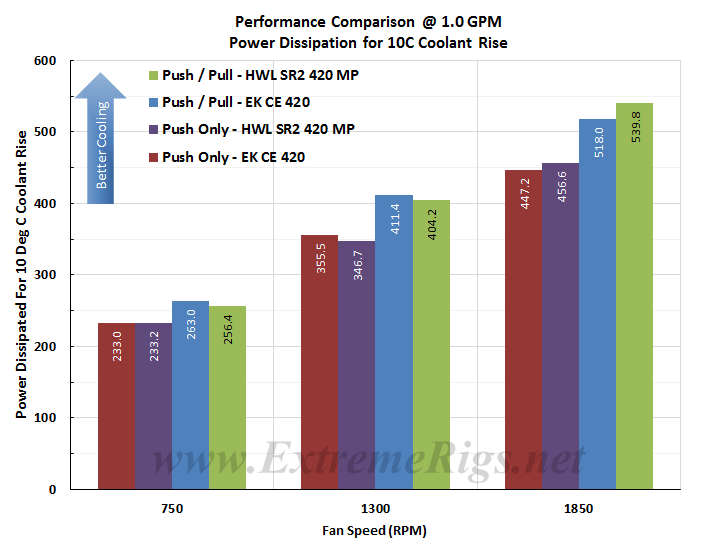
 Another way of looking at the results above might be to combine the results and plot them on a vertical bar chart.
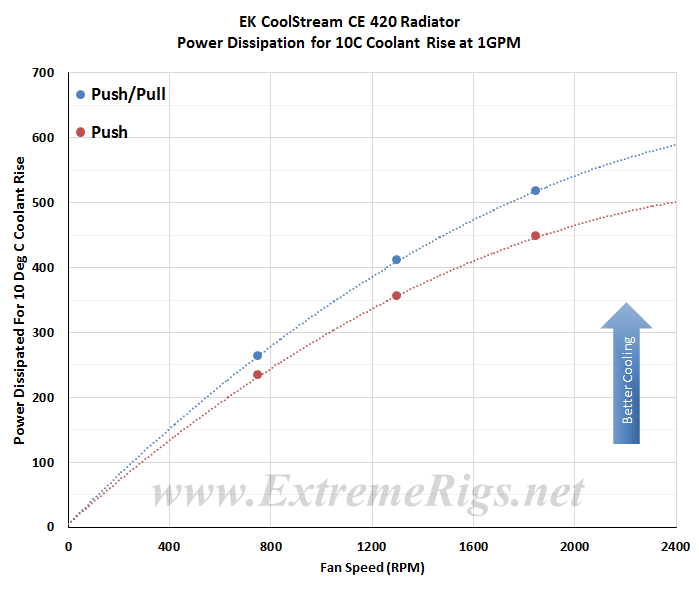
 And one last view, plotted as curves and adding some extrapolation.
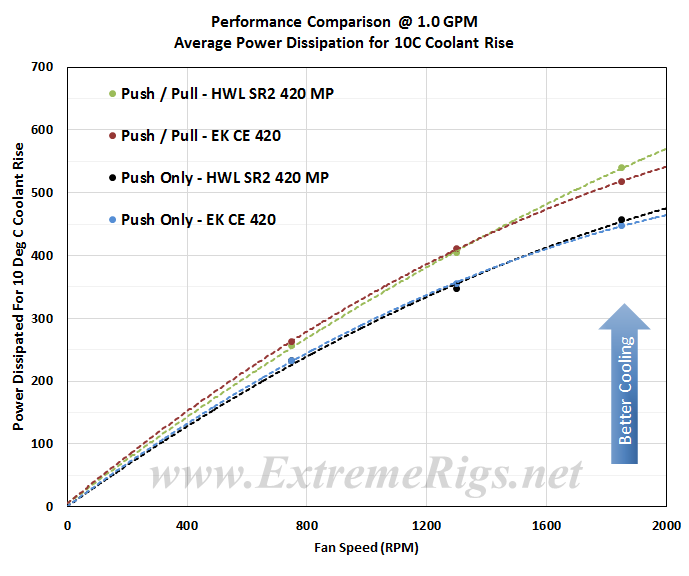 This perhaps best shows just how close the results are!
From all of test results we created “Average Performance Factor” charts for both Push and Push/Pull and then a combined plot called the “Master Performance Factor”. The radiator with the best cooling ability (W/10ΔT) at each rpm was awarded a score of 100, and each other radiators W/10ΔT result was scored as percentage of the top performer.
This way of looking at the comparison takes away any advantages that a radiator may have at higher or lower fan speeds and looks at an overall average. While this appears fair it does tend to favor those radiators that are all-rounders and those radiators which do very well at high RPM. Most users should be more focused on their specific use case.
Here is the CE 420’s percentage scores at each data point that thermal tests were conducted at with the addition of the SR2’s Push Only results relative to the Best performing Push/Pull results
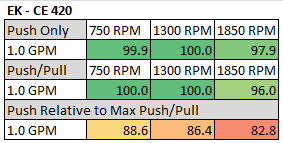
The percentage numbers in the table offer another way of looking at the CE’s results comparatively and how it performed, but for our scoring system we need a way to reduce the categories while retaining the data. To do this we average the results for each fan assembly type giving us Averaged Performance Factors for Push Only, Push/Pull and finally an average of everything in the Master Averaged Performance Factor.
Firstly – the Push Only APF:
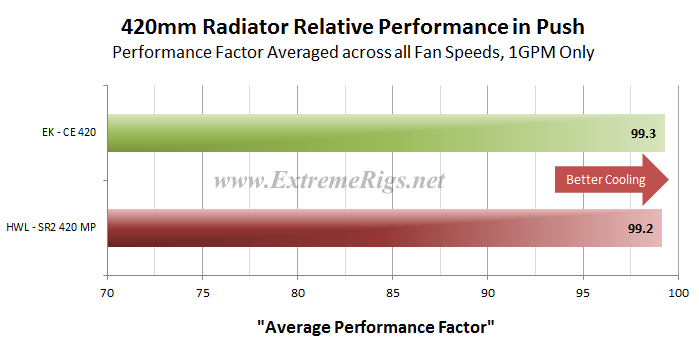 Incredibly close, the closest we have had in any head to head shoot out with the EK on top by the smallest of margins, but well within our test error margin, so effectively it is a tie.
Now the Push/Pull APF:
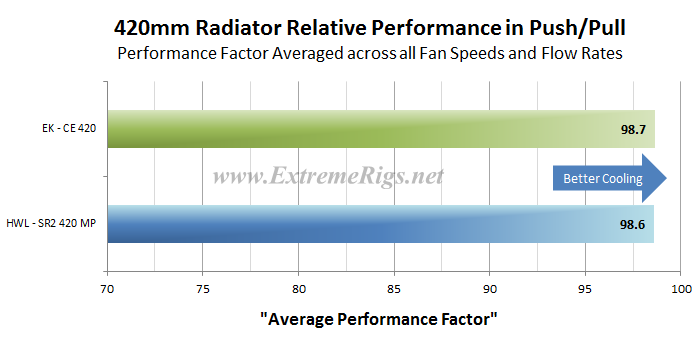 Again – 0.1% is all that separates the two radiators’ averaged results – well within the margin of error.
Finally we created the Master Performance Factor which is calculated from the averaged results of all the Push Only and Push/Pull thermal tests, at all fan speeds.
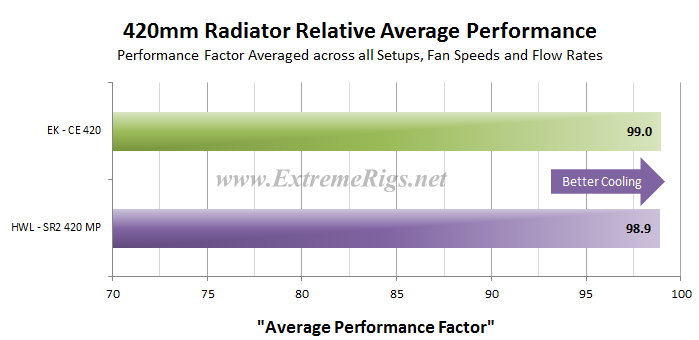
After over 100 hours of logging time and another 10 hours or so of data processing, the result is too close to declare a decisive a winner. The The EK CE’s winning margin of just 0.1% is not conclusive enough and we therefore declare the 2 radiators have equal thermal performance after averaging out across the tested fan speeds.
Quite incredible considering the differences in thickness and core density!
Before we move onto the summary let’s take a look at some thermal performance comparisons between a some different sized EK radiators . We did test the 360mm radiators at 3 flow rates, but only the 1.0 GPM data has been used in the charts below. These were chosen for comparisons because the PE is the same thickness as the CE and the XE is closest to the CE’s thermal performance. The CE 140 is a sneak peak of an upcoming review.
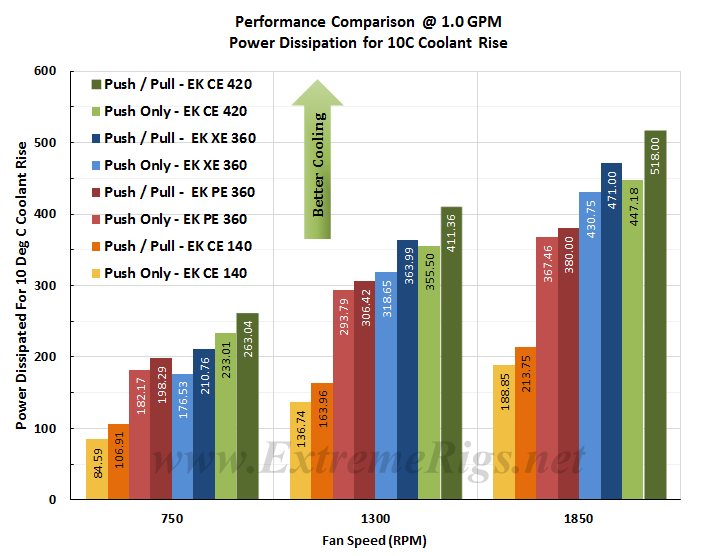 Definitely some interesting results in that plot and it really does show the benefit of researching specifically your intended fan set-up and rpm speed. Of course the 360 vs. 420 results above have different fans putting out different CFM, but both fan types we consider “best in class” and so could be considered a “somewhat fair” comparison of heat dissipation. A much better comparison would be Thermal Performance Vs. Noise instead of the Vs. RPM as above, but at this time we still have more fan testing to complete before we can use our fan data.
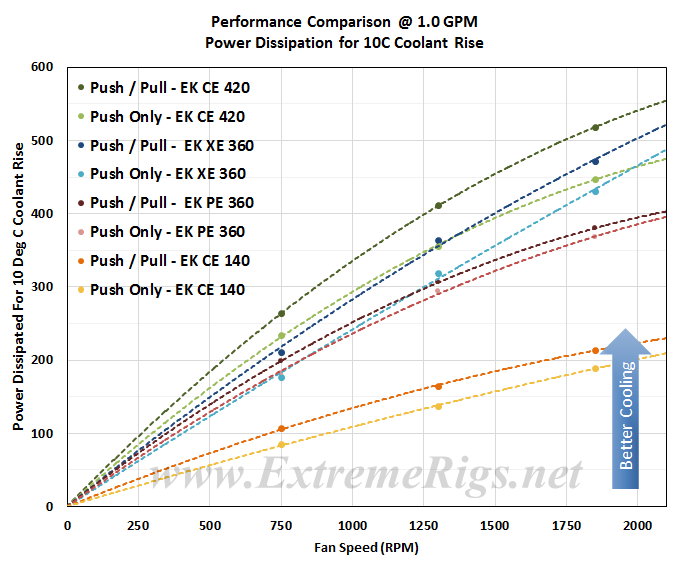
We can also plot the same data and extrapolate.
A note copied from our SR2 240 MP review on the heat load applied for rads other than 360mm.
“Having done then 360mm testing previously we had to decide how we were going to set up for testing other sizes. There were two practical options, both of which had advantages and disadvantages and none of the ER staff could ever really agree on which was the better option.
The first option was to run a power load proportional to that which was run for the 360mm rads, which was 300 Watts. For 240mm rads that would be 200 watts, being 66% of the surface area of a 360mm rad. This would show us the scalability of the different size of each model rad quite well, but the comparison results would be likely to end up in the exact same order as the 360mm Round Up and therefore maybe not the best comparison for readers who may be looking to purchase one or the other size of a particular radiator.
Another problem with this option is that the heater used for testing is 300 Watt, so for larger rads such as 420mm, 480mm and 560mm another heater would need to be incorporated in the test chamber loop, which would be a big change to they system in itself that would likely then render the test system useless for comparisons to older test data (any system change makes things no longer apples to apples – and yes the system is that sensitive).
The second option, which is what we have decided to use, was to run with 300 Watts on the 240 radiators. This mirrors the fact that we keep the heatload constant even when changing fan RPM. This gives a good comparison between different sizes of the same rad, as we are simulating a set load in a similar way to which a running system might. The downside to this test method is that we may run into temperature issues. On the smaller 120mm and 140mm rads 300 Watts is just going to be too much for them to dissipate with safe and acceptable coolant temps, so we may end up not getting full sets of data, in particular the Push Only 750 RPM data point would be almost certain to have coolant temps which are too high to test at. On the other end of the scale for any 480mm or 560mm rads, the cooling potential is likely to be very high resulting in very lower Delta Temps which could lead to data having to be discarded, particularly for the Push/Pull 1850 RPM data point.
There is no right or wrong choice, the results would just be slightly different due to Delta Temps being different between the two test options. In the end we are happy with the option which we chose as we believe is offers the reader a better comparison between different size radiators as they have all been tested under the same conditions. However as a reader you should be aware that W/10DT numbers are not calculated here with a delta of 10C so radiators with higher temperature deltas are operating more efficiently and will score higher than perhaps they should for a true scientific accurate test of heat dissipation for a 10C delta.”
Next up – Summary!
Summary
Thermal Performance
Thermal Performance scores are derived from the relevant Performance Factor scores. We set this scale with 72.5% and below as the 0 mark, with each 2.5% increase from 75% in relative performance adding 0.5 to the awarded performance score.
Note: In such a small test group of just two radiators the performance scores do not have a lot of other data to be compared against. Depending on the amount of variance in the results, this could end up with misleading scores based on the comparative performance.
As it turned out that was not the case with the two radiators that we tested because of the surprisingly close results.
We must mention that there are likely to be better performing 420mm radiators available which if tested and the results added to our group data would lower the scores that the EK CE 420 and SR2 would have generated. Worse performing radiators added to the test group would not affect the scores.
Push Only Thermal Performance
- 5/5
The CE 420’s Push Only APF result of 99.3% translated into a perfect thermal performance score of 5/5. It’s thinner core with a much higher FPI fin count was virtually equal to that of the SR2 which is thicker but has a lower fin count and thicker tubes.
The core dimensions meant it doesn’t scale as well as the SR2. It is best tuned for medium speed fans, although the lower and higher speed fans results were still very good.
Push/Pull Thermal Performance
- 5/5
The Push/Pull Performance result is pretty much a carbon copy of the Push Only with a score of 5/5 being generated.
In Push/Pull the low and medium fan speeds produced it best results with the high speed falling slightly behind.
Overall Thermal Performance
- 5/5
The Master Performance score of 99 gives a perfect overall performance score of 5/5.
Without more radiators in the test group, it really is difficult to add more perspective, however what is very clear is that there is no performance advantage between these two greatly differing models.
Features & Quality – 3.5/5
The CE 420 from EK features the now standard boxy outer casing which is quite stylish and yet inconspicuous at the same time. The paint finish is excellent and the outer casing can be easily removed for custom painting.
There is only one set of ports on the CE 420, no alternate ports, no ancillary port nothing. Also missing is tube protection plates under the fan mounting holes which we believe should be a standard feature these days even if the holes are no located directly above the tubes.
The core is slightly biased towards low to medium speed fans, due to it’s medium thickness, but still performs extremely well with higher fan speeds. because of it’s high FPI count.
With a very high FPI count the CE 420 will need cleaning more often than some other radiators. The medium restriction level will not pose any issues for pump power required when planning out your loop.
Summary – Silver Award 4.0/5
The CE 420 proved to be an excellent all round thermal performer against the other 420mm radiator that we compared against. It has a medium restriction level and a high FPI count.
The design is stylish, the build quality and finish are excellent, however there are no alternate ports.
It’s 45mm thickness and core design proved to be a perfect match for medium speed fans, while still having excellent results with both low and high speed fans in both Push Only and Push/Pull.
With the CE 420 currently retailing for $100 USD it offers some serious “bang for your buck” thermal performance and is possibly the best value radiator currently available for heat dissipation potential vs. cost. It is missing some features for sure, but not everyone needs 6 extra ports to choose from, so it is for this reason the CE 420 is a deserved recipient of our Silver Award.
In the end only you the end user can know which of the two radiators tested is best suited for you build, which style you prefer, which features are most important and which is within your budget. With the CE 420 being at least $50 cheaper than the SR2 420 MP, the price will be a deciding factor for many potential buyers. Both are great radiators with virtually equal performance, so it’s up to you: extra features or cheaper price because you can’t have both.
Where to buy:
- Performance PCs: EK CE 420 $99.99 + shipping from USA
- EK Webshop: EK CE 420 $99.99 + shipping from Europe


Nice review.
I’m looking forward to CE 280 & nemesis 280 series reviews.
Nice review.
I am looking forward to CE 280 and Nemesis 280 reviews.
Nice review!
Next… vs Nemesis 420 GTX ? ^^
Which is better 420 radiator ?
I would love to see this compared to the Nemesis GTS 420. I’m just about to buy and build my first full custom loop and I’m planning to use the Nemesis GTS rad for it, other than that it will be all EK. With the GTS I can just about do push/pull if needed, with the CE that would not be an option due to space limitations. In CE’s favour though I get a 10% discount on it and could incorporate it into one shipping instead of two. Visually I definitely prefer the European versions of the Hardware Labs radiators though. Choices, choices…
[…] it’s results against the other 140mm radiators we have tested. Previously we reviewed the CE 420 and currently the CE 280 is under scrutiny, so this CE 140 review will form part of the “CE […]
awesome work done, looking forward to the CE 280 and CE 140 reviews (if you’re doing them ;D ).
Thanks,

Review for the CE140 has been published already with the CE280 cued up in the to do list.
EK CoolStream CE 140 Radiator Review
[…] EK CE 420 Radiator Hardware Labs SR2 420 Radiator […]
Comments are closed.